Don’t let used tins go to waste! Transform them into functional DIY projects that will bring joy and purpose to your home. From storing pens to feeding birds, or creating unique candle holders, the possibilities are endless. I’m sure you’ve accumulated a stash of tin cans in the back of your pantry, awaiting recycling. But before they take over, why not unleash your creativity and upcycle them?
It’s as simple as cleaning, washing, and drying the cans thoroughly – then let your imagination run wild! For inspiration, explore 37 innovative tin can crafts and turn those empty cans into treasures.
Upcycled Tin cans
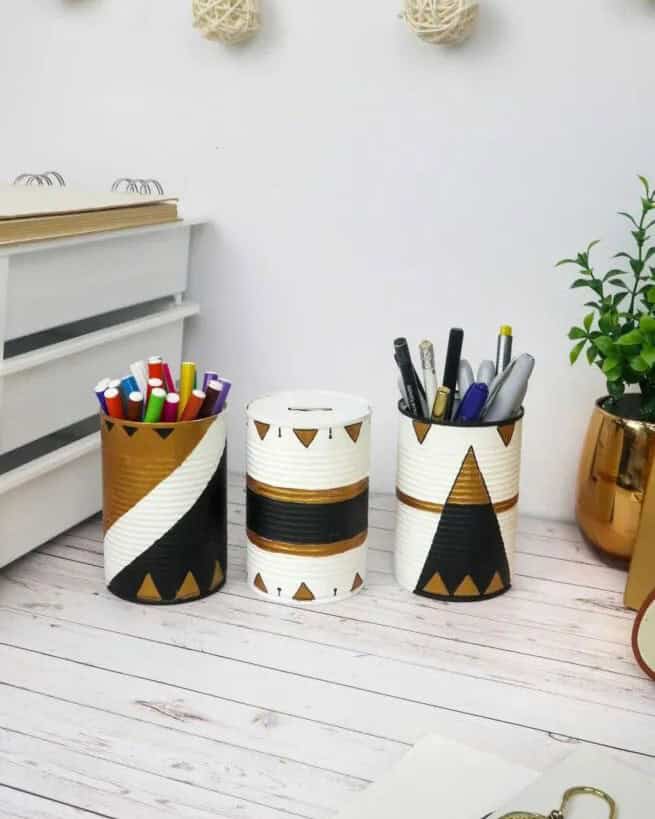
Upcycle tin cans are an excellent way to spend a lazy afternoon, especially when you’re looking for a simple craft project that’s hard to go wrong with. Among the many creative possibilities, this desk organizer is a standout. Not only will it keep your workspace organized, but you can also use one of the three canisters as a planter for a small cactus or succulent. The best part? It’s incredibly easy to make. Simply grab some metallic paints and get creative with those cans.
If you’re feeling inspired, be sure to check out our DIY rope organizer tutorial for another fun desk accessory project.
Tin Can Lanterns
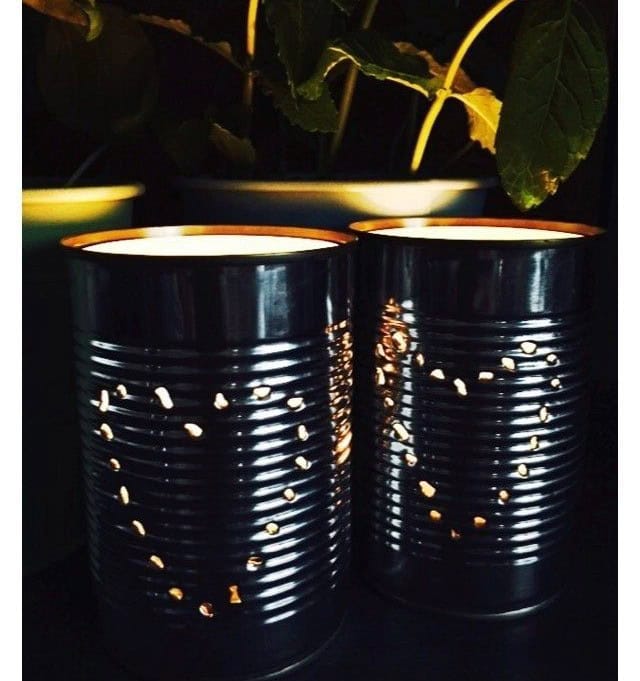
Get ready to create a stunning lantern in under 15 minutes! These urban-inspired lanterns boast a scrappy and edgy finish, perfect for adding a touch of modern flair to your outdoor space. To temper the rough edges, simply poke a few holes into a heart or flower shape. As the light filters through these designs, it will cast a warm glow that’s sure to be a showstopper in your garden or porch. Grab a piercing tool and let the creative process begin!
DIY Upcycled Tin Cans
As fall settles in, it’s the perfect time to get creative with upcycled tin crafts. One project that caught my eye is transforming ordinary tin cans into beautiful decorative holders with a warm, autumnal glow. To start, gather some essential supplies: faux fall florals like maple leaves, sticky dots, wood glue, orange spray paint (you can find it here), scrap paper, and a sturdy stick. Once you have everything at the ready, begin assembling your materials.
When it’s time to give the tin can its vibrant hue, don’t forget to lay down some newspapers first – we wouldn’t want any accidental splatters ruining our furniture! With these simple steps, you’ll be well on your way to crafting a stunning orange decorative holder that’s sure to add a touch of fall flair to any room.
Monster Pencil Holder
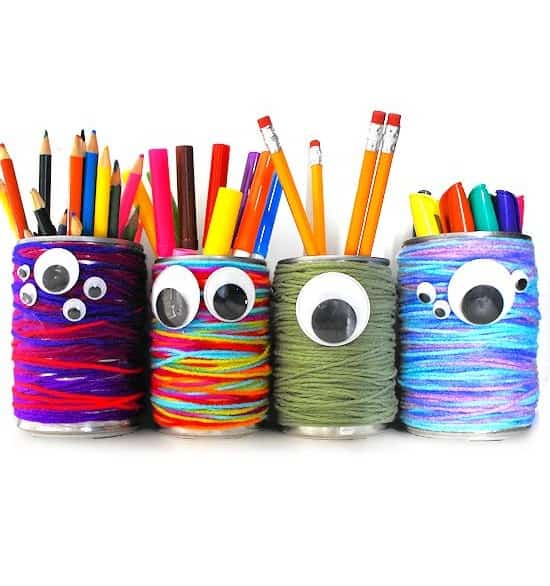
If you’ve got leftover yarn from previous projects, now’s the perfect opportunity to put it to good use. Gather up your scraps along with a hot glue gun and a couple of tin cans. Once you have everything you need, start by securing the end of the yarn in place using the hot glue. Then, wrap the yarn around the can in a spiral motion, checking periodically to ensure that the glue doesn’t drizzle down as you work.
To complete your monster pencil holder, top it off with some googly eyes and you’ll have a one-of-a-kind desk accessory. If you’re looking for more creative storage solutions, be sure to check out our DIY paper pencil holder and toilet roll pencil case tutorials.
Tin Can Owls
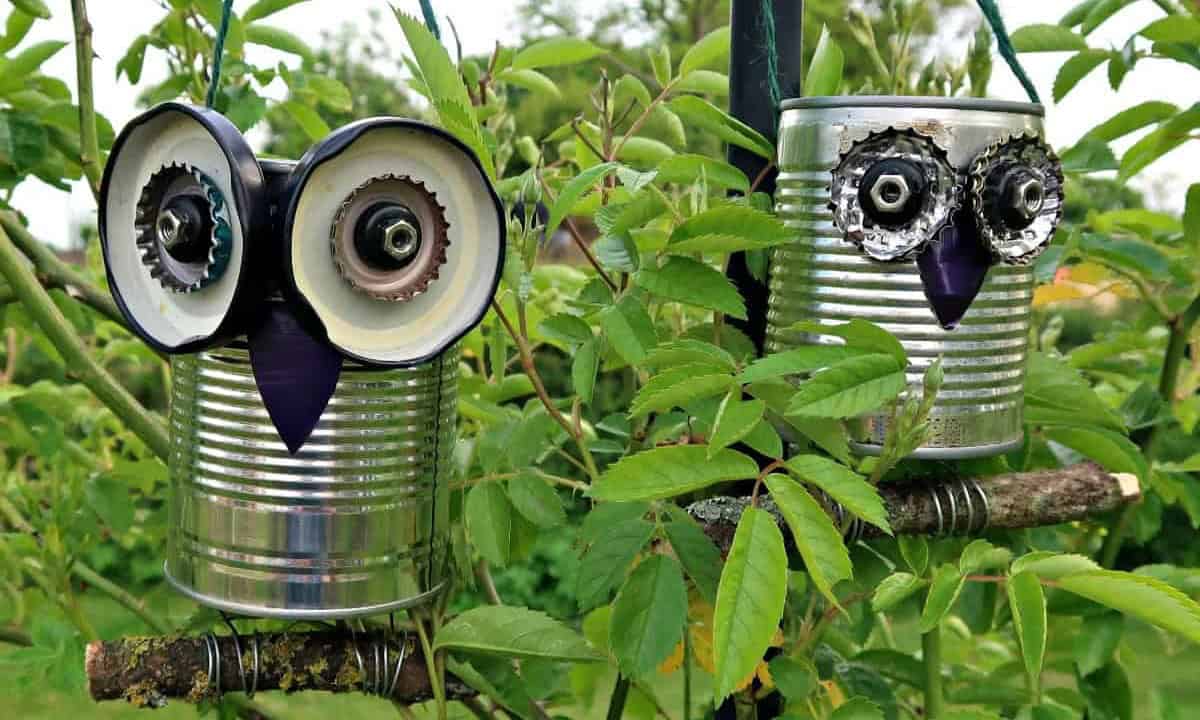
When it comes to creative projects, owls are an endless source of inspiration. Their quirky charm and adorable features make them perfect for upcycling and crafting. One such project that’s sure to delight is transforming tin cans into owl sculptures. To bring your creation to life, start by using glass jar lids as the eyes and combine them with a few bottle caps and a bolt to create a unique and captivating facial expression.
The real magic happens when you see all the different components come together to form this one-of-a-kind owl. And to give it a sense of depth and dimension, use some wire to perch your owls on a wooden branch, adding an extra layer of realism to your masterpiece.
Tin Can Robot
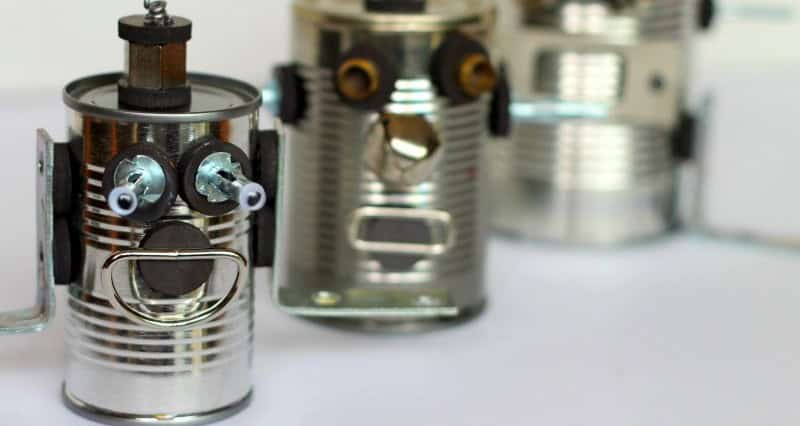
While reflecting on our previous project’s robotic owl, I found myself pondering the perfect material for building robots. It’s not hard to see why tin cans are an ideal choice – just think of the Tin Man from The Wizard of Oz! To bring your own tin robot to life, simply gather a can, hot glue, some strong magnets like these, and repurpose metal fixtures or scraps you have lying around. This might include nuts, screws, bolts, brackets, fasteners, or other small metal components.
If desired, add a touch of personality by painting your robot with bright silver hues and accents of black, gold, or copper to highlight its various parts.
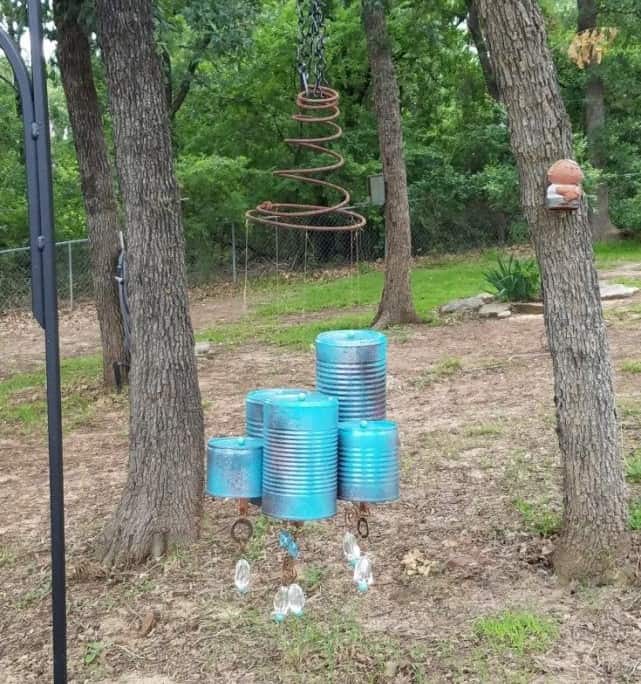
Tin Wind Chime
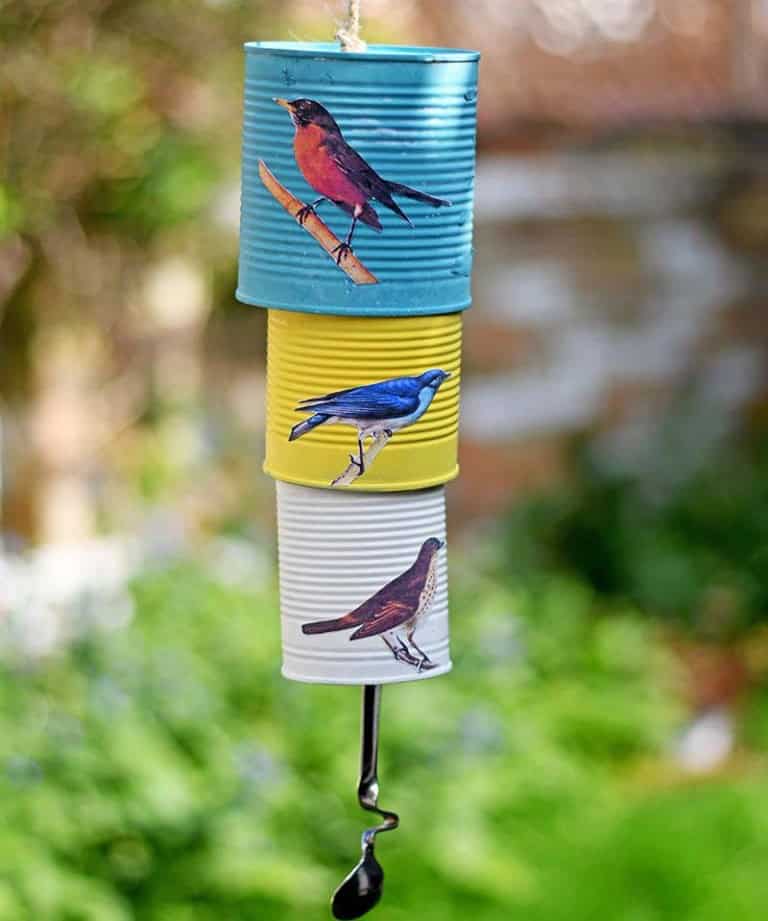
Wind chimes may be a delightful DIY project, but their primary function is to produce a pleasing sound. The auditory aspect of wind chimes is often overlooked, yet it’s what truly brings them to life. I’m reminded of nostalgic scenes from the past where vintage tin cans hung delicately from strings or twine, swaying gently in the breeze. Imagine the soothing clinking and clamoring of these rustic wind chimes as they dance on the porch stoop.
And you don’t have to be stuck in the past – you can create your own wind chimes that produce a harmonious melody.
Duct Tape Black Cat Container
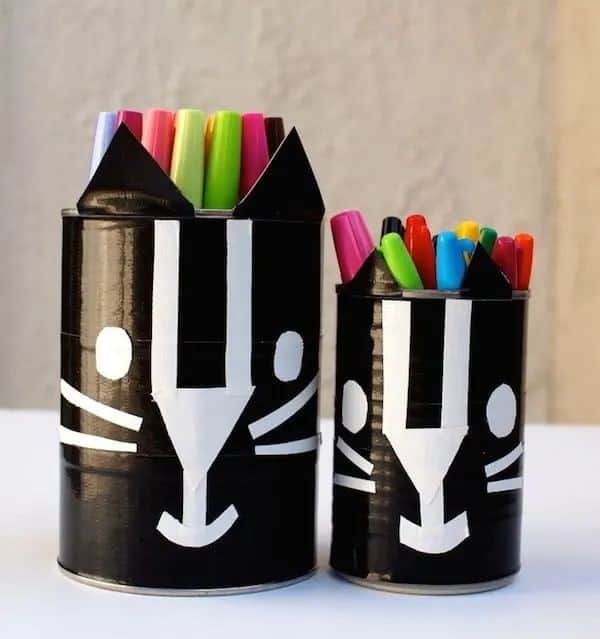
Let’s dive straight into the creative process. For those who adore felines, this DIY project is purr-fectly suited for you. To create an eye-catching pencil holder or desk organizer, you’ll need a few basic materials: jet black and snowy white paint, duct tape, a cutting mat, a craft knife, scissors, and a clean can or bottle. Before applying the first coat of paint, make sure to give your material a good cleaning and ensure it’s completely dry.
This will provide a smooth canvas for your artistic expression.
Makeup Organizers
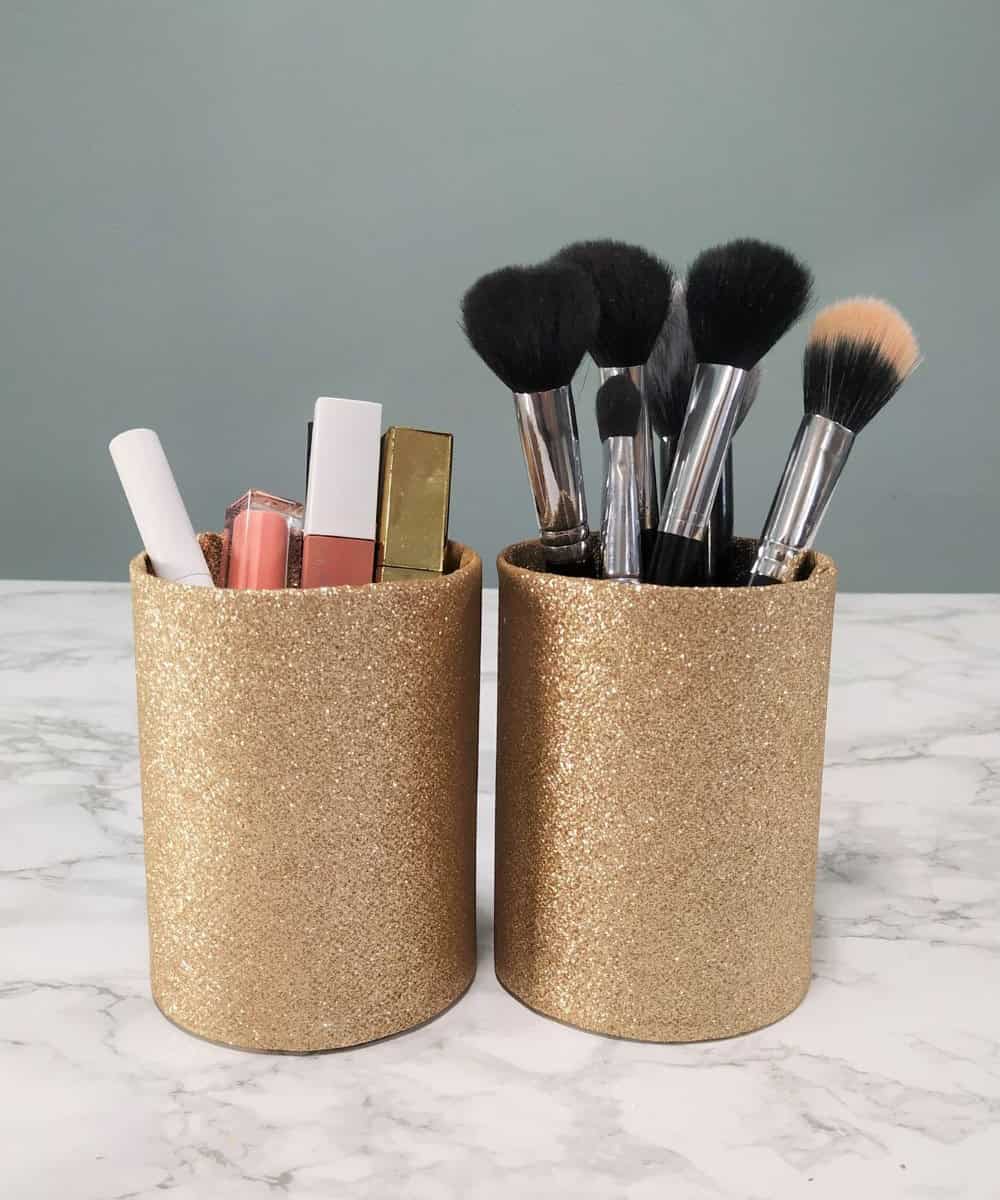
Think creatively about the number of upcycled tin organizers you can create. Why not make at least half a dozen, each one dedicated to storing your makeup? The logic behind this is simple: with more organizers, you can store even more makeup. It’s a concept that resonates deeply with anyone who has ever indulged in a shopping spree for their favorite cosmetics.
To get started, gather some fabric—preferably larger scraps—and a trusty pair of scissors.
Use the scissors to cut and shape the fabric as needed. To ensure your organizer is the perfect fit, simply roll the fabric around the tin can to take its measurements.
Tin Can Piggy Bank
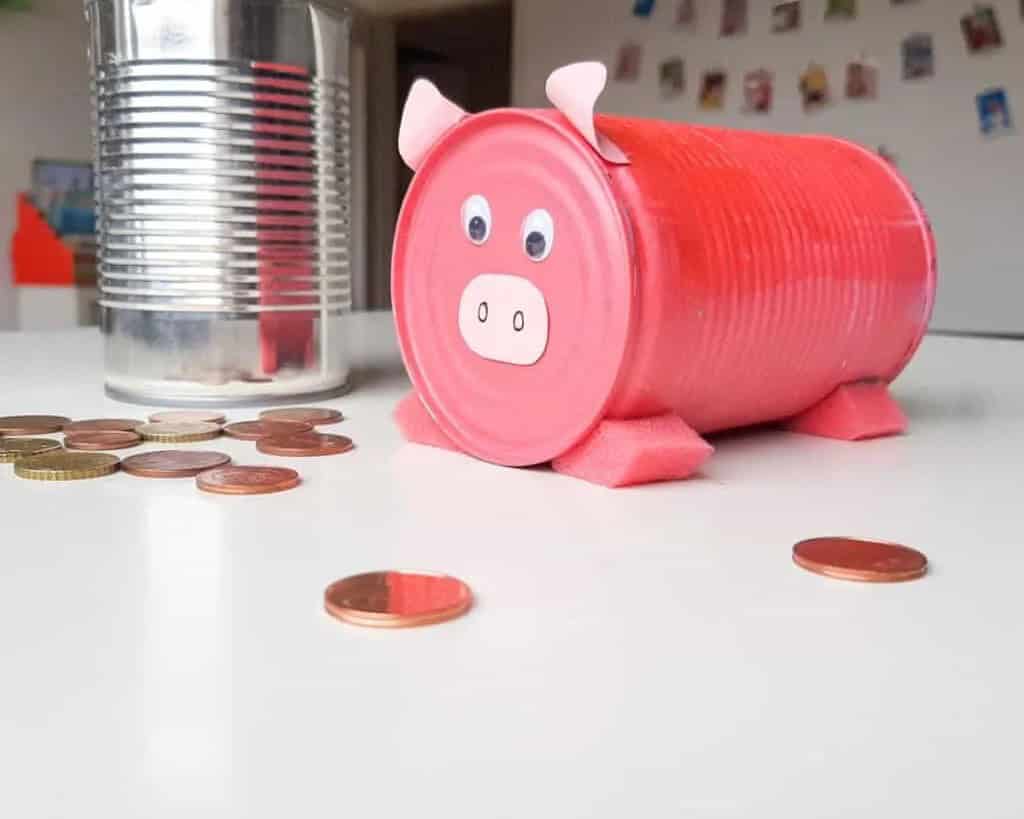
While it may seem like a relic of childhood, the humble piggy bank remains a staple for many. Even as an adult, I still find myself using one to stash away spare change. However, I’ve come to realize that breaking open a piggy bank to access your savings isn’t exactly the most practical or efficient approach. It’s almost as if you’re creating a need for yourself by spending money on a new container every time you want to use it.
This got me thinking – why not take matters into your own hands and create your own custom piggy banks using everyday materials? You likely already have all the necessary supplies, from paint and cardstock paper to googly eyes. But do you really have everything you need to bring this DIY project to life? Specifically, do you have access to a trusty hot glue gun?
Tin Handbag
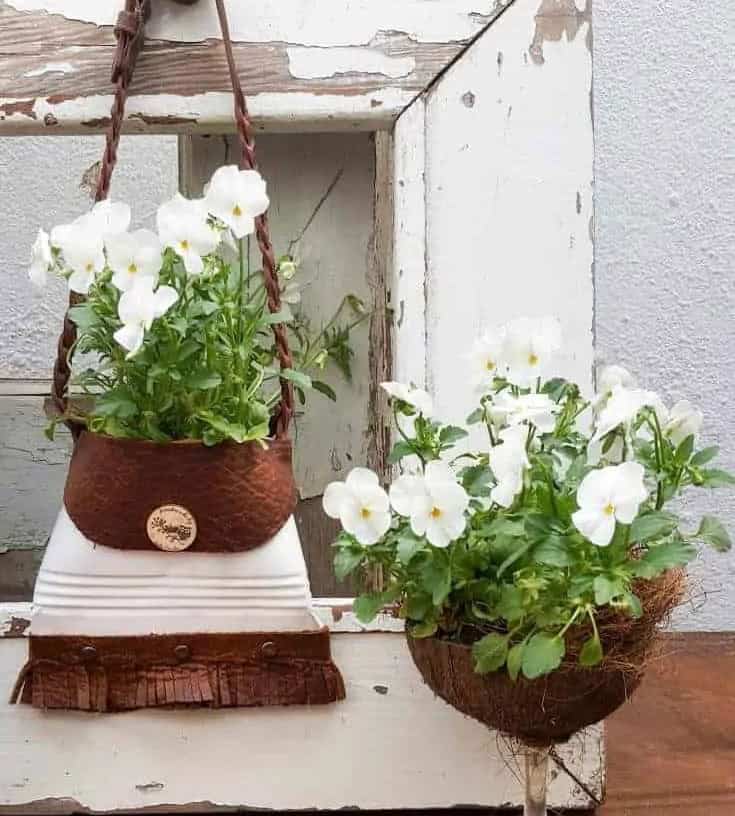
Transforming tin cans into planters offers a unique opportunity to repurpose and upcycle. These creative containers can add a touch of charm to your front porch or windows, providing a beautiful display without the hassle of maintaining real plants. For those who prefer low-maintenance options, consider substituting live plants with high-quality artificial ones.
This innovative project is not only eco-friendly but also a great way to generate income by selling them to others who appreciate handmade crafts.
DIY Tin Can Vase
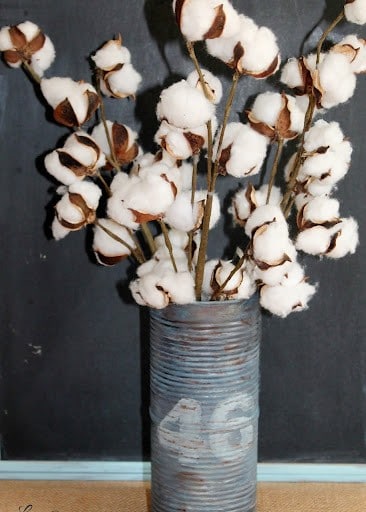
One of the most common issues when decorating with flowers is finding suitable vases, but what if you could repurpose an unexpected material to create a unique piece? Enter tin vases, which not only add a touch of industrial charm but also complement rustic farmhouse and shabby chic themes. While the rustic aesthetic may be overwhelming without some floral balance, the tin vase’s rough texture can be softened by incorporating lush blooms.
To take your upcycling game to the next level, grab an old tin can, clean it up, and get creative with a DIY project. For inspiration, check out these DIY dollar tree vases that showcase the versatility of this material.
Tin Cans into Wind Clankers
When comparing wind chimes and wind clankers, it’s natural to wonder what sets them apart. One key distinction lies in their overall tone – or rather, the sound they produce. Wind chimes are typically designed to produce a melodious chime, whereas wind clankers, with their larger metal components, tend to generate a more boisterous clanking noise. To create your own unique wind clankers, start by gathering some large cans and giving them a fresh coat of paint.
Before you begin, lay down some newspaper to protect your workspace from any spills or messes. Additionally, be sure to thoroughly clean the cans to remove any grease or residue, as this will ensure the paint adheres properly. For an added touch, you can also use sandpaper to subtly distress the paint and give it a more rustic appearance.
Farmhouse Vase
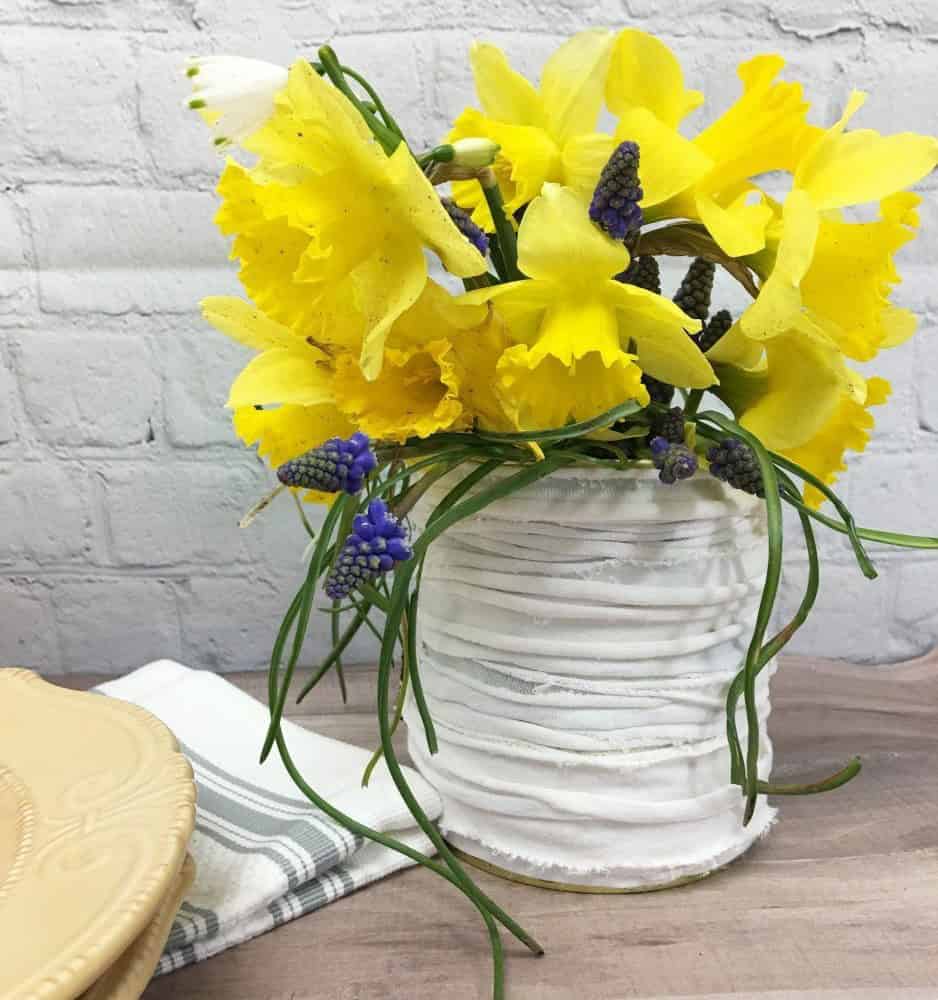
If you’re looking to breathe new life into old clothing items, consider upcycling them into a unique farmhouse tin can vase. Start by gathering those old t-shirts or tank tops collecting dust in your closet. You’ll be transforming them into strips of ‘yarn’ that will serve as the foundation for this creative project. Alternatively, you can opt for actual yarn if that’s more to your liking.
To complete the look, you’ll also need some ribbon, a pair of fabric scissors, and a selection of faux or real flowers to add a touch of elegance to your finished vase. If you’re looking for more ways to repurpose scrap fabric, be sure to check out our collection of innovative craft ideas.
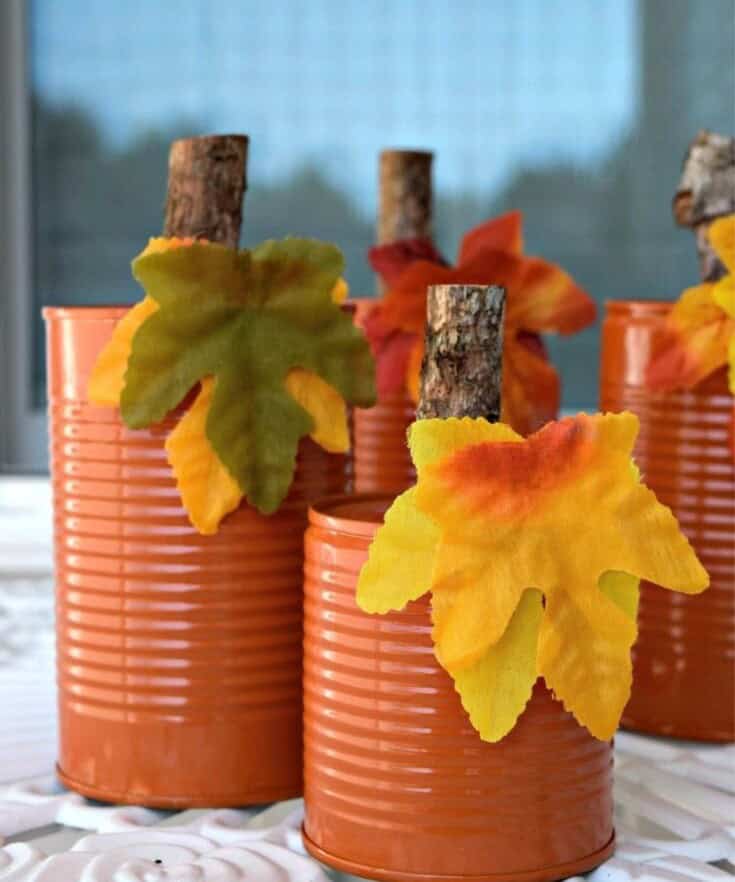
Thanksgiving Craft From Old Soup Cans
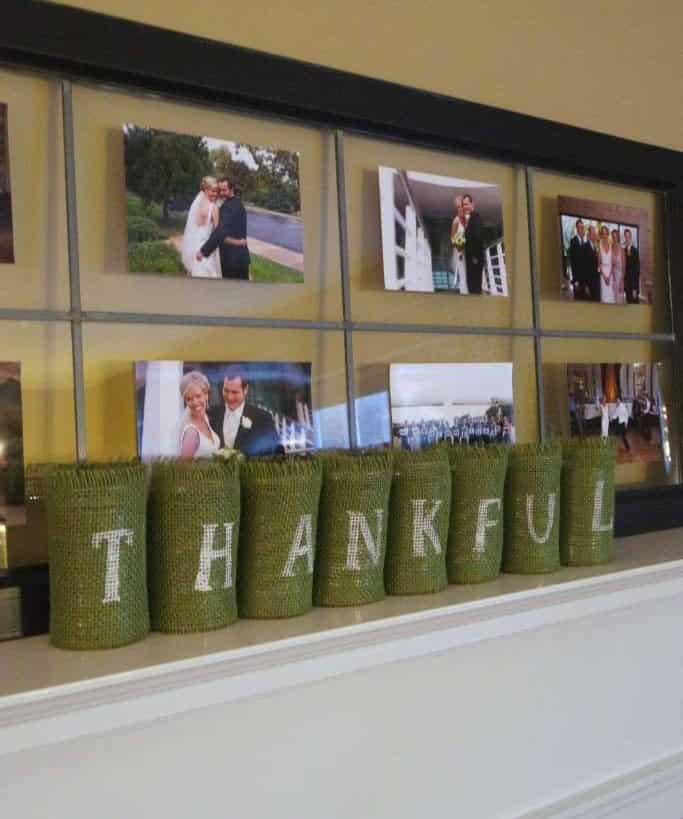
As you scour your closet for items to donate at your annual Thanksgiving food drive, you may stumble upon a stash of old soup cans collecting dust. Don’t discard them just yet! With a little creativity and some basic crafting supplies, these tin containers can be transformed into a unique and thoughtful decoration for the holiday season.
The process is surprisingly straightforward. Begin by giving the cans a good cleaning and drying to ensure they’re free of any residue or moisture.
Then, select a few fall-inspired hues and apply a couple of coats to give them a warm, autumnal glow.
Next, add a personal touch by painting the word ‘Thankful’ on eight individual cans. This will create a charming and cohesive display that’s sure to be a conversation starter.
To complete the look, arrange your newly decorated cans on the mantel or a nearby shelf, allowing them to serve as a beautiful vase for a bouquet of flowers or other decorative elements.
The result is a one-of-a-kind centerpiece that captures the essence of Thanksgiving and adds a touch of rustic charm to your holiday celebrations.
Decoupage Tin Can
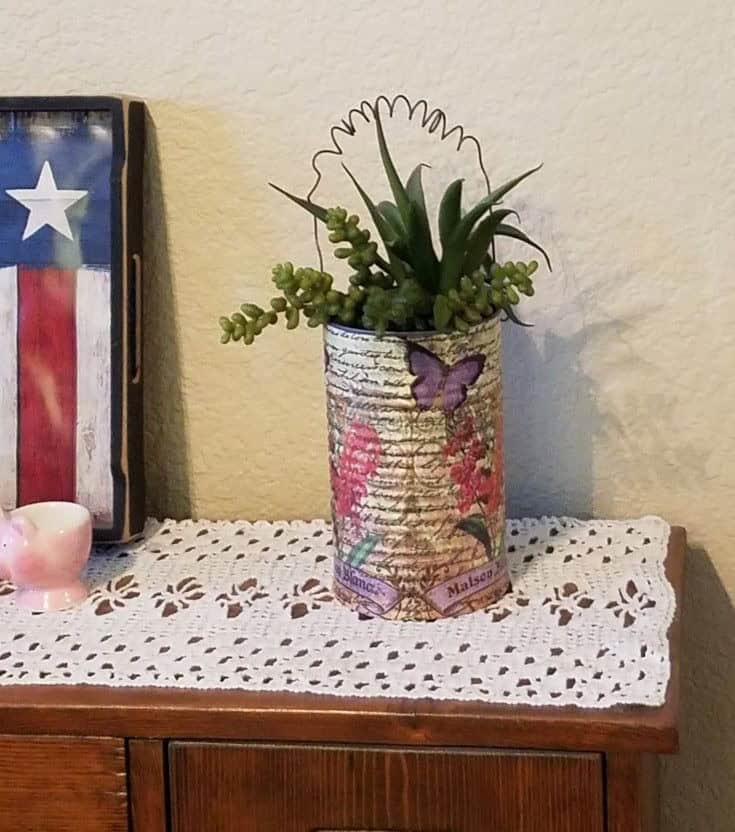
Imaginative transformations are at the core of this project. One such creative endeavour is giving old tin cans a new lease on life through decoupage. The end result is nothing short of stunning. To get started, select the paper or tissue you’ll be using for the makeover. Printed paper napkins can be found here and offer a wide range of design options. Once you’ve chosen your material, it’s time to bring in the mod podge and begin the decoupage process.
For added flair, consider using seasonal printed napkins to decorate your home with these upcycled tin cans.
Craft Storage With Cricut
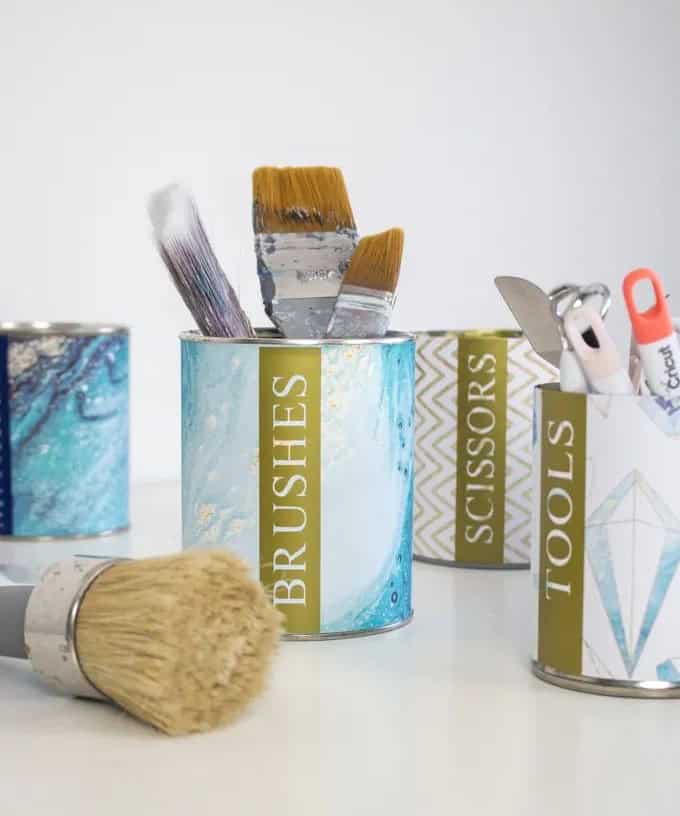
While some may argue that embracing chaos is part of the creative process, I’m firmly in the camp that believes a well-organized workspace is essential to productivity. In fact, I take it one step further by using repurposed materials to maintain my tidy environment. For instance, upcycled tin cans can be used to store small tools and supplies, keeping them organized and within reach. This not only keeps clutter at bay but also adds a touch of whimsy to an otherwise mundane task.
With a little creativity, even the most mundane objects can become functional pieces that contribute to a peaceful workspace.
Rustic Farmhouse DIY Patriotic Decorations
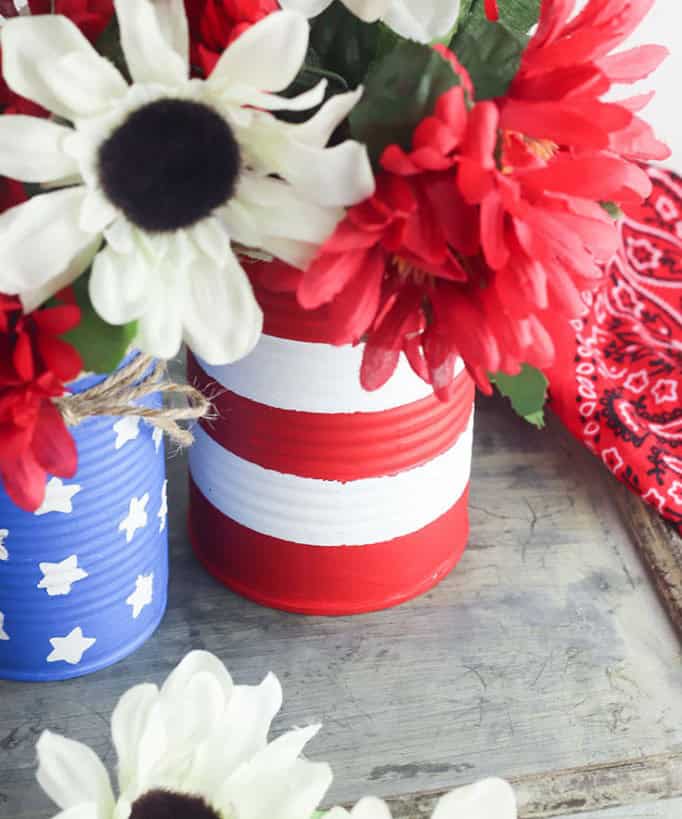
Transforming your home with a touch of patriotism and farmhouse charm is effortless during the summer months. With just a few cans, paints, and some creative flair, you can craft unique DIY decorations that reflect America’s spirit. Begin by painting two tin cans – one in blue with white stars and the other in red and white stripes – incorporating the iconic colors of Old Glory. For an added rustic touch, wrap jute twine around the rim of each can before adding your chosen flowers or greenery.
The end result is a charming blend of patriotic flair and down-to-earth appeal that’s sure to delight.
Utensil Holder
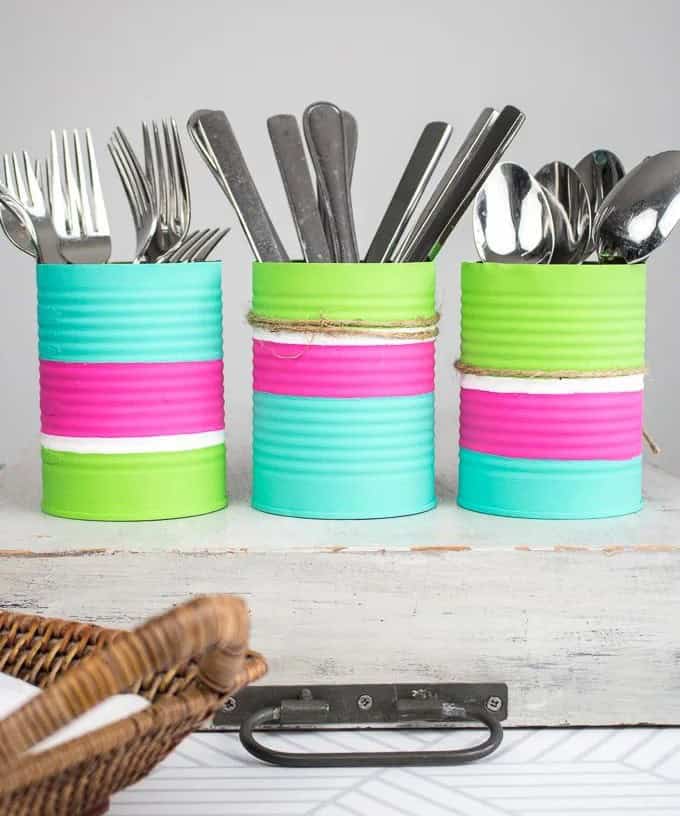
Transforming tin cans has become a staple in our creative endeavors. We’ve given new life to these humble containers by repurposing them for office supplies, craft materials, tools, and even flowers and plants. The idea of upcycling utensils and cutlery might have also crossed your mind, hasn’t it?
Three neon-hued tin cans with a matte finish can inject a pop of color, style, and whimsy into your kitchen decor. And the best part?
You can achieve this project on a shoestring budget by sourcing supplies from your local dollar store.
To take your creativity to the next level, consider painting a matching tin tray to serve as a charming receptacle for napkins and condiments.
Back-To-School Pencil Holder
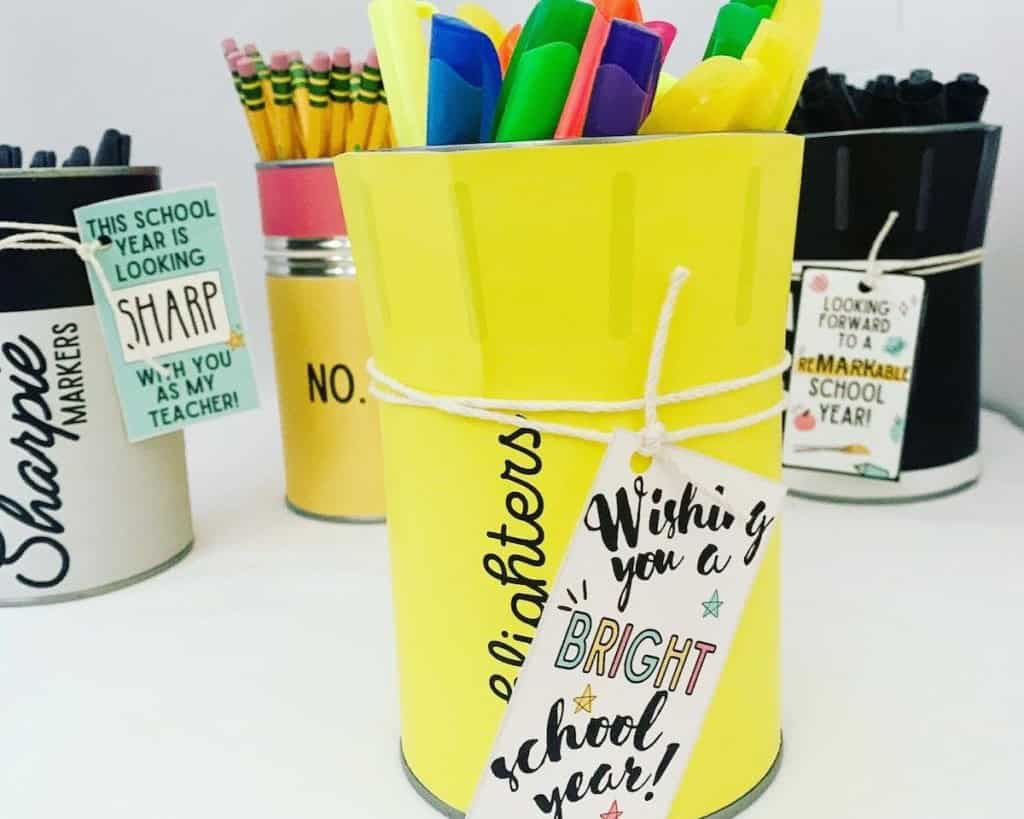
Kickstarting the new academic or work cycle can be a daunting task, especially after a prolonged break. However, setting a positive tone from the get-go is crucial. One way to do this is by tackling a fun and productive DIY project that gets you excited about the upcoming term. The ‘back-to-school pencil holder’ is an excellent example of such a project.
Not only does it keep your creative juices flowing, but it also provides a sense of accomplishment and prepares you for the daily routine ahead. Take it to the next level by personalizing the holder with an inspiring message that serves as a reminder of your goals and aspirations. For those seeking more inspiration, we have curated a list of 27 exciting back-to-school craft ideas that are sure to spark your creativity.
School Supplies Organizer
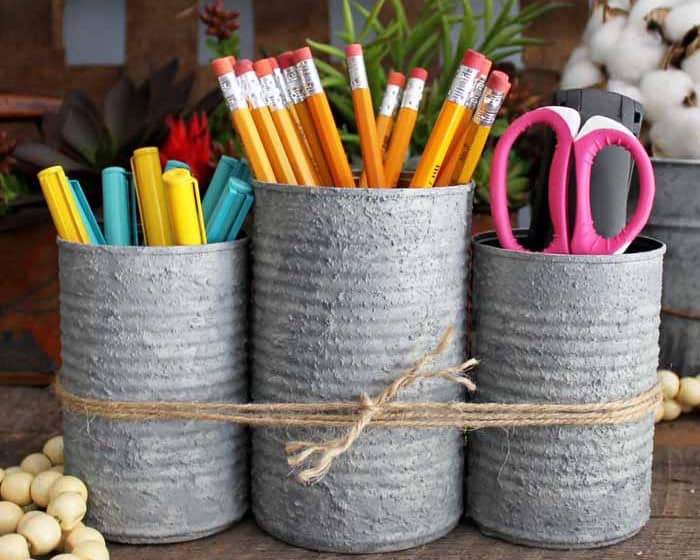
You might be surprised to learn that this three-piece school supplies organizer appears to be made from solid cement, but in reality, it’s crafted from tin cans. The end result is a unique faux concrete finish that can be achieved with a bit of creativity and some basic DIY skills. To get started, simply apply a coat of paint using a pouncer brush, allowing each layer to dry completely before adding the next one.
For those who love the look of faux concrete, you can find the necessary materials online or in-store.
DIY Tin Can Pencil Holder
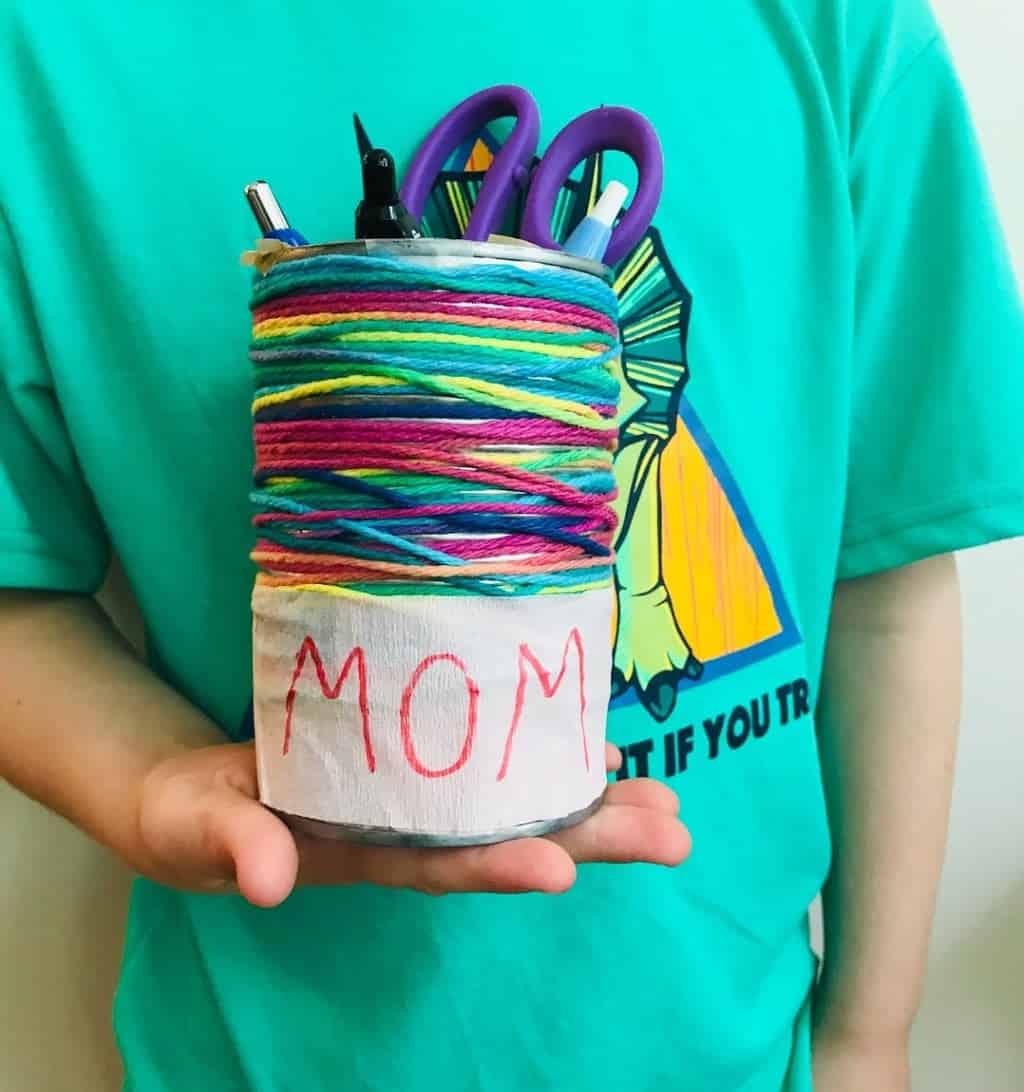
This pencil holder stands out from the crowd in not one, but two ways. Its individuality is just the beginning – it’s wrapped in a vibrant, non-uniform layer of yarn that adds tactile interest to the design. The result is a unique piece that exudes personality. But its appeal extends beyond mere aesthetics. This DIY project makes for a thoughtful and personalized gift, whether you’re celebrating a milestone or simply showing appreciation for someone special.
Galaxy Painted Recycled Pen Holders
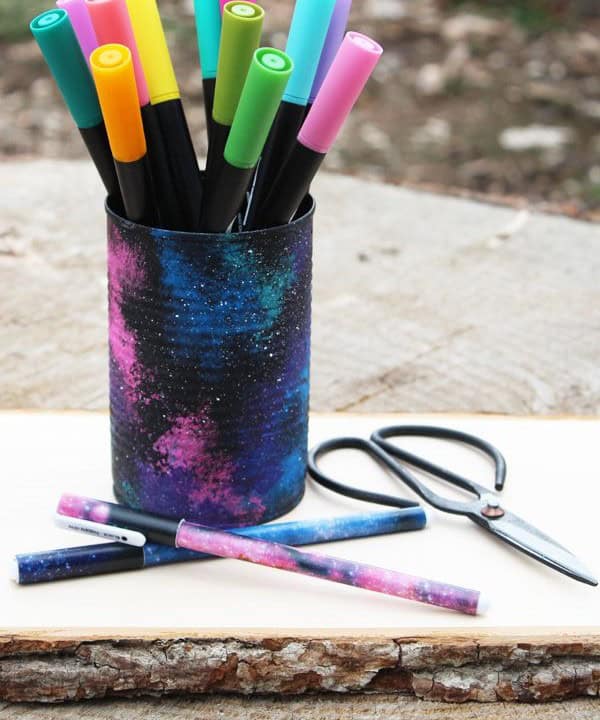
I’m thoroughly impressed by this pen holder’s design. Its sleek appearance is reminiscent of high-end products, yet it’s surprisingly affordable. To transform an ordinary tin can into an extraordinary piece of art, start by giving it a good cleaning and thorough rinsing before painting. Begin with a coat of midnight black paint as the base color.
Then, unleash your creativity by adding vibrant splashes of blue, pink, purple, and white, evoking the dazzling array of colors that appear when someone lands a solid punch.
Leprechaun Hat
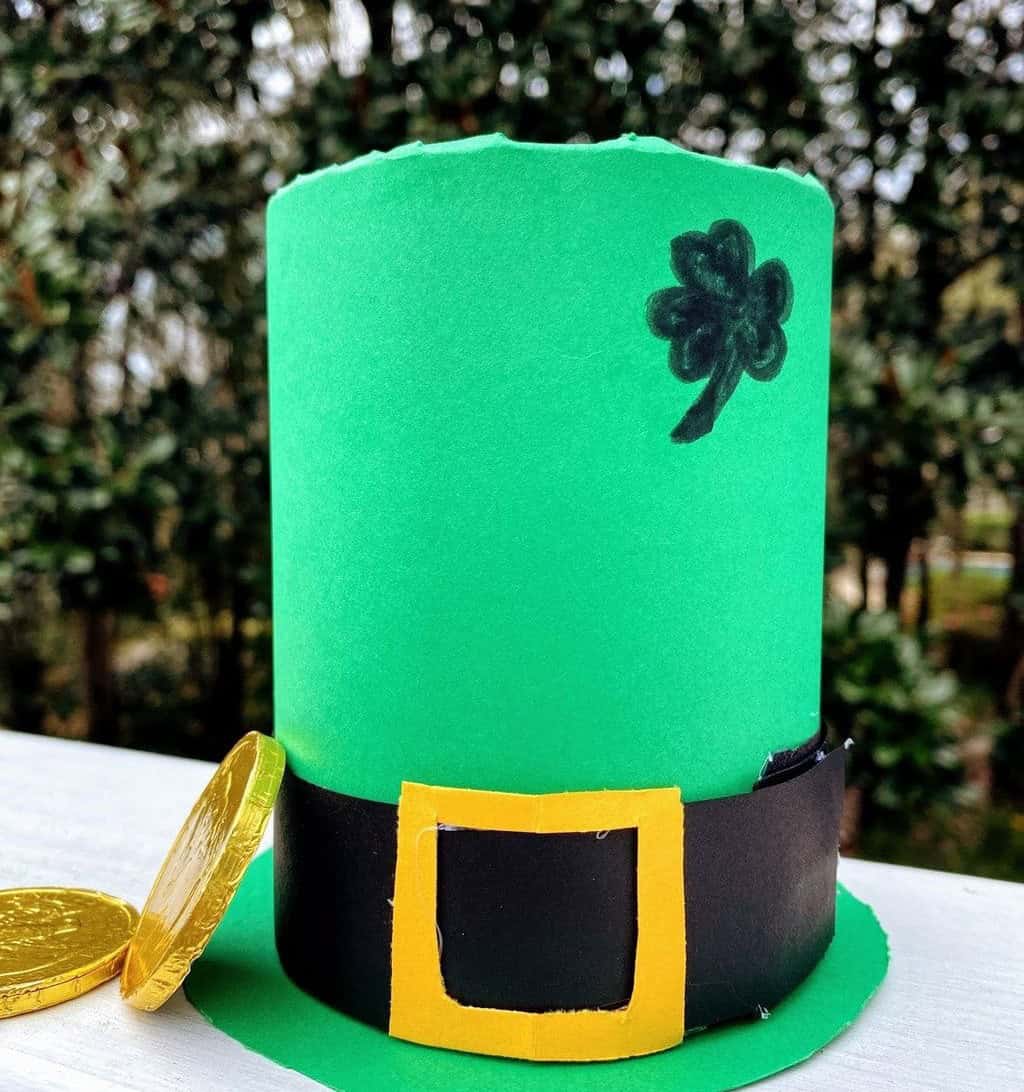
Transform your space with a touch of whimsy by creating a charming Leprechaun Hat from recycled materials. This delightful decorative piece can be proudly displayed on your mantel, nightstand, or even in the playroom of your little ones. Its vibrant green hue makes it an excellent addition to any St. Patrick’s Day celebration, while its symbolic significance is said to represent good fortune, prosperity, and joy. Who wouldn’t want a tin can Leprechaun Hat as a lucky charm, right?
Explore more creative DIY projects for teenagers and unleash their inner artist.
DIY Stamped Plant Markers
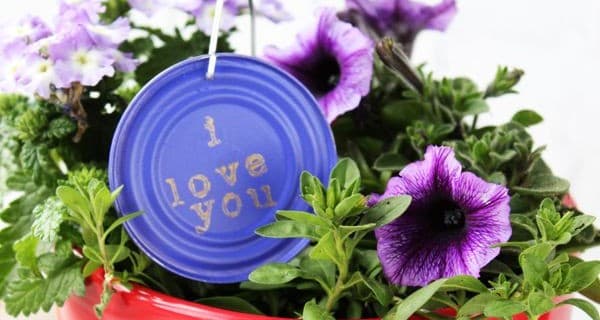
Transforming tin can lids into functional garden markers is a creative and eco-friendly endeavor that’s sure to delight. Who would have thought that these often-overlooked items could be repurposed in such a clever way? By utilizing the lids’ unique shape and size, you’ll create personalized markers that add a touch of whimsy to your garden or outdoor space.
To get started, gather some essential materials like jewelry wire, typewriter stamps, a drill and bit, as well as some paint to bring your project to life.
Tin Can Drums
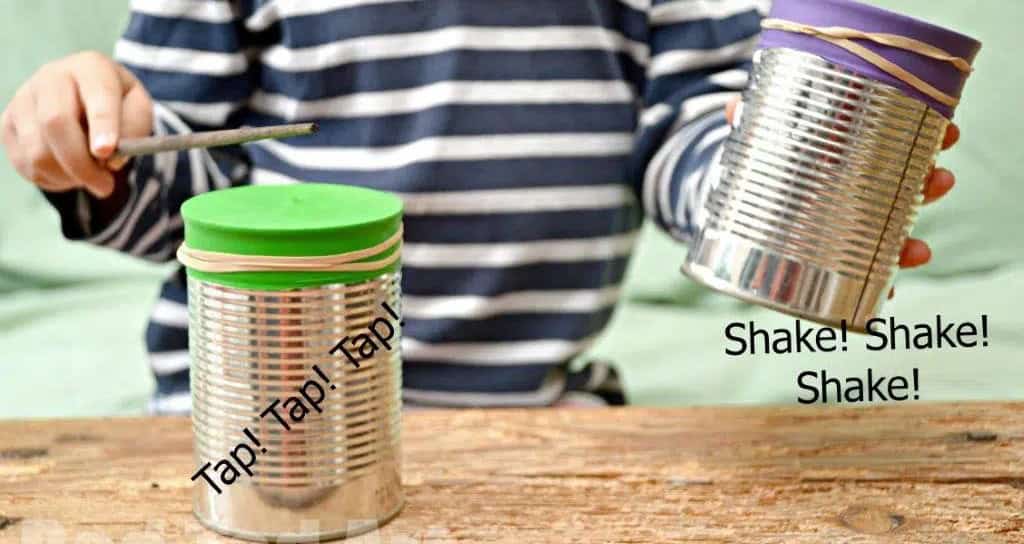
For those moments when you’re in the mood for a quick craft project, something overly complex is not an option. That’s why these simple tin can drums are perfect. They require just a few basic materials: a tin can, a balloon, an elastic band, and drumsticks. You’ll also need some filler material like rice, chickpeas, or lentils to add some substance to your drum. The key is that the balloon lid needs to produce a satisfying sound when you tap on it with the drumsticks.
Giftable Planter
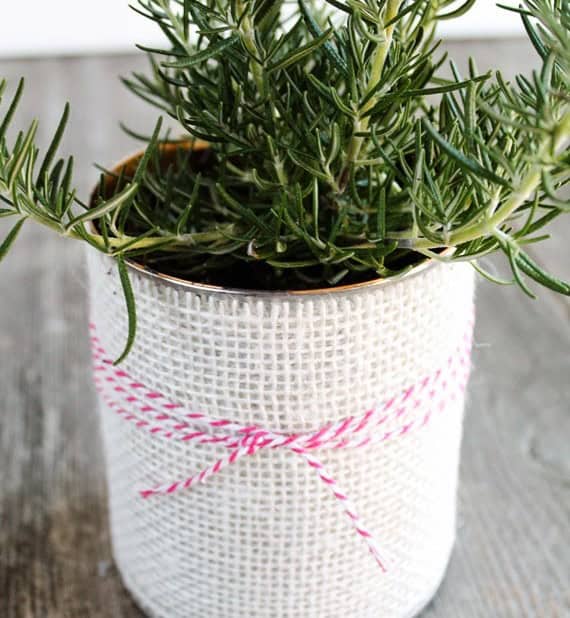
While this upcycled tin planter may be slightly fancier than usual, its unique charm lies in its potential as a thoughtful gift for friends, family, or loved ones. By crafting a few of these planters ahead of time, you can present them to significant others whenever the occasion demands. Of course, they also make for delightful personal keepsakes.
To add an extra touch of whimsy, gather wide burlap ribbon and baker’s twine, both readily available at [insert source], to wrap around the tin can and create a charming flourish.
Halloween Tin Can Bowling
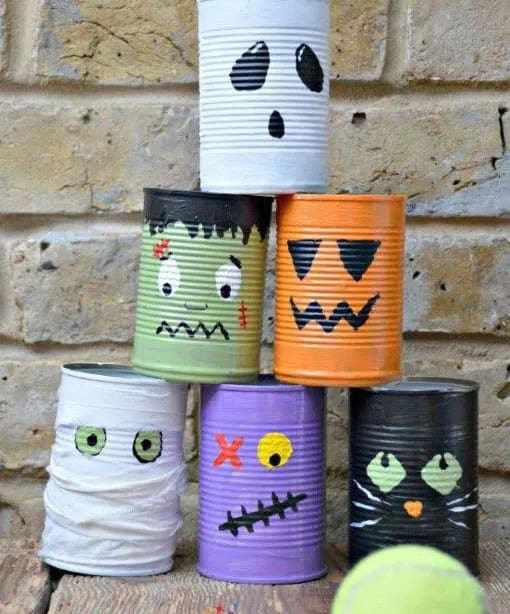
Nostalgia alert! Remember the thrill of stacking tin cans and trying to knock them down with a pebble or catapult as a kid? Let’s bring back that fun, but this time, let’s give it a spooky twist. Grab six to ten old cans, clean them up thoroughly, and get creative. Since Halloween is just around the corner, why not turn your ‘bowling pins’ into monster-themed figures?
You can choose from ghosts, ghouls, black cats, creepy mummies, Frankenstein’s monster, or even jack o’lanterns – the possibilities are endless!
Pretty In Pink Can Organizer
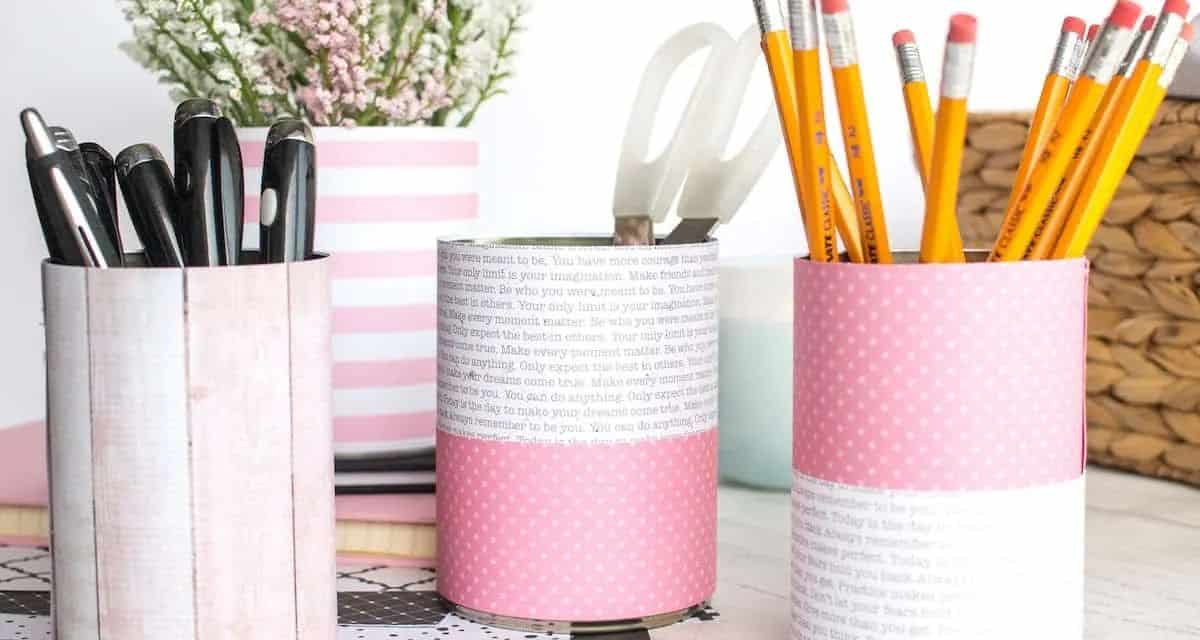
When I gaze at this three-piece organizer set, the adjectives that come to mind are fresh, pretty, and bright. The versatility of these cans is what truly stands out – one can be repurposed as a pencil stand, another for storing scissors, rulers, and writing utensils, while the third offers a unique opportunity to bring some greenery to your workspace. A small succulent or cactus would thrive in these cans, adding a touch of natural beauty to your table.
To take this DIY project to the next level, consider combining scrapbook paper and washi tape for a one-of-a-kind design. With double-sided tape on hand, you’re just moments away from transforming these organizers into functional works of art.
Craft Stilts
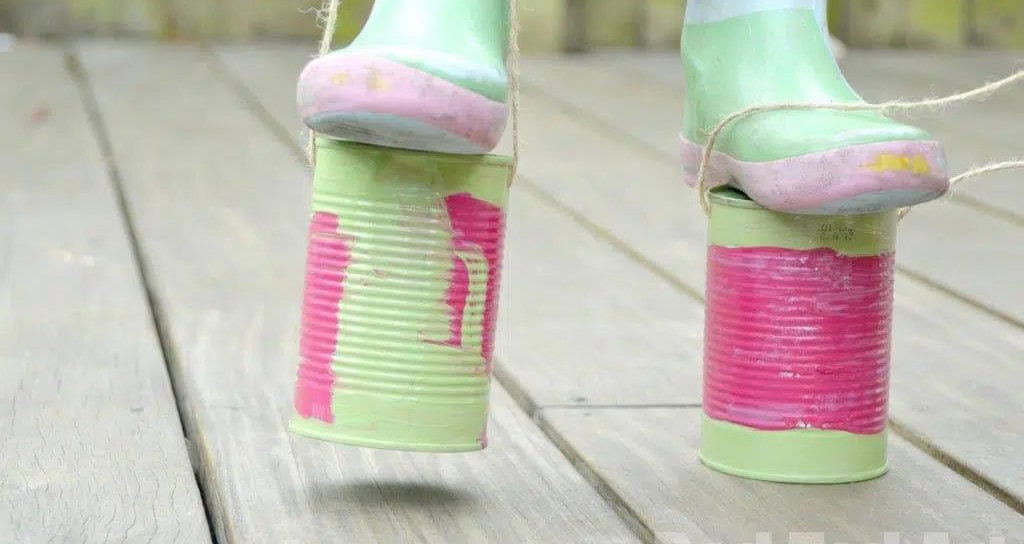
While marveling at the unassuming nature of these makeshift stilts – simply two tin cans bound together by twine – I couldn’t help but imagine the potential for creative play and learning opportunities. Perhaps a fun summer activity for kids, where they can experiment, take calculated risks, and develop problem-solving skills while navigating their way around. Just to be on the safe side, though, I’d strongly recommend helmets as added protection.
Ghost Tin Can Chimes

As trick-or-treaters approach your home on Halloween night, the first impression they’ll get is of your front porch. That’s why it’s crucial to deck it out with decorations that set the tone for a spooktacular evening. Consider transforming an ordinary wind chime into an eerie yet charming ghostly accompaniment by upcycling tin cans and adding a splash of paint.
To create this haunting harmony, you’ll need to gather a few essential items, including white chalk-finish matte paint, brushes, a screwdriver, hammer, googly eyes, and at least three tin cans of varying sizes that can be nestled together. For more creative ideas for adults, explore our collection.
Colorful Tin Can Planters
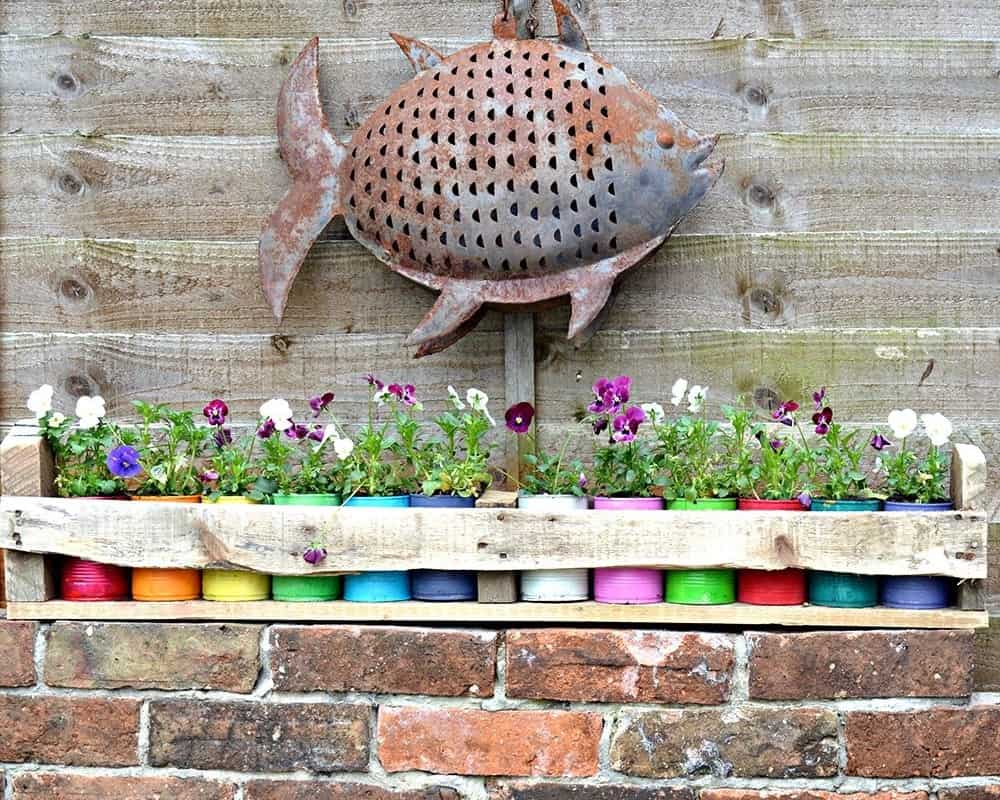
When it comes to decorating your front porch with planters, more is often better. While traditional clay or terracotta pots are always a great choice, you can also think outside the box – literally. Consider upcycling old tin cans into unique planters that require minimal effort and upkeep. To get started, make sure the cans are squeaky clean before painting them. Any dirt or grease will prevent the paint from adhering properly.
For an added touch of rustic charm, lightly sand the paint to create a distressed finish.
Tin Can Easter Craft
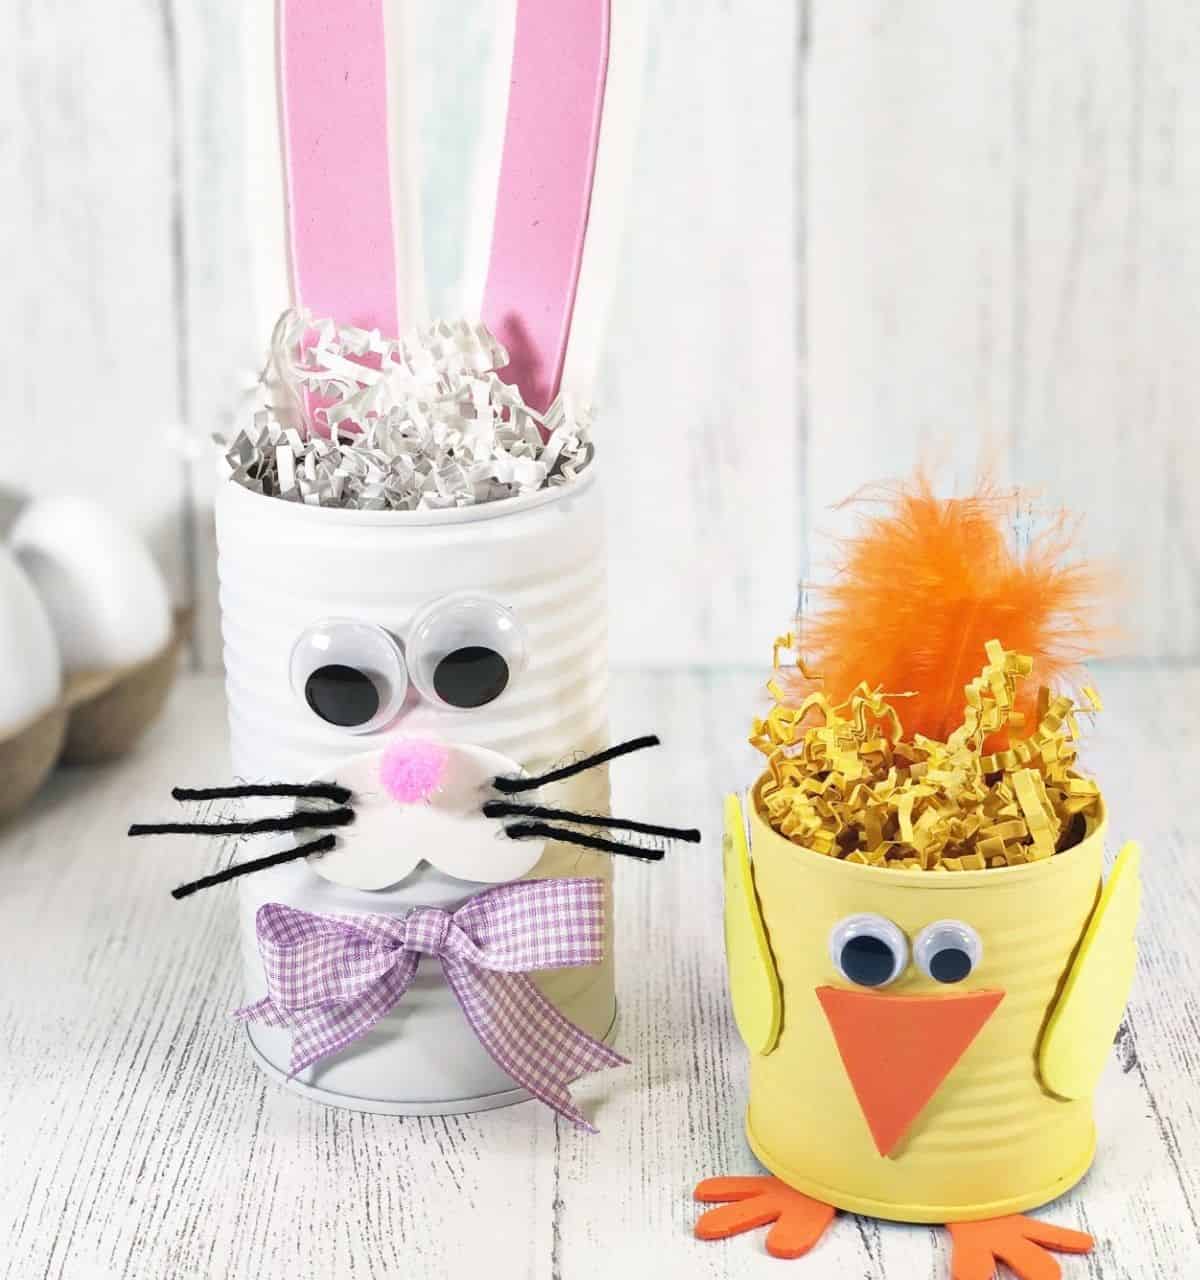
Get ready to unleash your creativity with this fun craft project suitable for kids of all ages!
To get started, gather the following essential supplies:A set of googly eyes to add a playful touchBlack twine for added dimension and texturePaints and brushes to bring out the colorsShredded paper in various hues – both colored and white – for creative experimentationCraft foam for adding an extra layer of depthDon’t forget to download the provided template, which will guide you in creating the bunny’s ears.
For a chick-themed version, simply use different colored paper to trace and cut out their respective ears.
DIY Tin Vase
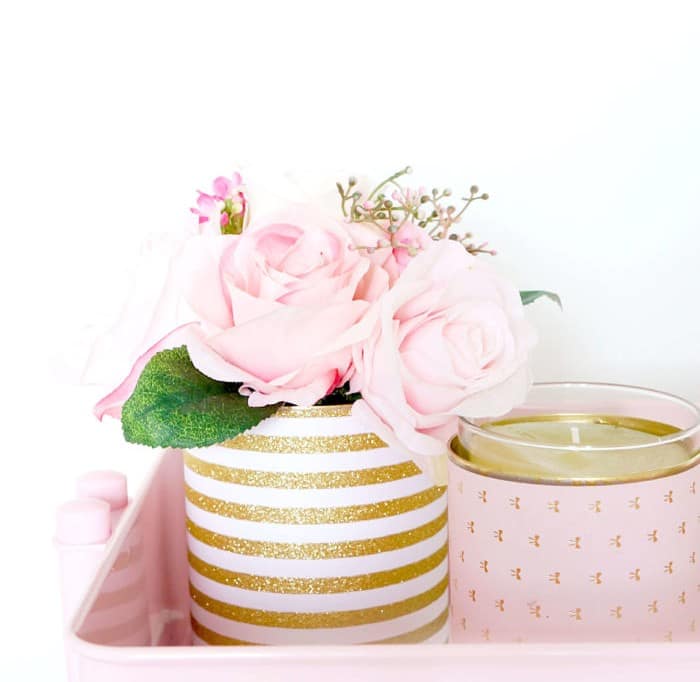
Envision a set of three pastel pink vases: one as a vase for fresh flowers or faux florals, another to cradle a scented candle, and the final one as a planter. The soft glow from the candle adds warmth to the space, while the vases’ gentle hue brings a touch of whimsy. To create a cohesive look, consider placing all three within a metal tray that matches your existing decor.
For those who enjoy crafting their own candles, I recommend exploring tutorials on scented candles or opting for a DIY leaf candle holder project. If you’re looking to upcycle old vases into new creations, give these Dollar Store vases a try! The possibilities are endless when it comes to repurposing and rearranging items to suit your unique style.
Tin Can Pendant Lights
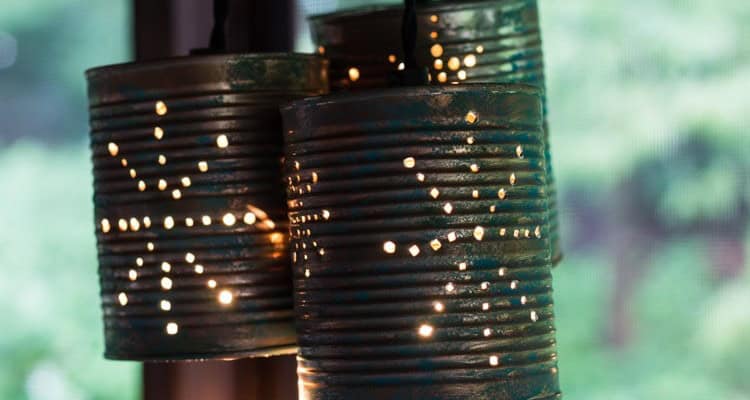
To create these unique pendant lanterns, individuals punch or pierce holes through a tin can, allowing the soft glow of light to pass through. For a seamless experience, consider purchasing a pendant light kit, conveniently available here. Alternatively, you can opt for a free-hand approach and manually pierce the holes or utilize a downloadable template. Simply place the paper against the can and carefully poke the holes at the designated spots, ensuring precise placement.
Rainbow Wind Chime

Selecting the ideal tin cans is crucial for this project, as their size will dictate the final result. Once you’ve gathered the necessary containers, give them a thorough cleaning and drying to prepare them for painting. With the cans now dry, unleash your creativity by painting them in vibrant hues that represent the colors of the rainbow. Don’t forget to add a decorative touch by painting the rim and bottom with a contrasting trim.
After the paint has dried, use a drill or sharp object to create holes through which you can thread a string. Finally, suspend the cans from your porch using the string, allowing them to catch the breeze and add a pop of color to your outdoor space.
Gold Crushed DIY planters
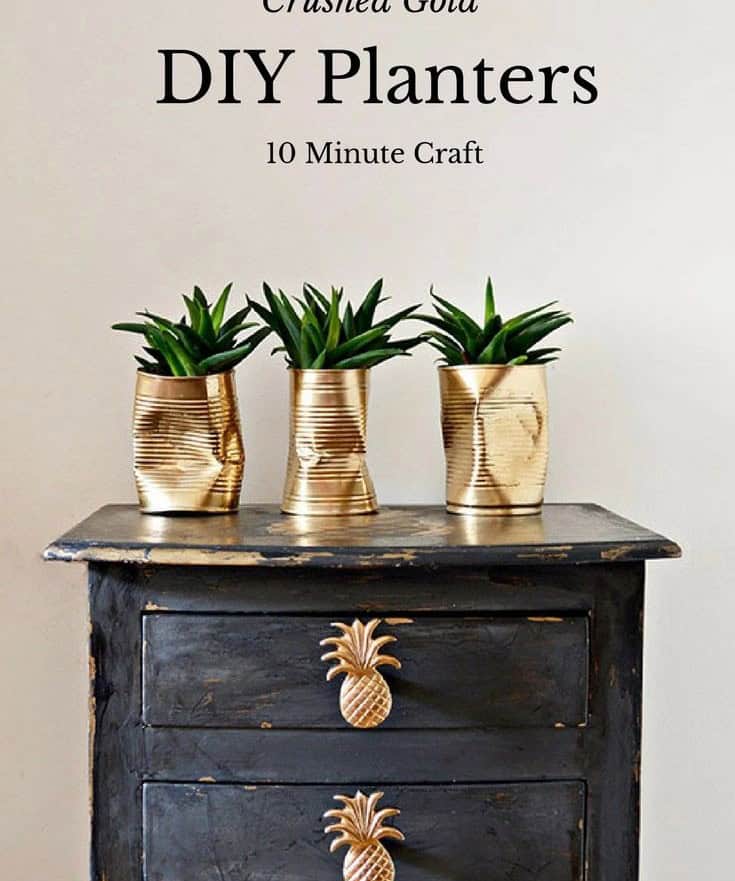
When life gives you dented cans, make crushed gold planters! While it’s inevitable that some of your cans will develop unwanted dents, dings, or scratches, don’t discard them just yet. Instead, set aside those ‘imperfect’ cans and use them to create one-of-a-kind planters. What would have otherwise ended up in the recycling bin can now be transformed into charming display pieces that showcase your creativity. And the best part?
This 10-minute DIY project requires minimal effort but yields maximum visual impact.