Discover the art of upcycling at its finest with Dollar Tree’s affordable crafting supplies. What initially appears to be a humble collection of decorative items can actually become stunning masterpieces, all without breaking the bank! As you gaze upon the beautifully curated interior spaces online, you might feel inspired to replicate the same aesthetic in your own home. But fear not, for you don’t have to mortgage your future to achieve that look.
By embracing DIY and tapping into your creativity, you can transform those humble Dollar Tree finds into something truly breathtaking.
Gold Dollar Store Frame
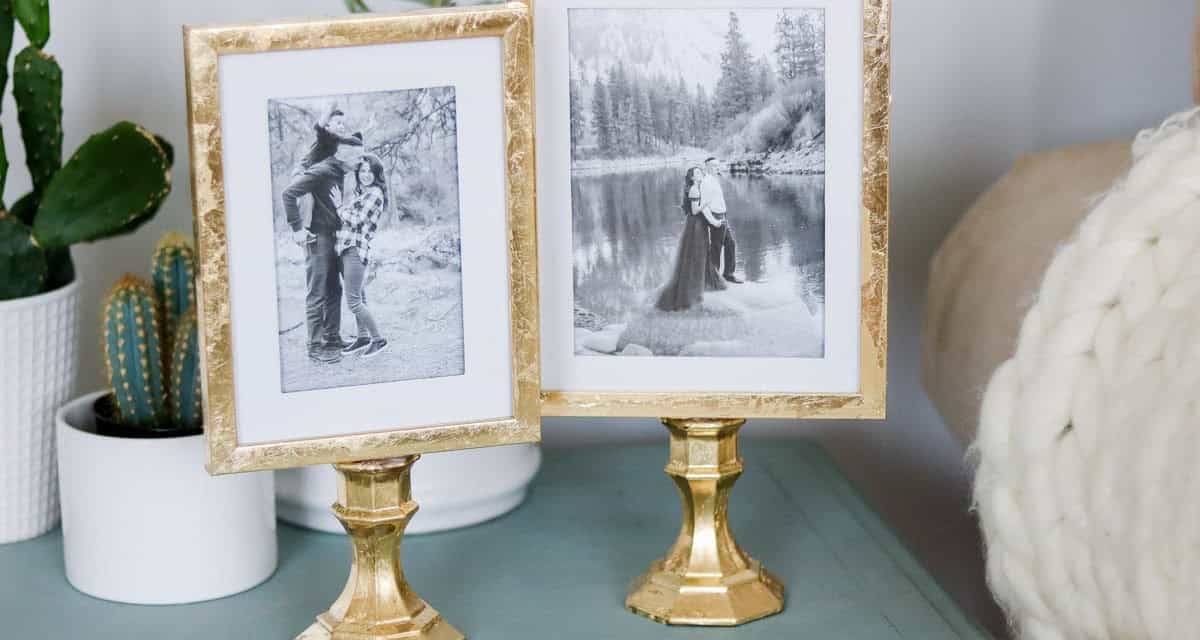
To create this stunning DIY gold leaf frame, you’ll need a few basic supplies. First, grab two picture frames from your local dollar store. You’ll also require two glass candleholders and some additional materials like a wooden dowel for support. For the adhesive process, have on hand a glue gun, gilding adhesive, a brush, and gold leaves. Additionally, you’ll need gold spray paint to give your project an extra boost of luxury.
Begin by spraying the candleholders with gold paint.
Once dry, apply the gilding adhesive to both the frames and candleholders. After waiting ten minutes for the adhesive to set, start applying the gold leaves using your fingers and brush to remove any excess. Be sure not to overdo it – you want a subtle, elegant look.
To add stability to your frame, attach the wooden dowel inside each candleholder using your trusty glue gun. Then, carefully glue the frames to both the dowel and the candlestick holder.
And just like that, you’ll have a breathtaking gold dollar store frame that’s sure to turn heads. For more DIY inspiration, check out our collection of creative dollar store crafts.
Glass & Rope Vase
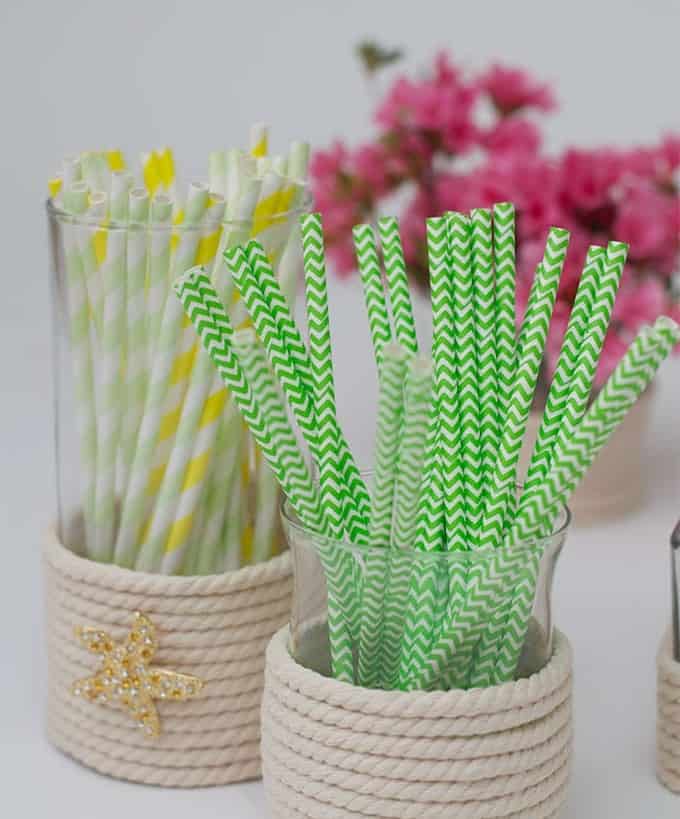
Transforming a humble glass vase into a stunning masterpiece is easier than you think! This Dollar Tree craft requires minimal materials, making it perfect for DIY enthusiasts of all skill levels. The beauty of this project lies in its versatility – experiment with different vase shapes, sizes, and styles to create a unique piece that reflects your personal taste.
To get started, gather the essential components: a glass vase of your preferred shape and size, a trusty glue gun, decorative rope, and a pair of sharp scissors. Begin by applying a small amount of adhesive to the bottom of the vase using your glue gun. Then, carefully wrap the decorative rope around the vase in a tight, even layer. Once you’re satisfied with the look, simply cut the excess rope and secure the end with a dab of glue. Voilà!
Your beautifully revamped vase is ready to adorn your home or gift to a loved one.
Hanging Flower Basket
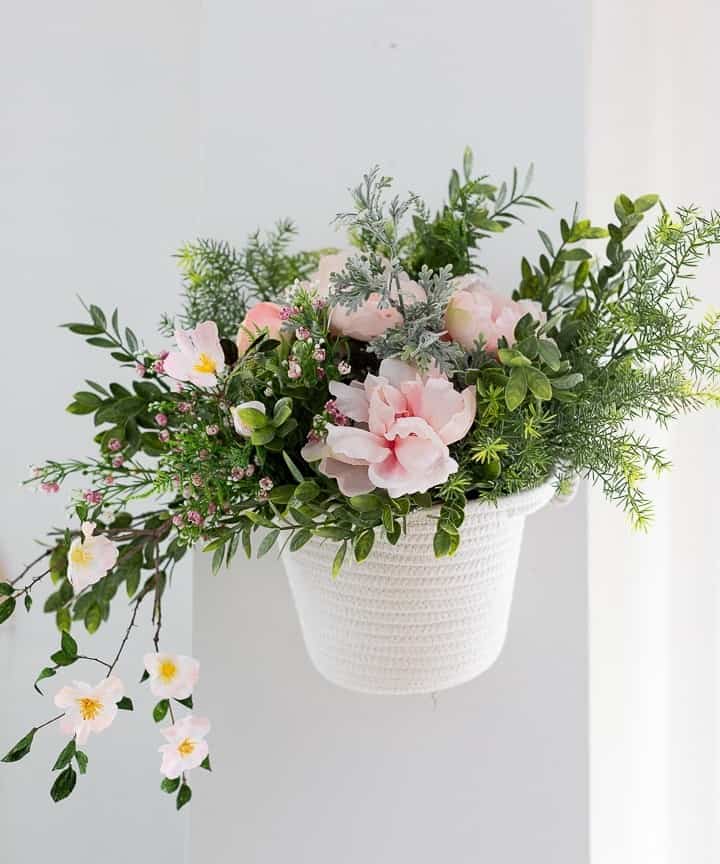
Transform a humble dollar store basket into a charming decorative piece with minimal effort and maximum visual appeal. This versatile creation can be hung in your kitchen, entryway, or even bedroom to add a touch of elegance to any space.
To get started, you’ll need just three simple components: a decorative rope, the dollar store basket itself, and some artificial flowers that catch your eye.
Begin by tying the rope around the handles of the basket, then start arranging the ‘greenery’ within. This is where you can let your creativity shine – have fun with it and give your project a personal touch.
Once you’re satisfied with your arrangement, find a spot on the wall to hang your new creation and enjoy the view every day. This delightful DIY craft is perfect for teen girls looking to add a touch of whimsy to their surroundings.
Antiqued Plaque

To craft a vintage-inspired plaque, start by gathering basic materials from the Dollar Store or repurposing old ceramic or metal trays. Next, grab your preferred color of spray paint and apply it in thin layers to create a base coat. For added depth and character, use a dark craft paint that’s been thinned with water to achieve an ink-like consistency. Paint your design onto the tray using a brush, allowing the colors to blend and merge for an antiqued look.
Once you’ve applied the paint, buff it off with an old rug or cloth to create subtle texture and wear. Finally, embellish your plaque with vinyl letters, names, monograms, or inspirational quotes. For added vintage flair, incorporate antique-looking accessories like keys, ornaments, and more – simply glue them down to the tray for a truly unique piece.
Votive Candle Holder
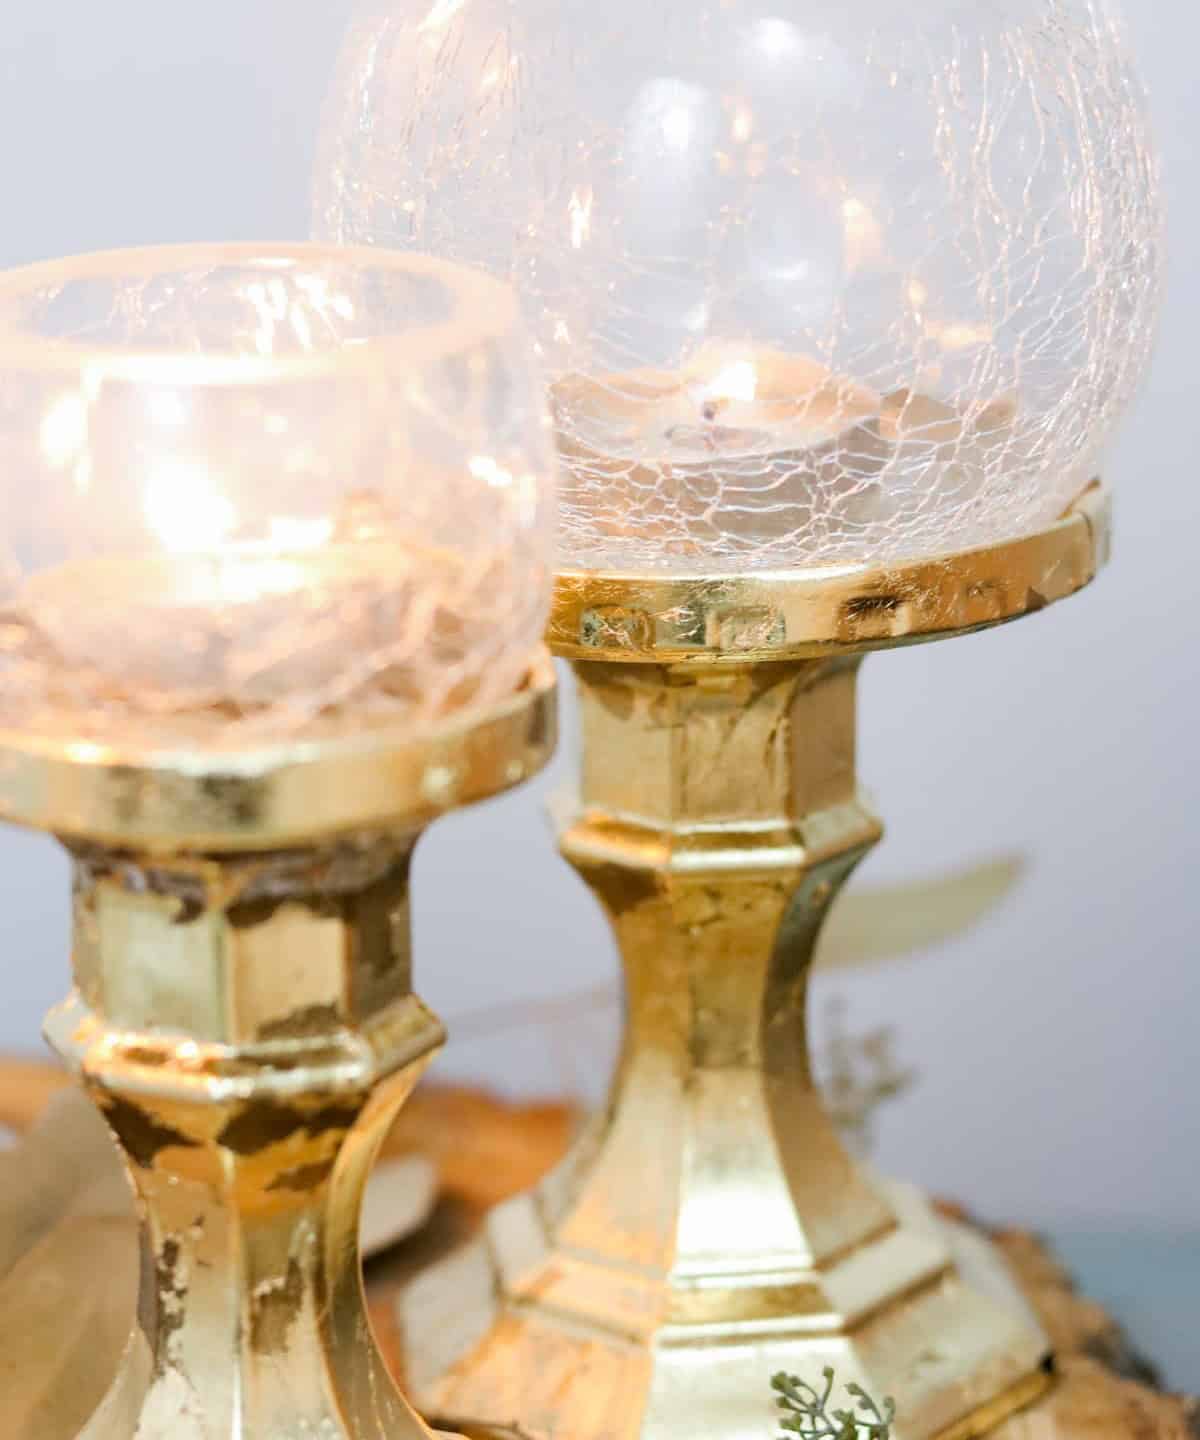
Transform your home’s ambiance with a stunning candle holder that exudes elegance. This versatile decorative piece can be placed on tables, mantelpieces, shelves, or anywhere else to add sophistication to the entire room. To create this beautiful votive candle holder, you don’t need to break the bank. Visit your local dollar store or repurpose old trinkets to get started.
Here’s a list of materials you’ll need: inexpensive glass candle holders, gold spray paint, gold leaves, gilding adhesive, old jar lids, and a glue gun.
DIY Dollar Tree Beach Glass
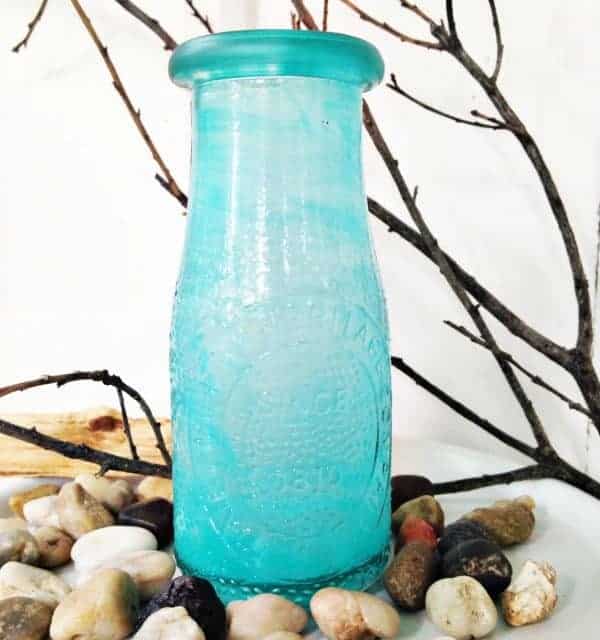
For those who desire to infuse their decor with a touch of the sea, creating a beach glass bottle can be a fun and effortless endeavor. To start, combine white glue in a disposable container or bowl with a few drops each of blue and green until you achieve your desired shade. Once satisfied, cease stirring the mixture. Next, dip a foam brush into the colored concoction and apply it to both the interior and exterior surfaces of your bottle.
Allow the paint to dry for several hours before admiring your finished handiwork. This charming craft is not only a delightful hobby but also presents opportunities to turn a creative outlet into a profitable venture.
DIY Fruity Mason Jar
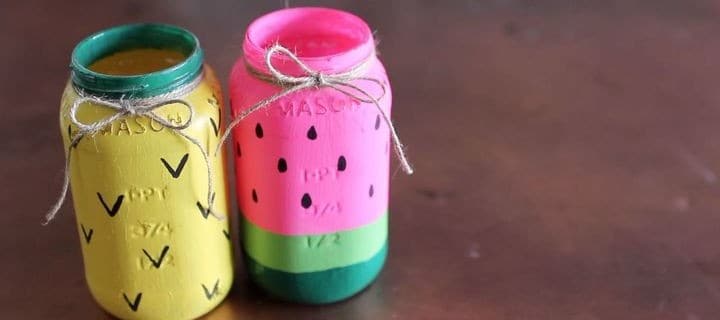
Mason jars are a versatile decorative element that can add a touch of charm to any outdoor space. One way to take them to the next level is by using colored mason jars, which offer endless possibilities for customization and personalization. To create these unique pieces, start by selecting your favorite fruits and choosing a color scheme that matches their hues. Then, use a larger brush to paint the jars with acrylic paint or any other medium of your choice.
For added texture and interest, consider incorporating additional accessories such as ribbons, twine, or other natural fibers that complement the fruit-themed design. To achieve an old, weathered look, lightly sand the painted surface using fine-grit sandpaper. Finally, use a small brush to add intricate details and complete your mason jar masterpieces. With these colorful creations, you can create a beautiful display for your garden or balcony that’s sure to bring joy and conversation.
DIY Reverse Canvas Sign
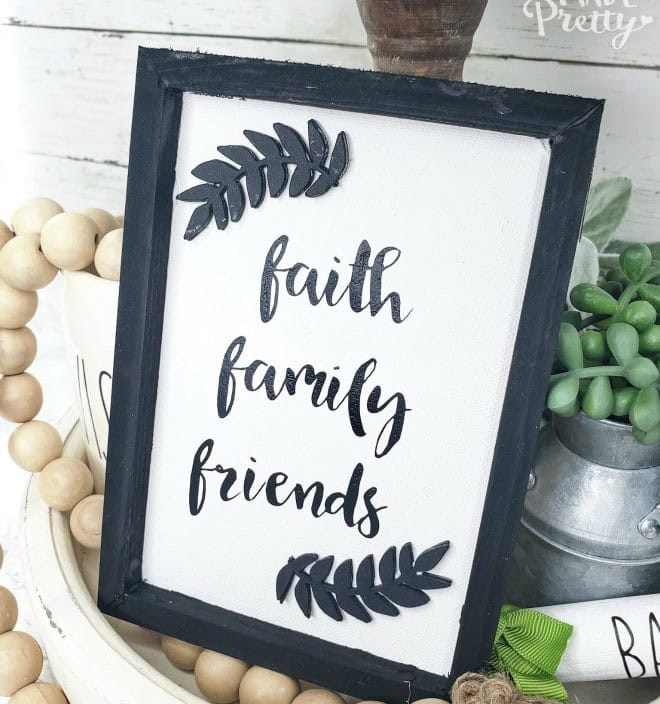
The reverse canvas technique is surprisingly straightforward. To begin, simply turn a standard canvas upside down and flip the white rear side to the front. Next, use a flat-headed screwdriver to carefully remove any staplers from the back of your canvas. For added flair, consider painting or purchasing a frame in a color that complements the overall aesthetic you’re aiming for.
Once your frame is ready, attach it to the canvas using an iron and ensure the staples are not too prominent, as this can detract from the overall design. To add some extra dimension, cut out leaves from heavy black cardstock and apply them around the image or text, creating a visually appealing contrast. Finally, secure the frame to the canvas using a staple gun, taking care to use staples that are proportionate in size to avoid drawing attention away from the main design.
Succulents
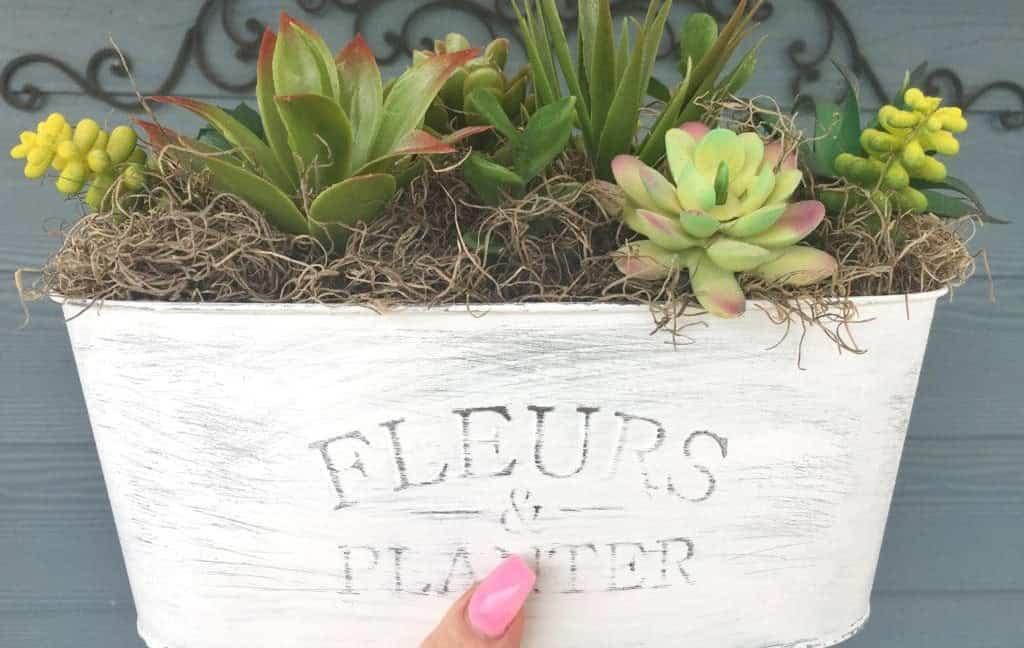
Transform an ordinary flower tin into a charming vintage planter by selecting one from your local dollar store. Begin by giving it a new coat of paint using spray paint, allowing the color to dry completely before moving on to the next step. Next, use medium-grit sandpaper to distress the tin and achieve that authentic shabby-chic look. Once you’ve got the desired texture, cut a piece of floral foam to fit inside the tin and start arranging your succulents within it.
To add some extra visual interest, fill in any gaps with moss and finish off the design by adding a touch of raffia for a charmingly rustic appearance.
Fall Jars
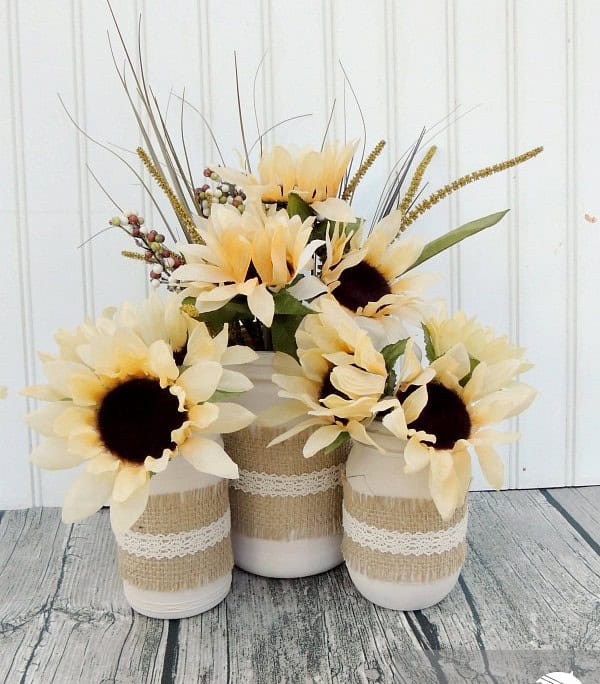
To embark on this DIY endeavor, gather the following essential materials: glass jars, FolkArt chalk paint, hessian fabric or a similar textured material, artificial sunflowers, grass or other foliage of your choice, and a reliable hot glue gun. Once you have these components at hand, begin by painting the jars with multiple coats of chalk paint to achieve the desired color and finish. For a distressed appearance, employ sandpaper to subtly roughen the surface.
Next, measure out a suitable length of hessian fabric or burlap ribbon and secure it around the jar’s middle section using hot glue.
Easy Thanksgiving Centerpiece
As Thanksgiving approaches, the focus often shifts from delicious food to crafting a warm and inviting atmosphere. One way to achieve this is by creating a beautiful centerpiece for your table using just a few simple materials. The DIY project requires a large glass jar, some twine, and a glue gun. To begin, wrap the twine around the jar in a decorative pattern, applying a small amount of glue as needed to secure it in place.
Don’t worry too much about perfection – the rustic charm of the twine will add to the overall aesthetic. For those looking for a more natural option, consider using jute twine instead.
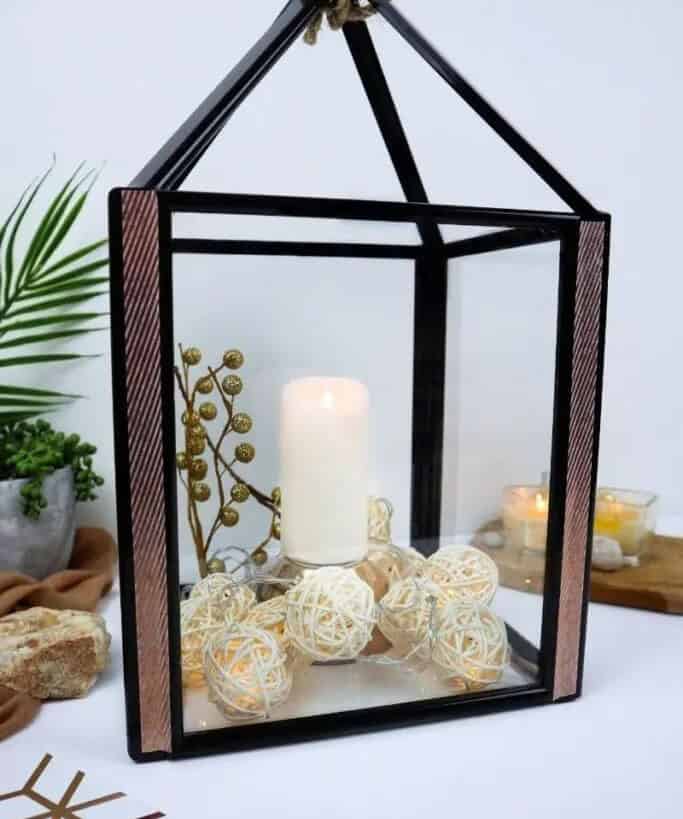
Trendy Decorative Lantern
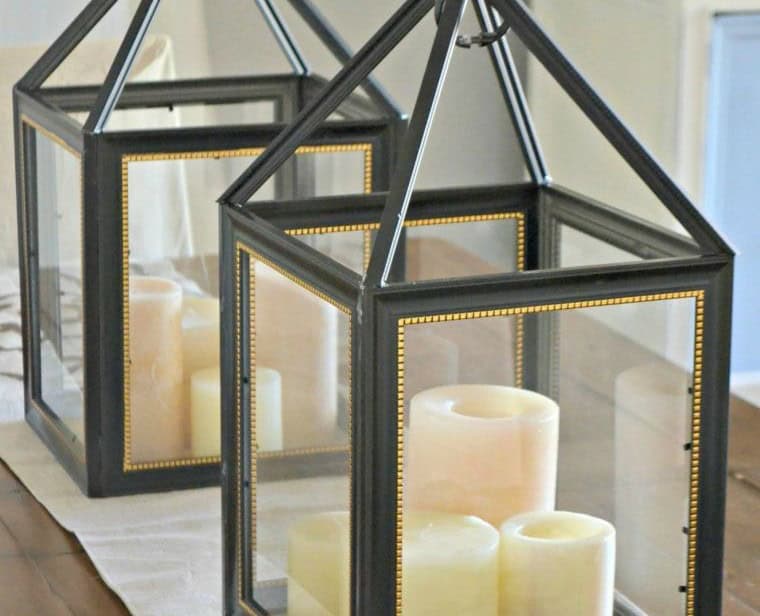
Transform your home with a DIY farmhouse-inspired lantern that’s surprisingly easy to create. Start by collecting flat-sided photo frames, pliers, a hot glue gun, and a shower curtain ring or similar item. Take the frames apart and use hot glue to shape them into a cube-like structure, leaving the glass intact. Repeat this process for the top of the lantern using more frame sides. Finally, add the shower curtain ring to complete the realistic design.
This charming DIY project is perfect for adding a touch of farmhouse flair to your home.
DIY Vintage Signs Made From Foam Board
To create a unique and rustic sign, start by gathering essential materials: foam board, clear wax, letters or lettering of your choice, a ruler for measuring and marking, a utility knife for cutting, command strips for hanging, and some aging dust to add character. Begin by trimming the foam board to the desired size using the ruler as a guide. Mark the location where you’d like to place the letters, then carefully glue them in sequence.
Once the letters are secure, apply a thin layer of clear wax to protect the surface and give it a subtle sheen. Next, sprinkle some aging dust evenly across the board to create a weathered look. Finally, attach the command strips to the back of the sign and hang it wherever you’d like to display your new rustic creation.
Lavender Candle Wreath
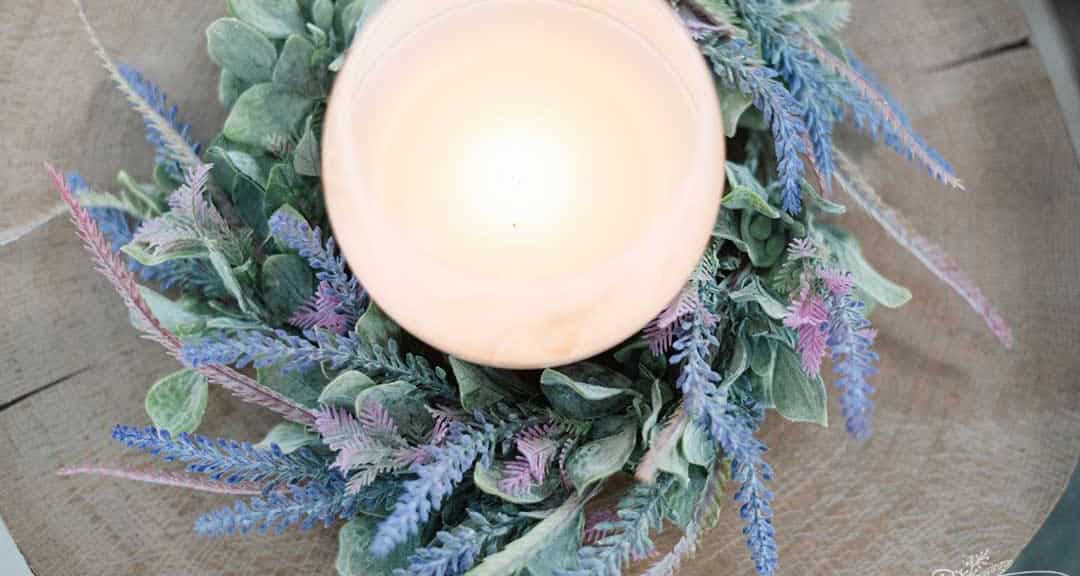
To create a charming lavender candle wreath for your interior decor, start by gathering some essential materials: faux lavender flowers, lamb’s ear, and a finished wire wreath form. Once you have these items, use wire cutters to arrange the lavender blooms around the wire form, securing them in place as you go. Continue this process until the full circle is complete, and voilà! Your beautiful lavender candle wreath is ready to adorn your table.
Easy Black and White Dollar Tree Succulent Vase
To transform a clear glass vase into a unique piece of home decor, gather the following materials: a clear glass vase, white spray paint specifically designed for glass, a black paint marker, water-based finish, and succulents. Begin by applying multiple coats of white spray paint to the vase, allowing each coat to dry before adding additional layers. Once the paint is fully dry, use the black paint marker to create intricate designs or patterns on the vase.
To protect your handiwork, apply a water-based finish to seal the design. The final step is to add some greenery in the form of succulents, rocks, or sand to complete the arrangement.
DIY Dollar Tree Chalkboard
To create your own DIY chalkboard, start by selecting a frame that suits your style and picking up a pack of white chalk. For the chalkboard surface itself, you’ll need some black or dark chalkboard paint. Once you have those essentials, follow these simple steps to get started.
Begin by disassembling the frame and applying a coat of chalkboard paint to the glass.
Allow it to dry completely before repeating the process a couple more times, building up the color until you’re satisfied with the result.
If you’d like to add some extra flair, now’s also a great opportunity to touch up any areas of the frame that need it or use leftover paint to give it a pop of color. Once everything is looking good as new, simply slide the glass back into its frame and your DIY chalkboard is ready for use!
Spring Terrarium with Dollar Tree Frames
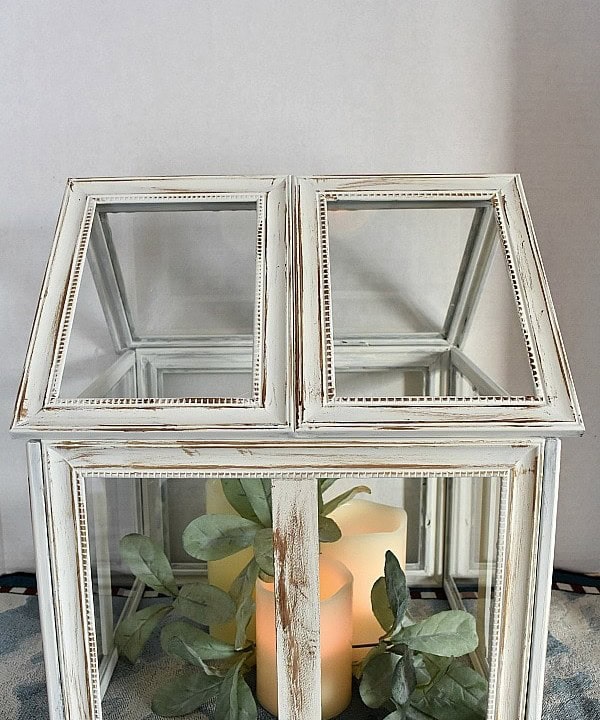
Spring is in the air, and what better way to celebrate than with a fun and easy DIY project? This spring terrarium DIY project is reminiscent of trendy decorative lanterns, but with a unique twist. To get started, gather a few photo frames of varying sizes, along with paint sticks, wood glue, hot glue, white paint, and some stain. Begin by disassembling the picture frames and then use the paint sticks to give them a fresh coat. Next, reassemble the frames into a cube-like shape using wood glue.
To complete the terrarium’s rooftop, reuse any remaining frame pieces and secure them with hot glue. Finally, add some greenery and candles inside to bring your spring terrarium to life.
Mini Easter Egg Topiary Dollar Store Craft
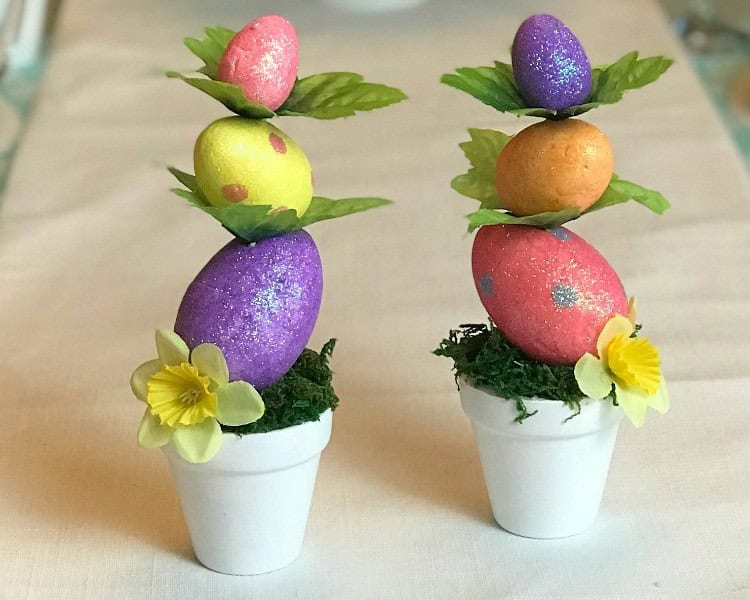
To create this unique Easter decoration, gather the following supplies: mini flower pots, foam Easter eggs, and embellishments like ribbons, flowers, moss, and other accessories that catch your eye. Begin by painting the mini flower pot and adding a layer of styrofoam on top. Secure the moss over the styrofoam using glue, making sure to cover it evenly. Next, insert a skewer stick into the middle of the foam, ensuring it’s firmly in place.
The final step is to stack the eggs on top of each other, and get creative with your decorations – add ribbons, flowers, or any other embellishments that fit your personal style.
Farm Fruit Basket Wagon Planter
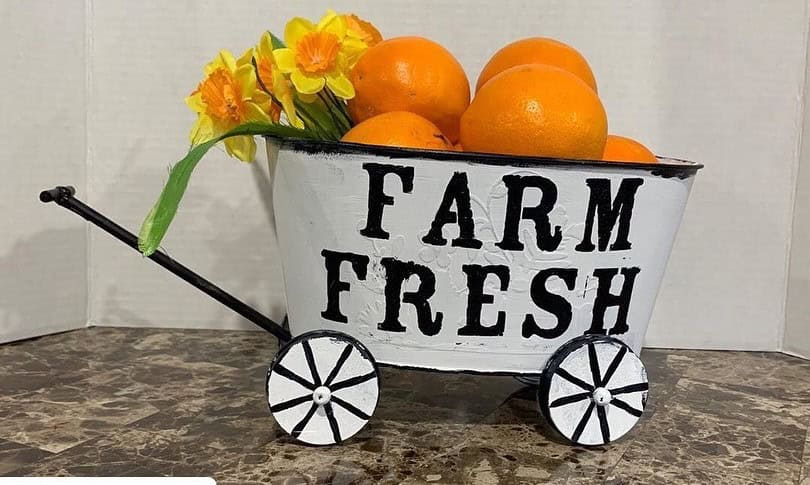
Transform an old flower tin into a charming farm-themed planter by repurposing ordinary materials. Start by painting skewers black and adding white accents using a thin brush to create the illusion of jar lids resembling wagon wheels. Next, distress four jar lids with chalk paint to give them an antique look, then glue them around the tin to form the base of your miniature wagon. To complete the look, attach the skewers to one side of the basket as a handle.
Once everything is dry, fill the planter with a vibrant arrangement of fruit and flowers to create a delightful farmhouse-inspired centerpiece.
DIY Faux Topiaries
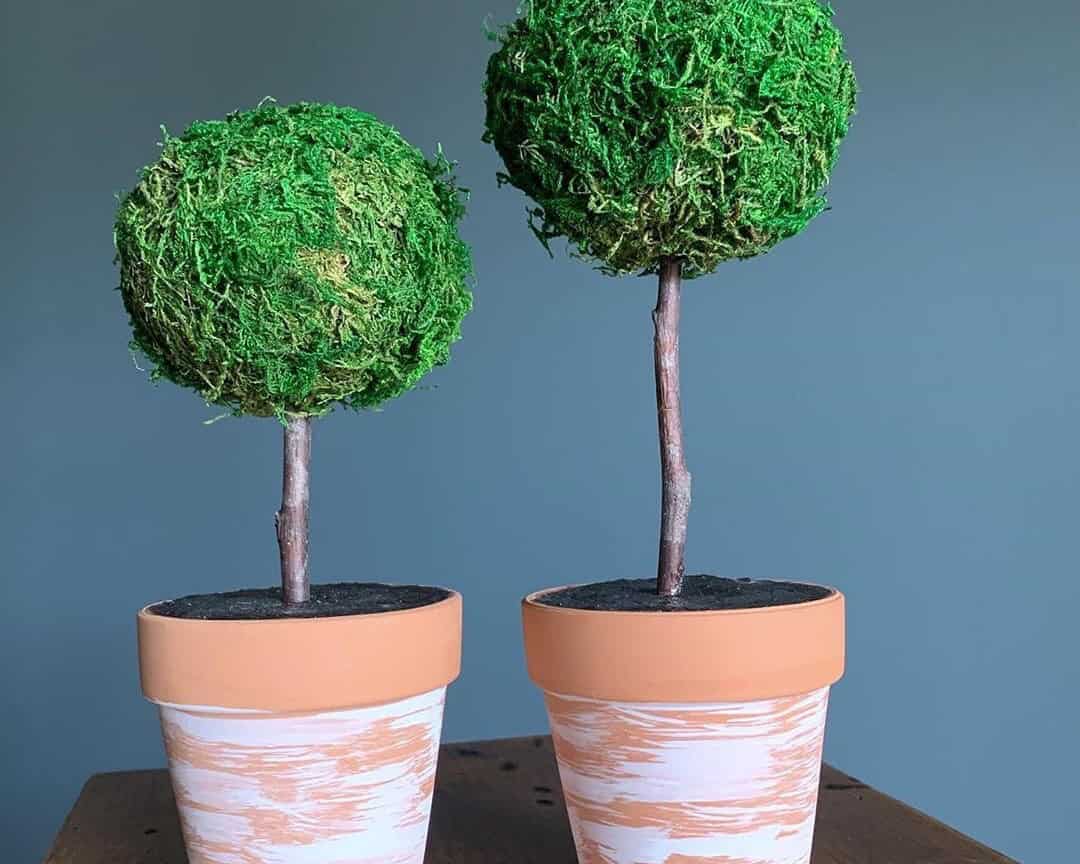
To craft these charming DIY faux topiaries that resemble miniature trimmed trees, you’ll need a few basic materials. Begin by covering a styrofoam sphere with a thick layer of moss using hot glue. This will form the base of your tree. Next, prepare a ceramic pot by mixing plaster with water and adding it to the container. Allow the mixture to reach a semi-dry state before inserting a branch or stick into the pot, serving as the tree trunk.
Secure the branch in place until the plaster dries completely. Once set, add additional moss to the plant pot, completing your DIY topiary. With its realistic appearance and easy construction, this project is perfect for decorating your table or adding a touch of greenery to any room.
Floral Vintage Candle
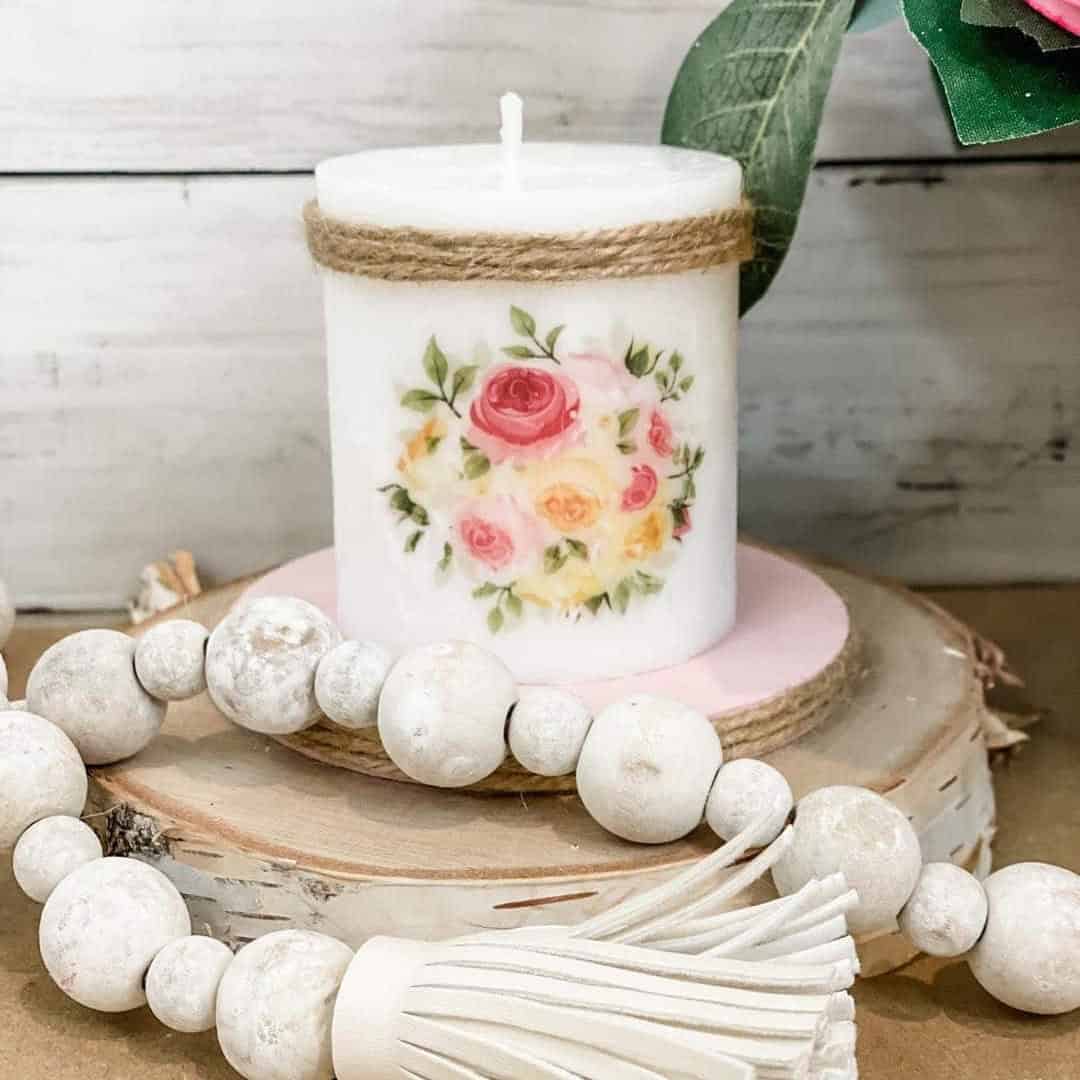
With minimal effort, anyone can create a stunning DIY candle. To begin, start with a plain white candle and utilize a Wagner heat gun to skillfully transfer an image onto its surface. The result will be a unique and eye-catching design that’s sure to impress. Next, add some rustic charm by wrapping the candle in jute rope, securing it with hot glue for a seamless look. To complete the piece, place the candle on a decorative wooden stand, elevating its overall aesthetic appeal.
Dollar Tree Lantern
Imagine being surrounded by the warm glow of this stunning lantern! Whether you’re seeking to illuminate your living space or infuse some visual flair into your decor, this charming piece has got you covered. To get started, head to your local dollar store and pick up a few wooden frames. Not only will they provide a solid foundation for your lantern, but the process of dismantling them will also reveal an array of useful parts to incorporate into your design.
As you begin to construct your lantern, allow yourself to get creative with the decorating process! Consider wrapping it in decorative tape, then adding a dash of glamour with glitter and sparkle. The possibilities are endless!
Confetti Bowl

The vibrant colors and textured design of this confetti bowl have left me in awe! For anyone who’s had the pleasure of working with confetti before, they know that it can be an incredibly fun and creative process. To get started on your own masterpiece, simply head to [link] to grab some confetti supplies. In addition to the confetti, you’ll need a balloon to serve as a mold for your bowl, as well as an actual bowl to contain it.
Finally, pick up some Mod Podge from [link] and a sponge brush, and you’re ready to begin crafting your unique confetti creation.
Yarn Wrapped Glass Vase
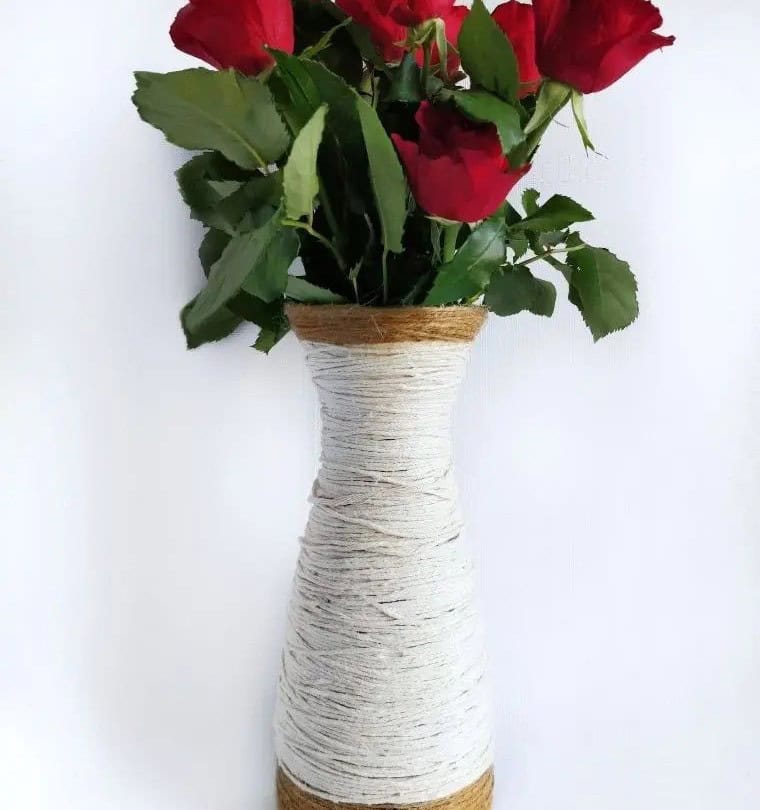
I’m thrilled to share that this project has nothing to do with mastering crochet or knitting skills. Instead, it’s all about breathing new life into an old vase. If you have a piece that’s seen better days and is collecting dust, now’s the perfect chance to upcycle it. By wrapping yarn around its imperfections, you can easily conceal any dents or scratches, giving your vase a fresh new look.
Simply select a few skeins of colored yarn – jute or hemp twine work beautifully too – from your stash, heat up your hot glue gun, and get ready to transform!
Disney Countdown Craft
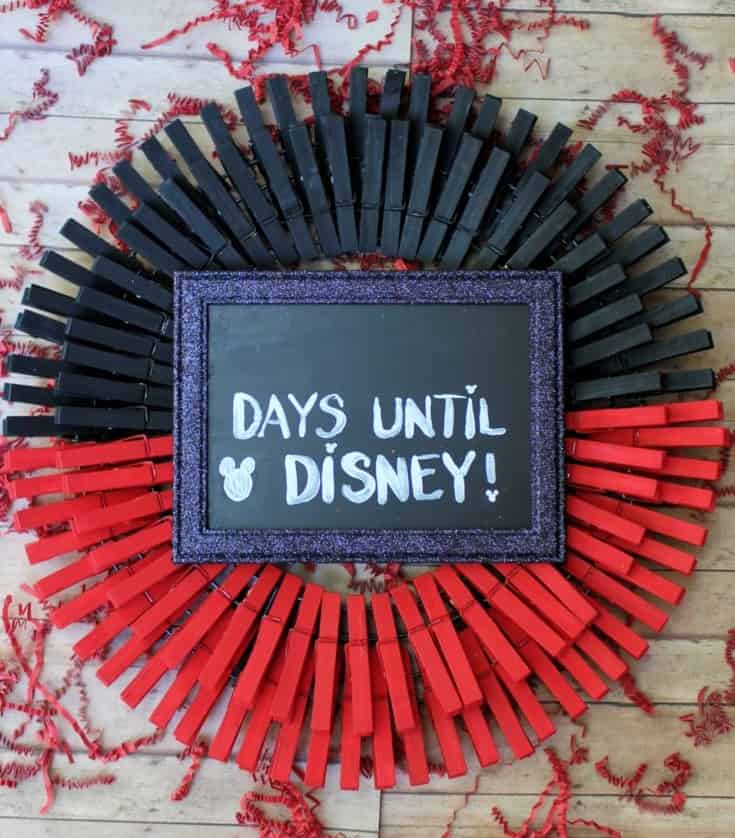
It’s hard to imagine anyone who doesn’t have a special place in their heart for Disney. The magic of the brand has been woven into our lives from a young age, bringing joy and enchantment to countless individuals. So, what better way to bring that same sense of wonder into your home than with a vibrant and whimsical Disney-inspired wreath? To get started, grab some clothespins and let’s begin building this delightful Mickey Mouse-themed masterpiece. The best part?
You can find all the necessary materials at your local dollar store, making it an affordable and accessible DIY project that’s sure to delight.
Wood Tiered Tray
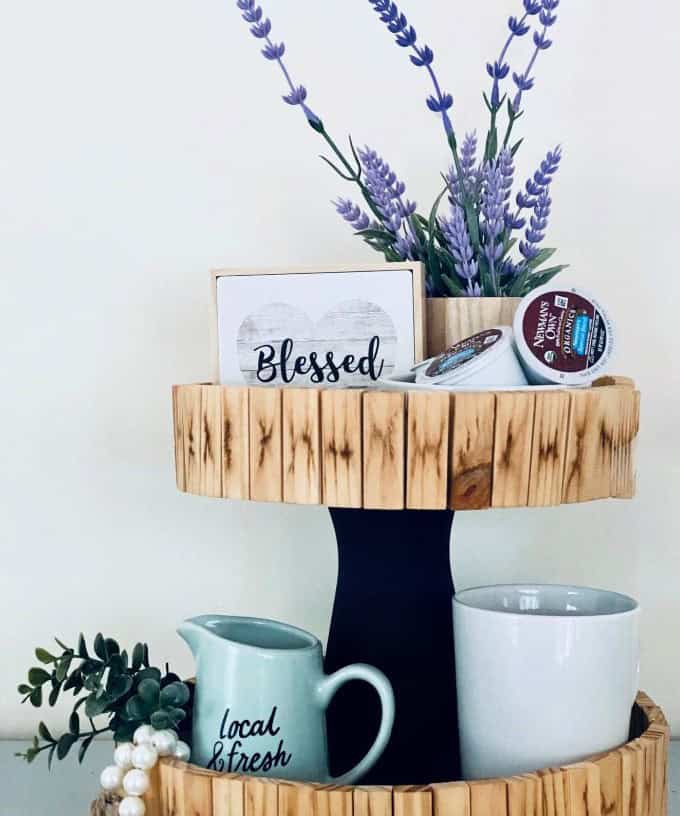
When it comes to setting the stage for seasonal decor, a tiered wooden tray like this can serve as the perfect foundation. Just envision this charming base sitting beside your coffee maker, overflowing with festive treats and essentials to elevate your hot beverage experience. To bring this vision to life, head to your local dollar store to gather all the necessary materials.
Don’t forget to stock up on edible supplies too, such as coffee pods, chocolate chips, marshmallows, syrups, and more – everything you need to create a visually appealing display.
Farmhouse Window Frame
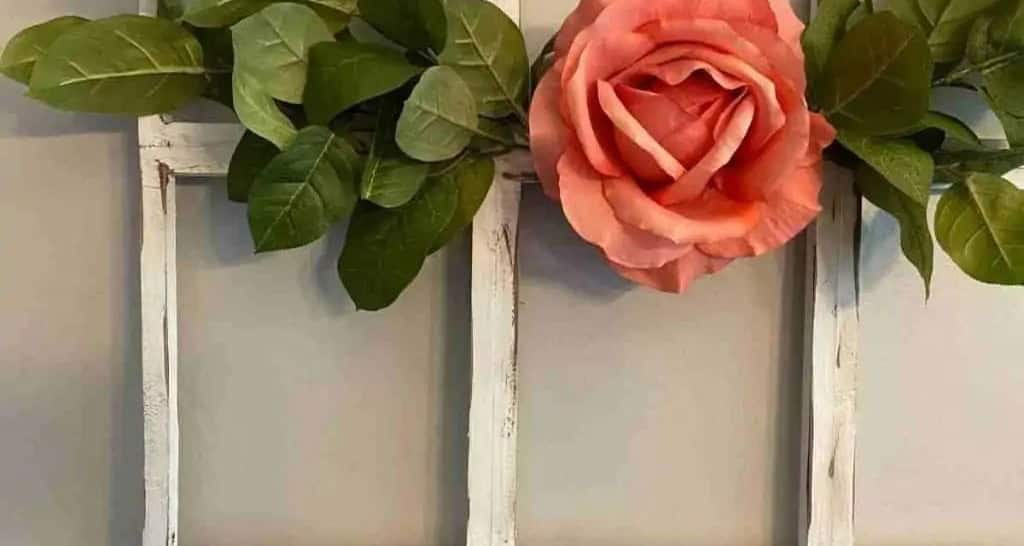
Farmhouse decor’s rustic charm is undeniable. One way to infuse this style into your space is by repurposing everyday materials into unique decorative pieces. For instance, a farmhouse wooden frame can be crafted using nothing but canvas frames from the dollar store or here. This budget-friendly and DIY-friendly approach eliminates the need for power tools, making it accessible to anyone. The end result is a charming piece that seamlessly blends country living with personality.
The addition of vibrant flowers like roses and delicate ivy leaves injects a pop of color into the frame, further emphasizing its rustic appeal. If you’re looking for more creative inspiration, be sure to check out these DIY dollar store frame craft ideas.
Pillow Cover
Dollar stores offer a delightful array of bandannas, perfect for crafting unique pillow covers. The question arises, why invest in bandannas when you can simply purchase a pre-made cover? However, with this DIY project, you’ll learn to sew like a pro (or, at the very least, like a beginner) and create something truly special. For those who prefer not to sew, fear not – a simple adhesive can take its place, eliminating the need for stitches altogether.
When shopping for your bandannas, don’t forget to grab an insert pillow to complete your DIY project.
Fall Mug

As the crisp fall air sets in, there’s nothing like curling up with a good book and a warm cup of coffee or tea by the fireplace. But what makes this cozy scene complete is a thoughtful addition – a mug that matches the autumnal atmosphere. Imagine sipping pumpkin-spiced hot cocoa from one of these fall-themed mugs, surrounded by the warmth and comfort of home.
The phrase ‘sweater weather’ takes on a whole new meaning when you’re enjoying your favorite beverage in a DIY mug that reflects the season’s cozy vibe. And with a Cricut machine at your disposal, designing your own font and template is a breeze, making it easy to create personalized mugs for yourself or as thoughtful gifts for loved ones.
Tape Resist
Tape resist art may seem deceptively straightforward – simply applying tape to a canvas and painting over it – but its possibilities are truly breathtaking. By experimenting with various patterns, colors, and tape widths, you can unlock an array of geometric designs that will leave you in awe. The process is surprisingly meditative, as you carefully manipulate the tape to create intricate, layered compositions that burst forth with color when the paint meets the canvas.
And when it’s all done, what’s left but to proudly display your masterpiece for all to admire?
Wooden Snowman Ornament
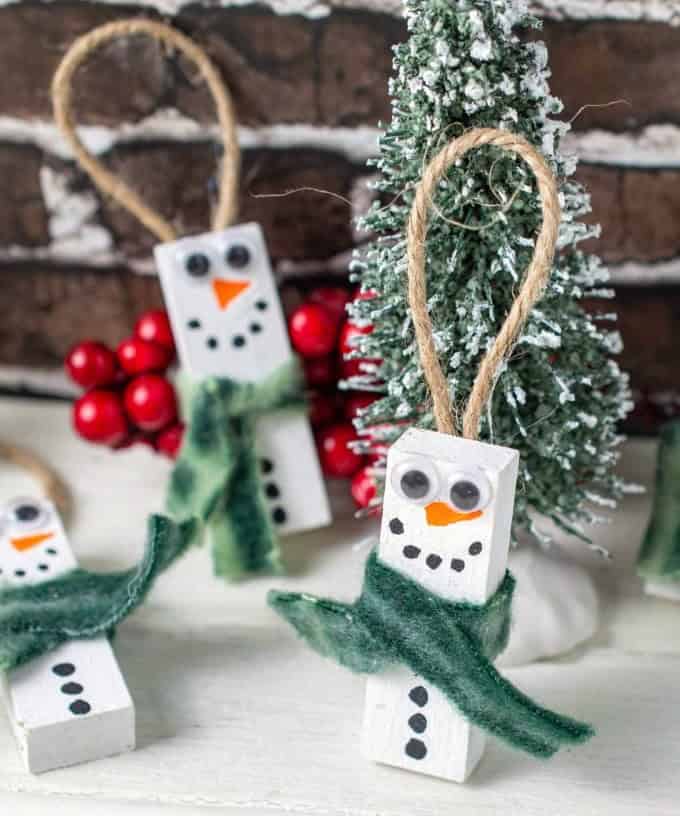
Elevate your Christmas tree’s charm with these whimsical wooden snowman ornaments that require minimal effort but yield maximum impact. Each one infuses the tree with an extra dose of personality and color.To get started, head to your local dollar store or grab a Jenga kit or Tumbling Towers game for the wooden blocks you’ll need. Once you have them, let your creativity shine by decorating the blocks with paints, brushes, and some playful googly eyes from Michael’s.
Love Sign
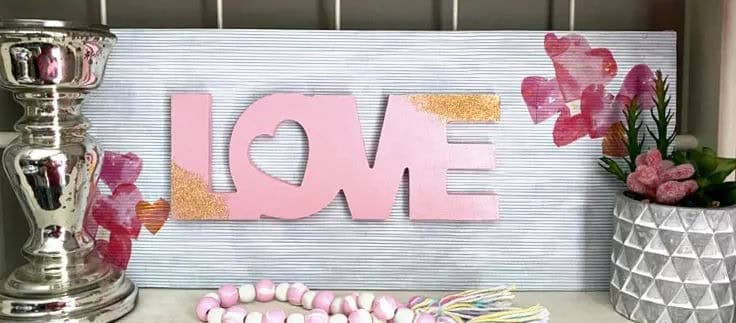
Are you searching for signs that your partner is ‘The One’? While pondering this question, why not create your own symbol of love? This DIY Dollar Tree love sign is an excellent place to start. To begin, gather all the necessary materials and tools, including your craft essentials and scrap wood for future projects. You can even reuse leftover wood scraps from previous DIY endeavors to give them a new purpose.
If you’d like to add some extra glamour to your sign, consider picking up some sparkly dust. Then, use a foam brush to apply a light coating of gold dust to the ends of the sign, giving it a touch of sophistication.
Travel Mug
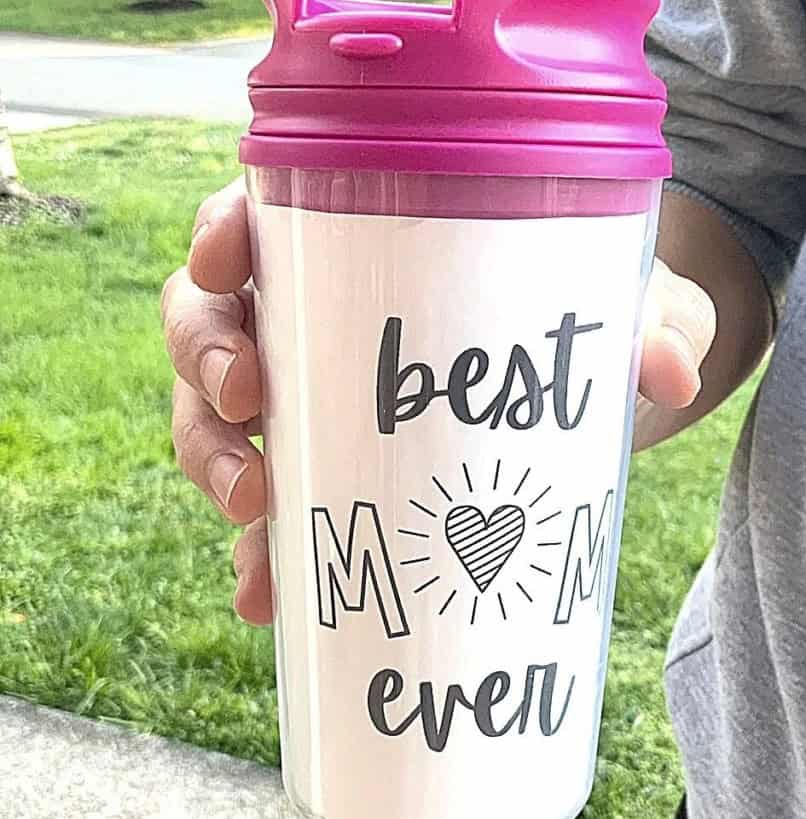
Your daily commute just got a whole lot brighter with the right travel mug by your side! It’s that one thing that makes even the most arduous journey bearable. And what’s more, this fantastic accessory can be tailored to suit your unique style and preferences. Simply remove the glass cover and insert a custom paper design – voilà! You’ll never have to face another long queue or tedious traffic jam without a smile on your face.
Plus, with its versatility as a thoughtful gift option for birthdays or special occasions like Mother’s Day, this travel mug is sure to become your new go-to companion.
Gnome Wreath
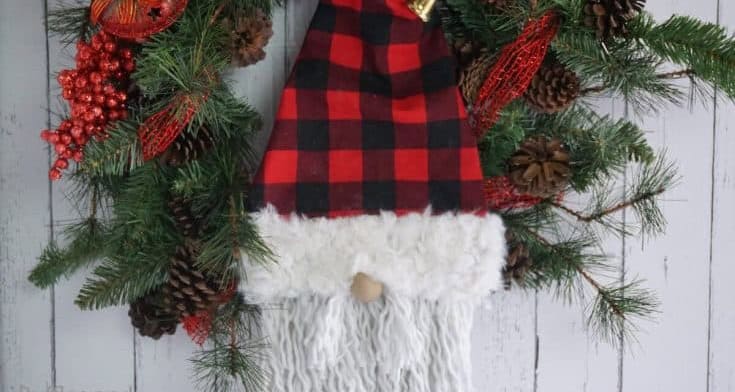
Imagine a Christmas wreath that’s not only festive but also uniquely charming – thanks to the humble dollar store! The adorable button-nosed gnome, dressed as Santa, is sure to bring a smile to anyone’s face. This DIY project has the potential to elevate your front door’s curb appeal and set it apart from the usual generic wreaths. However, it’s essential to be mindful of the weight factor, as an overloaded wreath can become too heavy for its frame.
To avoid this issue, carefully select materials that will ensure your masterpiece stays upright. A sturdy wire or foam wreath frame is a great starting point, and with some creativity, you’ll have a one-of-a-kind Christmas gnome wreath that’s sure to delight.
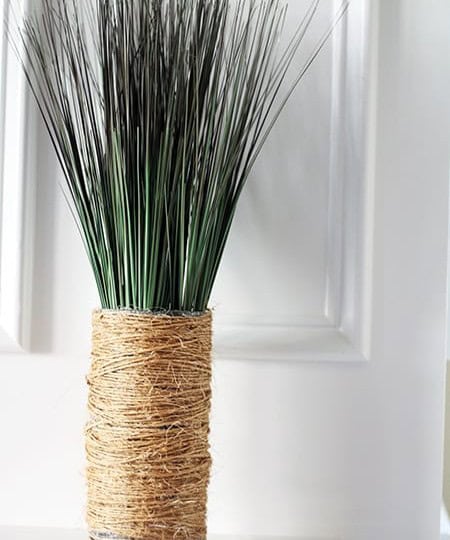
DIY Dollar Tree Rope Vase
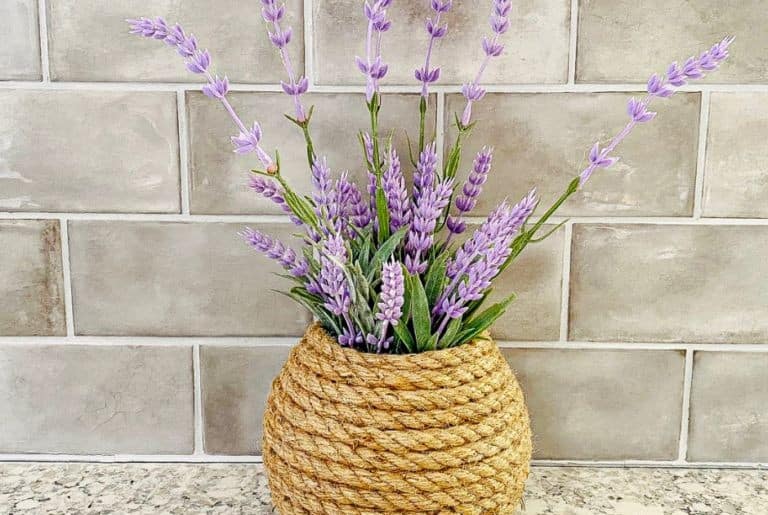
When it comes to adding texture to your decor, a rope-wrapped vase can be a game-changer. The key is to choose the right type of rope – jute, with its rustic vibe, or cotton, which brings a bohemian flair. To make this DIY project come together, start by selecting your rope and then finding a suitable bowl to wrap it around. You can opt for a new vase from [link], or get creative and upcycle an old one you have lying around.
If you’re looking for more DIY projects that involve yarn or rope-wrapped items, check out our guides on yarn-wrapped flower pots, desk organizers, and coasters – perfect for teens who love crafting.
Plate Decor
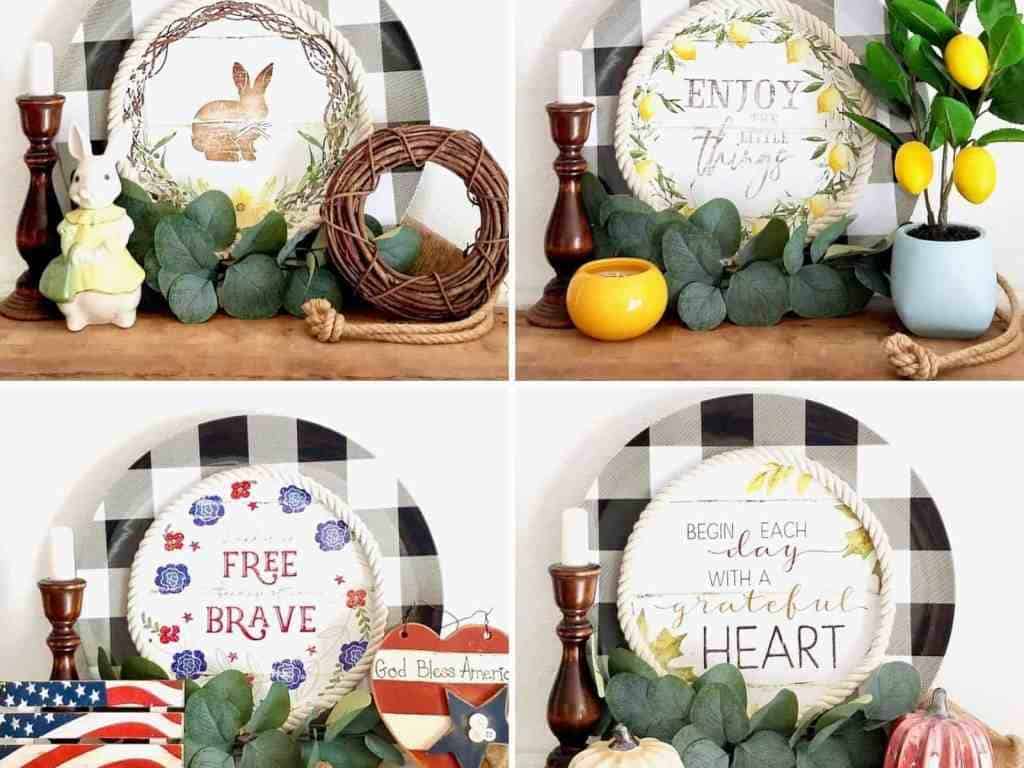
Next time you’re browsing at your local dollar store, take a closer look at their selection of plates – you never know when inspiration might strike! With so many options to choose from, it’s only a matter of time before you stumble upon the perfect one for creating this stunning sign plate. The combination of vibrant yellow lemons and dark minty green leaves is nothing short of refreshing, almost as if you can smell the citrusy aroma wafting off the page!
To add some extra depth to your display, consider placing a candlestick in one corner – it’s a simple yet effective way to balance out the composition. And for that added touch of rustic charm, why not wrap a bit of corded rope around the potted lemons? The result is a visually appealing piece that’s sure to brighten up any room.
Hugs and Kisses Book Stack
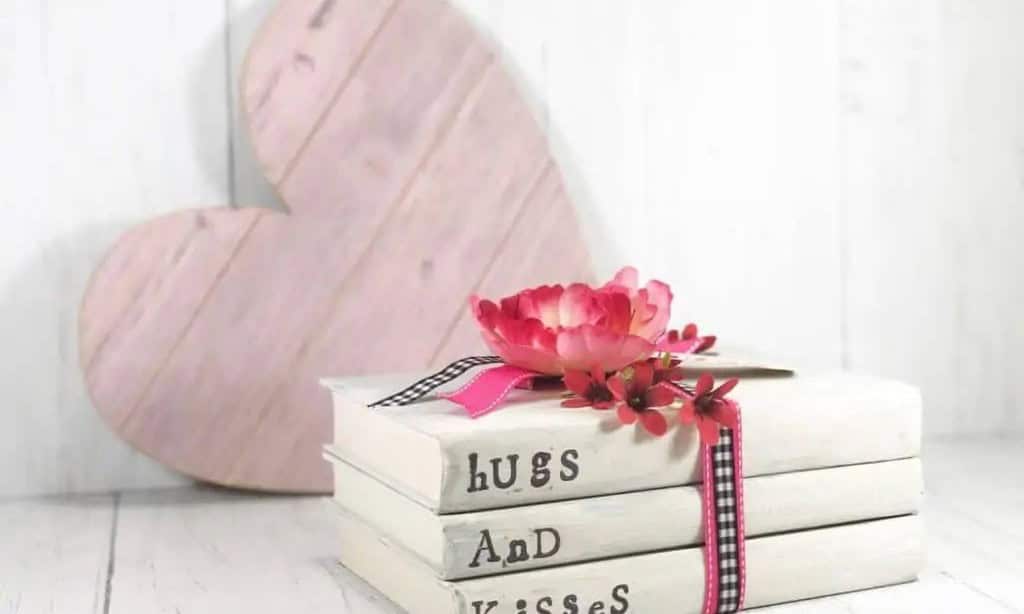
Who says you can’t create your own stunning book stacks? Forget pricey coffee table books – you can easily craft your own stackable masterpieces using items from your local dollar store! The result is not only budget-friendly but also incredibly customizable. Simply add your preferred words or phrases, and voila! Your unique book stack will bring a touch of personality to any room. With its effortless charm, this DIY project is sure to delight anyone who loves books – and won’t break the bank.
Hot Chocolate Mug Gift
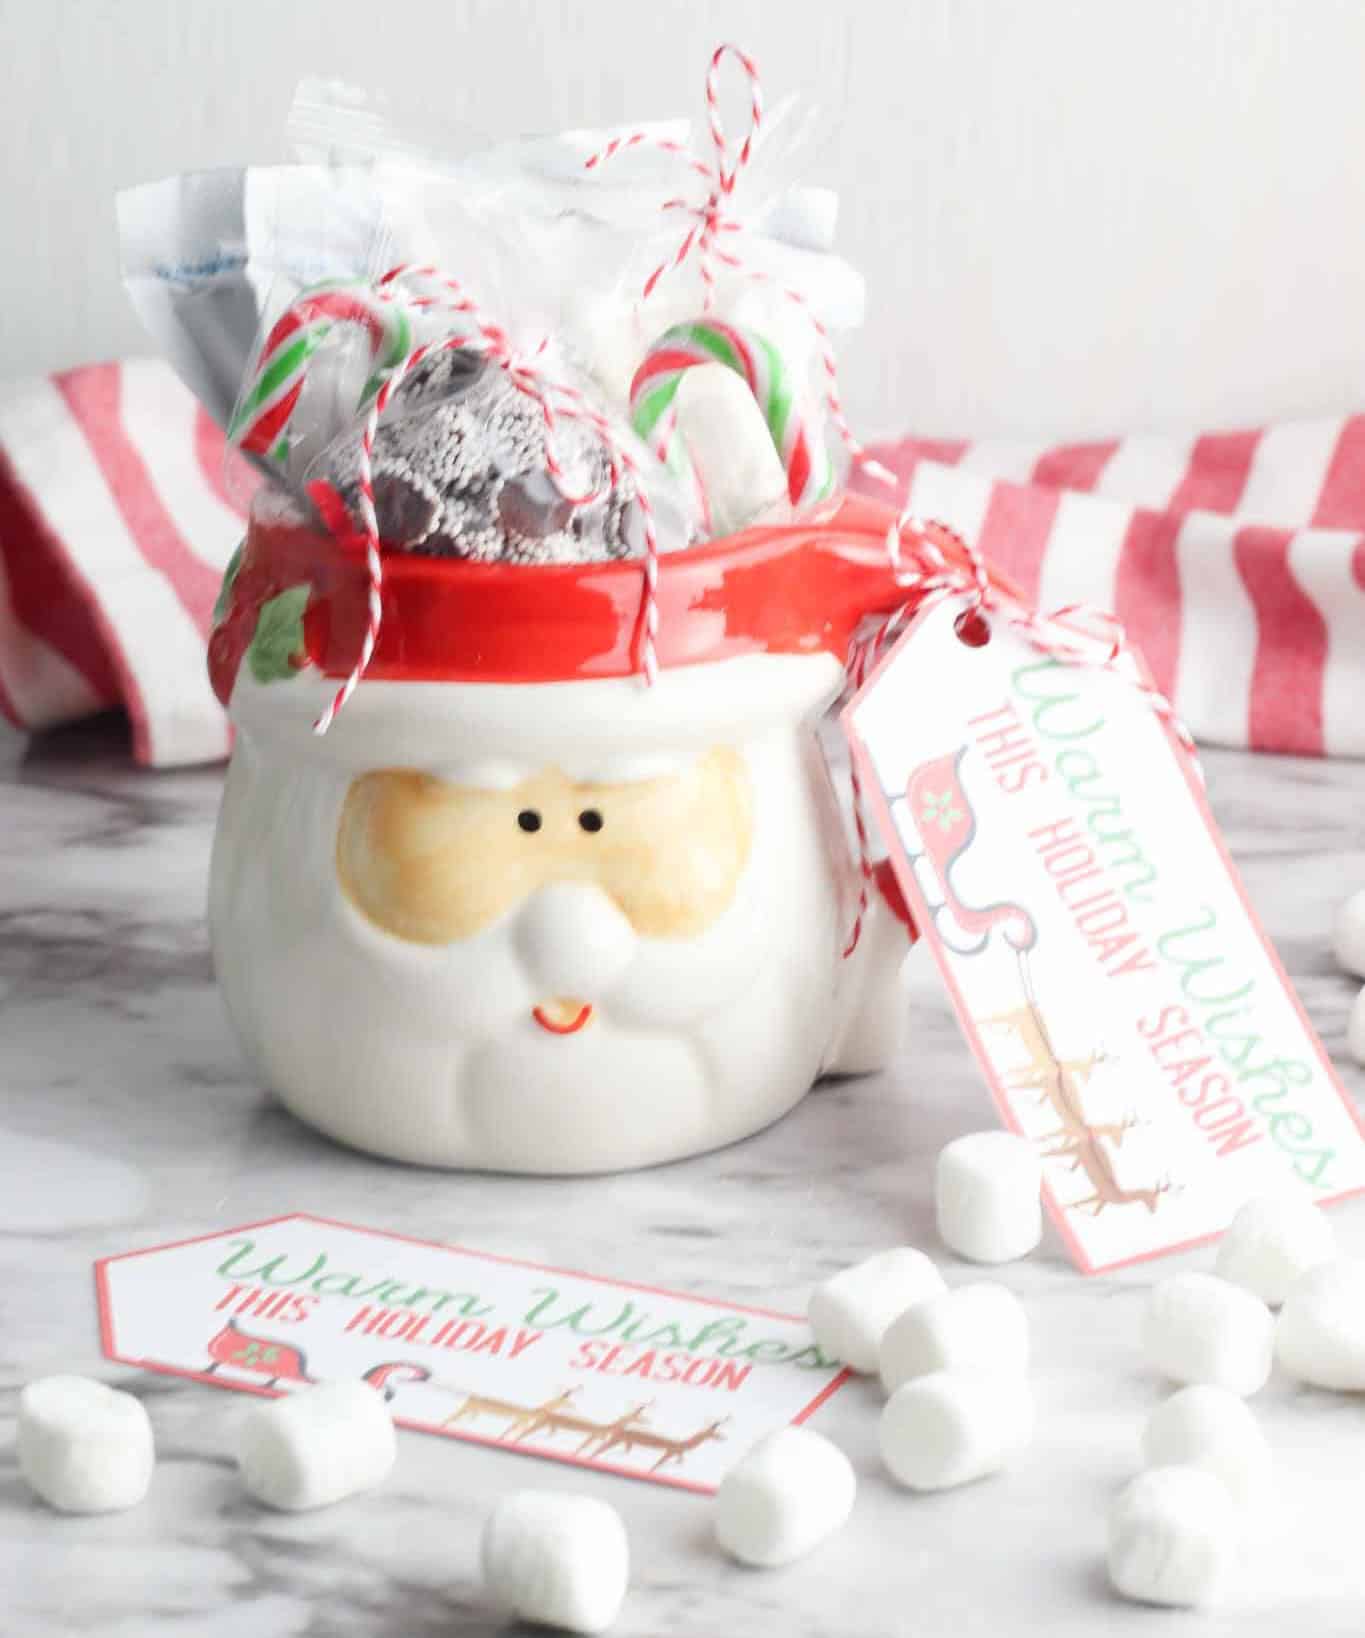
The Santa hot chocolate mug that caught our eye earlier in the fall season is still a great gift option come Christmas time. This mug comes equipped with everything you need to whip up a rich and creamy hot chocolate, but what really sets it apart is its customizability. With a little creativity, you can create your own unique hot chocolate flavors by adding in various stirrers, toppings, and mix-ins.
For example, why not try combining the classic hot chocolate with some salted caramel syrup and top it off with crushed Snickers bars? The possibilities are endless!
Bird Finger Puppet Origami
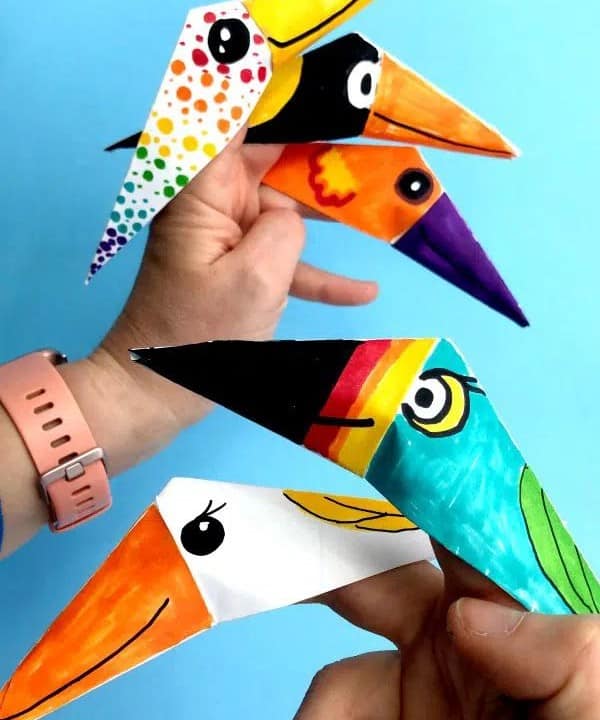
Mastering origami requires dedication and persistence, but fortunately, it doesn’t demand a significant investment in supplies – simply time, patience, and paper will suffice for most projects. A prime example is the origami finger puppets that can be crafted in just under five minutes. Once the folding process is complete, you can then embellish your creations with paint, using either specialized pens or regular acrylic paint.
For an added touch of realism, consider incorporating googly eyes instead of drawing them on by hand.
Pizza Pan Wreath
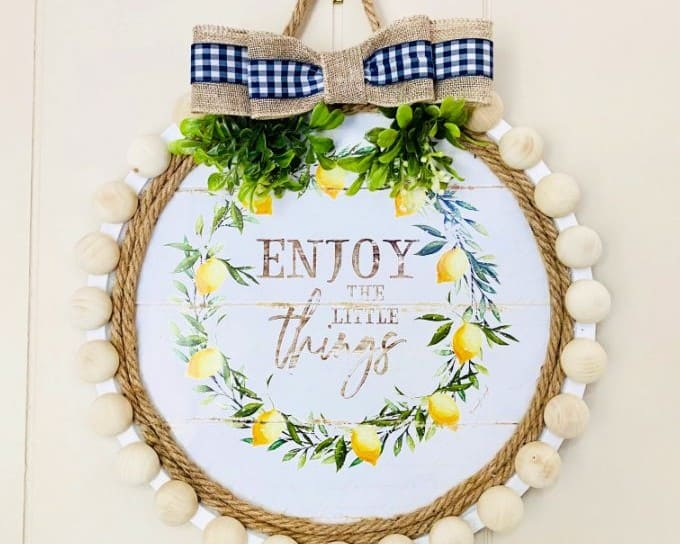
As an ardent pizza enthusiast, I confess that my affection for this beloved dish goes far beyond just a casual appreciation. The mere thought of transforming a humble pizza pan into a decorative wreath sends me into a whirlwind of excitement! Even if the pan serves merely as a shape-former, its creative repurposing is enough to thrill me. This charming beach-inspired wreath may not be an exact replica of a pizza, but the vibrant lemons and their zesty charm have won my heart.
To amplify the coastal vibe, why not add some decorative beads, a statement checkered bow, or a touch of rustic jute twine?
IPAD Case
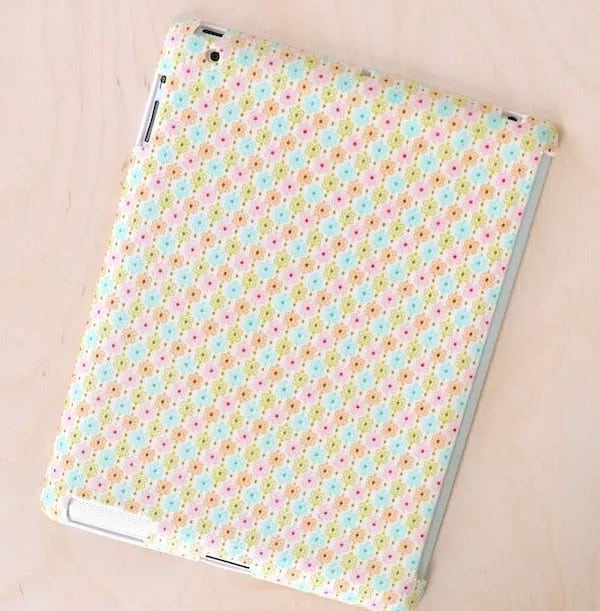
Creating a one-of-a-kind iPad case is not only budget-friendly but also allows for endless customization options. While purchasing cases from the Apple store may come with a hefty price tag, making your own can be a fun and creative solution. To start, you’ll need to acquire a plain iPad case at a local retailer – these often retail for just a dollar or so.
From there, you can use a decoupage medium like Mod Podge to apply any fabric of your choice to the back of your iPad, giving it a unique and personalized touch.
Conclusion
While exploring the world of DIY and crafting, I came across a treasure trove of creative projects that can be executed at an affordable price point – literally. Dollar stores have become a go-to destination for craft enthusiasts on a budget, offering an array of materials to unleash one’s creativity. So, which dollar store crafts caught my attention? Let me share some of the most intriguing ones with you and encourage you to share them with your friends.