Think outside the box (literally!) with some creative cardboard crafting! If you’ve got cardboard lying around, now’s the perfect opportunity to get crafty without breaking the bank. Cardboard is an incredibly versatile material, rivaling mason jars and hot glue guns in its potential for DIY projects, home decor, and storage solutions. Not only will you be reducing your environmental impact by upcycling, but you’ll also be tackling that pesky pile of cardboard boxes.
Let’s dive into 41 innovative and amazing cardboard craft projects to get you started!
DIY Drawer Dividers
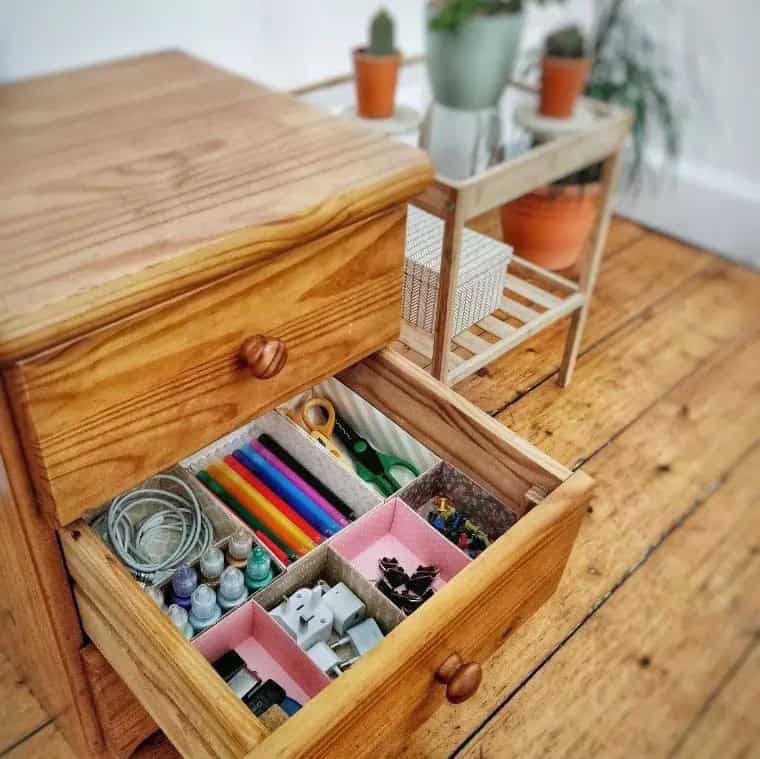
The universal struggle of cluttered drawers unites us all. We’ve all experienced the frustration of rummaging through disorganized spaces in search of a specific item. However, this problem doesn’t have to be an ongoing issue. The solution lies in implementing simple yet effective drawer dividers. By designating separate areas for various categories of items, you can maintain a sense of control and ease when accessing your belongings.
With just a few sheets of cardboard as the starting point, you can create a customized organizational system that meets your unique needs. To add an extra touch of personality to your drawers, consider lining the cardboard with colorful cardstock from [insert source], resulting in a tidy and visually appealing space.
Giant Gingerbread Man Christmas Craft
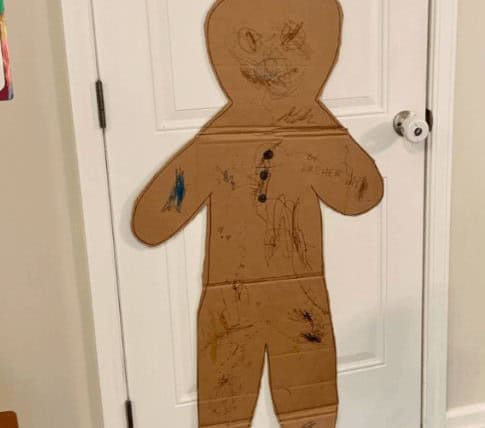
Forget the usual edible gingerbread men – we’re creating a gigantic cardboard giant that’s sure to spark excitement in your little ones. Yes, you read that right – our project isn’t edible, but it’s just as fun (and slightly eerie) as its edible counterpart. Despite initial reservations, put aside any concerns and join me in making this massive gingerbread man out of cardboard with your kids.
As you work on the details, the ‘terror factor’ will quickly dissipate, replaced by the thrill of bringing this giant to life. And let’s be honest – there’s nothing quite like using your kids as human tracings for a project that’s sure to become a family favorite!
Postman Pat Van
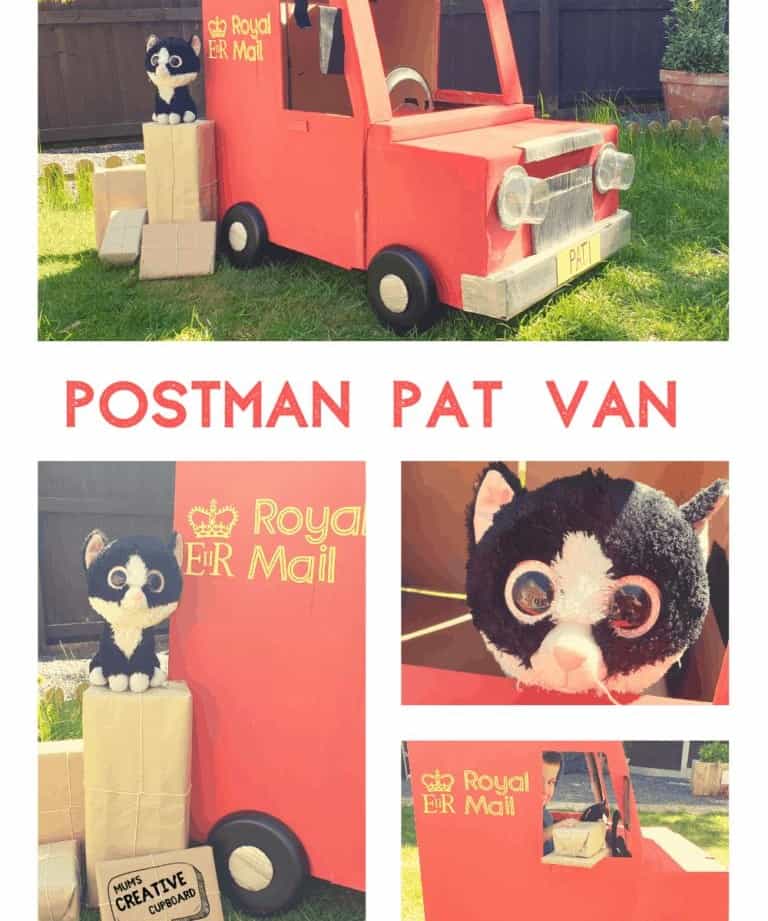
Do you recall the catchy jingle from that beloved cartoon? ‘Postman Pat, Postman Pat, Postman Pat, and his black and white cat…’ For many of us, it’s an nostalgic earworm. But did you know that with a few simple materials like cardboard boxes, a hot glue gun, and some basic crafting supplies, you can bring this iconic red truck to life?
The possibilities don’t stop there – you can create an entire display featuring the famous number plate, the British Royal Mail logo on the side of the truck, and even add some parcels propped up against it. With a little creativity and some DIY know-how, you can transport yourself back to a simpler time and relive those childhood memories.
DIY Rope Basket
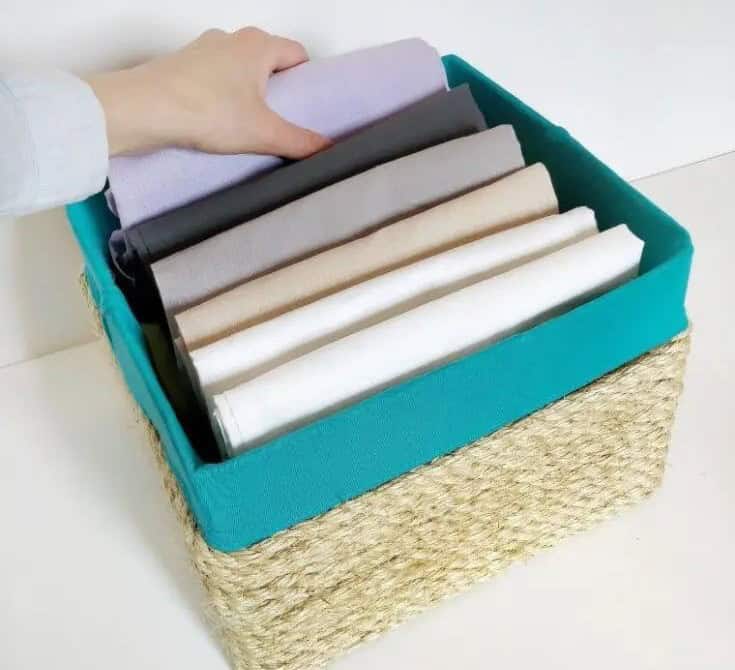
When it comes to storage containers, it’s easy to get caught up in the allure of stylish options only to be priced out. However, what if I told you that this rope basket, which looks like a store-bought find, is actually a plain old cardboard box with a creative makeover? The best part is that it’s incredibly easy to make and you’ll likely end up making more than one, as they’re just too cute.
To get started, gather some fabric you love, a length of hemp rope, your trusty hot glue gun, and a cardboard box in the size you prefer. This project is perfect for upcycling old boxes rather than recycling them, and it’s a great way to give new life to items that would otherwise end up in the trash.
Fish Tank
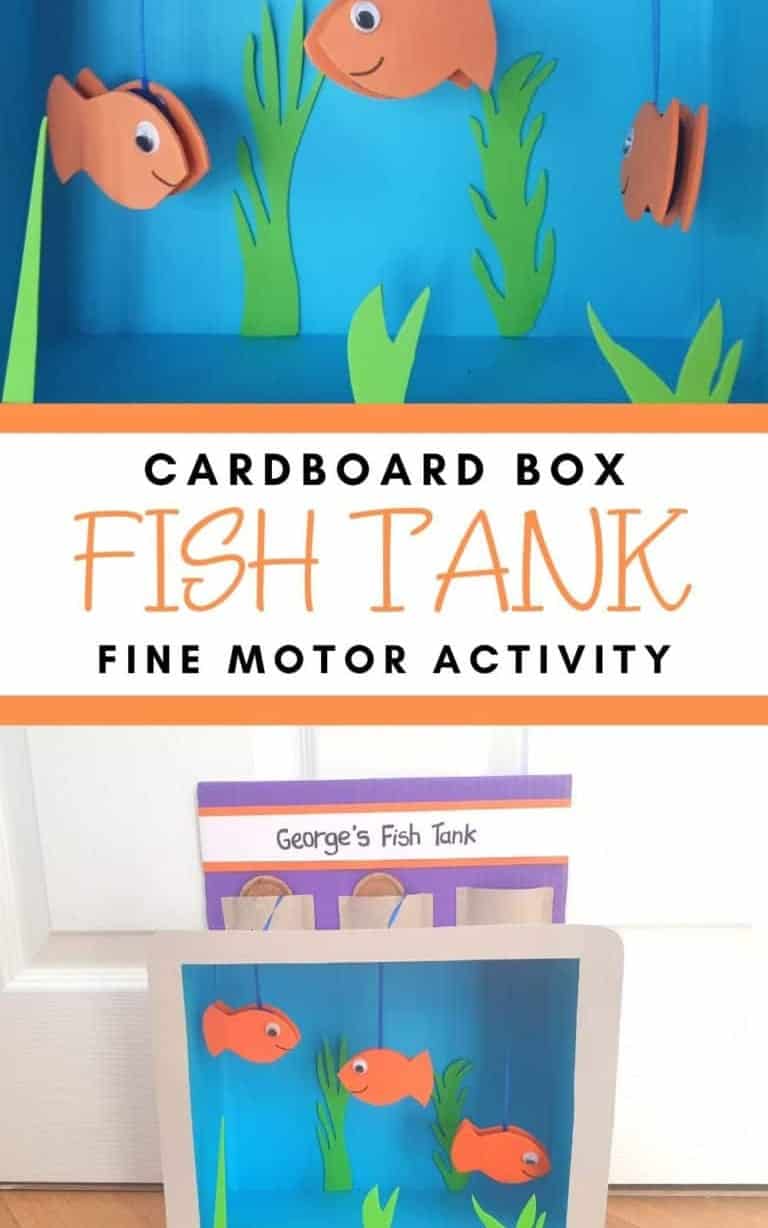
While setting up and maintaining a fish tank can be a significant undertaking, parents who want their kids to enjoy the experience may find common ground. One creative solution is to create a cardboard-based aquarium that’s low-cost, easy to set up, and forgiving if your little ones forget to feed their finned friends.
This DIY project transforms a cardboard box into a mini aquatic environment.
Simply line the box with blue paper or paint, then use craft foam to add fish, plants, and other underwater elements. For an extra touch of realism, you can attach googly eyes to your faux fish. If you’re looking for more fun crafts, consider making this fish-inspired project.
Dollhouse
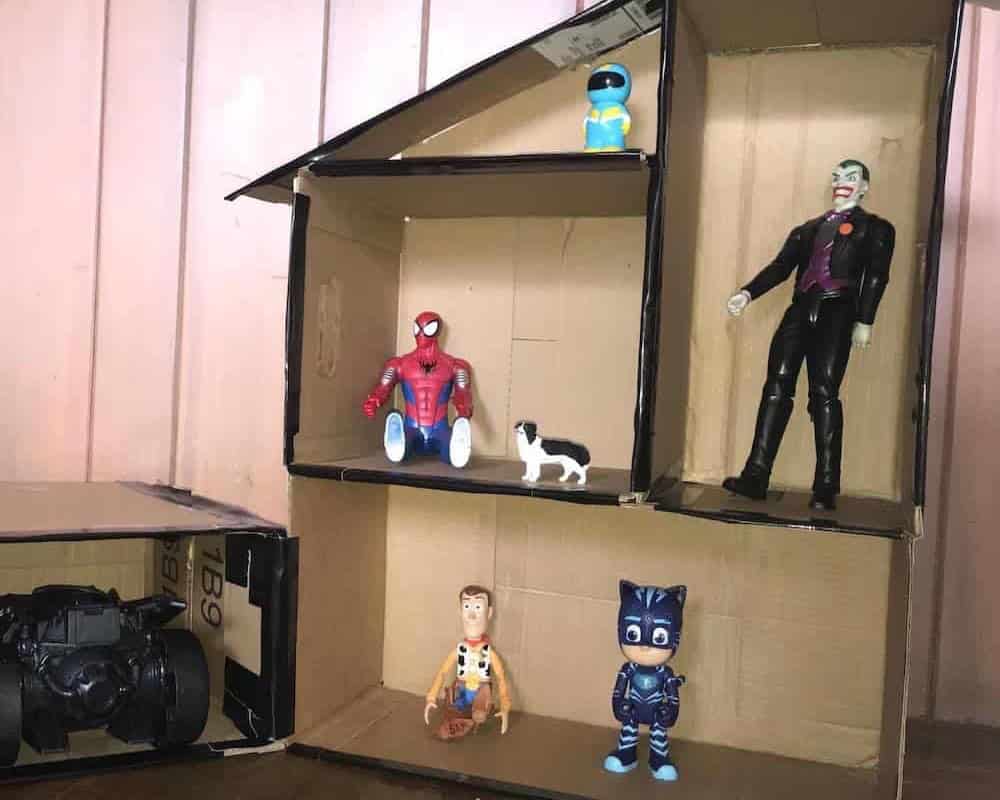
Imagine being able to design your very own dollhouse, tailored specifically to your unique tastes and preferences. The pre-made ones can be lovely, but they often lack the personal touch that makes a space truly special. With the ability to create your own, you could bring your most fantastical ideas to life – think sauna rooms or home cinemas! It’s entirely possible, I assure you.
To get started on this creative adventure, all you’ll need are some humble materials: cardboard boxes, some strong adhesive (such as gorilla tape or duct tape), a pair of scissors, and either a craft knife or a box cutter. With these simple tools at your disposal, the possibilities for customization become virtually endless.
DIY Table Centerpiece
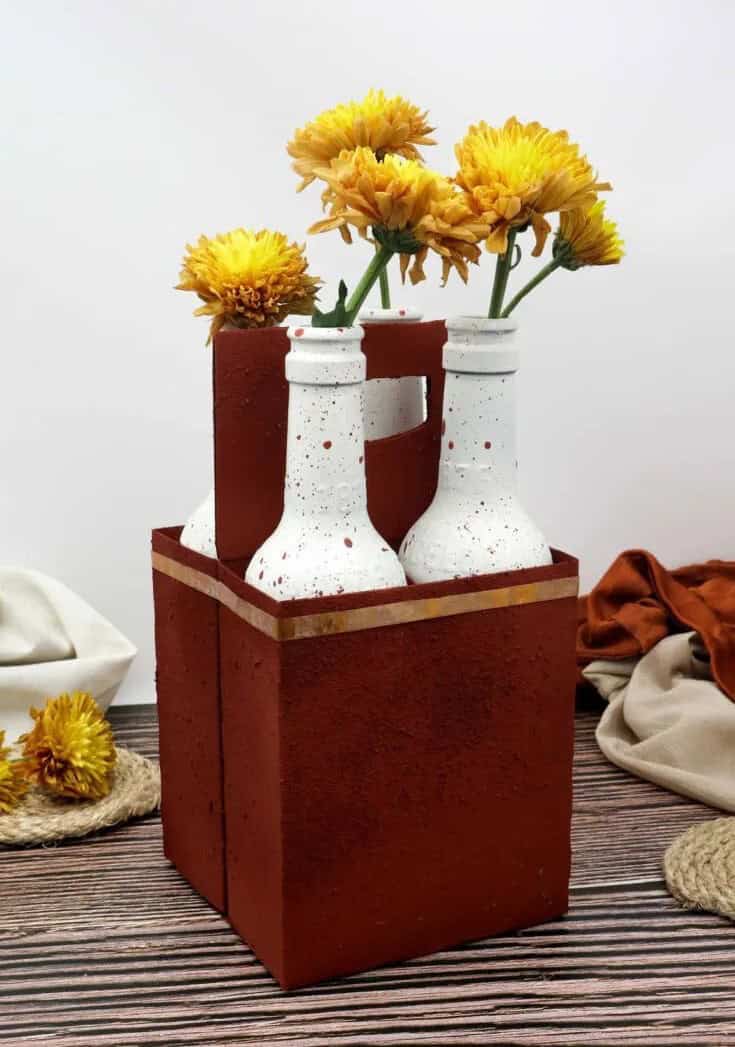
Transforming everyday objects into stunning centerpieces is an art form! Take the humble beer caddy, for instance. By upcycling a four-pack of beer bottles, you can create a rustic yet elegant piece that doubles as a vase or simply serves as a decorative accent. Imagine it on your dining table at home or even at a wedding – it’s sure to impress. Simply cut and shape the cardboard to form the desired design, then secure it with some decorative tape (available here).
The result is a unique and eye-catching centerpiece that’s perfect for any occasion. And if you’re looking for more inspiration, check out our collection of DIY table centerpiece ideas here.
Valentine’s Day Hang Tag
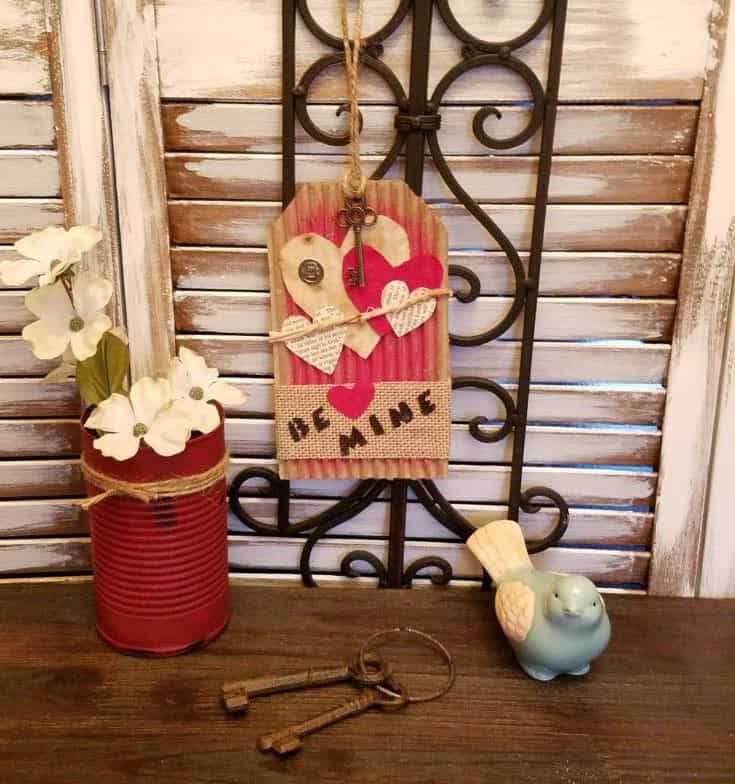
Before you know it, Valentine’s Day will be upon us. Have you given any thought to gift-giving? As you ponder and plan, consider adding a personal touch to your present. One way to do this is by creating a customized hang tag, which can replace a traditional greeting card. To make one, start with a piece of cardboard and cut it into the desired shape and size. Then, get creative by adding charms, embellishments, ribbons, or other decorations.
Once you’re done, finish the look with some twine to hang your masterpiece up.
Gift Box
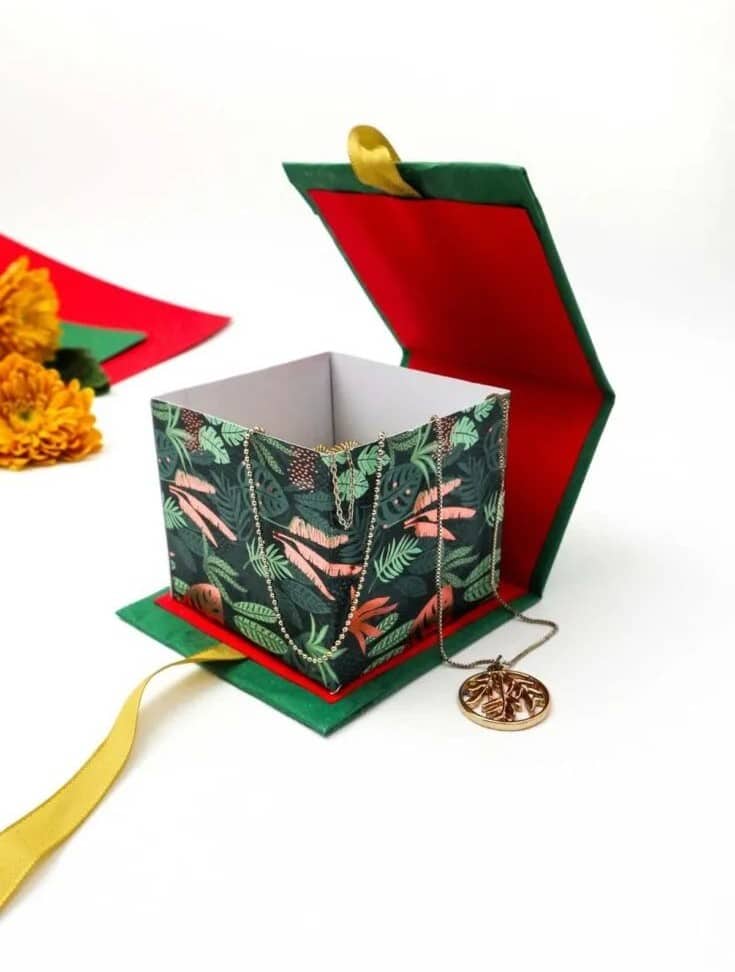
While store-bought gift boxes can be quite pricey, there’s a clever way to create your own without breaking the bank. By using cardboard as the base, you can craft mini gift boxes that are not only budget-friendly but also customizable to fit your personal style. To take it to the next level, consider adding a pull-over lid for an extra touch of sophistication. This is where engineering comes in handy – with a few simple folds and cuts, you can create a sturdy yet elegant closure.
For the outer wrapping, select a patterned cardstock that’s thick and durable, preferably featuring vibrant colors or prints. This will not only add visual appeal but also provide a sturdy surface for crafting your gift box. To complete the look, gather some ribbon, a hot glue gun, and a pair of scissors. With these basic supplies, you can tie everything together (literally!) and create a unique, handmade gift box that’s sure to impress.
Cardboard Treehouse
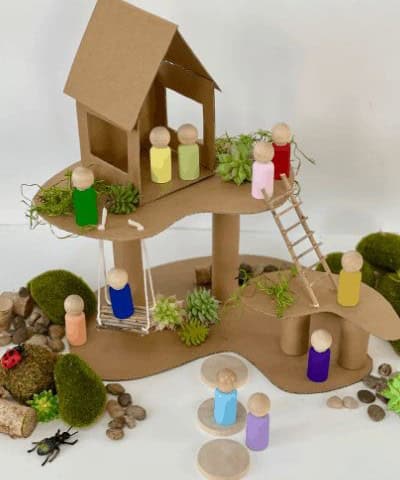
As a child, I often dreamed of having a cozy hideout, like a treehouse. However, when you live in an apartment, it’s difficult to replicate this experience. But, with a little creativity and some cardboard, you can create a miniature treehouse at home that your kids will love. The best part? It’s not only more accessible than building an actual treehouse but also budget-friendly. So, take out your pencil and start sketching your design.
You’ll need a few skewer sticks to prop up the cardboard ‘walls’ of your mini-treehouse.
DIY Copper Snowflakes Ornament
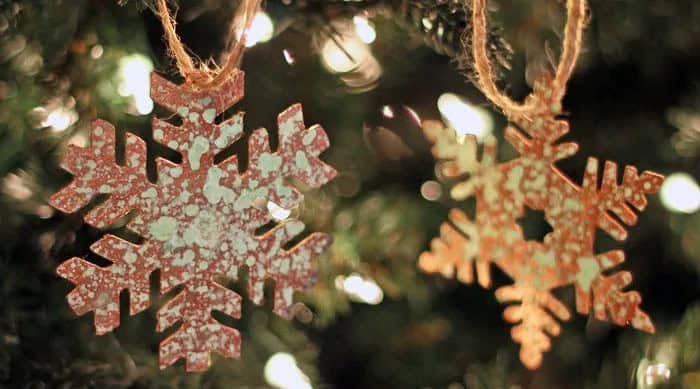
Cereal boxes are a staple in many craft projects, particularly when it comes to creating cardboard cutouts. One creative way to repurpose these cardboard containers is by transforming them into stunning snowflake ornaments. The aged-copper finish gives the final product a sophisticated look that belies its humble beginnings as a cereal box. With a Silhouette cameo, cutting mat, and some painter’s tape, you can recreate this project at home.
Don’t forget to add a touch of metallic copper paint from [insert source] for an extra layer of realism. If you’re looking for more winter-inspired crafts to pair with your cardboard ornaments, be sure to check out our collection of DIY projects here.
Portrait
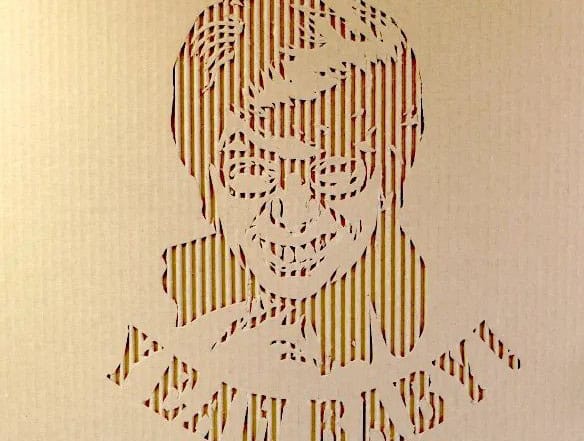
Transforming a headshot into a portrait is easier than you think, thanks to the power of cardboard art. Take a look at this stunning example and I challenge you not to see it as anything less than a masterpiece. The simplicity of the design belies its potential as a statement piece in your home decor. With this technique, you can recreate a portrait that reflects your personal style or opt for a striking two-tone effect once you’ve mastered the basics.
Ladybug Toilet Roll Craft
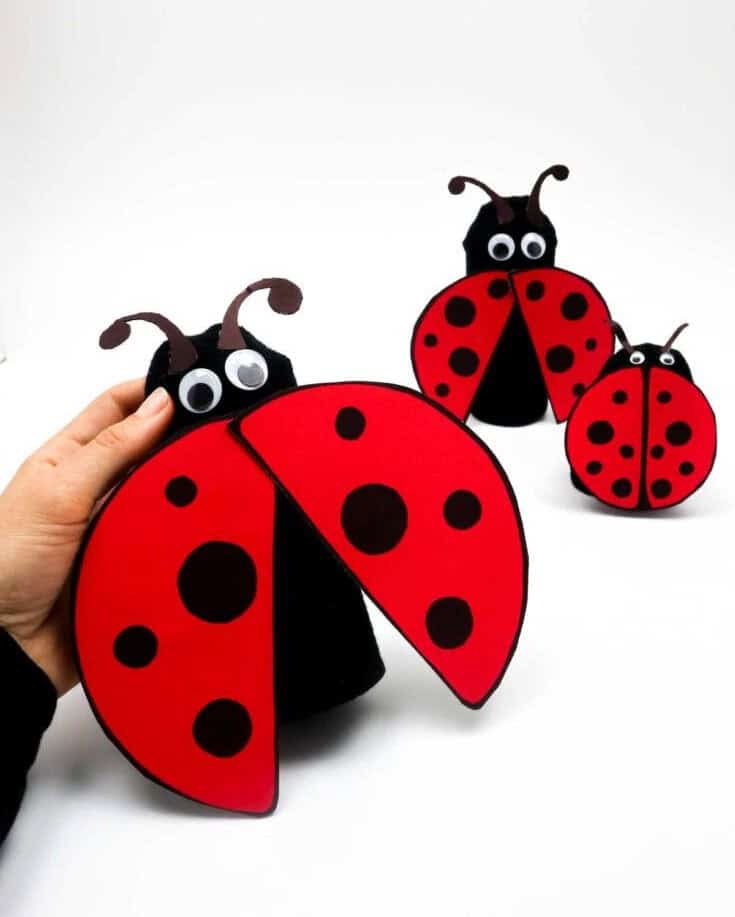
Toilet roll crafts have a special place in my heart – they’re effortless, budget-friendly, and often require minimal materials. This is especially true for the charming ladybug design we’re about to create. With just a few simple supplies, you’ll be on your way to crafting a stunning ladybug toilet roll that’s sure to impress. And the best part? You likely already have most of what you need, making it an accessible and enjoyable DIY project.
Dragon Shield Craft
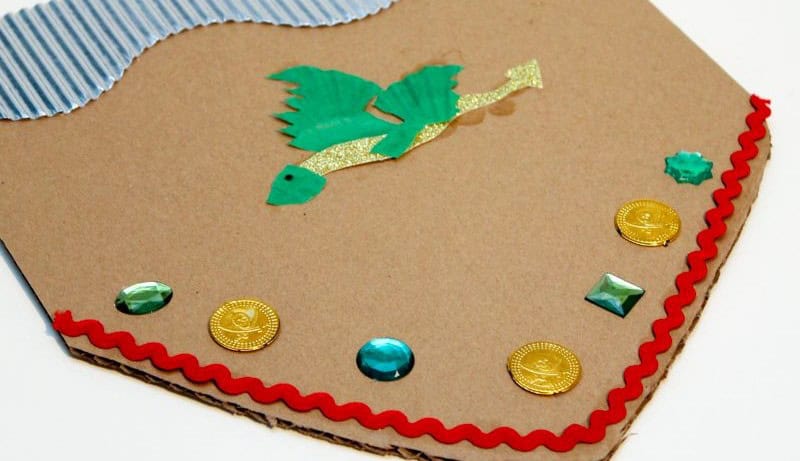
Protect your little hero’s hide with a DIY dragon shield! This creative project requires just a few recycled materials and cardboard. Let your imagination run wild as you decorate the shield with ribbon, glittery card paper for the dragon’s body, craft gems, and colorful stones. Double-sided tape or hot glue will help keep everything in place.
Bumble Bee Tube

This charming cardboard bumblebee is crafted from empty toilet rolls, a testament to their versatility in creative pursuits. For this project, you’ll need a few simple materials: black paint, yellow paper, tracing paper, red and black pens, two black pipe cleaners, and an adhesive of your choice (tape or glue).
If you’re looking for more inspiration, consider exploring 20 toilet paper roll crafts or 27 pipe cleaner crafts, both great resources to have on hand if you happen to have extra supplies lying around.
Toy Car Wash
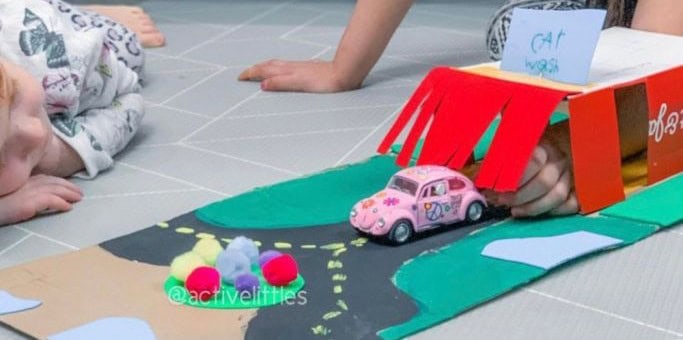
As a child, I fondly recall the excitement of visiting the car wash with my parents. The experience was like stepping into a mini-world, filled with sounds and sensations that captivated me. If your little ones share this enthusiasm, you’re in luck! This DIY car wash craft project is designed to transport them to their own miniature car wash adventure.
To get started, gather construction paper and foam sheets.
As an added bonus, if you still have some paper left over, be sure to explore the world of 36 construction paper crafts for even more creative inspiration! The driveway, entryway fringes, and other details are all accounted for in this engaging project.
Valentine Box Love Train
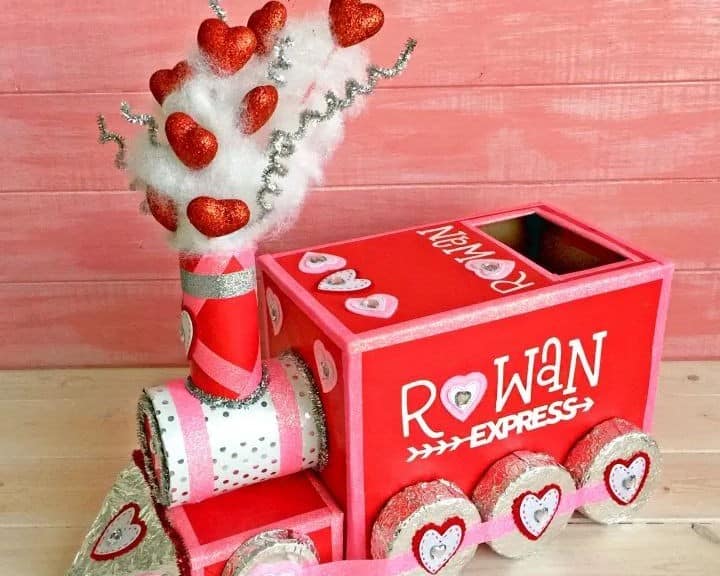
Imagine a train that embodies the essence of Valentine’s Day. As it chugs along, its vibrant reds, pinks, silvers, and whites catch the eye. With so many delightful details to take in, take your time to envision how you can make this romantic train uniquely yours.
The pièce de résistance is a fluffy tuft of cotton smoke infused with silvery pipe cleaners and hearts, adding a touch of whimsy. The silvery wheels adorned with hearts are another charming feature.
And let’s not forget the side where you can print your name using a Silhouette cameo, making this train an even more personalized expression of love.
Minion

What I love about this cardboard box Minion is its uncanny resemblance to the real thing. Depending on the size of the box, you might even be able to create a life-size Minion. These DIY decorations would make fantastic props for themed parties at home, adding an extra layer of fun and creativity. To take it to the next level, simply place the box in an old pair of scrunching up jeans or shorts, just as depicted here!
Once you have your base design, grab some paints and brushes and let your artistic side shine by bringing these Minions to life.
Bigfoot Cardboard Feet
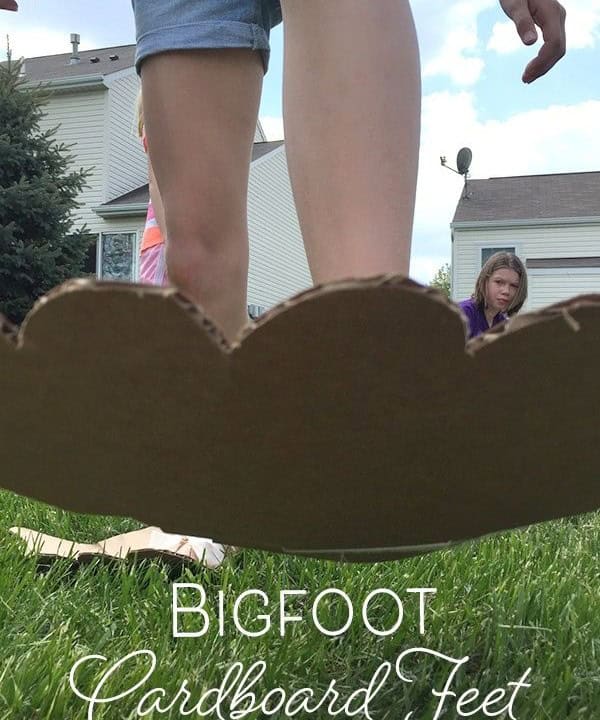
The fascination with Bigfoot and Yeti has only intensified since the release of ‘Abominable’ a few years ago. It’s easy to see why – these enigmatic creatures are shrouded in mystery, magic, and allure. In fact, they’ve captured our imagination so thoroughly that it’s not uncommon for people to want to get creative and bring them to life. For kids, what better way to do that than with a fun craft project? Let’s start by crafting some Bigfoot cardboard feet!
To begin, take out your pencil and sketch the rough shape of the foot onto a poster board. Once you have your template, use it to cut out your actual Bigfoot feet from some sturdy cardboard. And if you’re looking for more creative projects for kids, we’ve got plenty more where that came from!
Giant Christmas Tree Ornaments
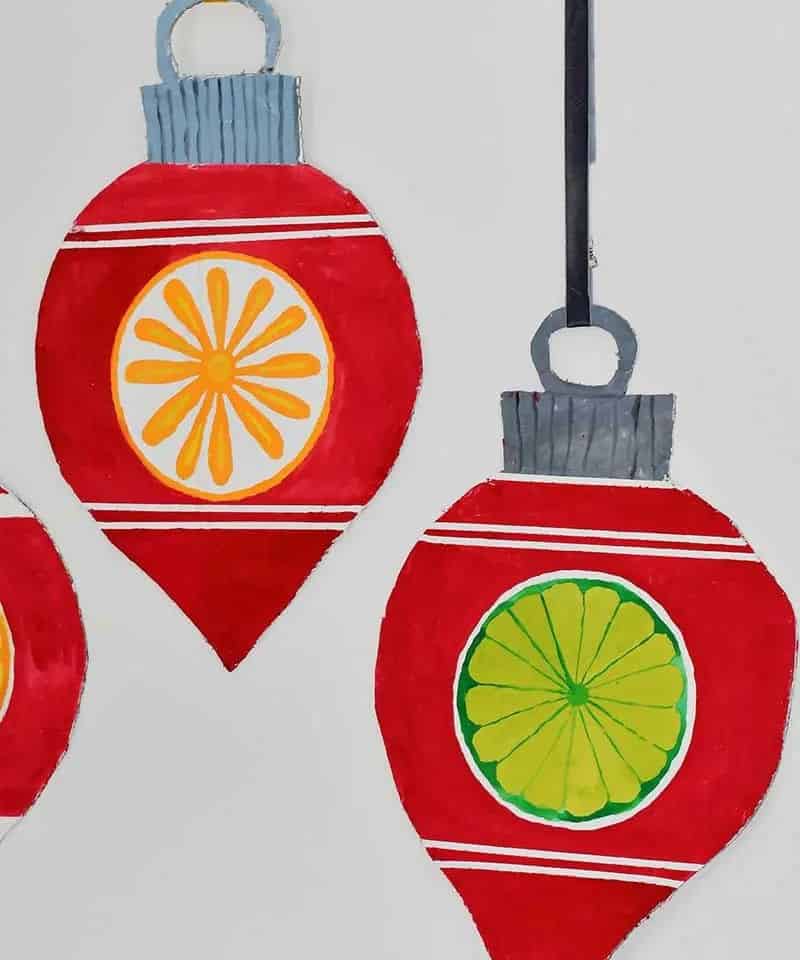
Get creative with this unique cardboard ornament project! Assuming you have all the necessary craft supplies at hand, start by flattening out a piece of cardboard. Next, use a large plate as a guide and draw around it on the cardboard using a marker. To add some personality to your design, extend one edge of the circle into a tear-drop shape. At the top of the circle, opposite the tear-drop side, draw a bauble cap.
With these basic shapes in place, you can now cut out your ornament, get creative with paint and decorations, and voilà! Your very own handmade Christmas tree decoration is ready to shine.
Pink Flamingo Feet Craft
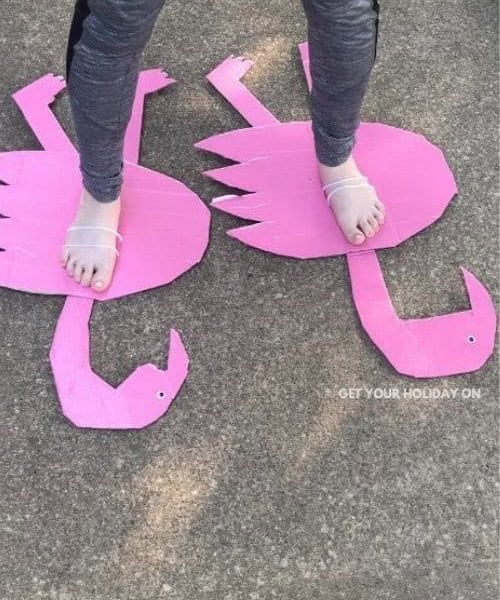
Given the apparent popularity of the Bigfoot craft project, it’s likely that a similar endeavour would also be well-received. A potential alternative is the pink flamingo feet craft, which involves acquiring various materials such as pink duct tape, googly eyes, scissors, yarn, and cardboard sheets. To ensure precise cutting, you can create a stencil on paper first and use it as a template to cut your cardboard. Who knows?
This might just inspire a collection of big-footed animal crafts – an intriguing possibility.
Kids Fort
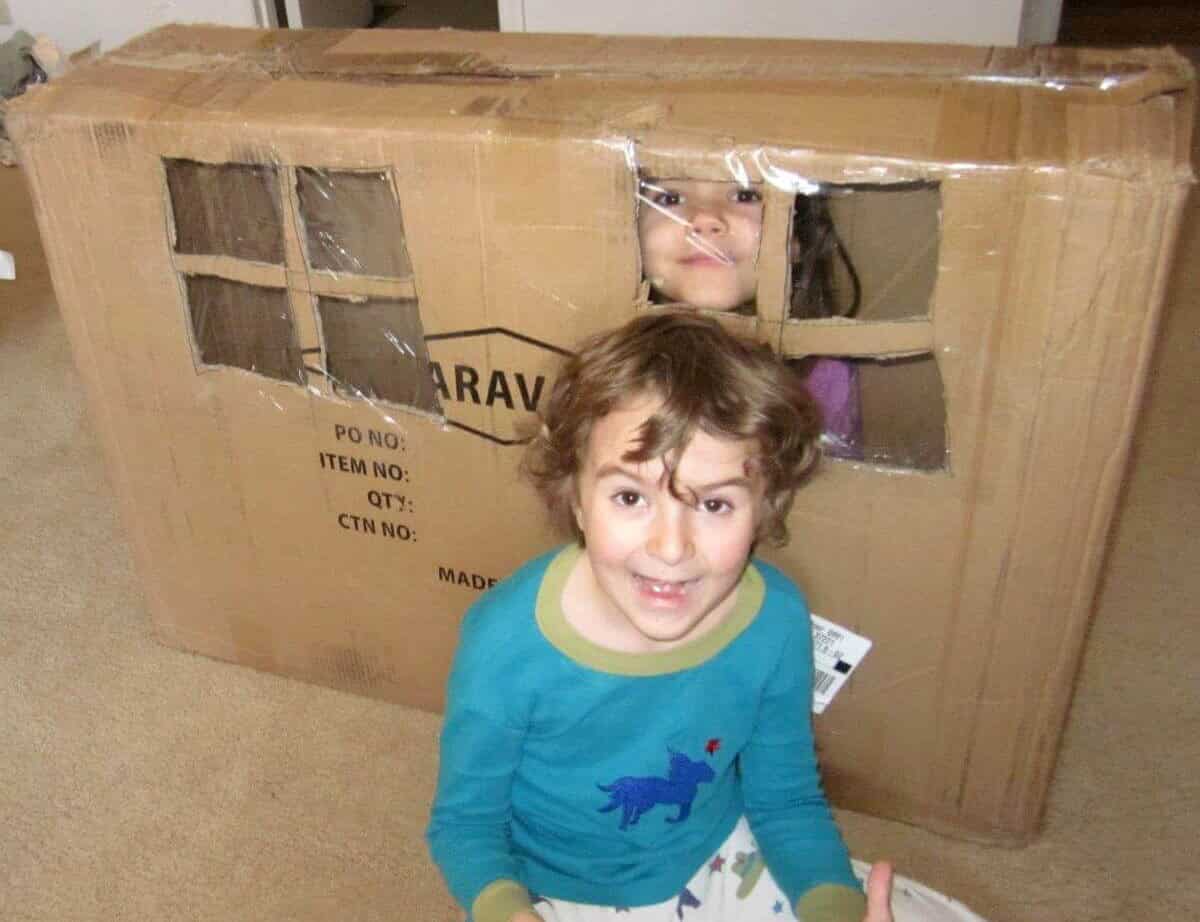
Who hasn’t wished for a chance to turn back the clock and relive carefree childhood days? For me, those were times spent building sprawling forts in our living room, carefully stacking cardboard boxes into structures that seemed impenetrable. Fast forward to today, and you can recreate this magic with your own kids. On a rainy or chilly day when outdoor play isn’t an option, why not spend the afternoon constructing your very own fort?
The journey begins with design – decide what you want your fortress to look like and sort those cardboard boxes accordingly. Once you have a clear vision, the fun can begin! And let’s be real, a plate of warm cookies and steaming cocoa would only add to the experience.
Fabric Birdhouses
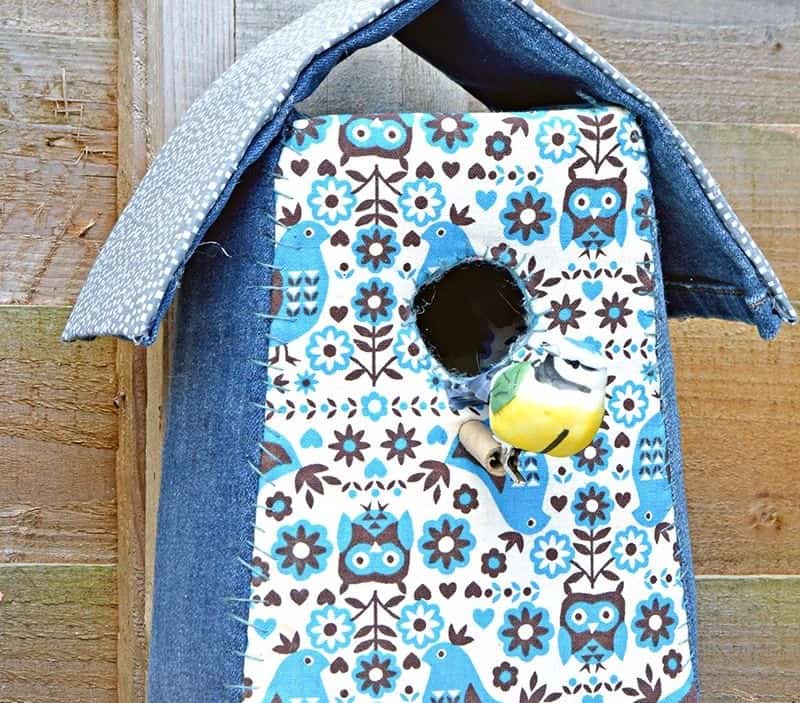
Add a touch of nature’s charm to your home without the hassle of cleaning bird droppings by using these fabric birdhouses as unique decor pieces. Moreover, this creative upcycling project allows you to breathe new life into old clothes or scraps of cloth, reducing waste and promoting sustainability. If you’re already skilled at repurposing cardboard, you can incorporate that too!
To get started, simply cut out your chosen cardboard base, line it with a piece of fabric, and secure the two together. For added comfort and dimension, consider adding some batting to cushion the fabric.
Alphabet Board
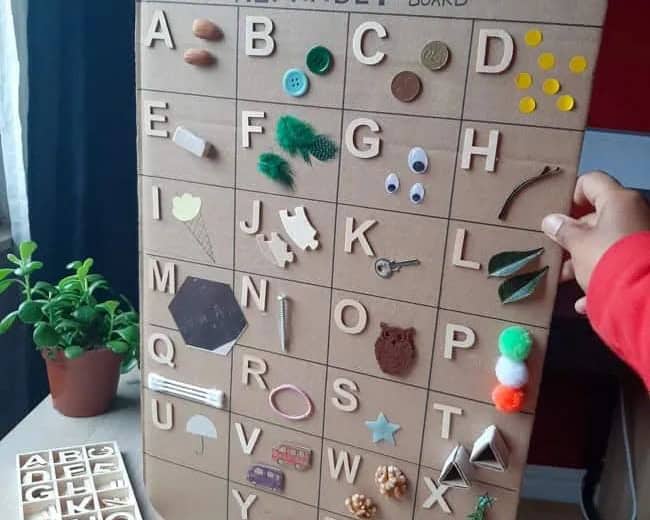
The journey of teaching children the alphabet is a significant milestone in their educational and personal development. It’s an experience that rivals taking first steps or uttering their first words in terms of significance. To make this learning process engaging and memorable for both you and your child, consider creating an A to Z alphabet board that sparks imagination and creativity.
Unlike traditional boards that focus on mundane associations like ‘A is for apple’ or ‘B is for ball’, this customizable option allows you to infuse your child’s personality and interests into the learning experience. With its vibrant colors and playful design, this interactive board can become a cherished keepsake of their educational journey.
Pressed Flower Bookmarks
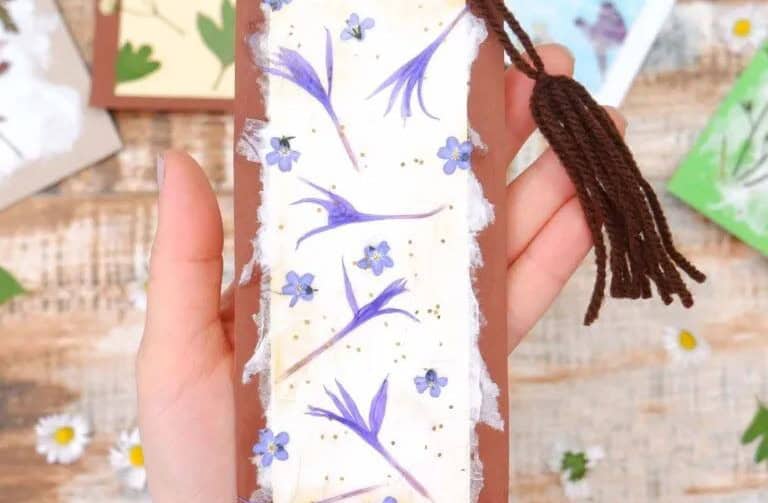
I’ll never tire of pressing flowers – a hobby that requires patience and practice, but yields a treasure trove of preserved blooms. Once you’ve mastered the technique, the possibilities are endless. One of my favorite ways to showcase these delicate creations is by crafting a beautiful bookmark. Start by preparing your base: cut or tear cardboard into desired shape, then cover it with colored paper for added flair.
From here, simply arrange and adhere the pressed flowers and leaves to create a one-of-a-kind keepsake that’s sure to delight.
Pool Noodle Flower Wreath
At first glance, the phrase ‘pool noodle flower wreaths’ may seem like an oxymoron, but trust us when we say that this project is a game-changer. To create this unique wreath, you’ll need one key component: a foam pool noodle. You can find these at most sporting goods stores or online. Once you have your pool noodle, simply bend it into a circular shape and secure the ends with duct tape.
The real magic happens when you add some colorful felt sheets, toothpicks, and a hot glue gun to create the flower arrangement. To finish off the look, add a ribbon for hanging purposes.
Pirate Boat
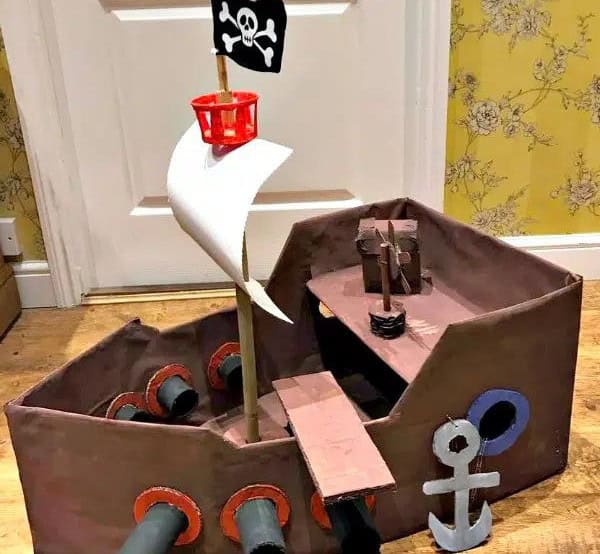
The allure of pirates is undeniable, and I’m willing to bet that even the most land-locked youngsters can’t resist the charm of swashbuckling adventures. If you’re a parent or caregiver looking to craft an unforgettable experience for your little buccaneer, look no further than this DIY pirate ship project.
With just a few basic materials – think cardboard, masking tape, newspapers, scissors, paint, a hot glue gun, two sticks for the masts, and some scrap fabric – you’ll be well on your way to creating a treasure-filled vessel that’s sure to captivate even the most skeptical of young buccaneers. And as an added bonus, using layers of newspaper in your paper mache design will not only add a pop of color but also provide extra stability for those inevitable (and enthusiastic) play sessions.
Chick Craft
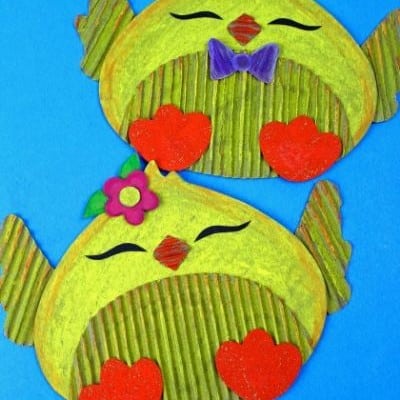
Get ready for an egg-stra special craft session with your little one! This adorable chick craft is perfect for Easter or any time of year. You’ll need some basic supplies: cardboard, yellow paint, sandpaper, safety scissors, and a chick template. Don’t worry about the corrugated texture of the cardboard – it adds character to your little chicks! Simply trace the design from the template onto the cardboard, then cut out the shape.
With these simple steps, you’ll be on your way to creating a flock of adorable chicks in no time.
Owl Pinata
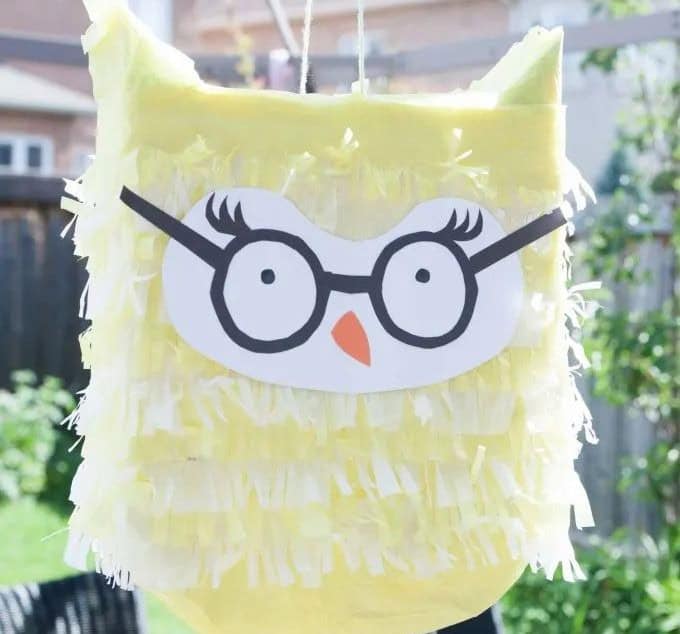
There’s something undeniably therapeutic about breaking open a piñata. It’s not just the rush of excitement when you finally get to the sweet treats inside, but the process itself can be meditative. I mean, what’s not to love about a fun-filled activity that combines creativity and candy?
But I digress. Let’s talk about this owl piñata. It’s so beautifully designed that it almost feels like a shame to break it open. Almost.
The best part is that making it is just as much fun as the thrill of smashing it apart. And if you’re wondering why an owl piñata, well, I say why not? It’s a unique and quirky twist on the classic party favor.
To make your own owl piñata, you’ll need:
A large cereal box
Sheets of colored paper, including one sheet of white paper
Colored tissue paper
Scissors and tape
Printable owl piñata template
Kids Pencil Case
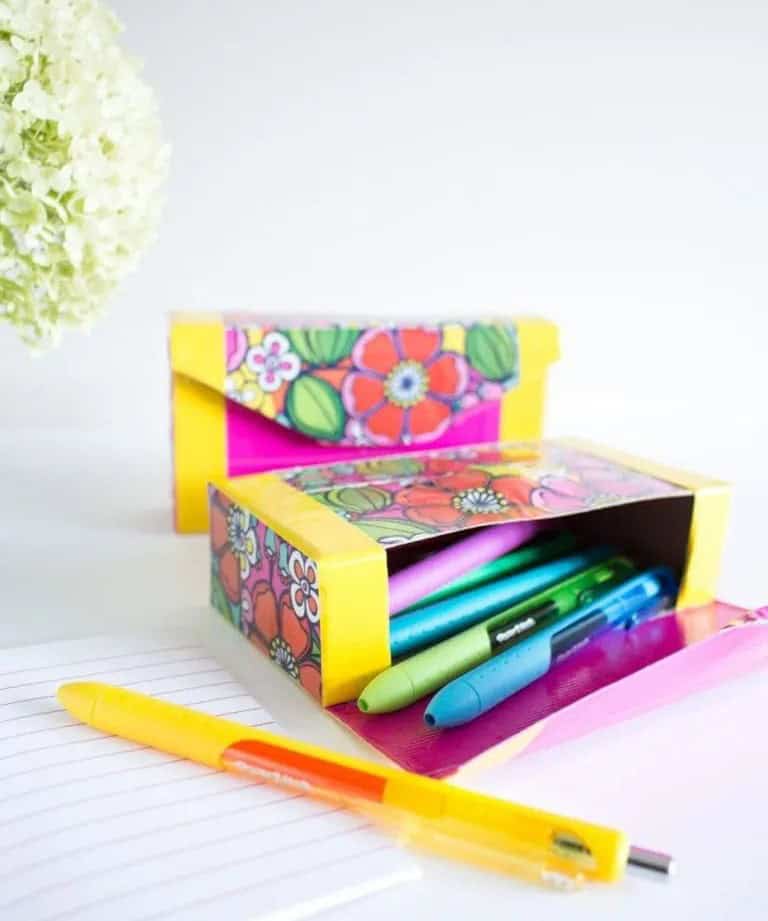
Transforming cardboard into a one-of-a-kind pencil case is a simple yet creative process that requires just a few basic materials – cardboard and duct tape. This project is perfect for those moments when inspiration strikes or you’re looking to create something special without breaking the bank. As an added bonus, it makes for an excellent back-to-school activity. Who wouldn’t love showing off a uniquely crafted pencil case to their classmates?
If you’re eager to explore more creative and quirky crafts, I invite you to browse through our collection of back-to-school projects. For another fun and imaginative take on the humble pencil case, be sure to check out our DIY pencil case tutorial made from toilet rolls.
Storage Organizer Cubes
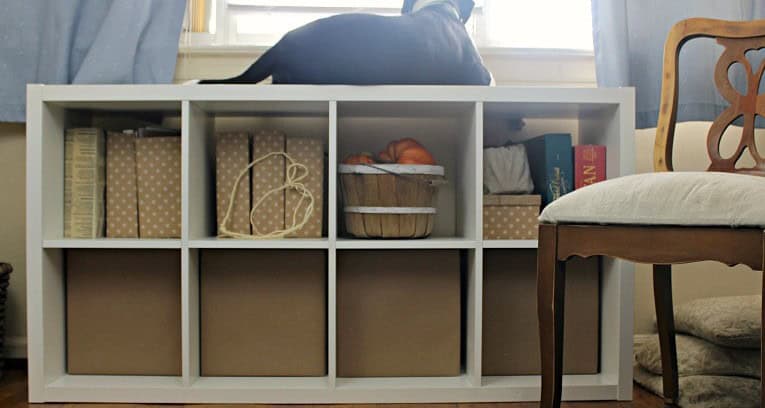
When it comes to organizing your belongings, having the right storage systems and devices can make all the difference. One cost-effective solution is to create a storage cupboard using cardboard, which not only serves as a practical tool but also offers an eco-friendly alternative to traditional materials. The cubed system’s modular design allows for easy division and segregation of your items, making it perfect for storing office supplies, craft materials, or even shoes.
By utilizing this versatile solution, you can create a customized storage space that meets your specific needs. To get started on your project, simply grab a roll of brown paper from [link] and follow the steps to set up your cardboard cupboard. With a little creativity and effort, you’ll have a functional and sustainable storage system in no time.
Kid’s Box Satchel
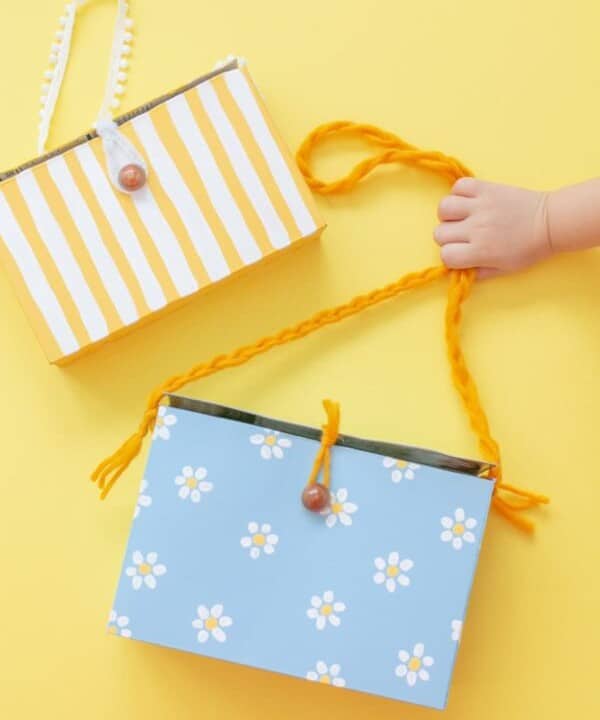
Transforming a simple cardboard box into a charming satchel is a project that sparks creativity and imagination in kids. To get started, gather empty cereal boxes or cardboard sheets, some yarn for the shoulder strap, and a big button to add a touch of personality. Once you have all your materials ready, let your child’s creativity shine by painting the box with vibrant, playful patterns. Next, apply glue to seal the ends, followed by a decorative flourish, and voilà!
Your kid’s very own box satchel is ready for adventure.
Trinket Box Craft

I have a special fondness for collecting small mementos during my travels. Whether it’s a humble seashell or a more elaborate piece of jewelry, I relish the process of gathering unique trinkets that evoke memories of my adventures. Not only do I enjoy accumulating these treasures, but I also appreciate having a beautiful container to store and showcase them.
This practice can be especially beneficial in shaping the collecting habits of children, as it teaches them the value of organization and appreciation for small, meaningful items.
To encourage this hobby in kids, start by transforming an ordinary shoebox into a work of art. Gather some paint, glue, embroidery thread from [source], and a bit of polymer clay from [source].
With these materials, you can turn the box into a stunning trinket keeper that will inspire your little ones to collect and display their own treasures.
Decorative Framed Mirror
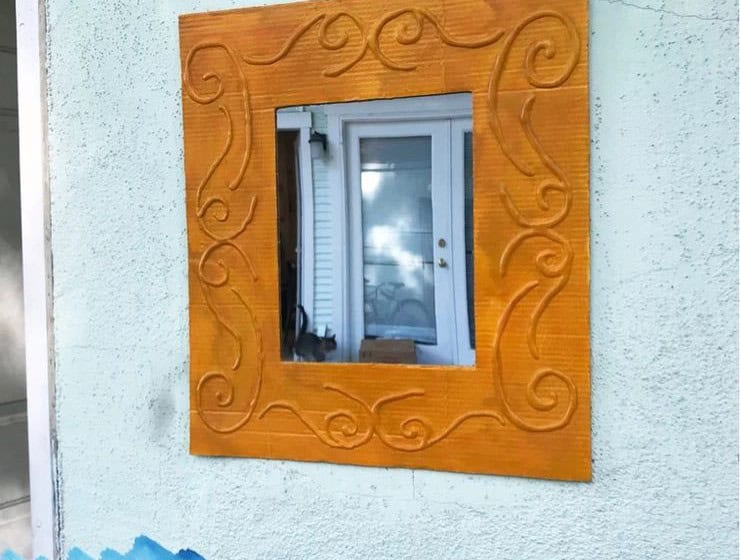
Having a foyer mirror is a game-changer for anyone who’s in a rush to leave the house. It’s a quick fix solution that can make all the difference in how you look and feel. So, why not create your own decorative framed mirror to hang in your foyer? With just an hour of crafting time, you can have a beautiful piece that adds a touch of elegance to your entryway. To get started, gather your supplies – a hot glue gun and some cardboard – and let the creative process begin!
Reindeer Lollipop
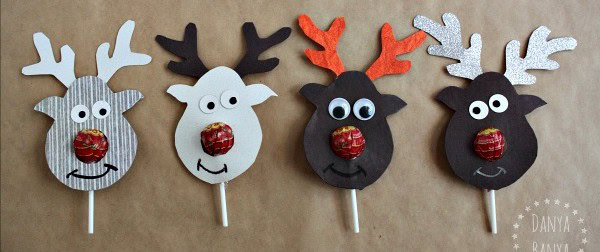
Imagine indulging in a sweet treat that’s been given a festive twist – meet the edible reindeer lollipop! This isn’t just any ordinary lollipop, but rather a cleverly crafted creation that combines a traditional candy with some fun and festive flair. The key to creating this delightful treat is to start with a plain old lollipop, then add some reindeer-themed cardboard cutouts to give it a holiday-inspired look.
To take it to the next level, you can use any type of candy lollipop and attach it to create the illusion of a reindeer’s nose. This requires a simple circle or hole punch tool, which allows you to securely fasten your candy into place. With this creative twist on a classic treat, you’ll be sure to spread some holiday cheer with every delicious bite.
Knights Shield
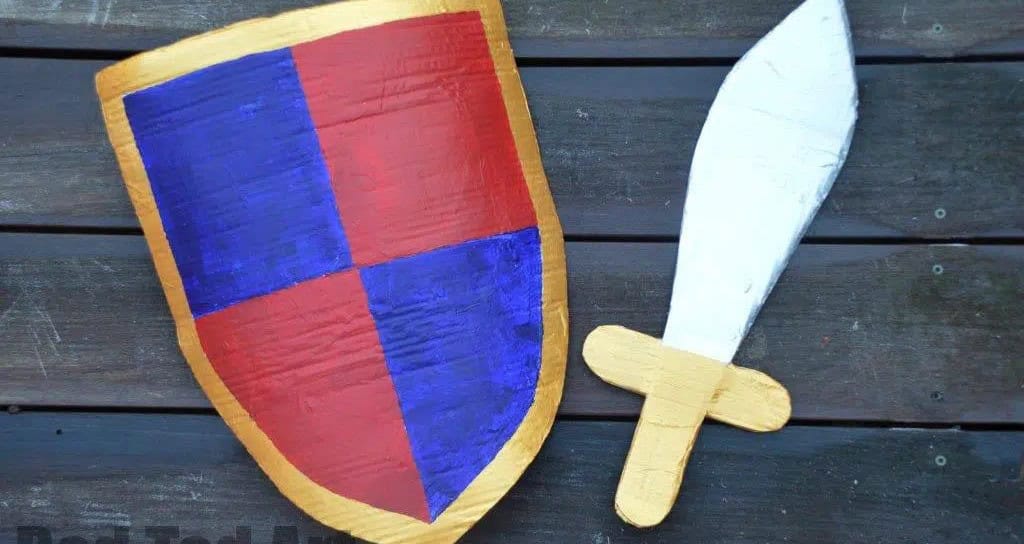
Remember those epic dragon shields you crafted with the kids? It’s time to expand the collection with a knight’s shield that matches their valor! You can also start planning a sword-making project for another fun-filled day. Gather your supplies and get the little ones excited about painting the shield, where they’ll unleash their creativity. To take it to the next level, conduct some research and decide on the colors and emblems that best represent your knightly persona.
For those who prefer a more structured approach, you can download and print custom templates or create your own designs before cutting them out and tracing them onto the cardboard shield. With a little imagination and elbow grease, you’ll be creating an armor-clad duo in no time! Check out our DIY project archives for more inspiration.
Yarn Wall Art
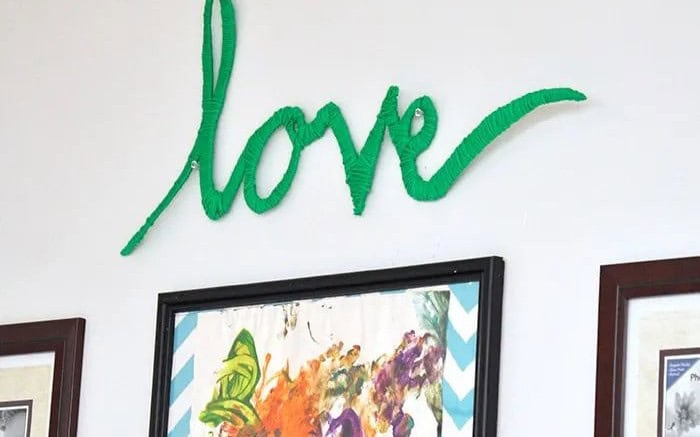
Working with yarn is a true delight! Whether I’m tackling crochet, knitting, or even creative wrapping projects, its versatility never ceases to amaze me. Among my favorite yarn-based endeavors, this lovely wall art holds a special place in my heart. Its charm is undeniable, don’t you agree? Moreover, the project’s affordability is a significant plus – medium-weight yarn or something lighter will suffice, just be sure to opt for a non-bulky variety that ensures seamless blending of the strands.
String Instrument
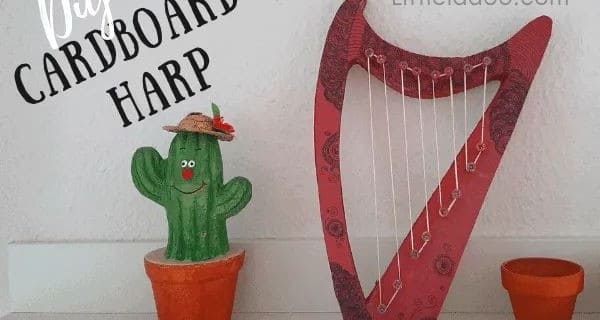
Imagine a cardboard instrument that produces music just as enchantingly as a toy store find would. This fun project not only showcases your creative skills but also invites playfulness and imagination. To get started, print out a template and carefully cut out a harp-shaped silhouette from cardboard. Feel free to unleash your artistic side by painting and decorating it however you like.
Once you’re satisfied with the design, you can begin transforming your masterpiece into a functional instrument. Simply string it up using actual strings or rubber bands – just ensure that they’re taut and ready for playtime! With this delightful project, you’ll be strumming along in no time.
Gingerbread Garland
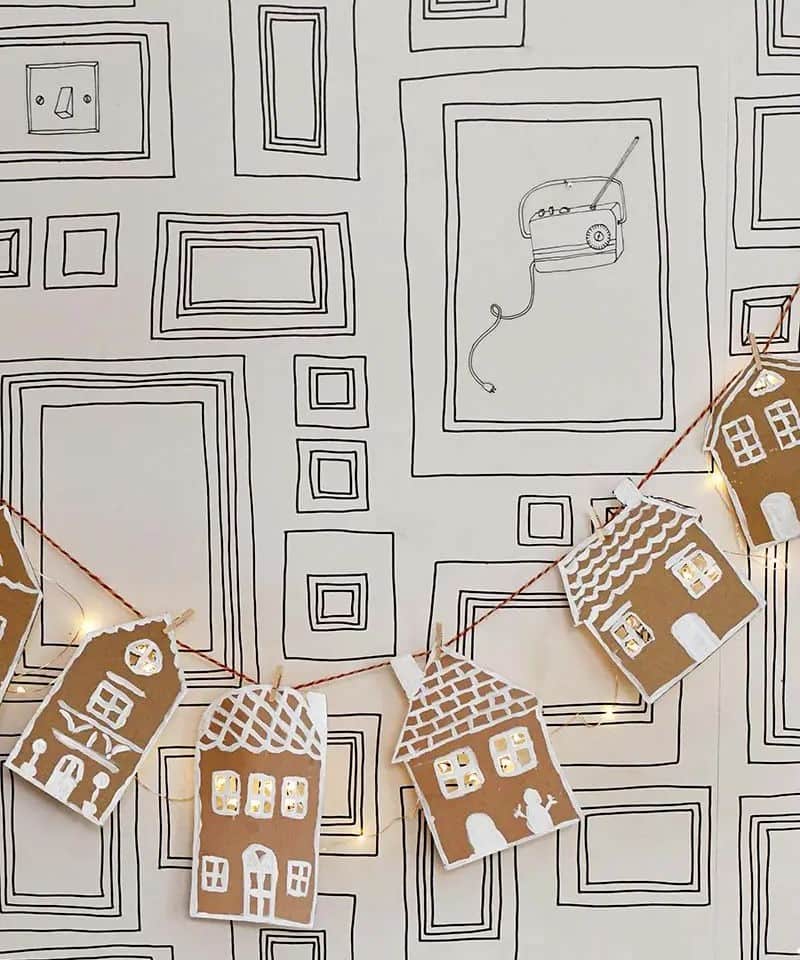
A gingerbread garland is a delightful creation that combines the warmth of gingerbread with the charm of a festive decoration. The one featured in this passage is particularly striking, with gingerbread houses strung together on a thread-like material, evoking a sense of cozy wonder. While it’s not meant to be devoured (unfortunately!
), the idea of hosting an afternoon craft session with kids, complete with gingerbread cookies and lemonade, sounds like a fantastic way to spend quality time together. To recreate this garland, gather twine, wooden pegs, copper string lights, and a marker. You can find these materials at [insert link]. If you enjoy this craft, you might also appreciate exploring other creative projects, such as those found on the Dollar Tree website.
Christmas Tree Craft
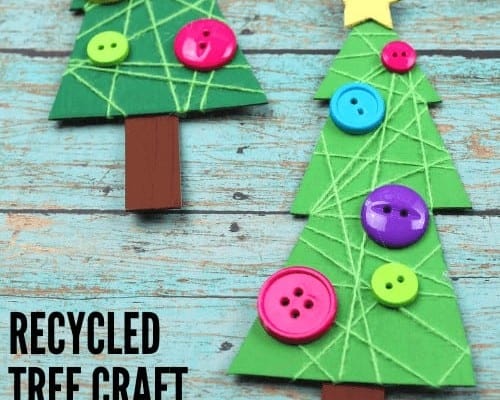
To add some extra magic to your holiday decor, try creating a cardboard Christmas tree ornament that doubles as an actual miniature tree. Start by tracing and cutting out the shape of a small tree using a template. Next, get creative with buttons and other embellishments to decorate your tiny tree once you’ve given it a coat of paint.
Parking Garage
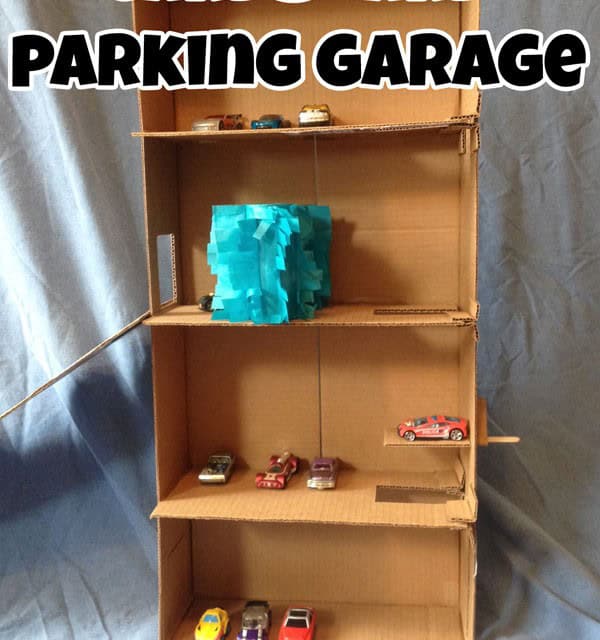
Why not build upon your earlier car wash structure by creating another engaging project – a multi-level car park! This one can double as a clever storage solution for those endless Hot Wheels cars that seem to have a life of their own. By incorporating this activity into playtime, you’ll be teaching kids the importance of tidying up while having fun at the same time. It’s a win-win, and we’re all for it!