Are you looking for a new DIY project to sink your teeth into? Look no further! These 47 quick and easy DIY projects are perfect for adults, teens, and kids alike. They’re the perfect way to get creative, have fun, and enjoy a sense of accomplishment in just a short amount of time. While I adore diving into a big project that keeps me busy for weeks on end, sometimes I just crave something simple and swift.
A small yet satisfying DIY project can bring instant joy and a sense of pride as you complete it. Plus, many of these projects are not only fun but also functional, adding to your home decor or serving as useful tools around the house. Take a look at this impressive list of 47 super easy DIY projects that can be completed in just one day! You never know what hidden talent or creativity might emerge when you give one of these a try.
Rock Photo Holders
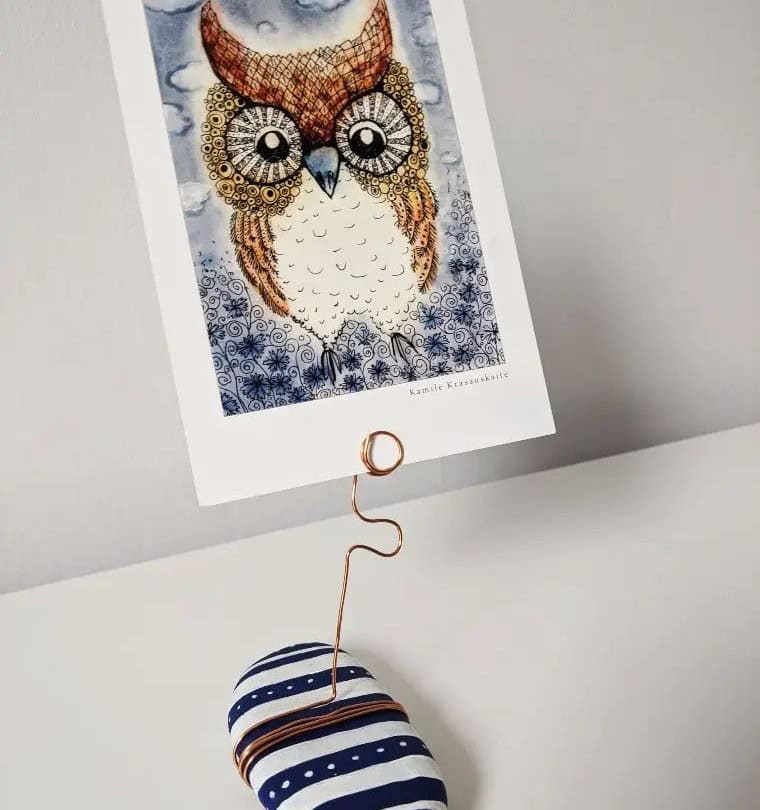
Rock painting is an effortless yet thrilling activity that brings people together. Whether it’s a fun-filled afternoon with kids or a stress-relieving moment for parents, this craft project has the power to bring smiles. By applying just a few strokes of paint, you can effortlessly transform ordinary rocks and pebbles into unique works of art that can be proudly displayed in your home. What’s more?
These masterpieces double as functional photo holders, making them an unbeatable combination of creativity and functionality. To get started on this exciting project, simply grab some copper wire and let the imagination run wild.
Leafy Felt Wreath
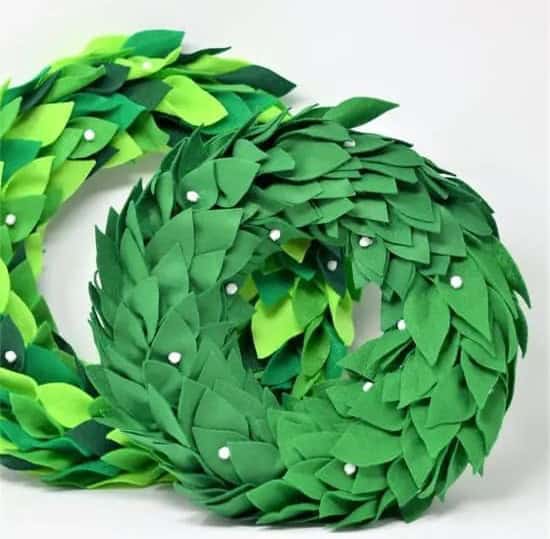
As spring awakens, the vibrant leaves burst forth with lush greenery and irresistible charm. Why not bring this natural beauty indoors by crafting your own DIY leafy wreath? To achieve a realistic texture, felt is an excellent choice – simply acquire some sheets from the online store mentioned earlier. For added visual interest, consider hot gluing a few mini pom-poms around the wreath to inject a splash of color.
DIY Yarn-Wrapped Planter
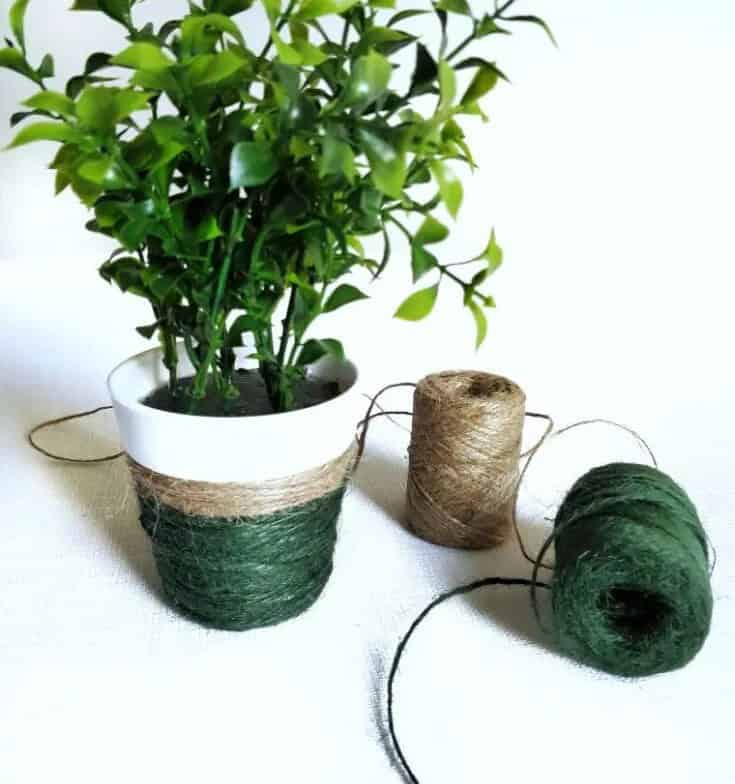
Elevate an old planter by transforming it into a unique piece of home decor with a DIY yarn-wrapped planter. If your pots are scratched or chipped, painting them might not be enough to cover up imperfections. Instead, combine the rustic charm of natural fibers with a splash of color. Gather colored yarn, your favorite planters, and a hot glue gun. For an added touch, apply a couple of coats of paint as a base for your yarn design.
Next, simply wrap the yarn around the pot, allowing it to become a one-of-a-kind statement piece in your home. Explore another creative yarn-wrapped DIY project for a glass vase that’s sure to inspire.
Hanging Succulent Planter
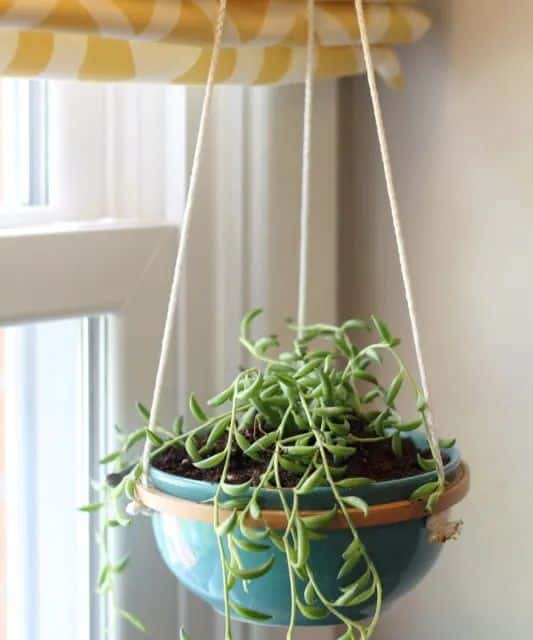
Got a stash of embroidery loops collecting dust? Put them to good use by creating another planter – this time, a charming hanging one. Start from scratch and give new life to those old hoops! Plant succulents or tiny cacti in the pots and let them cascade down your porch. To keep everything secure, you’ll also need some reliable synthetic cord.
Yarn Wrapped DIY Glass Vase
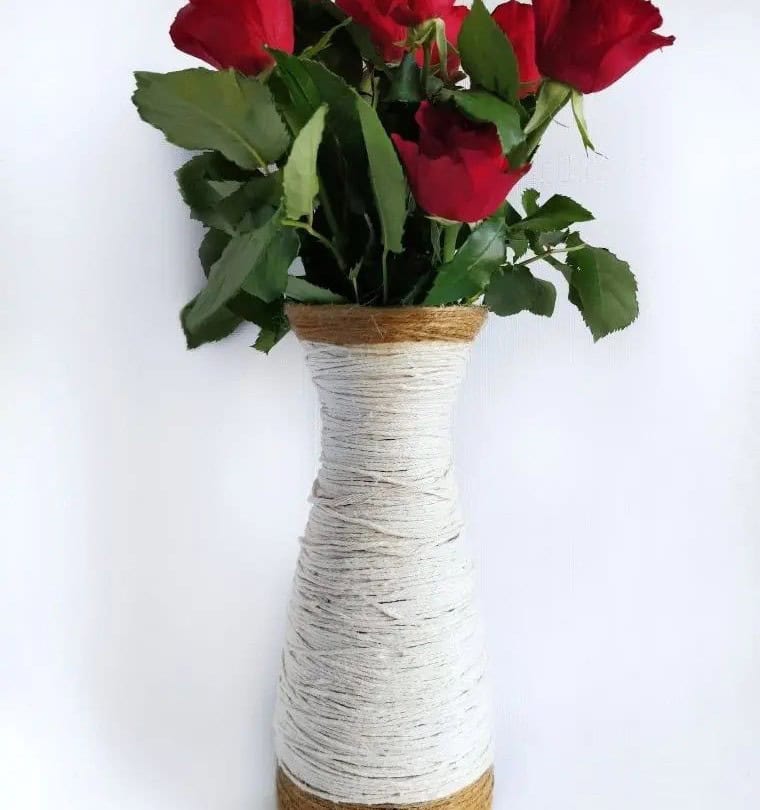
Give your old vases a new lease on life by transforming them into unique pieces of art. Do you have a vase at home that’s seen better days? If it’s still structurally sound, there’s no need to toss it just yet. Instead, let’s get creative and give it a makeover. One clever way to do this is by wrapping yarn or twine around the vase itself. This simple technique can help cover up any minor imperfections or dents that may have developed over time.
But that’s not all – you can also use colorful, textured yarns to add a pop of personality and visual interest to your newly revamped vase. The possibilities are endless, so don’t be afraid to experiment and make it your own.
Aromatherapy Stress Balls
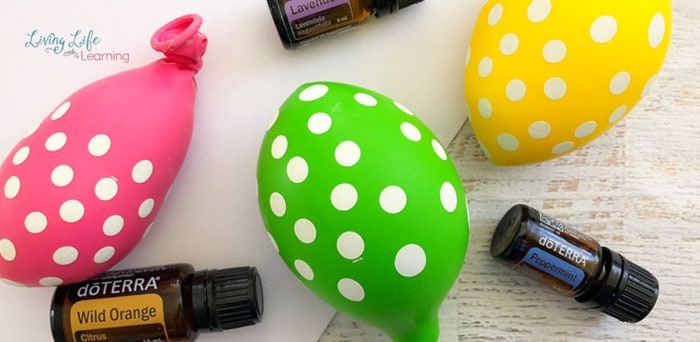
Stress can be overwhelming, but there’s a simple way to find calm amidst the chaos. By combining aromatherapy with stress balls, you can create a powerful coping mechanism that soothes your mind and keeps your hands busy. The gentle stimulation of essential oils can help quiet your racing thoughts, while the tactile nature of squeezing a stress ball provides a sense of grounding and control.
To get started, mix 1-2 tablespoons of cornstarch with a few drops of your preferred essential oil – choose from our selection of calming scents here. Then, inflate two balloons and let the stress-relieving magic begin!
Paper Squishies
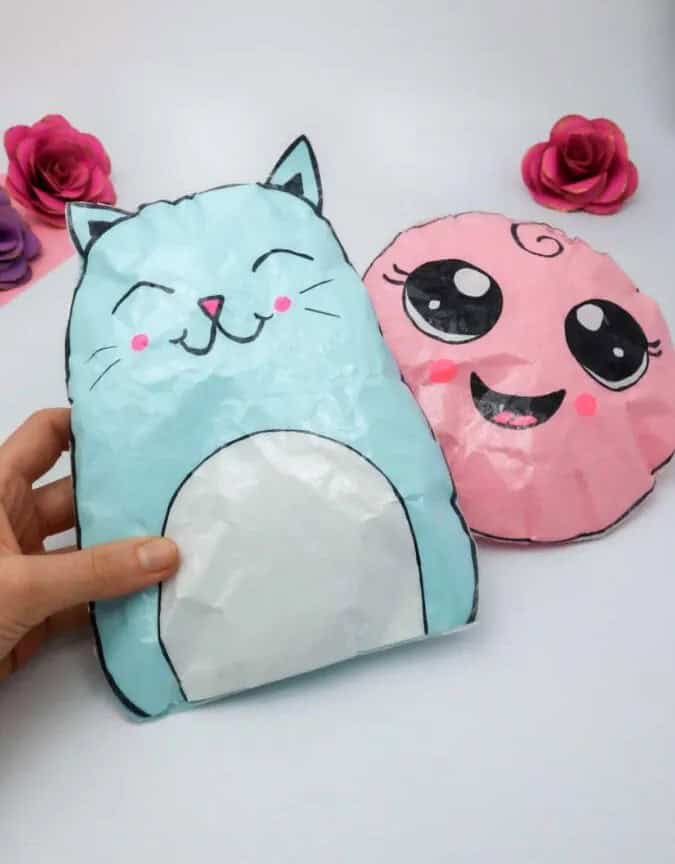
Paper squishies are an entertaining DIY project that can be enjoyed with minimal investment. Unlike store-bought versions, which often come with a hefty price tag, these homemade creations are surprisingly affordable.
To get started, gather ample transparent tape – this will form the outer layer of your squishie. You’ll need to wrap it around the entire shape, so make sure you have a sufficient supply before commencing.
Next, grab your hot glue gun and scissors, then download, print, and cut out your preferred cartoon character design. This will serve as the ‘face’ of your squishie. As you work on multiple designs – you may end up with a dozen or more – ensure you have enough tape to go around.
Watermelon Sponge-Stamped Tea Towels
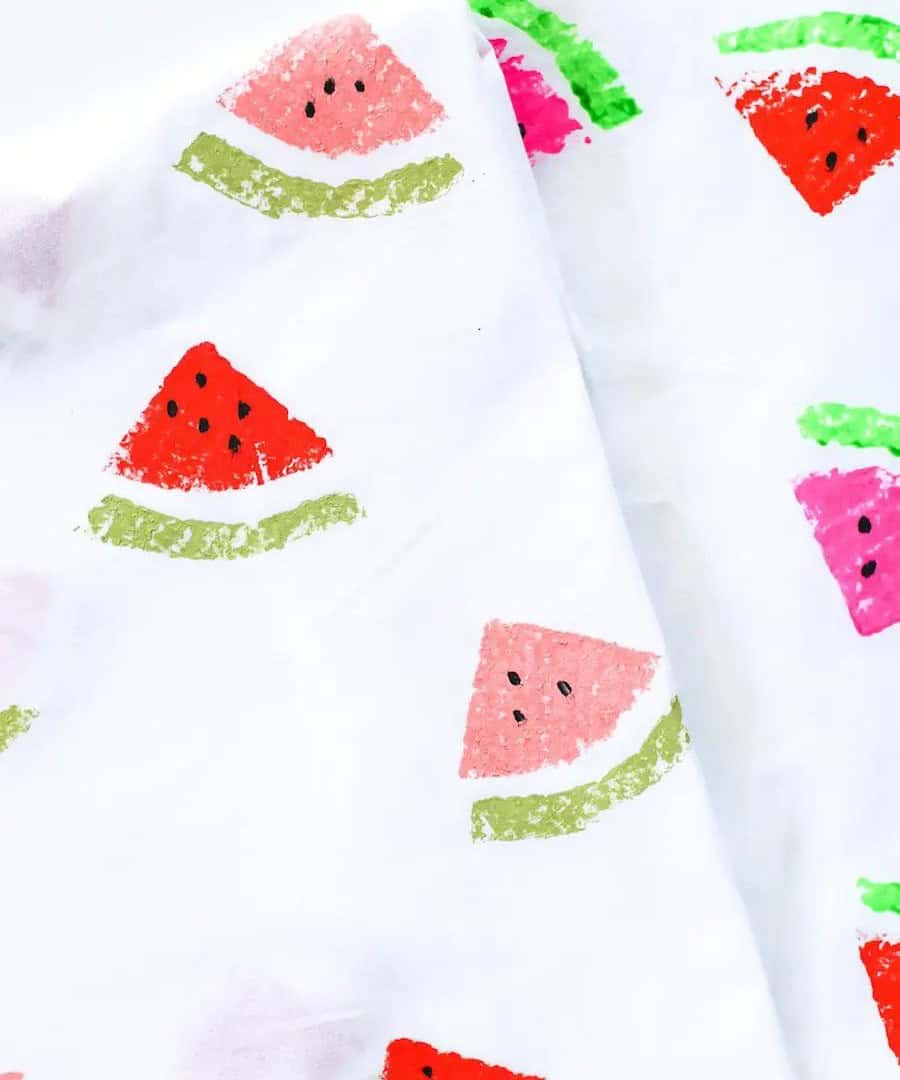
Elevate plain tea towels in your kitchen with a creative twist: sponge stamping! Take inspiration from these charming watermelons, for instance. To get started, you’ll need tea towels, sponges, scissors, paints, brushes, and an iron. For added stability during the ironing process, consider using cardboard to support your towel. Don’t forget the finishing touches – a few strategically placed paint strokes will add an extra layer of realism to your watermelon design.
Paper Rings
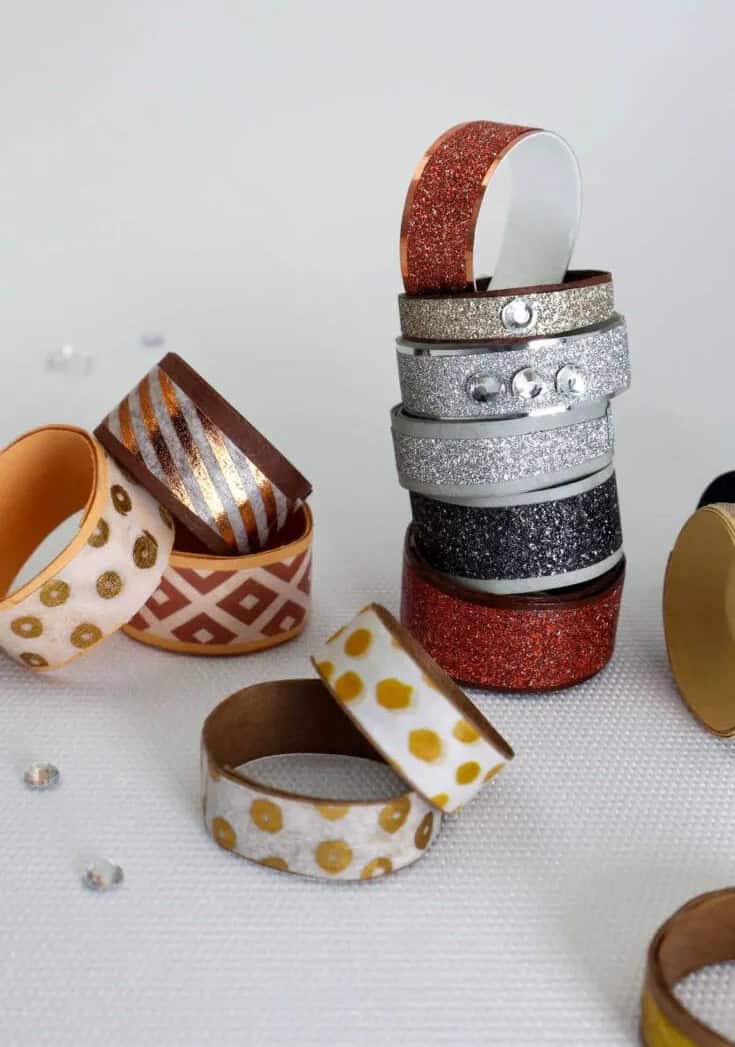
Paper jewelry offers a quick and easy craft solution when you’re in a bind. It’s an activity that’s perfect for keeping kids entertained, and the best part is that you likely already have all the necessary materials at home. To create these charming paper rings, you’ll need a few basic supplies: craft paper, Mod Podge, brushes, craft glue, a ruler, scissors, and flat-back gems or crystals.
These crystals can add an extra touch of sophistication to your paper creations, or you can use washi tape in various designs for a similar effect. If you’re looking for even more inspiration, consider trying out DIY ring designs as well!
Marbled DIY Coasters
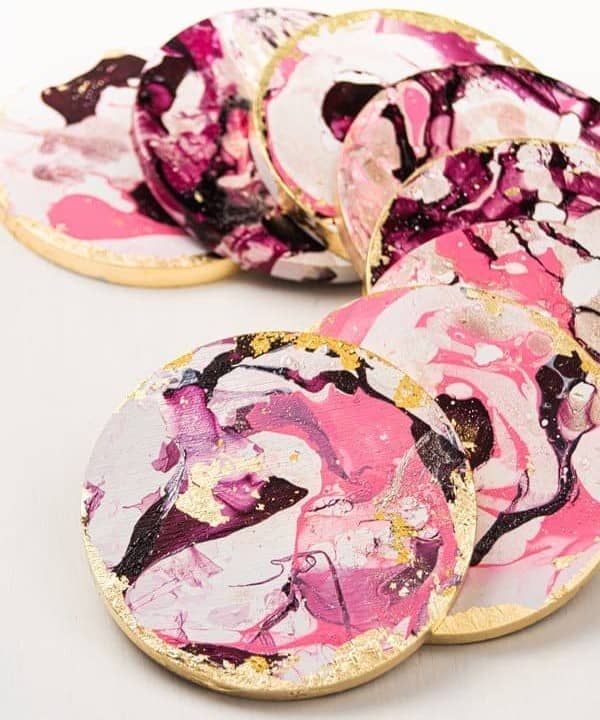
Indulge in the allure of modern art and decor with these mesmerizing DIY marbled coasters. With their effortless blend of shimmer, gold, and elegance, they’re sure to captivate your senses. And the best part? They’re surprisingly simple to create. To achieve this Anthropologie-inspired agate finish, you’ll need: a few basic supplies like nail polish, water, wooden coasters, and a touch of gold metal leaf adhesive.
Seal it all in with Mod Podge or clear sealant spray for a durable and long-lasting finish. If you’re hooked on these gorgeous coasters, be sure to explore our collection of wood crafts for more creative inspiration.
Scented Candles
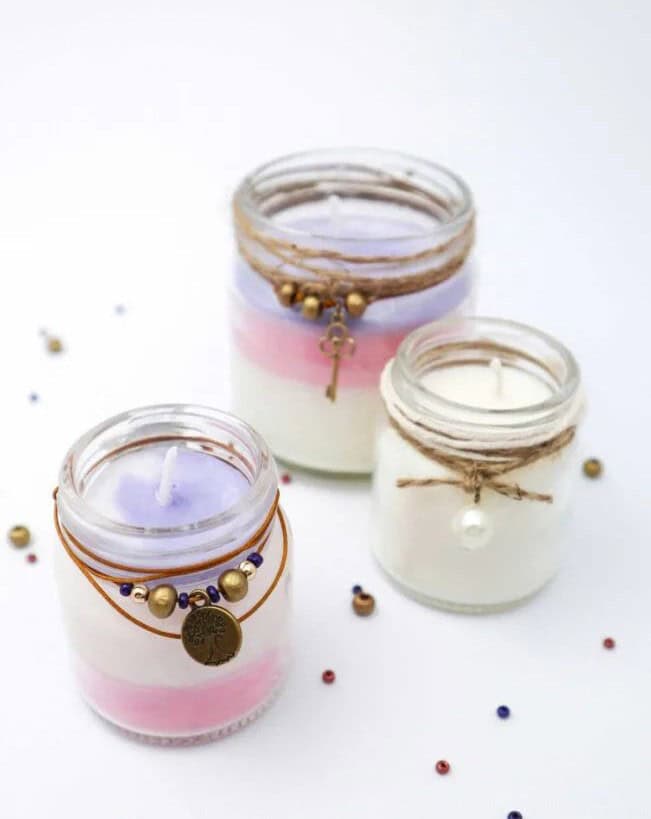
Having an abundance of candles at home can be incredibly uplifting and inviting. It’s not uncommon for me to emphasize that having too many candles is simply impossible – especially when they’re affordable, scented, and come in a variety of pleasant aromas! When it comes to upcycling glass jars for this project, you might have some suitable containers already on hand. Alternatively, you can easily source wicks from here and add beeswax to create your unique blend.
Feel free to enhance the fragrance by adding food-grade dye or essential oils that resonate with you. To give your candles an extra touch of personality, consider adorning them with charms or wrapping twine around the rim. If you’re looking for inspiration to customize your glass jars further, I recommend checking out this DIY leaf candle holder tutorial.
Valentine’s Day Garland
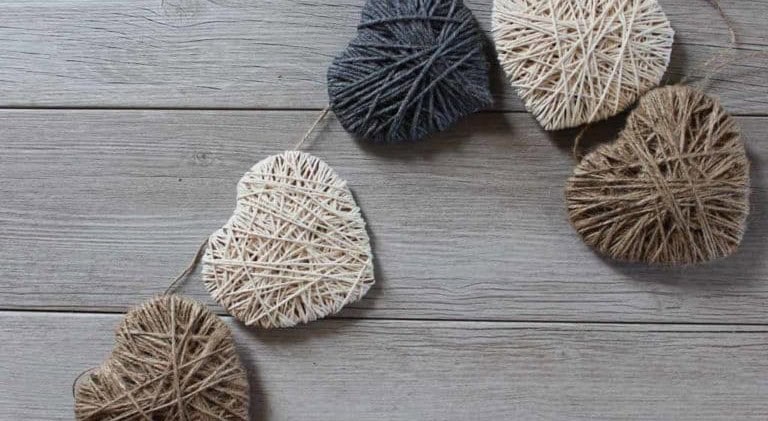
While I’m a fan of Valentine’s Day, the abundance of pink, purple, and red hues can sometimes be overwhelming. When used excessively, they can veer into garish territory. On the other hand, these understated garlands exude elegance, making it difficult to pinpoint their connection to Valentine’s Day without the hearts. To recreate this subtle charm, start by acquiring some cotton string. Before wrapping your hearts with thread, trace and cut them out on cardboard.
DIY Journal Cover

There’s something undeniably thrilling about new books, with their endless possibilities waiting to be explored. The anticipation is almost too much to bear. However, what really gets my goat is the fact that the ones with beautiful covers are often accompanied by a hefty price tag, leaving little room for creativity. And then there are those bland, uninspiring covers that make journaling a chore. But fear not!
With just a few pens and your artistic flair, you can transform those plain book covers into stunning works of art. Simply scour the web for inspiring doodles, zentangles, or mandala designs to draw on the cover, and watch as your journaling experience takes on a whole new level of excitement.
Wine Bottle Luminaries
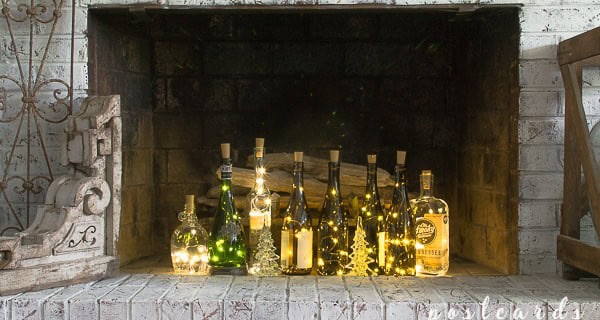
As the winter months unfold, I find myself especially fond of luminaries – there’s something undeniably charming about their soft glow amidst the season’s snow-covered landscapes. The warmth they emit is particularly welcome during Christmas and the cold winter days that come with it. To get started on this project, you’ll need a few simple materials: a couple of empty wine bottles (which can be easily cleaned and prepared for use), and some wooden corks, which are readily available online.
Once you have these supplies at hand, you’re just one step away from bringing the magic of luminaries into your own home.
DIY Shoelace Bracelets
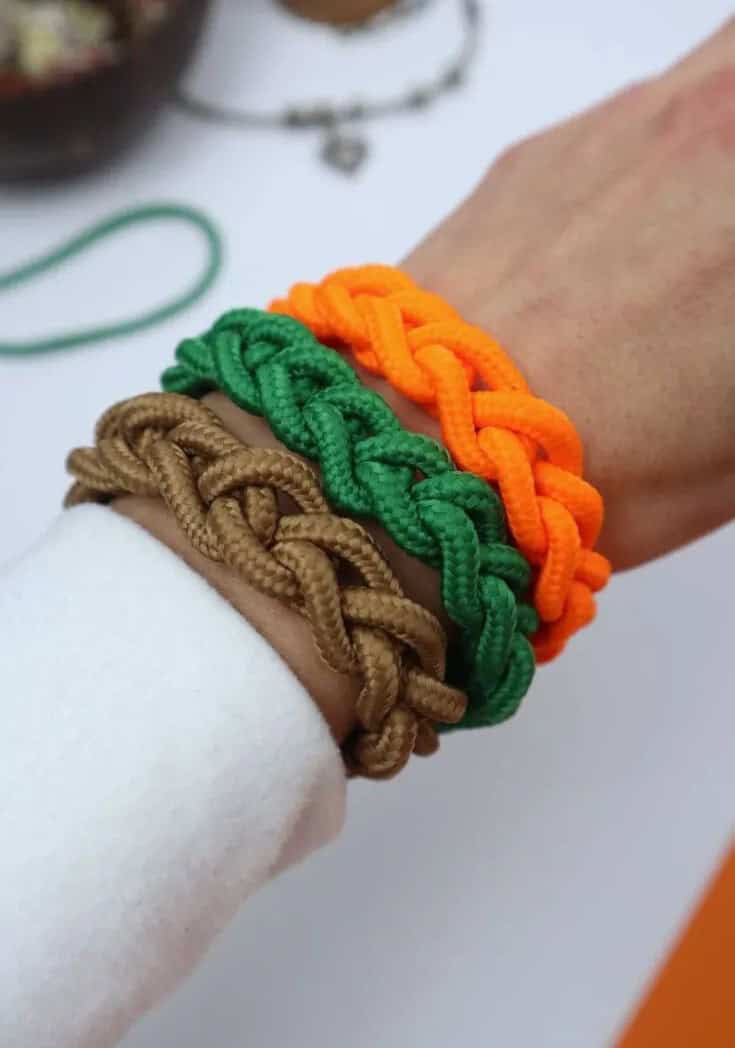
The nostalgia is real when I think about the DIY accessories my friends and I used to create together. We’d whip up all sorts of goodies with everyday materials like wires, paper, and embroidery floss. Maybe it’s time to revive that creative spirit? Let’s get started with this quick and easy DIY shoelace bracelet project that’ll have you hooked (pun intended) within 30 minutes. All you need is a few colored shoelaces from [here] and you’ll be churning out dozens for your friends in no time.
DIY Honey Bee Decor
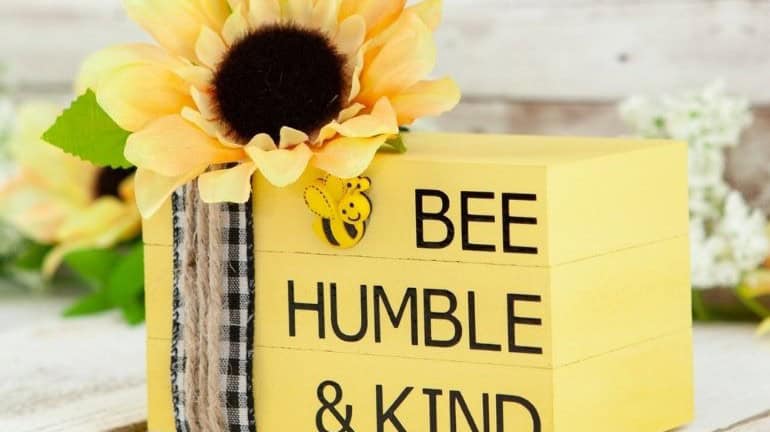
Transform your space with a DIY decor project that’s sure to put a smile on your face! Who wouldn’t be lifted by the warmth of yellow, the majesty of sunflowers, and the whimsy of bee puns? To bring this sunshine-filled design to life, you’ll need to harness the power of your Cricut machine. You’ll also require three wooden blocks to serve as the foundation for your ‘book’ stack. Find these blocks here and get ready to unleash your creativity!
Just remember to let those freshly painted blocks dry completely before diving into the decorating process – patience is indeed a virtue, especially when it comes to bee-utiful DIY projects like this one.
Unicorn Toilet Paper Roll
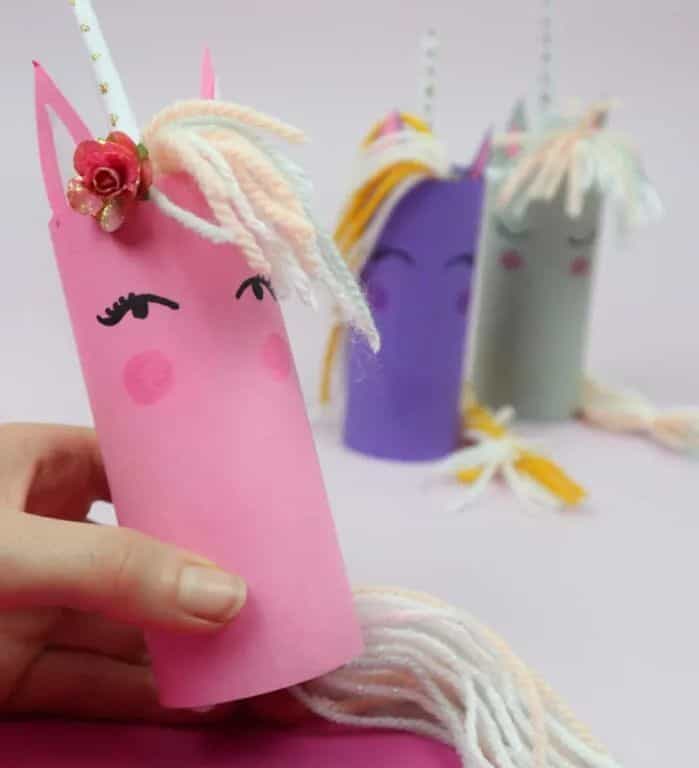
You might be surprised by how many empty toilet paper rolls you actually have lying around. With those on hand, let’s start gathering the other supplies needed to bring your unicorn creation to life – think colored paper, glitter glue, and yarn. If you want to take it up a notch, you can even add some faux flowers from [source] or embellishments with hot glue. The real showstopper, though, is when you get to crafting those iconic unicorn tails.
Simply braid the yarn just so, and your masterpiece will be complete. For more creative ideas like this, check out our collection of toilet paper roll crafts.
Mandala Trinket Dish
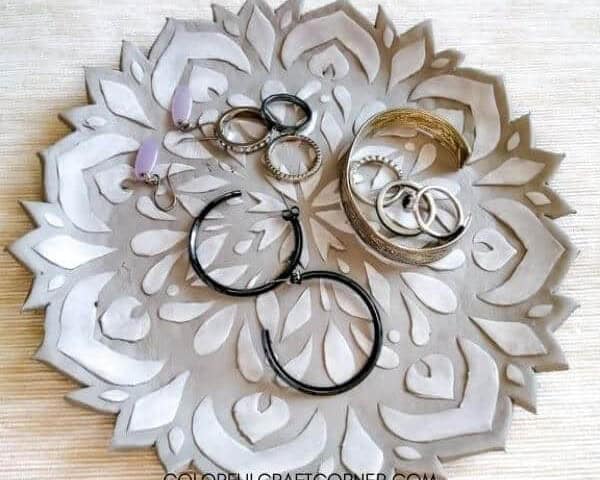
One of the best things about trinket dishes is that there’s no limit to how many you can collect. They’re perfect for corralling small items like accessories, keys, loose change, and other knick-knacks. To create a stunning trinket dish, you’ll need air-drying clay from [link]. Additionally, you’ll require a mandala stencil – you can find these online or even design your own using a Cricut machine. A rolling pin, craft knife, and plate will also come in handy for shaping and assembling the dish.
DIY Phone Holder

Do you still have some spare toilet paper rolls lying around after that creative project? If so, grab them because they’re about to find a new purpose in this DIY phone holder tutorial. I’m sure many of you can relate when trying to study and needing to prop up your phone to take notes – it’s always frustrating when the angle just isn’t right! This DIY solution is designed specifically for that problem.
You’ll need some colorful washi tape to get creative with, so go ahead and pick out your favorite roll and start decorating!
DIY Unicorn Bubble Bars
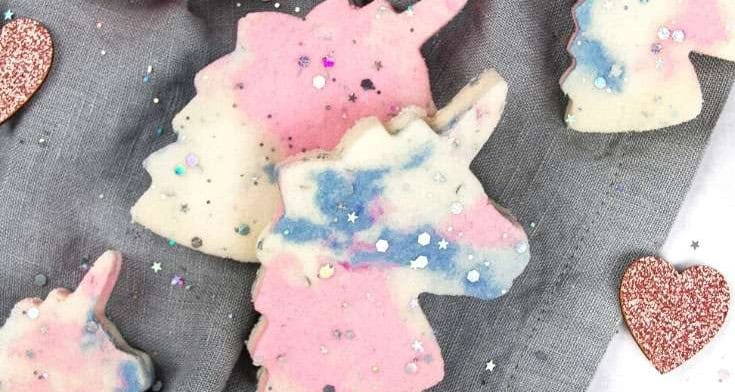
Creating a luxurious bubble bar experience at home is a game-changer. The reality, however, is that many high-end options can be quite pricey. That’s why I’m excited to share this DIY approach with you! By making your own unicorn bubble bars, you’ll not only save money but also unleash your creativity and have a blast.
All you need are some simple ingredients like baking soda, shea butter, an essential oil of your choice, biodegradable glitter for that extra sparkle, and an emulsifier to bring it all together. And if you’re feeling crafty, don’t forget to check out these delightful unicorn-themed crafts to satisfy your inner sparkly unicorn fan.
Upcycled Tin Cans
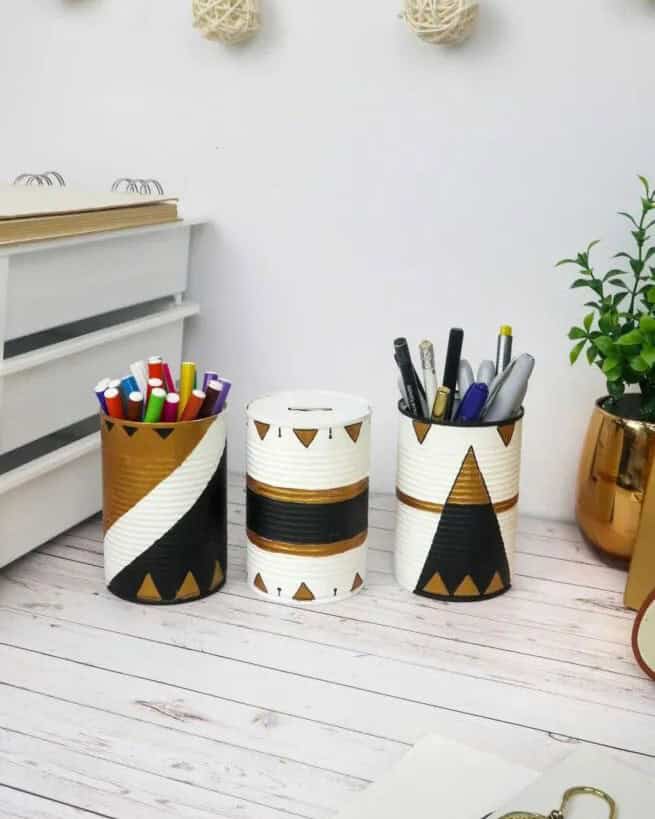
Upcycling tin cans is an entertaining DIY activity that yields impressive results with minimal effort. By transforming these humble containers into creative desk organizers, pencil holders, and more, you’ll be amazed at the versatility of this simple project. For a sleek and modern aesthetic, try combining gold, silver, and black paint for an edgy look that retains the cans’ metallic finish. Alternatively, experiment with various finishes, from glossy to matte, to suit your personal taste.
Beyond desk decor, these upcycled planters can brighten up any workspace. To take inspiration to the next level, check out our DIY rope organizer tutorial and discover even more ways to breathe new life into discarded tin cans.
DIY Terrarium Magnets
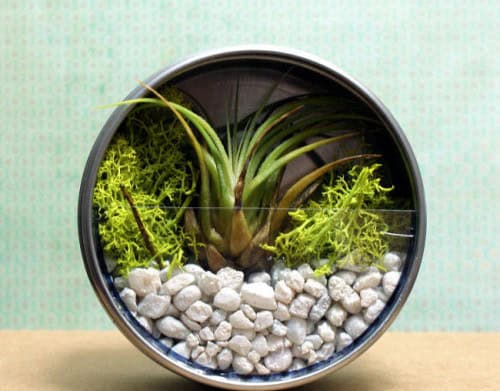
Transforming your home with a unique family project, this plant terrarium is an excellent way to spend quality time together while adding a touch of greenery to any room. Its versatility allows it to seamlessly blend in with your living room decor, kitchen ambiance, or even enliven a dull corner.
The construction process itself is quite straightforward, requiring only that you carefully assemble the components and ensure everything is securely in place before moving on to the final step: attaching a magnet to the back of the finished terrarium, giving you the freedom to reposition it as desired.
Paper Envelopes
When it comes to paper envelopes, buying them at a supplies store can be a costly affair. However, with a few simple steps, you can create at least a dozen of your own envelopes from the comfort of your own home. This DIY project is a great way to declutter your scrap paper stash and give new life to materials that would otherwise go to waste.
For optimal results, it’s recommended to use thick, padded cardstock for making your own envelopes.
Not only will this ensure they last longer, but you’ll also have the satisfaction of creating unique stationery that’s truly one-of-a-kind.
If you’re looking for more creative outlets, be sure to check out these paper crafts for adults that are perfect for those who love crafting and DIY projects.
DIY Farmhouse Wreath
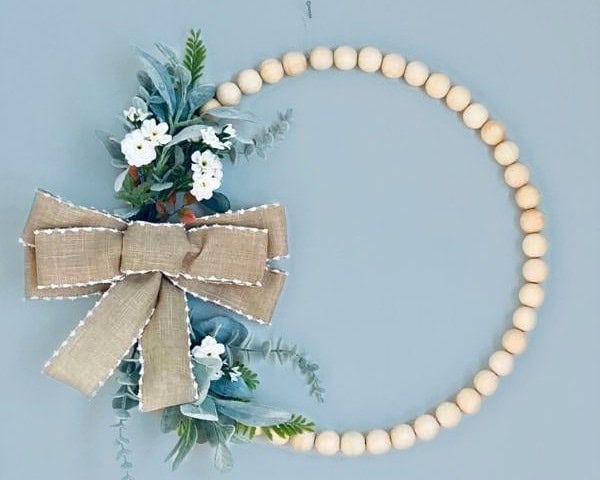
Create a farmhouse-chic masterpiece by wrapping burlap ribbon into a bow, and suddenly any wreath becomes a stunning piece of art. But what if you want to take it up a notch? Consider looping wooden beads around a wire wreath frame instead of traditional materials. This unique approach allows for the addition of faux florals and leaves, bringing a touch of elegance to your rustic decor. For an extra pop of color, why not give those wooden beads a fresh coat of paint?
The possibilities are endless! If you’re looking for more creative inspiration, explore our collection of DIY wreath ideas for all seasons: from stunning fall designs to unique summer and Christmas creations.
Fish Crafts For Kids
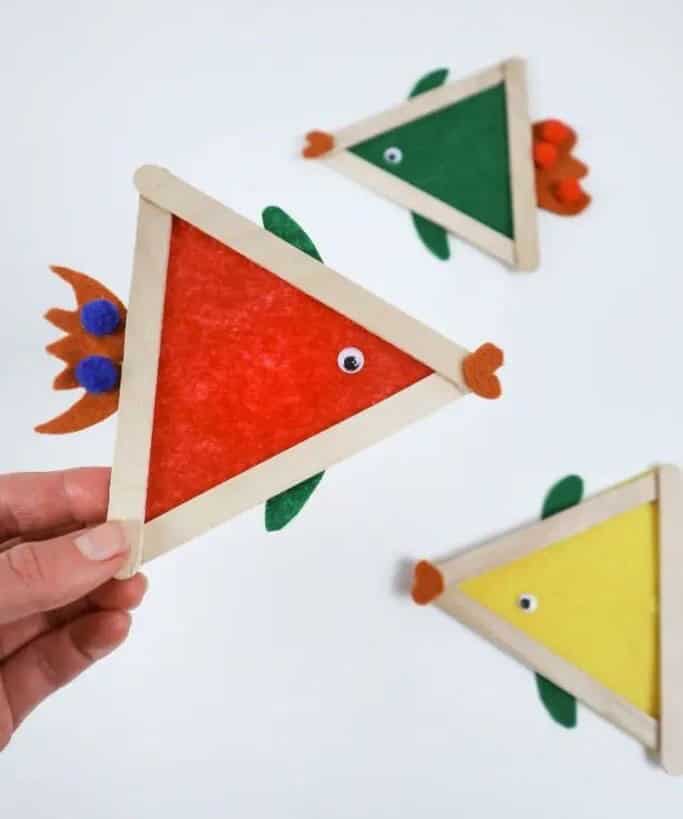
When our little ones become fascinated with a particular animal, it’s not uncommon to see a wave of enthusiasm for fish too. To harness this energy and encourage creativity, consider the following project that combines fun with learning. Simply promise them they’ll be making fish sticks, but instead, surprise them with a crafty twist: creating their own fish! The excitement will surely pique their interest and keep them engaged.
To get started, gather the necessary supplies: craft or popsicle sticks, a hot glue gun, some googly eyes, and felt sheets. You can also explore other fun crafts for kids to occupy them while you complete your household chores.
Pressed Flower Bookmarks
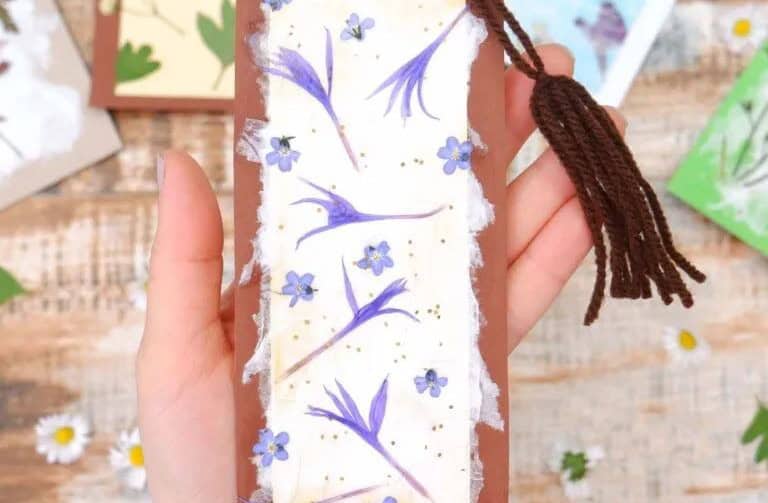
Pressed flower bookmarks evoke a sense of nostalgia, transporting us to a bygone era. The process of creating these delicate keepsakes is both timeless and vintage, with the promise of a delightful experience. To begin, you’ll need to be patient, as pressing flowers requires a certain amount of time. If you opt for natural pressing, this will involve waiting a few days, whereas dehydrating with an iron can speed up the process.
While your flowers are taking shape, use the interim period to prepare other essential supplies such as colored paper, yarn, a hole puncher, glue, and scissors.
DIY Bookmarks For Kids
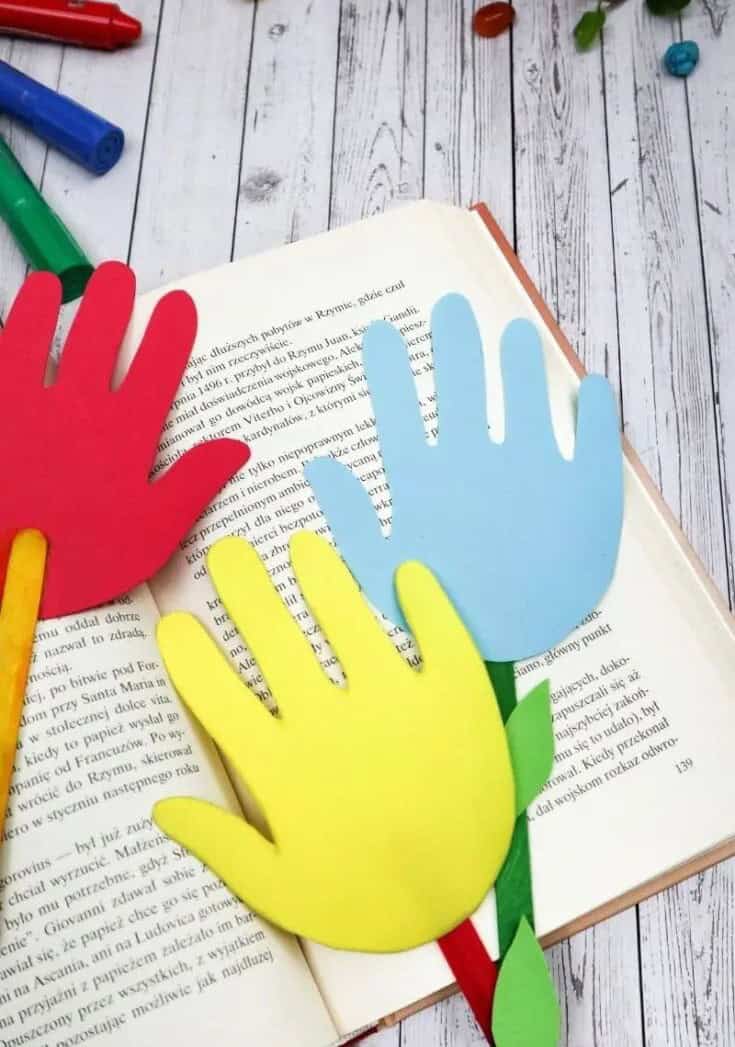
To keep your little ones engaged while waiting for pressed flowers to dry, consider creating a fun and interactive bookmark with them. One idea is to make handprint bookmarks that will surely delight their love of reading. The goal is to spark their interest in books and encourage them to read more. To get started, simply grab some cardstock, have the kids trace their handprints, and then cut out the design. Add a craft stick to the bottom for stability, and you’re all set.
This easy project is perfect for keeping your children occupied while also fostering a love of reading.
Painted Flower Pots
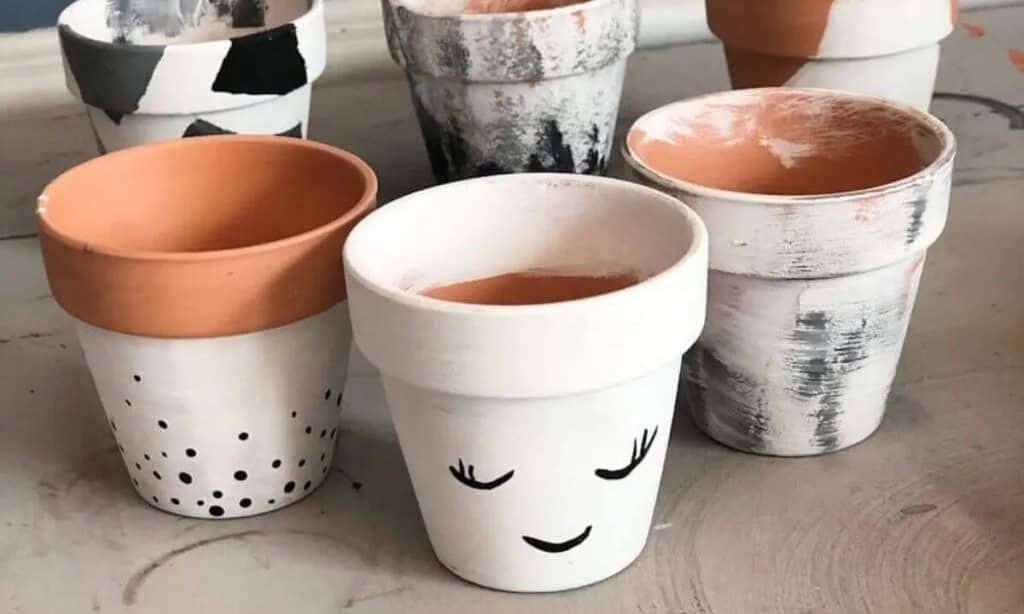
Give your flower pots a makeover with a dash of creativity! Whether you’re working with old, weathered containers or brand new ones, a splash of paint and some decorative flair can transform them into beautiful planters. The examples shown here feature a monochromatic scheme, perfect for those who appreciate minimalistic-chic. Begin by applying a base coat using your paintbrushes, allowing the layer to dry completely before moving on to the next step.
Once the paint is fully set, seal it with a protective spray to ensure your design lasts. With these simple steps, you’ll be well on your way to creating stunning planters that will add a touch of elegance to any outdoor space.
DIY Leaf Candle Holder
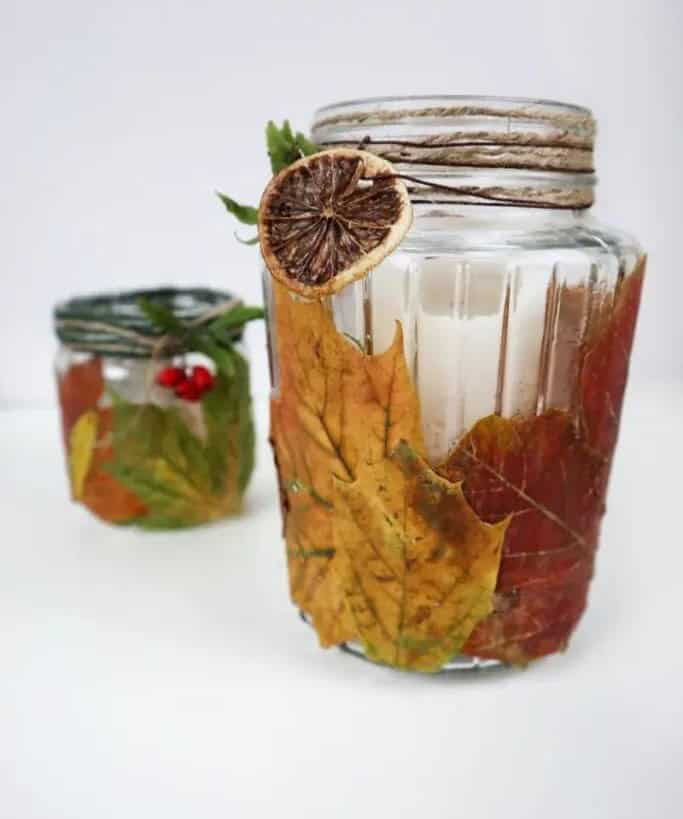
Imagine transforming your outdoor space into a treasure trove of creative inspiration. With a simple stroll into your backyard, you’ll discover an abundance of leaves that can be used to craft unique and personalized DIY projects. As the seasons change, so too will the colors and textures of the leaves, allowing you to create a diverse collection of materials for your creative pursuits. For instance, during fall, you can gather vibrant hues to adorn a spicy cinnamon-scented candle jar.
To add an extra layer of depth and interest, consider dehydrating an orange peel, piercing a hole through it, and securing it around the rim with some string. As you gaze upon the finished product, let your senses be transported to a cozy winter evening, filled with the warm aroma of cinnamon and citrus.
DIY Milk Carton Bird Feeder
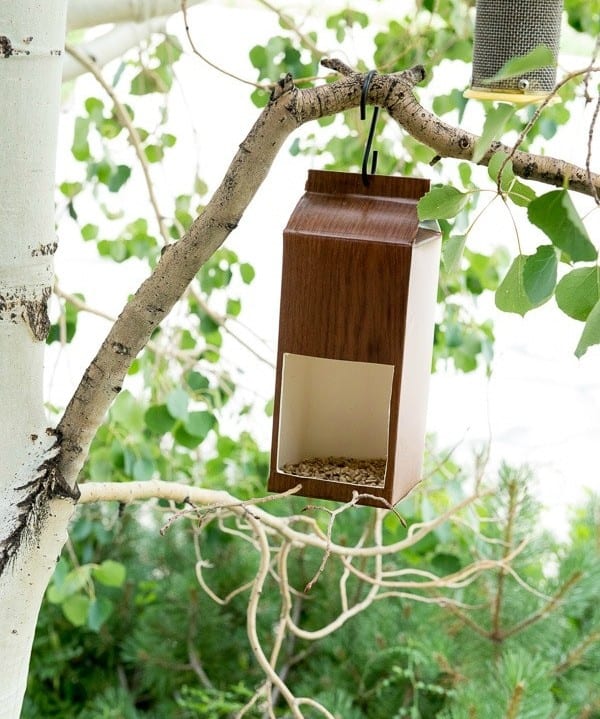
If you’re an avid bird enthusiast, you likely have a few bird feeders scattered around your property. Whether it’s in your backyard, on the front porch, or suspended from a tree branch, you’ve probably got at least one set up to attract some feathered friends.
To create your own DIY feeder, start by taking an old milk carton and giving it a good scrub with soap. Rinse it thoroughly with water, then let it air dry before repurposing it for its new life as a bird feeder.
You’ll also need a box cutter to trim the carton to size, some sturdy twigs for perches, and an S-hook to hang your creation from that tree branch. With these simple materials, you can create a functional and charming bird feeder that’s sure to draw in some curious visitors.
Tissue Paper Pompom
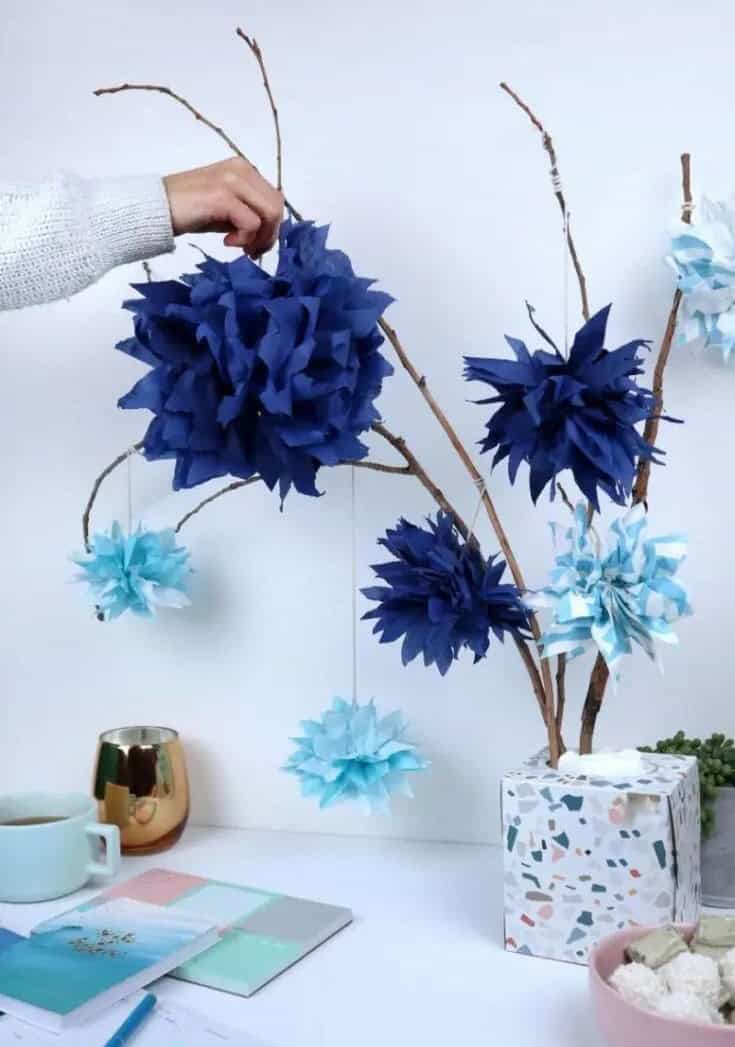
There’s something uniquely alluring about working with tissue paper, don’t you think? The tactile sensation of rumpling and crinkling the material is incredibly satisfying, making it a favorite among craft enthusiasts like myself. To get started, grab some vibrant colored tissue paper from your preferred supplier. These delightful pom poms can be used to add a touch of whimsy to your home decor by hanging them as decorative elements.
Alternatively, they make excellent accessories for photo booths and corners, serving as eye-catching backdrops.
DIY Milk Carton Lanterns
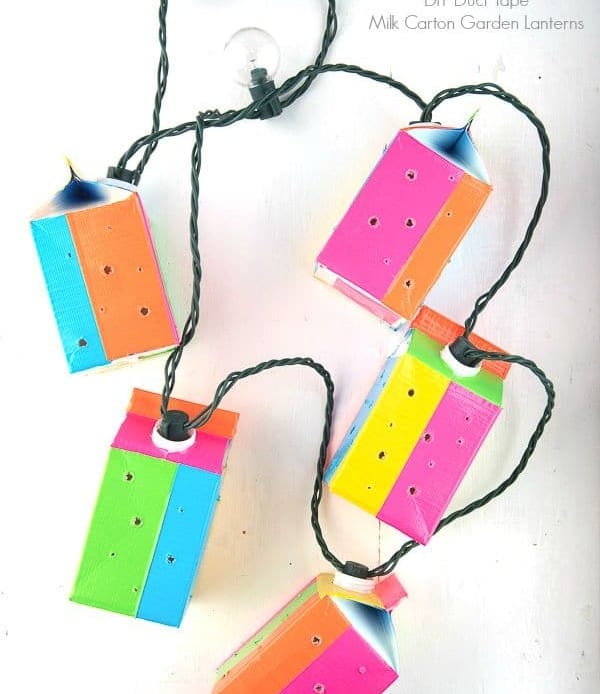
Transforming empty milk cartons into a stunning display of colorful lights is an effortless and enjoyable craft project perfect for bonding with your younger kids. With materials readily available at home, start by preparing the cartons by washing, rinsing, and drying them thoroughly. To add a personal touch, wrap washi tape around the cartons to create unique patterns and designs.
Once they’re ready, string the cartons up with fairy lights and hang them on your porch or patio to mesmerize in their radiant glow.
Paper Flowers
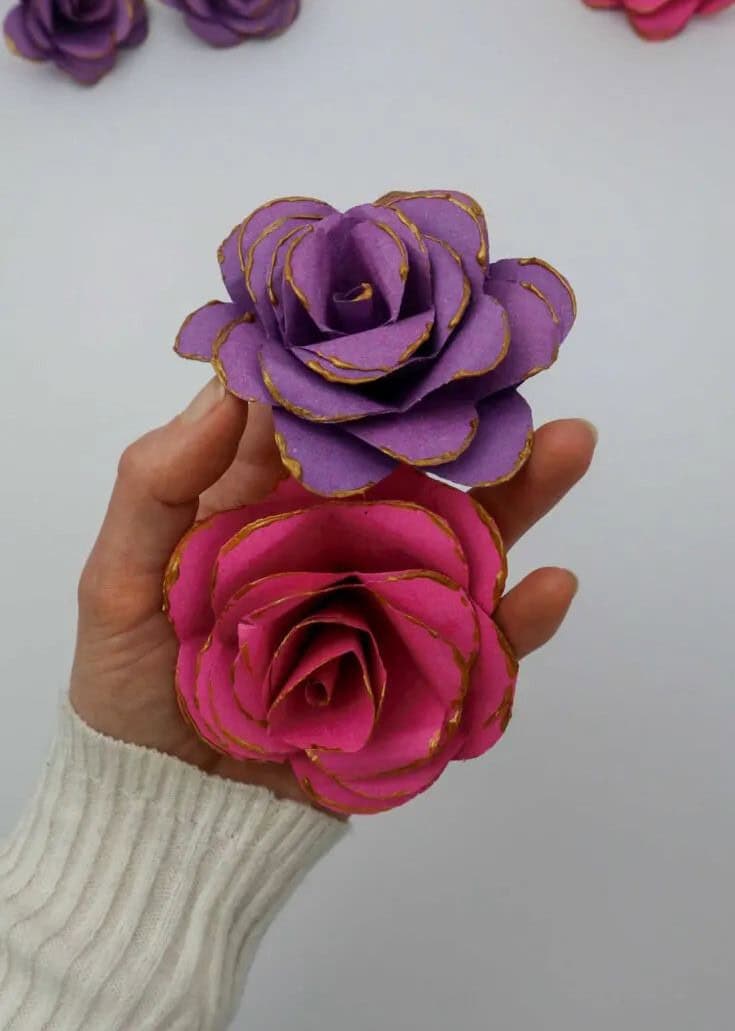
One of the best things about crafting with paper flowers is that they’re incredibly versatile. Rather than rushing to create a dozen in one sitting, you can make them ahead of time and store them for future projects. This flexibility allows you to experiment with different sizes, colors, and textures by using various papers. For an added touch of elegance, consider incorporating metallic glitter glue around the edges of your flower petals.
Not only will this add visual interest, but it will also give your creations a unique and eye-catching quality. By using patterned paper, you can take your craft flowers to the next level and create truly show-stopping pieces.
Bottle Cap Emoji Magnets
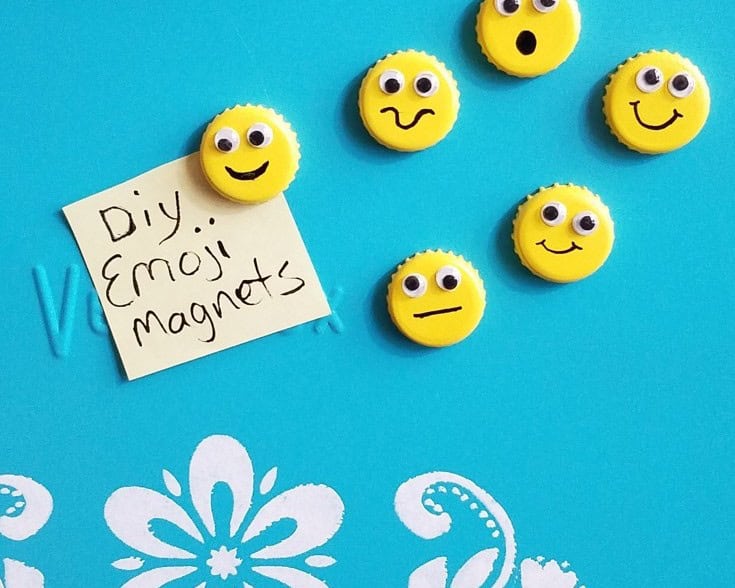
Remember the joy of collecting and decorating soda bottle caps as a kid? I, too, fondly recall the excitement of stringing them up on my dresser. The idea is to recreate this nostalgia, but instead of plain painted caps, let’s craft custom emojis using googly eyes and magnets. To get started, head over to [link] and grab some whimsical eyes that will bring your creations to life.
In addition to these playful accessories, you’ll need a strong adhesive like gorilla glue to secure the round magnets (make sure they fit snugly inside the bottle cap) firmly in place. With these essential components, you’re ready to unleash your creativity and bring back those carefree childhood memories.
DIY Woven Bowl Out Of Paper Plate
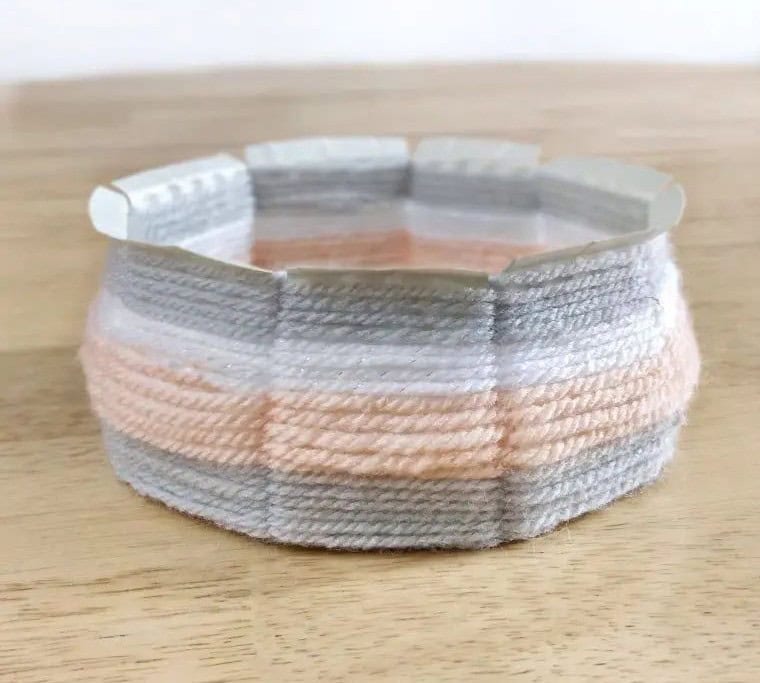
Crocheting is more than just a hobby for me – it’s an obsession! I adore the process of creating something beautiful with yarn, and having a stash full of colorful skeins always at my fingertips. This abundance of yarn often leads to leftover scraps from completed projects, which I find myself collecting and storing away for future use.
If you’re anything like me and have a stash of yarn lying around, then take out those extra skeins and grab a paper plate – we’re about to create something amazing together! You can experiment with different colored yarns to give your DIY woven bowl some personality, as well as play around with varying textures and ply for added visual interest. The possibilities are truly endless!
DIY Cork Honeybee
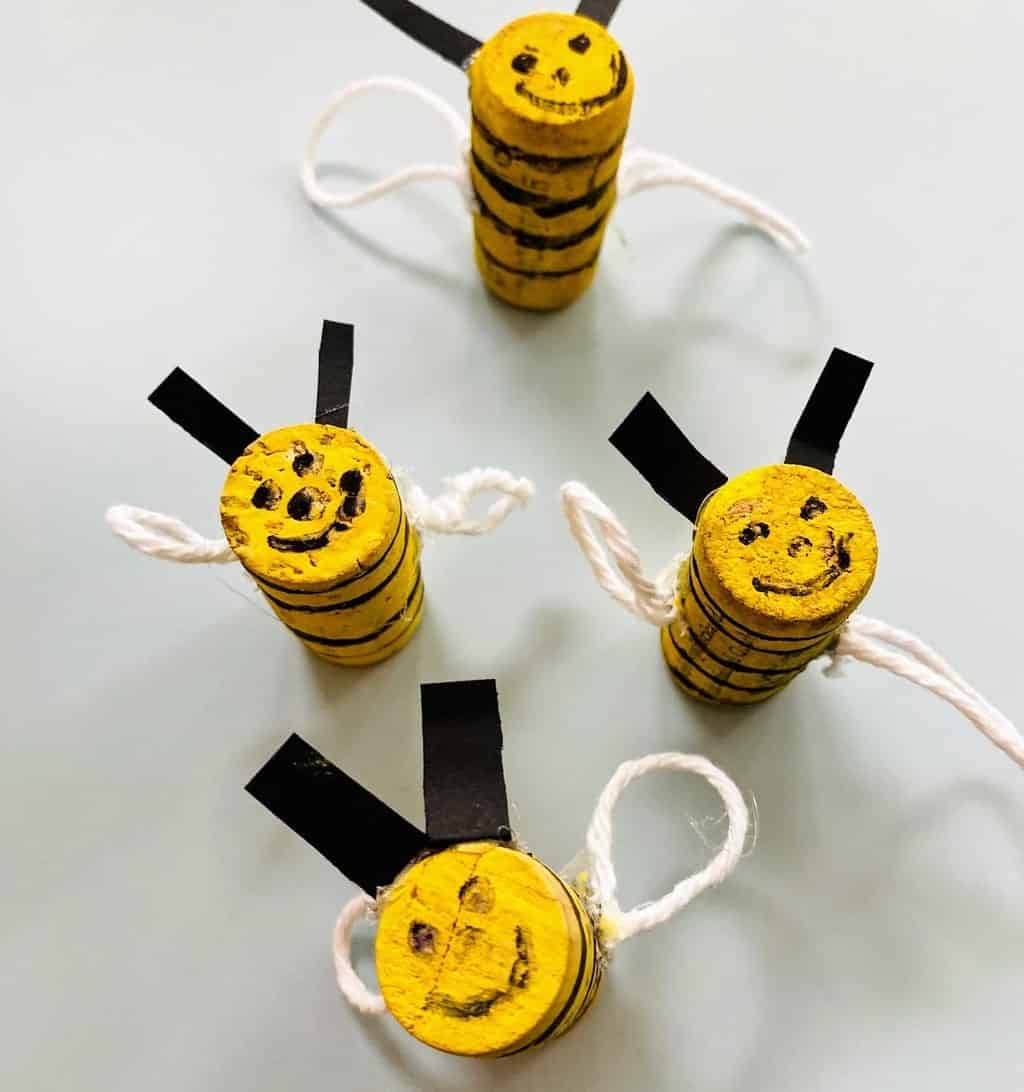
If you have a stash of old wine corks or leftover corks from a previous project, it’s time to get creative! Begin by painting the corks in bold black and yellow stripes using your favorite paints and brushes. Once the paint is dry, take some cotton twine or yarn and shape them into wing-like forms. Secure these wings with a dab of glue, attaching them to the sides of the corks.
To add an extra touch of personality, use a marker to draw eyes on the flat side of each cork, or get playful and attach googly eyes instead. The result will be a charming, one-of-a-kind craft that’s sure to delight.
DIY Bottle Cap Candle
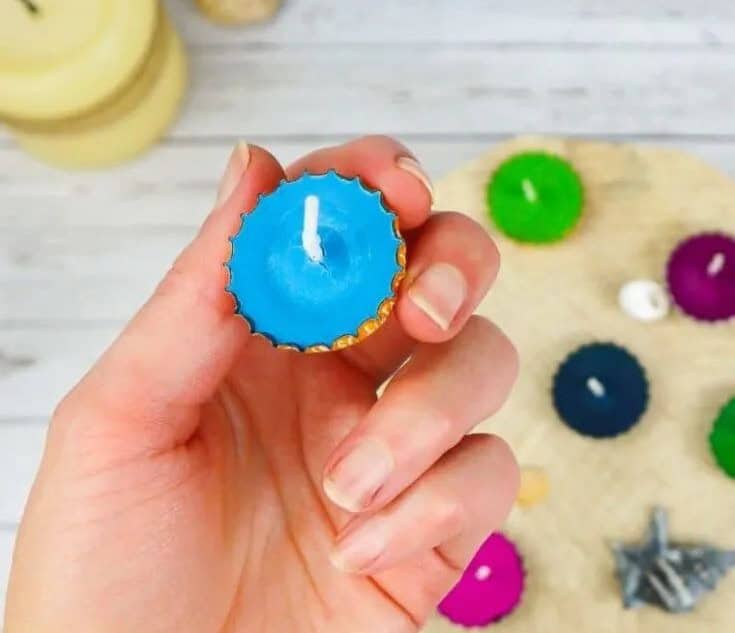
While bottle cap candles may seem like a small project, they can have a significant impact on the ambiance of your space. These miniature candles pack a big punch when it comes to adding character and charm to your decor.
If you’re in need of bottle caps, there are plenty of resources available. For instance, [insert link here]. Make sure to also stock up on wicks, specifically tea light wicks that can be trimmed down to size if needed.
What’s great about this craft is that it’s accessible and enjoyable for anyone, regardless of gender. It’s a fun project that can be appreciated by people of all backgrounds.
Washable Home Fabric Paint
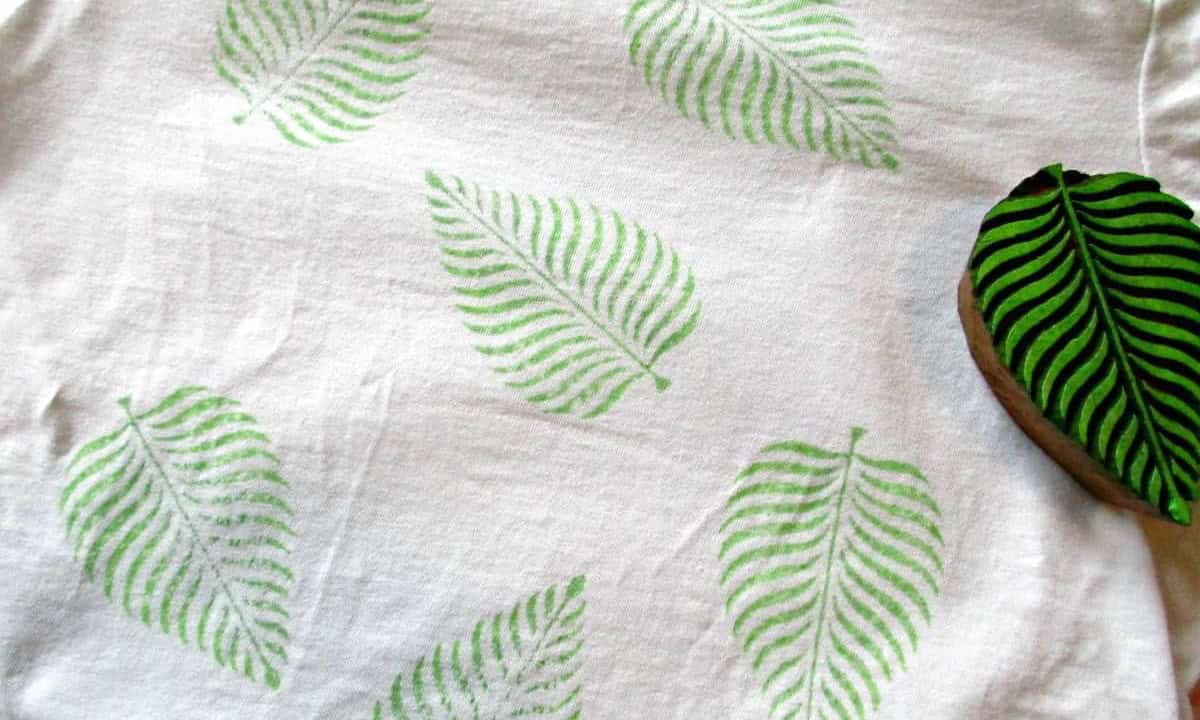
Create your own unique fabric paint by combining acrylic paint with household ingredients like glycerine and white vinegar. This simple process will yield a versatile medium perfect for painting designs onto fabric using wooden stamps. To get started, mix the necessary ingredients together to form the fabric paint. Then, use a sponge or brush to apply the paint to your chosen fabric, followed by pressing the stamp down firmly onto the material.
The result is a one-of-a-kind design that can be as vibrant and playful as a rainbow-colored leaf, or as subtle as a single hue.
Paper Picture Frame
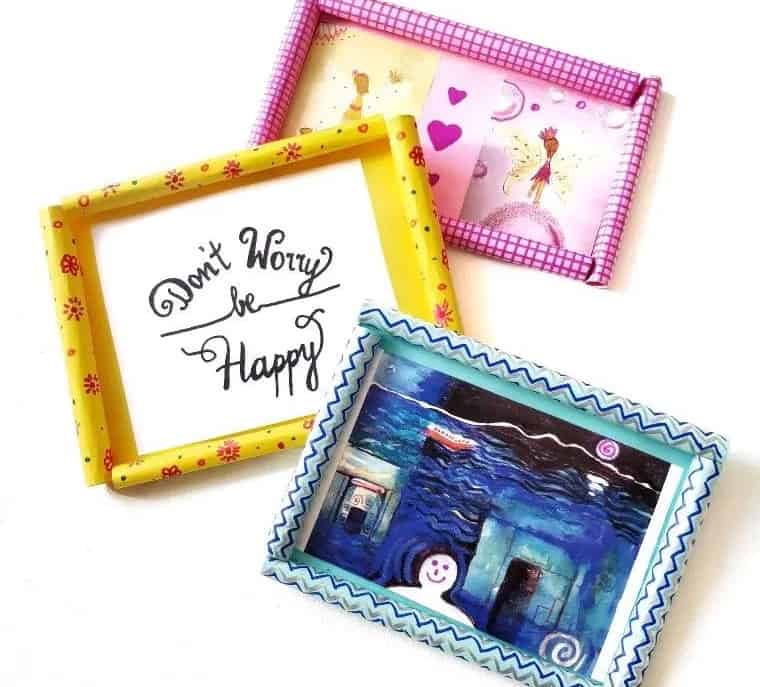
With a stash of craft paper at your disposal, you’re off to a flying start with this creative endeavor! The key to successfully embellishing picture frames is in the details. Utilize permanent markers to add intricate designs and patterns onto the paper, taking care to create smaller motifs rather than a single large design. This approach ensures that even when you cut the paper for the frame, your artistic expression remains intact.
For added inspiration, explore other construction paper crafts and let your imagination run wild!
DIY Giant Jenga
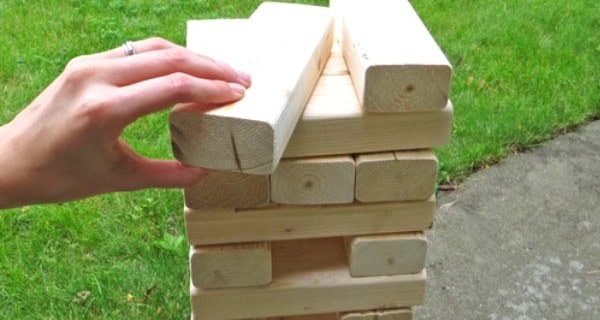
There’s something special about gathering with friends in the backyard on a warm, sunny day. Imagine the atmosphere: laughter, good company, and a hint of friendly competition. A game of giant Jenga would be the perfect addition to your Sunday barbecue plans. You can take it up a notch by incorporating themed Jenga games, similar to truth or dare Jenga. This twist will surely elevate the fun factor at your gathering, making it an unforgettable experience for everyone involved.
Concrete Succulent Planters
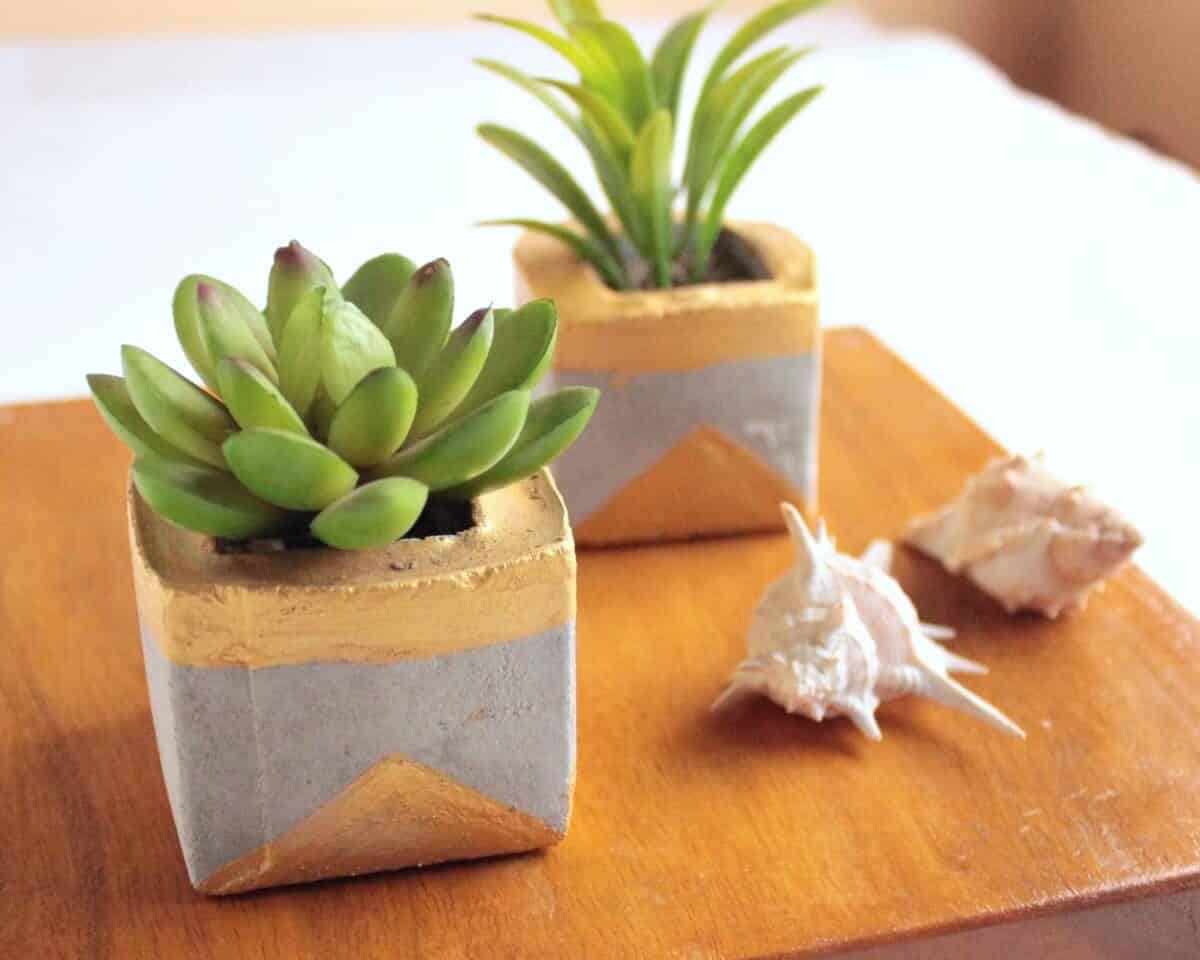
Urban chic meets natural charm with these concrete planters! To bring this stylish combination into your home, simply follow these easy steps. Begin by gathering some dry cement, a plastic bucket for mixing, sand, and a large stick for stirring. Next, cut out two cardboard boxes to serve as the mold for your cement planter. Feel free to experiment with different sizes or substitute an old milk carton or cereal box if you prefer smaller planters.
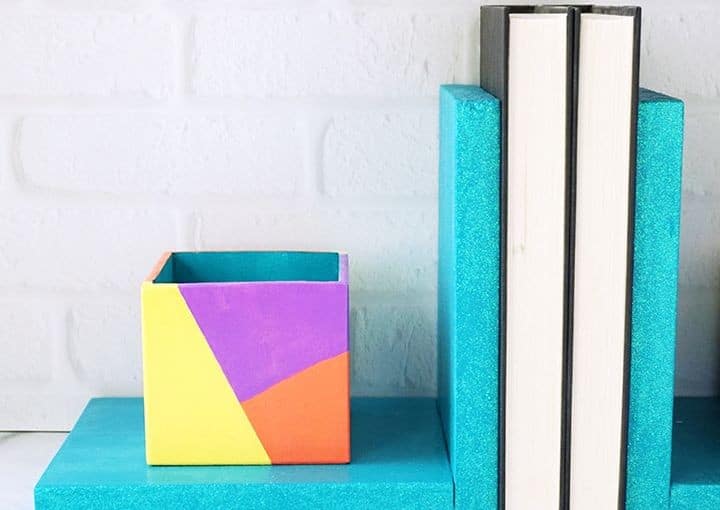
DIY Boho Wall Decor

Need a decorative piece to fill that wall gap? Consider creating your own unique boho-chic wall art. This DIY project is easy on the wallet and requires minimal materials. Start by browsing bohemian patterns online, such as on Pinterest, to get inspiration for your design. Once you have an idea of what you want to create, gather your supplies: watercolor paints, brushes, watercolor paper, and a picture frame (or make your own if you’re skilled with woodwork).
By taking the time to customize your piece from scratch, you’ll be able to infuse it with your personal style and add a touch of bohemian flair to any room.
DIY Wood Storage Bookends
As a crafty individual who delights in woodworking and crafting, I’m sure you’ve accumulated a collection of wooden blocks and scraps just begging to be repurposed into something new. One creative endeavor that comes to mind is designing unique bookends from these materials. Imagine presenting a thoughtful gift to a book lover – handcrafted bookends that not only keep their favorite volumes organized but also provide a dash of personality.
Consider adding small boxes or compartments to the ends for storing bookmarks, making it an even more special and functional present. To give your creation some extra flair, you can paint the wood in bold hues or apply a wood stain to enhance its natural beauty. If you’re feeling adventurous, why not try carving a simple yet sophisticated design onto the wood itself?
Upcycled Vase

Want to breathe new life into an old vase and turn it into a stunning piece of decor that reflects your unique style? Look no further! With just two simple ingredients – baking soda and acrylic paint – you can transform your glass vase into a beautiful, bohemian-inspired masterpiece that will add a touch of elegance to any room. And the best part? This DIY project is incredibly easy and budget-friendly, making it accessible to anyone looking to get creative with their home decor.
Honeycomb Wood Shelves

While floating wood shelves have their charm, there are more sophisticated ways to maximize your wall space. Honeycomb shelves, for instance, elevate the aesthetic appeal of any room by introducing a touch of elegance. The unique design offers additional storage opportunities as well, allowing you to place items within the honeycomb cells or on top of it.
To ensure these shelves remain both functional and visually appealing, opt for high-quality wood that maintains its integrity and durability over time.
DIY Wooden Tray
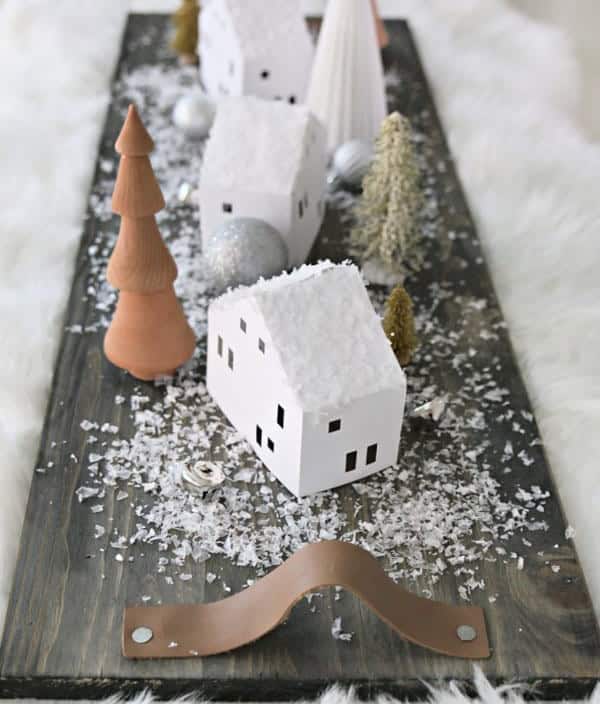
As we discussed earlier, if you’re an artisan with a passion for woodworking, it’s likely that you have leftover wood scraps gathering dust. Fortunately, these scraps can be transformed into something truly beautiful – like a stunning wooden tray. To get started, select your preferred wood stain and pair it with some supple leather fabric for the handles. The union of wood and leather is nothing short of harmonious, much like the classic combination of peanut butter and jelly.
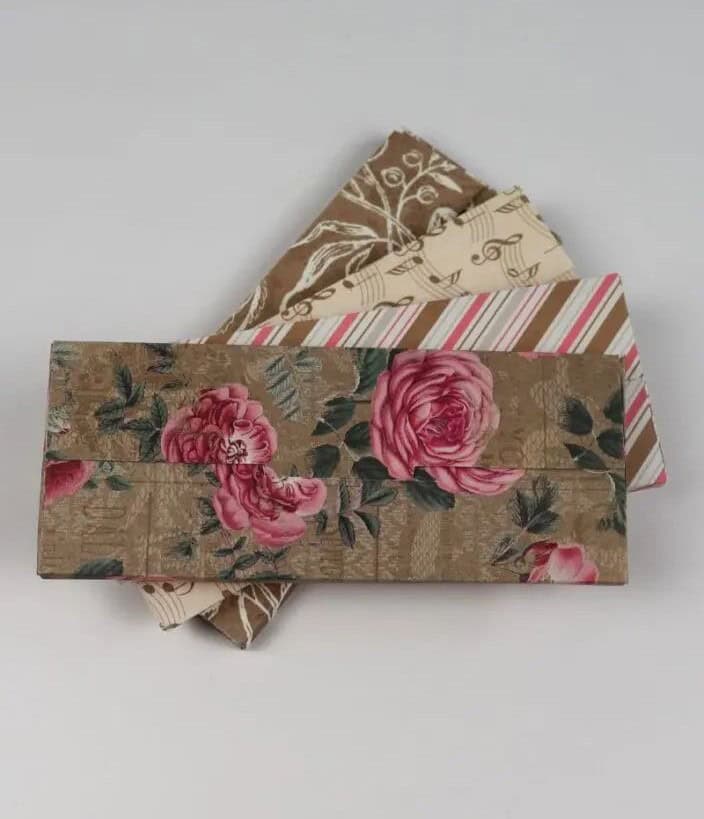
Transfer Image Onto A Candle
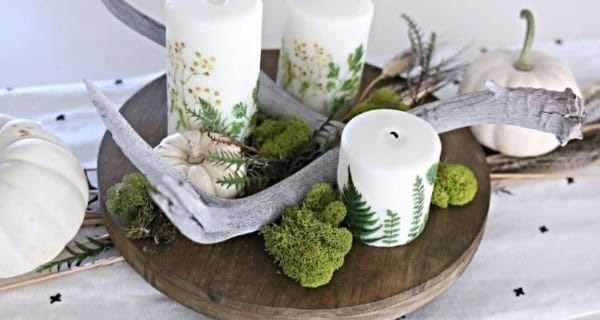
Despite initial impressions, creating photo candles is surprisingly straightforward. The notion that it’s an elaborate process is likely due to the complexity of transferring images onto a candle, which can seem daunting at first. However, with the right materials and a few simple steps, you’ll be amazed at how effortless the process really is.
To get started, make sure you have a suitable candle type in your possession.
Additionally, gather the following supplies: patterned paper napkins, a printer, wax paper, washi tape, and a blow dryer. With these materials at hand, you’ll be ready to begin your creative project.