Make the most of your weekends or school breaks by engaging your kids in fun-filled arts and crafts activities. As a busy parent, you’re likely looking for ways to keep them entertained while also freeing up some time for yourself. DIY salt dough ornaments are an excellent solution – they’re easy to make, require minimal supervision, and can be transformed into a wide range of creative designs.
By involving your kids in this project, you’ll not only be nurturing their artistic skills but also creating a beautiful decoration for their room that they’ll treasure. And the best part? You’ll have some well-deserved free time to tackle other tasks at home.
Supplies You’ll Need for Salt Dough Ornaments
For this creative project, you’ll need a few basic ingredients. Start by gathering the following: one large glass measuring cup filled with all-purpose flour, which should be approximately 250 milliliters or 9 ounces in volume. You’ll also require an identical large glass measuring cup filled to the same capacity with salt. Additionally, prepare a standard-sized cup that’s equal to 230 milliliters or 8 ounces when full of warm water.
To add some extra flair, you can also incorporate acrylic paint and glitter paint into your design.
Tools You’ll Need
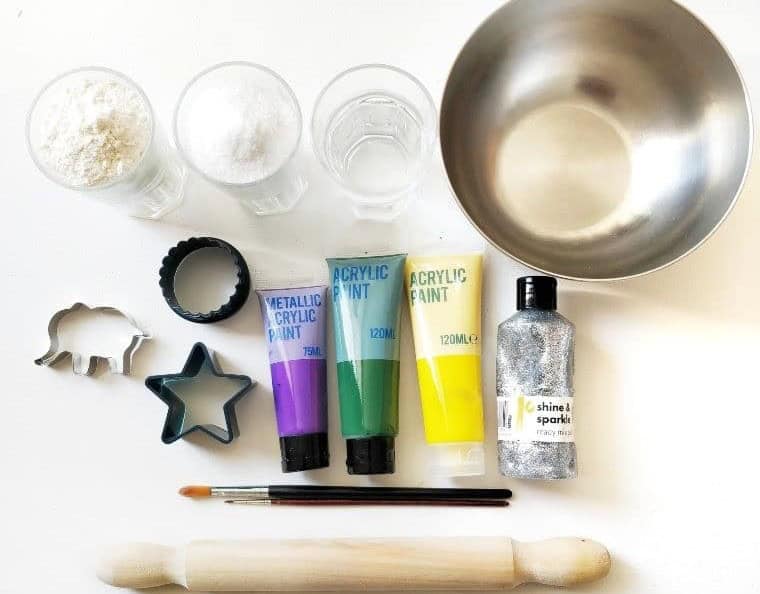
The essential tools for any baker include a variety of kitchen staples. At the heart of this arsenal are baking sheets, which provide a flat surface for cookies and other treats to spread out and bake evenly. Parchment paper, a must-have for many bakers, offers an extra layer of protection against sticking and makes cleanup a breeze. For shaping dough into perfect spheres or slabs, a trusty rolling pin is indispensable. But what about adding some visual flair?
Cookie cutters come in all shapes and sizes, allowing you to create intricate designs on your baked goods. And finally, for those artistic touches, paintbrushes can be used to add colors and patterns to cakes, cookies, or other treats. All of these tools are centered around one crucial item: a bowl. This humble vessel serves as the foundation for mixing, whipping, and combining ingredients in the pursuit of culinary magic.
How to Make Salt Dough Ornaments?
Baking and crafting with kids can be a wonderful way to spend quality time together. Salt dough ornaments are an excellent activity to engage your little ones in baking, painting, and creativity. This project is perfect for weekends or school breaks, providing hours of fun and entertainment. After you’ve prepared the adult part of the dough, the rest of the process is simple enough that kids can take over with minimal supervision. The best part?
You’ll be creating something beautiful together to cherish long after the activity is done.
STEP 1

Next, head to your kitchen and prepare for the next step in the process. Grab a large mixing bowl and add 250 milliliters of all-purpose flour. This will be followed by an equal amount of salt, which should also be measured out at 250 milliliters.
STEP 2
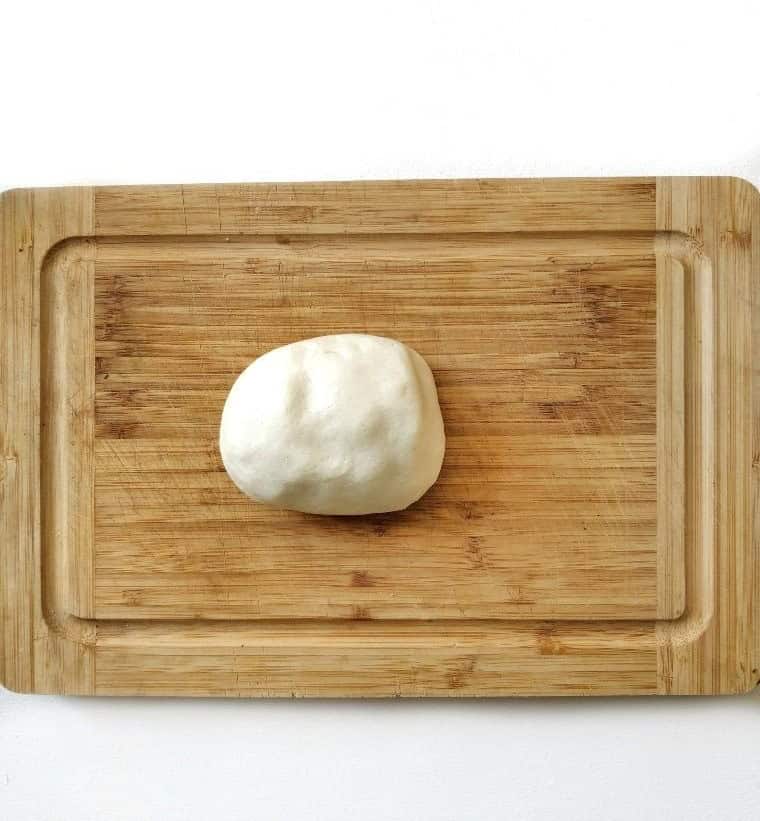
Combine 230ml of lukewarm water with the dry ingredients in a bowl, taking care not to scald yourself with too hot of an addition. A warm temperature makes it easier to work the dough by hand. Consider enlisting your kids’ help with this step, as they’ll benefit from measuring out ingredients and following a recipe, developing important skills along the way.
STEP 3
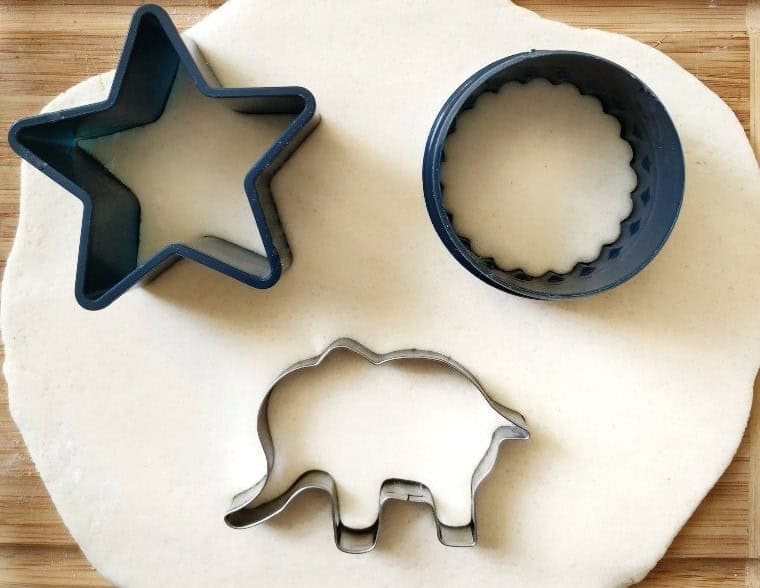
When the dough is prepared, transfer it to a lightly floured surface or parchment paper, then roll it out to your desired thickness. This flexibility allows you to control the final texture and appearance of your baked goods. The trade-off, however, lies in the baking time: thinner dough will cook more rapidly, resulting in a product that’s both delicate and prone to breaking, whereas thicker dough requires more time in the oven, yielding a more robust and resilient finished product.
STEP 4
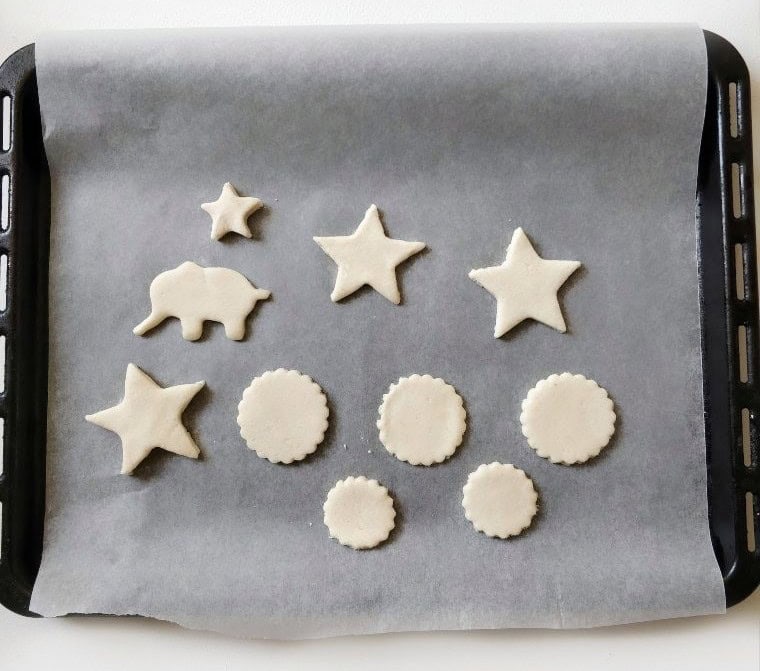
Roll out your dough and use a cookie cutter to create the shapes of your choice – there’s no limit to how many you can cut! Line a baking tray with parchment paper and carefully arrange your cut shapes on it. Then, pop them in the oven at 210F (100C) degrees for three hours. If they still feel slightly doughy when you take them out, don’t worry – just give them some extra time to bake until they’re nice and firm.
And remember, if there’s any moisture left in the ornaments, it’s best to let them air dry in the sun for a day before painting to avoid ruining your masterpiece.
STEP 5
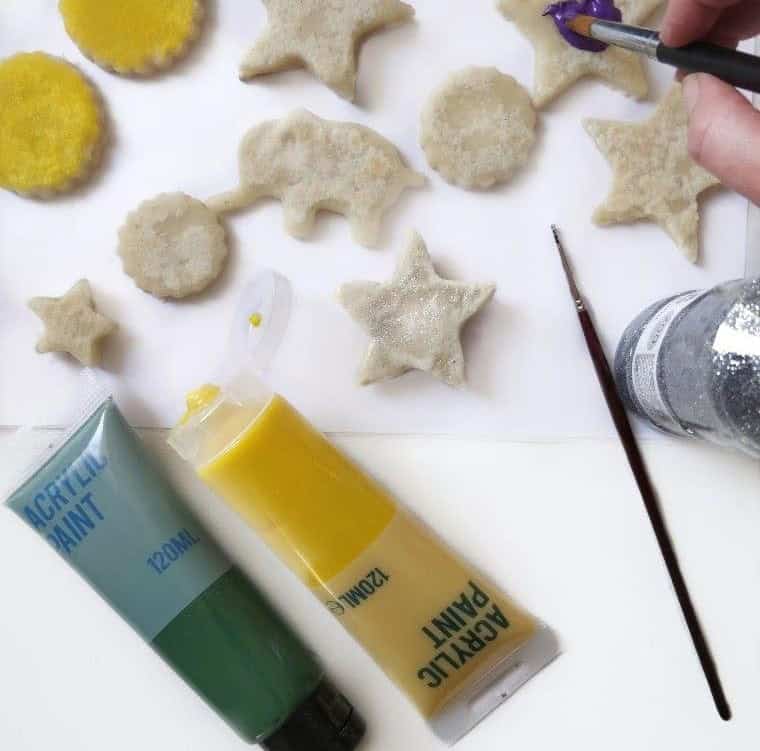
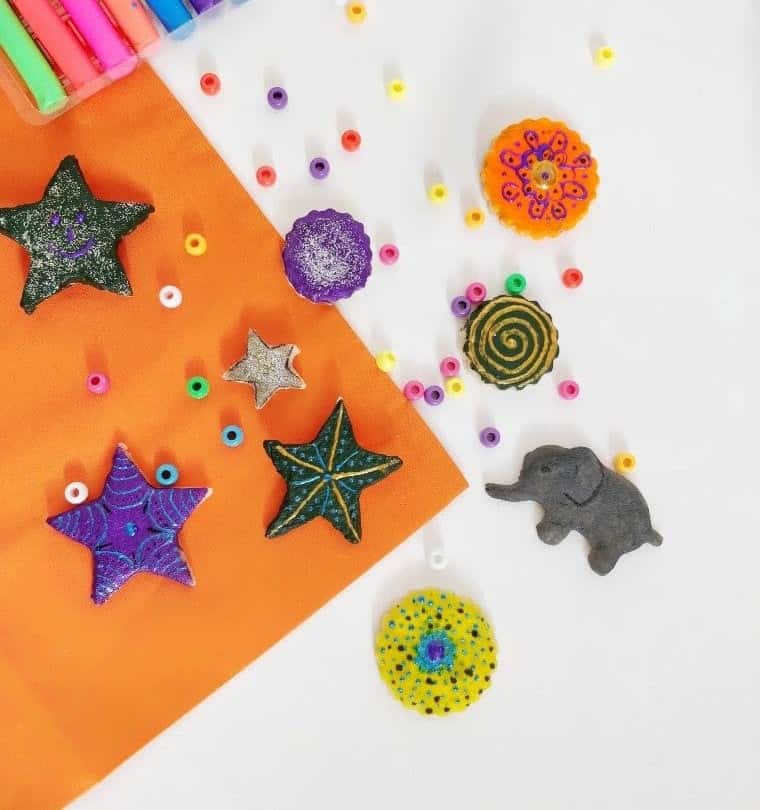
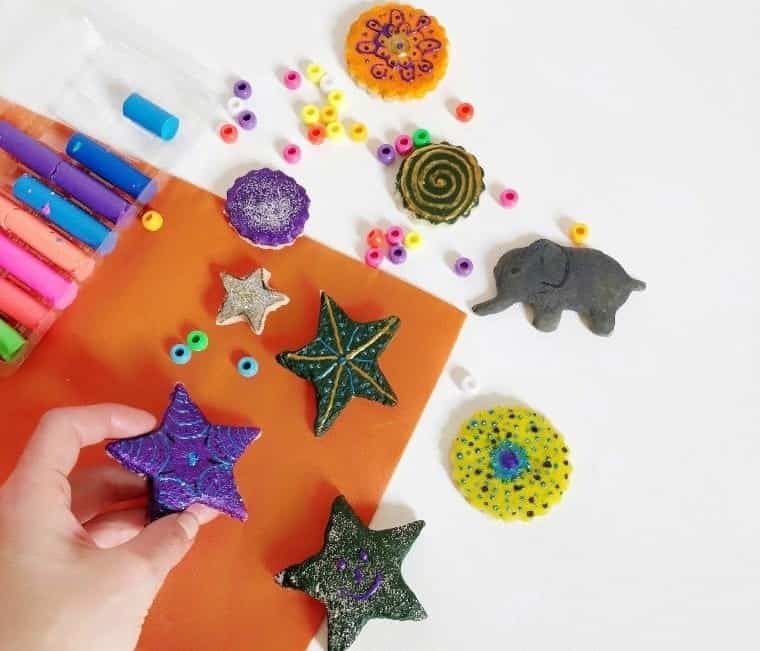
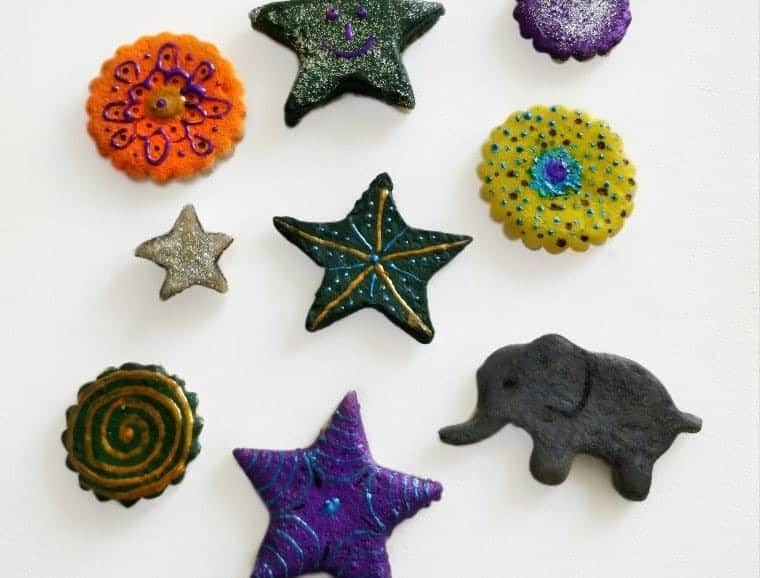
Before decorating, ensure the shapes have reached a firm consistency by allowing them to cool completely after baking. You can then use acrylic or oil paints to bring your ornaments to life. Keep in mind that oil-based paint may require 2-3 days to fully dry. Feel free to get creative with a variety of colors and add a touch of sparkle with glitter paint. For an extra layer of visual interest, consider incorporating beads into your design.
The possibilities are endless when it comes to transforming these salt dough shapes into unique and captivating ornaments. Allow your child’s imagination to run wild, and be amazed by the final product of their creativity.
How Long Do Salt Ornaments Last?
To extend the lifespan of your salt ornaments, proper preservation is crucial. One effective method is to apply a thin, even layer of mod-podge or clear glaze to all sides, effectively sealing in their delicate features. For added protection and long-term preservation, store them wrapped in bubble wrap within a sturdy box when not in use, ensuring they remain intact for years to come.
Why Did Your Salt Dough Ornaments Rise?
If you’re experiencing issues with your ornaments puffing up unexpectedly, it’s likely due to one of a few common mistakes. Firstly, it’s possible that your dough is overly thick, resulting in the ornaments expanding more than intended. To rectify this, consider rolling out thinner sheets of dough for your next ornament-making endeavor. Alternatively, your oven temperature may be too high, causing the ornaments to rise excessively.
To avoid this issue, try reducing the heat setting to a more moderate level. Finally, be mindful when selecting flours, as using self-rising flour instead of all-purpose can also lead to unwanted expansion. By taking these precautions, you should be able to achieve the perfect shape and size for your ornaments.
Do Salt Ornaments Last Forever?
While they may not last forever, the salted preserves are remarkably durable and can remain usable for an extended period. The added salt serves as a natural preservative, effectively preventing any potential fungal or yeast growth caused by moisture. Furthermore, applying a layer of mod-podge or clear glaze can significantly enhance their shelf life.
With proper storage and handling, it’s entirely possible to use these preserves year after year, potentially even for decades to come with careful attention.
What Kind of Paint Do You Use on Salt Dough?
When it comes to coloring your ornaments, you have the flexibility to use either oil paint or acrylic paint. However, if you opt for oil paint, be aware that it may take up to three days to fully dry, which can be a significant waiting period. A more practical and mess-free option, especially for younger children, is to employ washable paints, ensuring a safe and enjoyable creative experience.
How to Seal Salt Dough?
When it comes to salt dough, moisture is a major concern that must be addressed. To prevent damage and ensure longevity, it’s essential to seal the dough thoroughly. A suitable option for achieving this is by applying a layer or two of either Mod Podge or clear glaze. Not only will these products safeguard the vibrant colors, but they’ll also extend the shelf life of your ornaments, keeping them looking their best for a longer period.
Other Crafts for Kids

Unleash your child’s creativity with these amazing and affordable DIY projects, perfect for kids of all ages! From turning everyday items into unique paper wallets to creating stunning unicorn crafts, we’ve got 20 dollar store crafts that are sure to inspire. Get creative with popsicle stick masterpieces, decorate eggs for Easter with fun and easy crafts, or add a touch of magic with rock painting ideas. And when you’re done crafting, consider upcycling old items into something new and exciting.
With over 47 DIY projects to choose from, the possibilities are endless!
DIY Salt Dough Ornaments
Create unforgettable memories with your little ones by crafting DIY salt dough ornaments together! With just 3 hours of preparation and 30 minutes of active time, you’ll have a batch of 10 adorable decorations to cherish. Make the most of your evening and bond with your kids over this fun and easy project!
Equipment
To ensure a seamless baking experience, having the right tools at your disposal is crucial. Baking sheets, parchment paper, rolling pins, cookie cutters, and paintbrushes (yes, you read that right – paintbrushes can come in handy when dusting off excess flour) are all must-haves for any aspiring baker. And let’s not forget a sturdy bowl to mix and measure your ingredients. But what about preventing your screen from going dark while you’re busy whipping up a storm?
It’s easy to get caught up in the creative process, only to find yourself struggling to see the digital display on your device as the hours tick by. To avoid this issue, consider enabling the ‘Screen Wake’ or ‘Screen Saver’ feature on your computer or mobile device. This way, you can set your screen to remain active for a predetermined period of time, allowing you to refer to recipes and tutorials without having to constantly wake up your device.
Materials 1x2x3x
To get started with this unique DIY project, you’ll need a few simple ingredients. Begin by gathering the following supplies: one large glass measuring cup (approximately 250ml or 9oz) filled with all-purpose flour. Next, grab another identical measuring cup and fill it with salt to the same volume. You’ll also need about a quarter of a cup (230ml or 8oz) of warm water. For the finishing touches, prepare some acrylic paint and glitter paint for added decoration.
Instructions
To begin, gather all the necessary ingredients. In a large mixing bowl, combine 250 milliliters of all-purpose flour and 250 milliliters of salt. Next, add in 230 milliliters of warm water and thoroughly mix the ingredients until well combined. Knead the dough to achieve the desired consistency. Then, roll it out on parchment paper to a thickness that suits your needs. Use a cookie cutter to cut out shapes of your choice, and transfer them to a baking tray lined with parchment paper.
Place the tray in a preheated oven at 210 degrees Fahrenheit (100 degrees Celsius) for three hours. Once completely dry, you can paint and decorate your ornaments as desired, bringing your creative vision to life.