Transform your bullet journal or scrap paper into a canvas for creativity with these effortless face doodle ideas. As someone who loves to indulge in doodling, I’ve found that simple yet playful face drawings are an excellent way to express oneself. If you’re like me and enjoy putting pen to paper but crave something more defined, this list is perfect for you! With endless possibilities for facial expressions and body shapes, the options are truly limitless.
Whether you’re looking to add some whimsy to your daily drawing routine or simply want to relax and unwind, these doodle faces are sure to bring a smile to your face. And if you need a little extra guidance, I’ve even created a YouTube video featuring the exact drawings. For those who want to know my go-to supplies for projects like these, I recommend checking out [notebooks], [marker set], [pens], and [pencils] – they’re essentials in my creative arsenal.
Whatever your style, I hope you enjoy drawing from this list as much as I do! Don’t forget to share your favorite doodle face with me in the comments below.
Watch: 23 Easy Doodle Face Ideas
Slightly Smiling Faces
Begin by crafting the character’s inner arm on the left side, guiding your pen downwards to shape the hand and then upwards for the ears, using a smaller scale for the latter. As you move along the axis, create a gentle arc to define the head, mirroring this on the opposite side to complete the overall outline. Next, bring forth the eyebrows, followed by the eyes, which should be positioned off-center from the eyebrows.
To add depth and dimension, draw tiny triangles within each eye to represent the irises, leaving room for further details to fill in the rest of the character’s features.
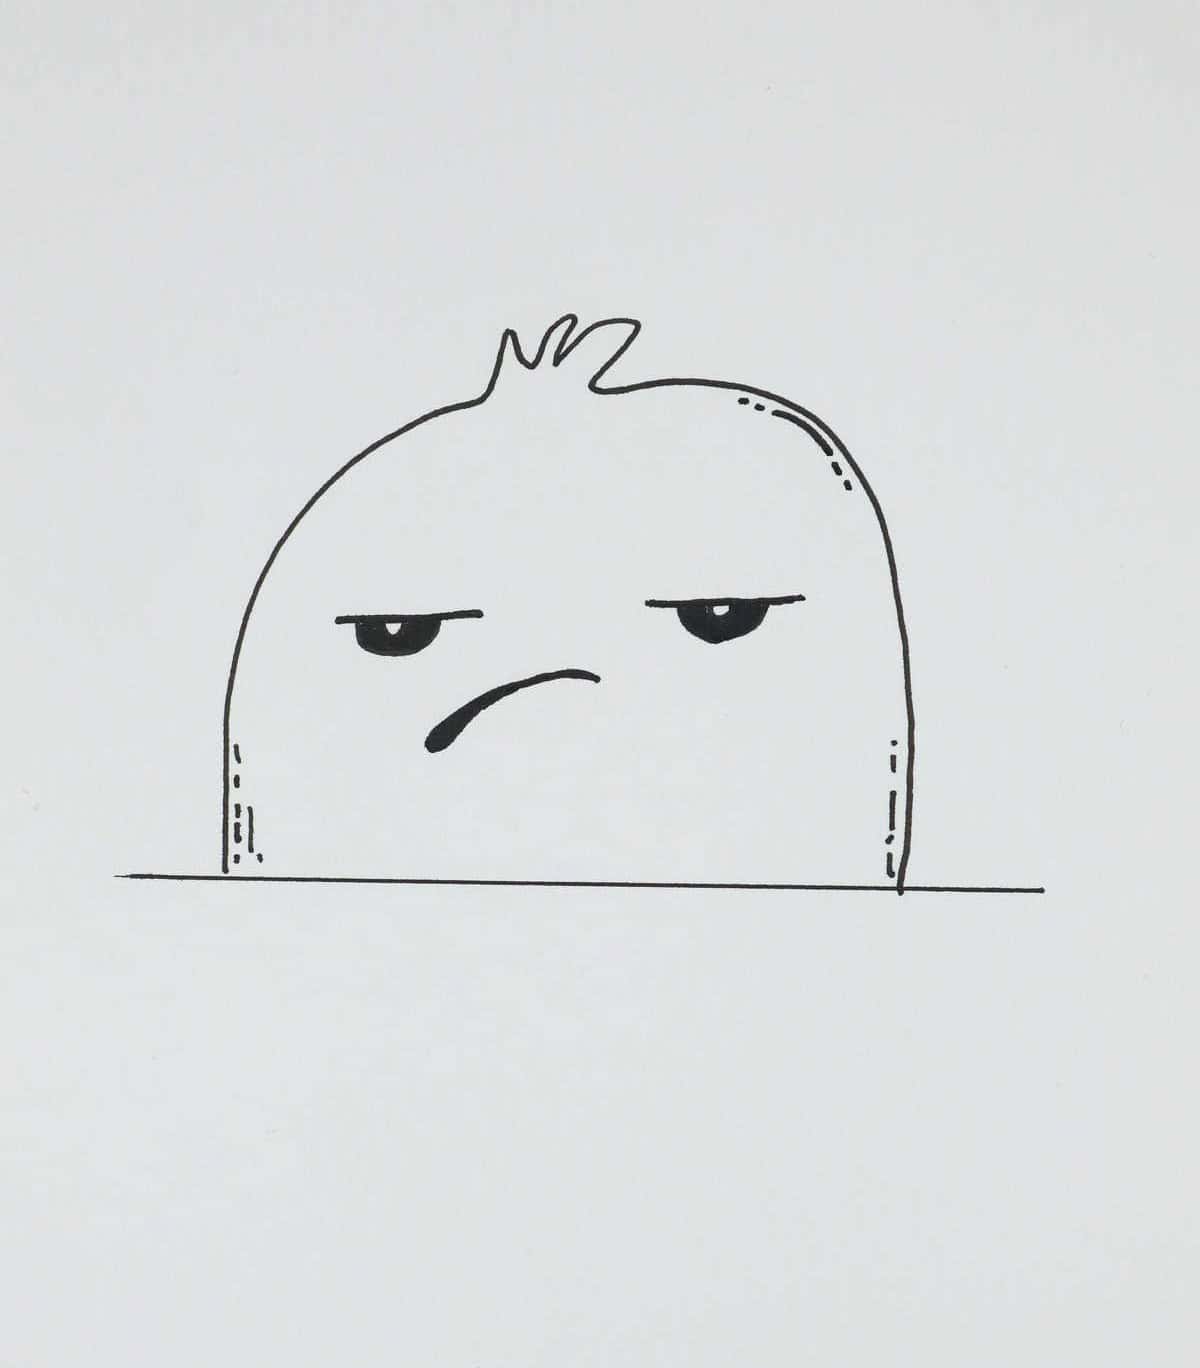
Angry Face

To craft a cartoon face, start with the body of the rainbow shape. Then, for the eyes, draw two ‘6’s – one traditionally and one in reverse – and fill them in. Next, move on to the frown, followed by the hair, which resembles multiple ‘3’s connected. Finally, complete the look by adding the arms and detailed features around the eyes.
Relieved Face
To bring your doodle to life, begin by crafting the eyes. Use a curved line to create a Pacman-inspired shape in each eye. Next, move on to the body, drawing an upside-down hook that meets the middle of the far eye and extends below the face. From there, you can add the smile, arms, and baseline details before finishing with the circular elements at the back of the head.
Smirking Face
To begin crafting the whimsical creature’s features, start by forming the body into a roughly half-sizeable soft-angled rectangle. This provides a solid foundation for the rest of the design. Next, move on to create the ears, carefully shaping them to add depth and dimension to the overall piece.
Squinting Face with Tongue

A unique combination of shapes and features comes to mind when envisioning this character’s face – an arched body resembling a rainbow, triangular eyes with squinty lids that evoke the sense of a greater-than and less-than sign, and a mouth that adds depth to the overall design. The finishing touches are sweat drops and facial lines, which add texture and emotion to the piece. Once complete, this character would be well-suited for use in bullet journal mood tracker ideas.
Confused Face

To breathe life into your character’s features, start by crafting a head shape reminiscent of a rainbow-arched arc. Then, attach ears to the most rounded portion of the upper body, making sure they’re positioned in harmony with the rest of the design. For added depth and dimension, fill in the inner ear details.
Next, turn your attention to the facial features. Define the shape of the eyebrows and mouth, taking care to balance their proportions.
Finally, add some subtle detailing at the bottom and a few thought-provoking question marks to imbue your character with a sense of curiosity and wonder.
Jolly Face
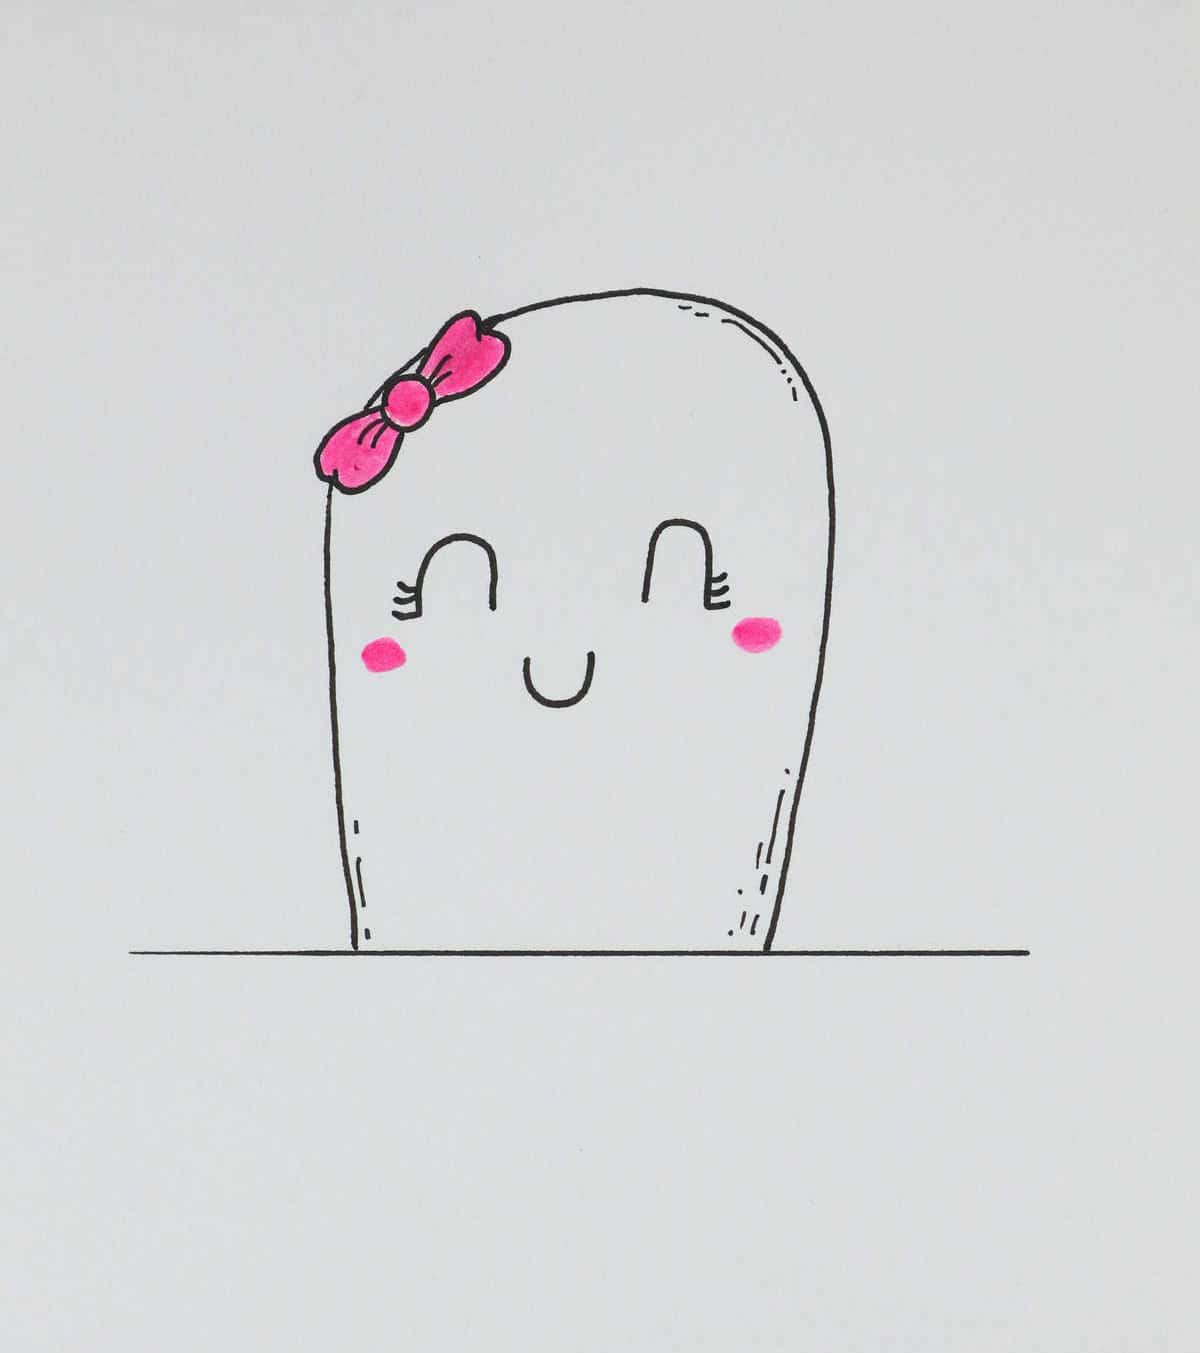
To bring Miss Jolly to life, start by drawing a proportional bow that sets the tone for her facial features. Next, add an arced-shaped body on either side of the bow, including the eyes and mouth. This foundation will help guide your doodling as you move forward. Finally, complete the face with eyelashes, color in the bow, and add subtle details to the cheeks and markings at the base. Once finished, this delightful face doodle is sure to shine surrounded by a bouquet of flower doodle ideas!
Smiling Face
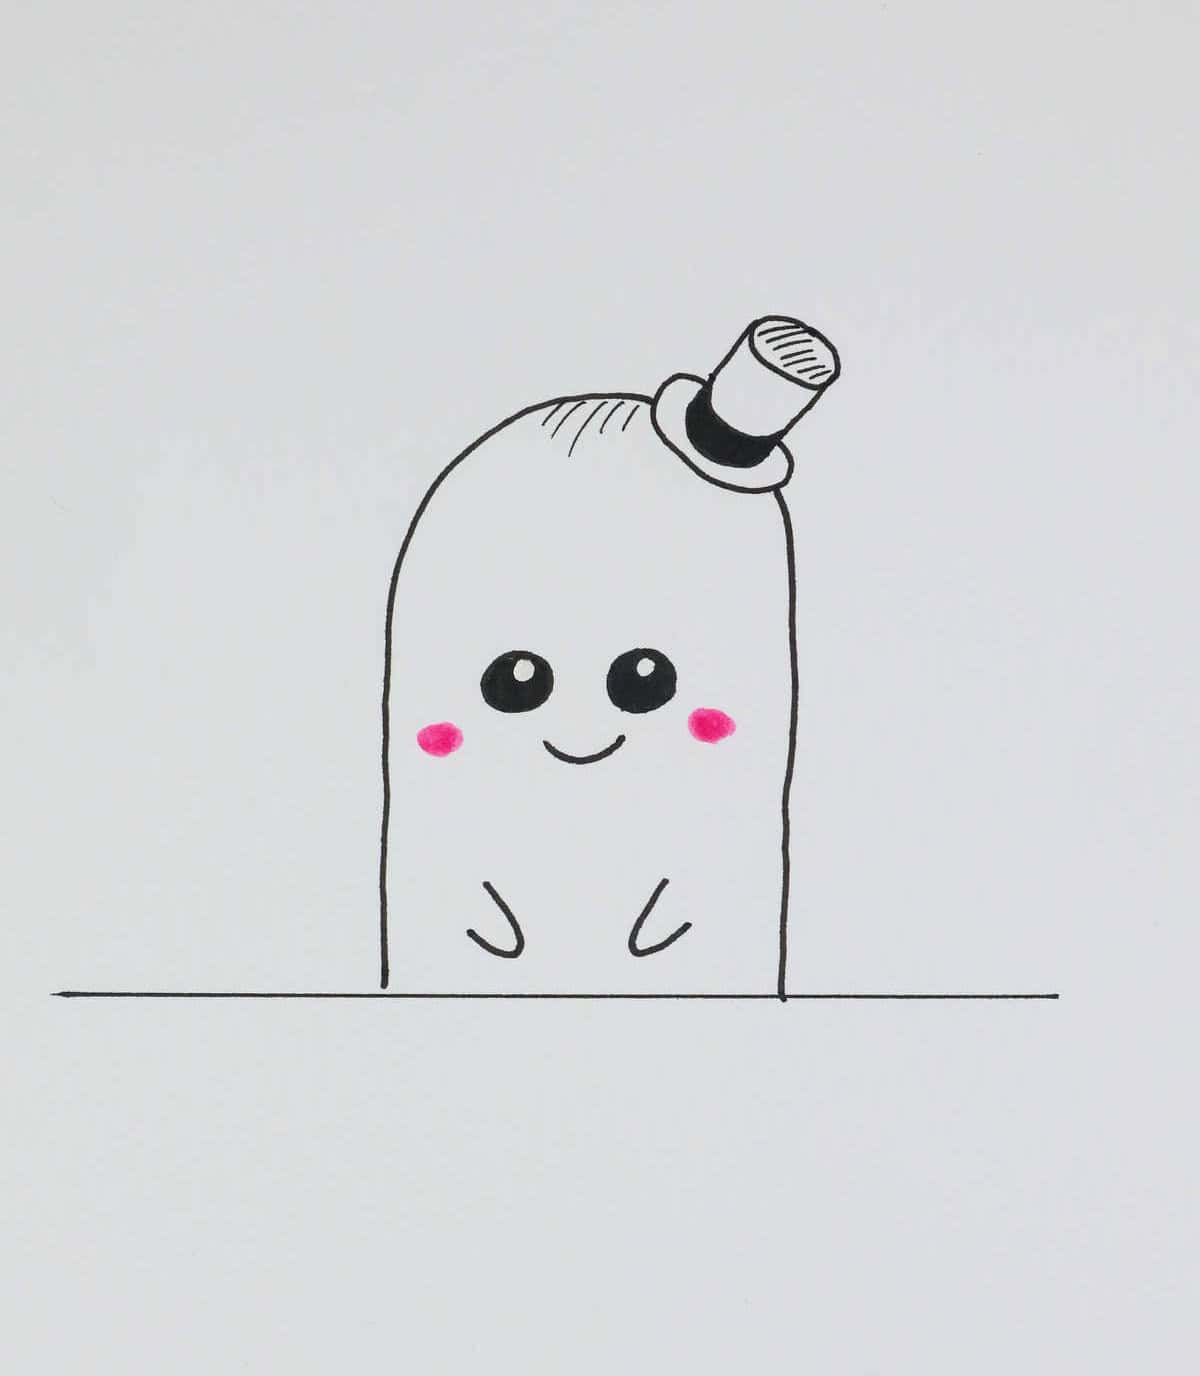
To bring this character to life, start by drawing the hat as an anchor for the rest of the features. Begin with an angled cylinder reminiscent of a can, then add the brim and complete it with fine details. With the hat in place, move on to the body. When adding eyes, remember to draw small circles within the larger ones before coloring. Next, bring this character full circle with a simple mouth, tiny arms, rosy cheeks, and delicate trimming details.
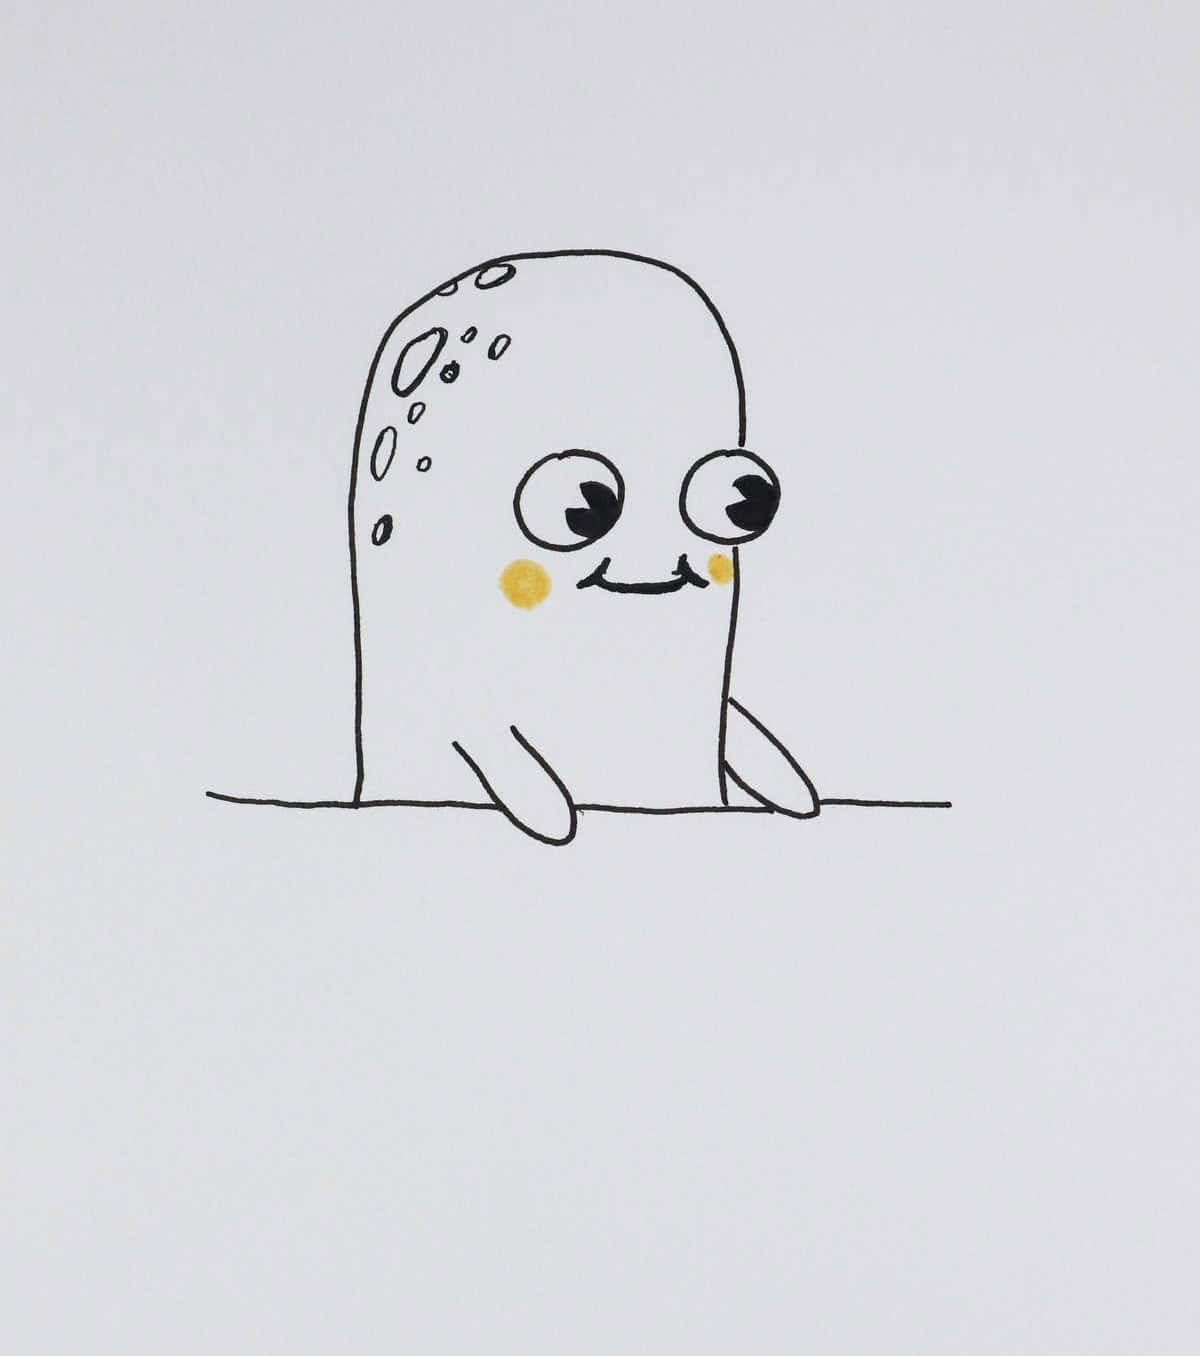
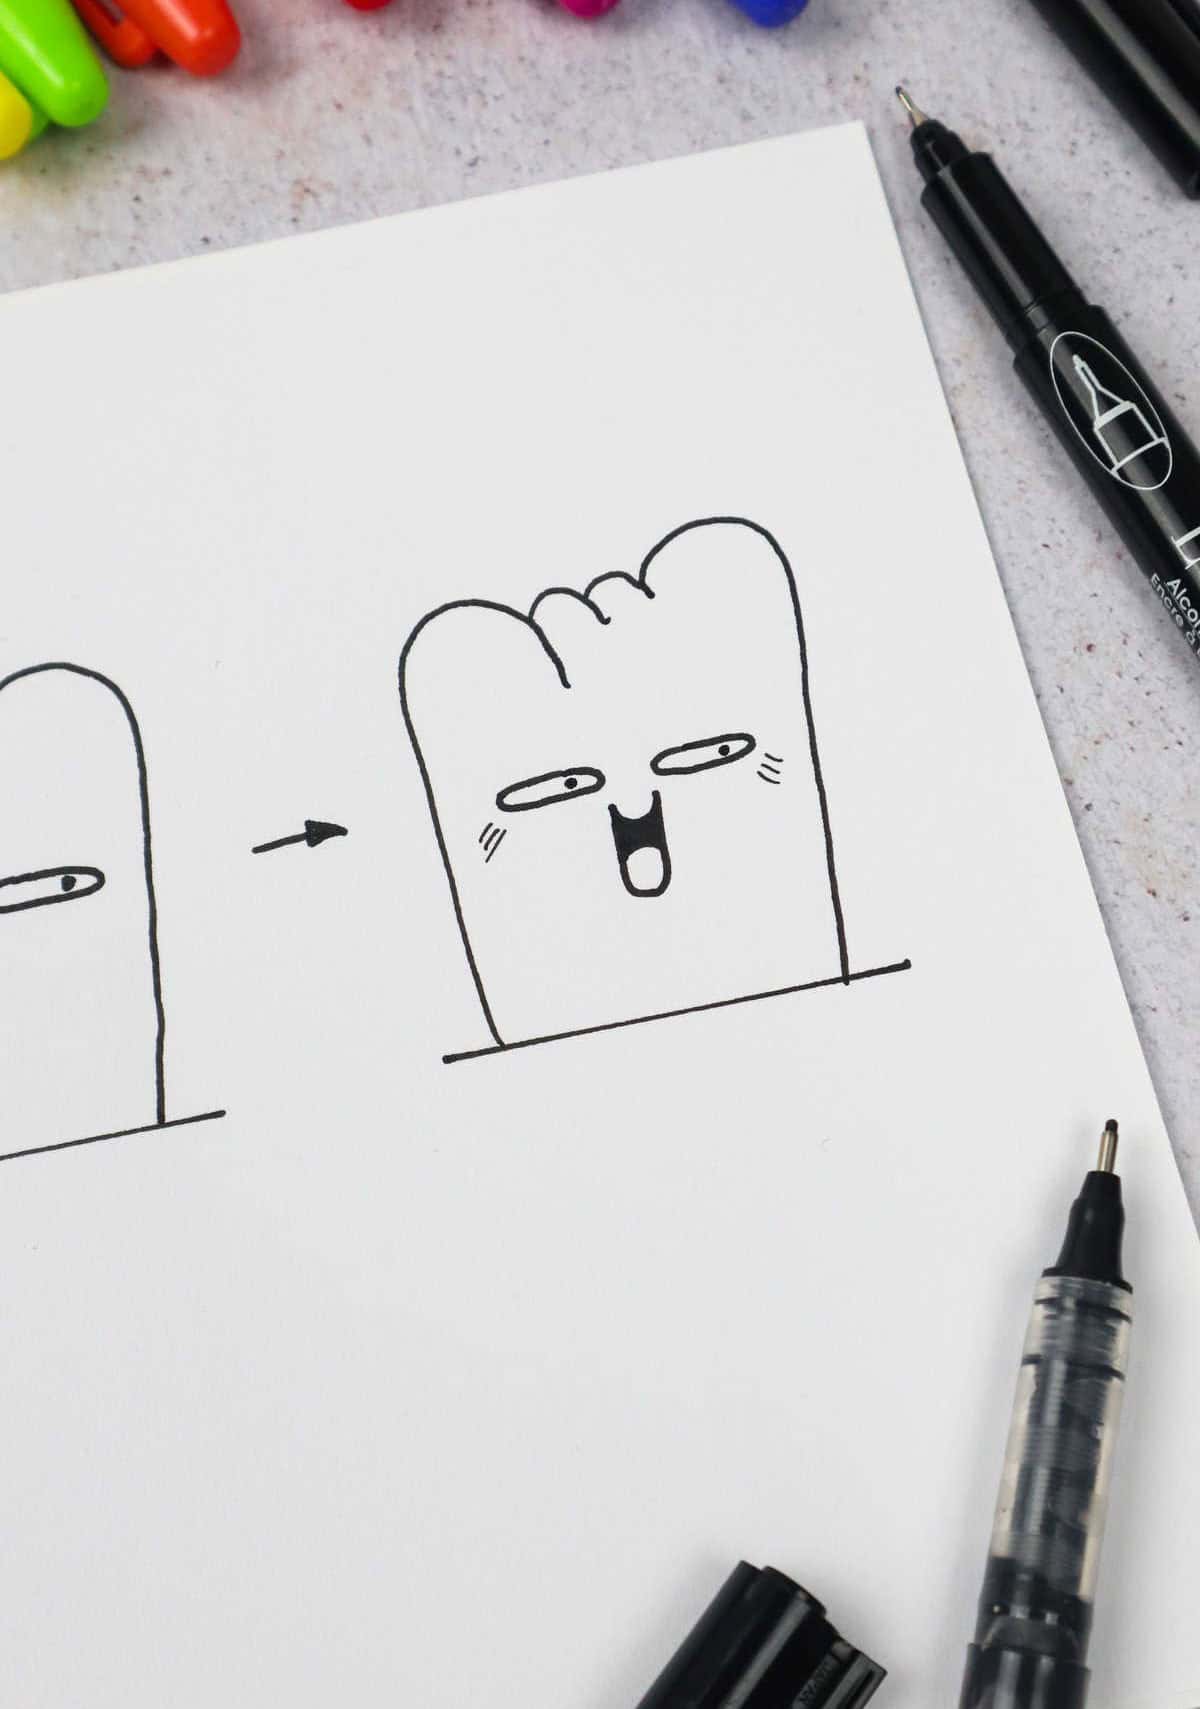
Exhaling Face
Starting with the body and arms of our small succulent figurine, we’ll then move on to crafting its eyes. Envision two pairs of uppercase ‘Ds’ facing downwards, with one slightly smaller than the other – an endearing feature that adds to its charm. The overall appearance is reminiscent of a cactus, don’t you agree? To bring this little guy to life, all that remains is to add eyelashes, pink cheeks, fine markings, and a mouth to complete the look.
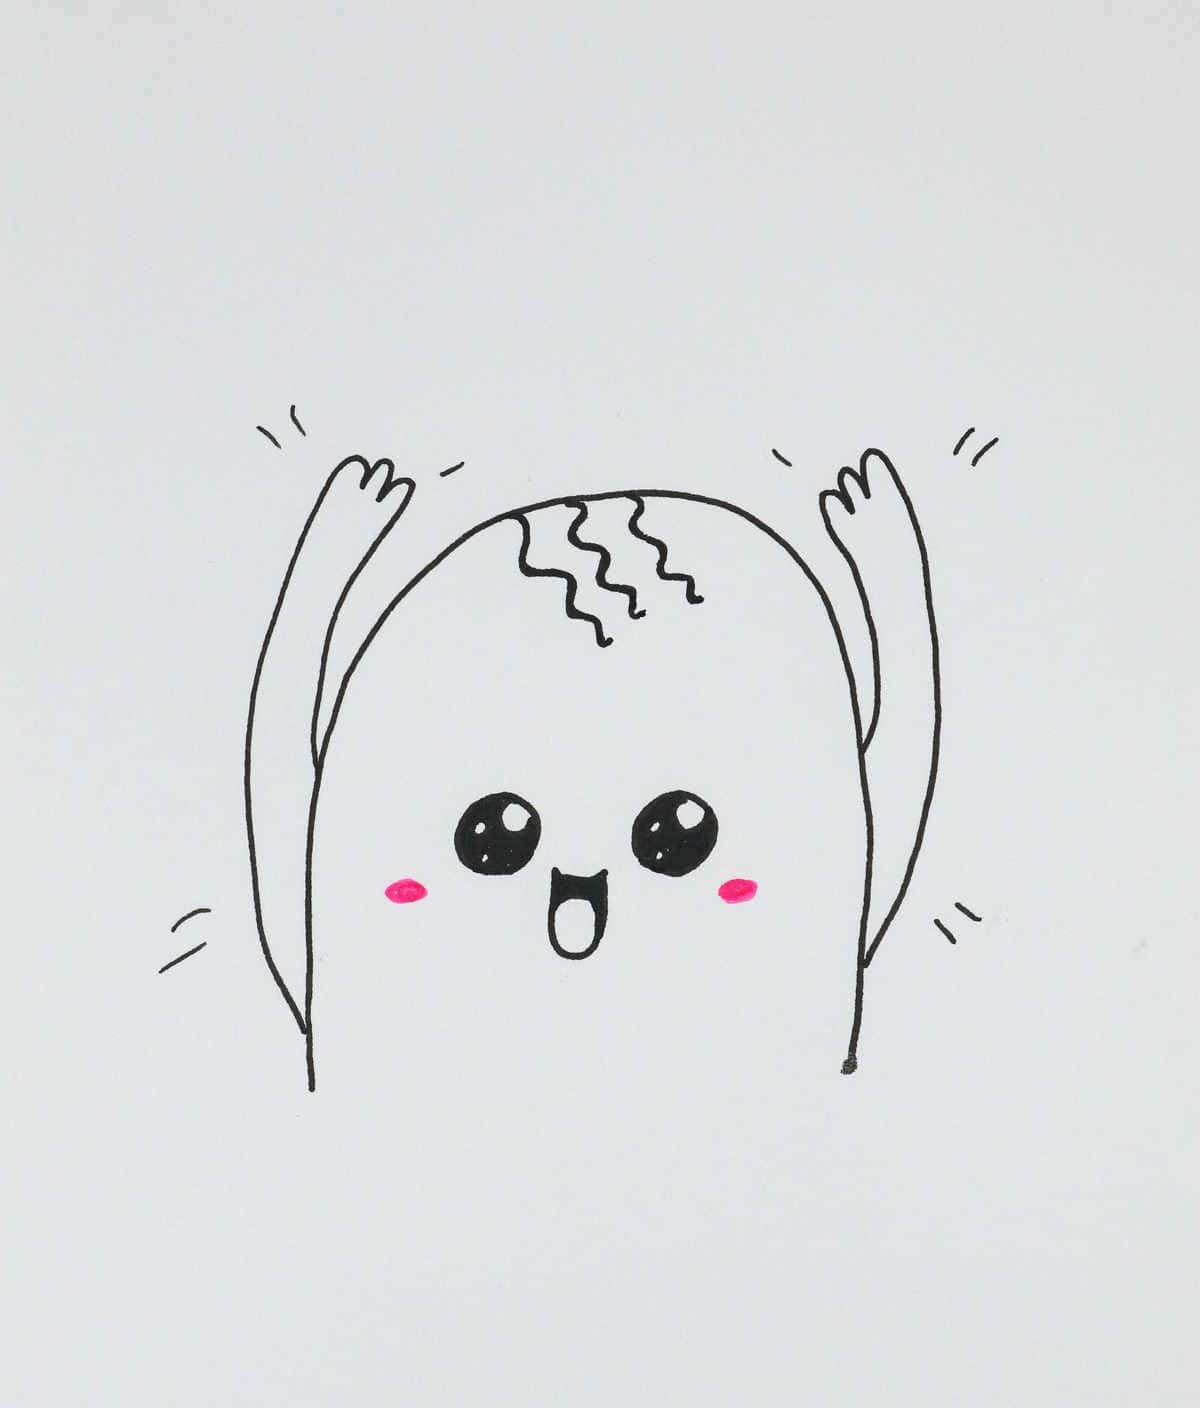
Excited Face
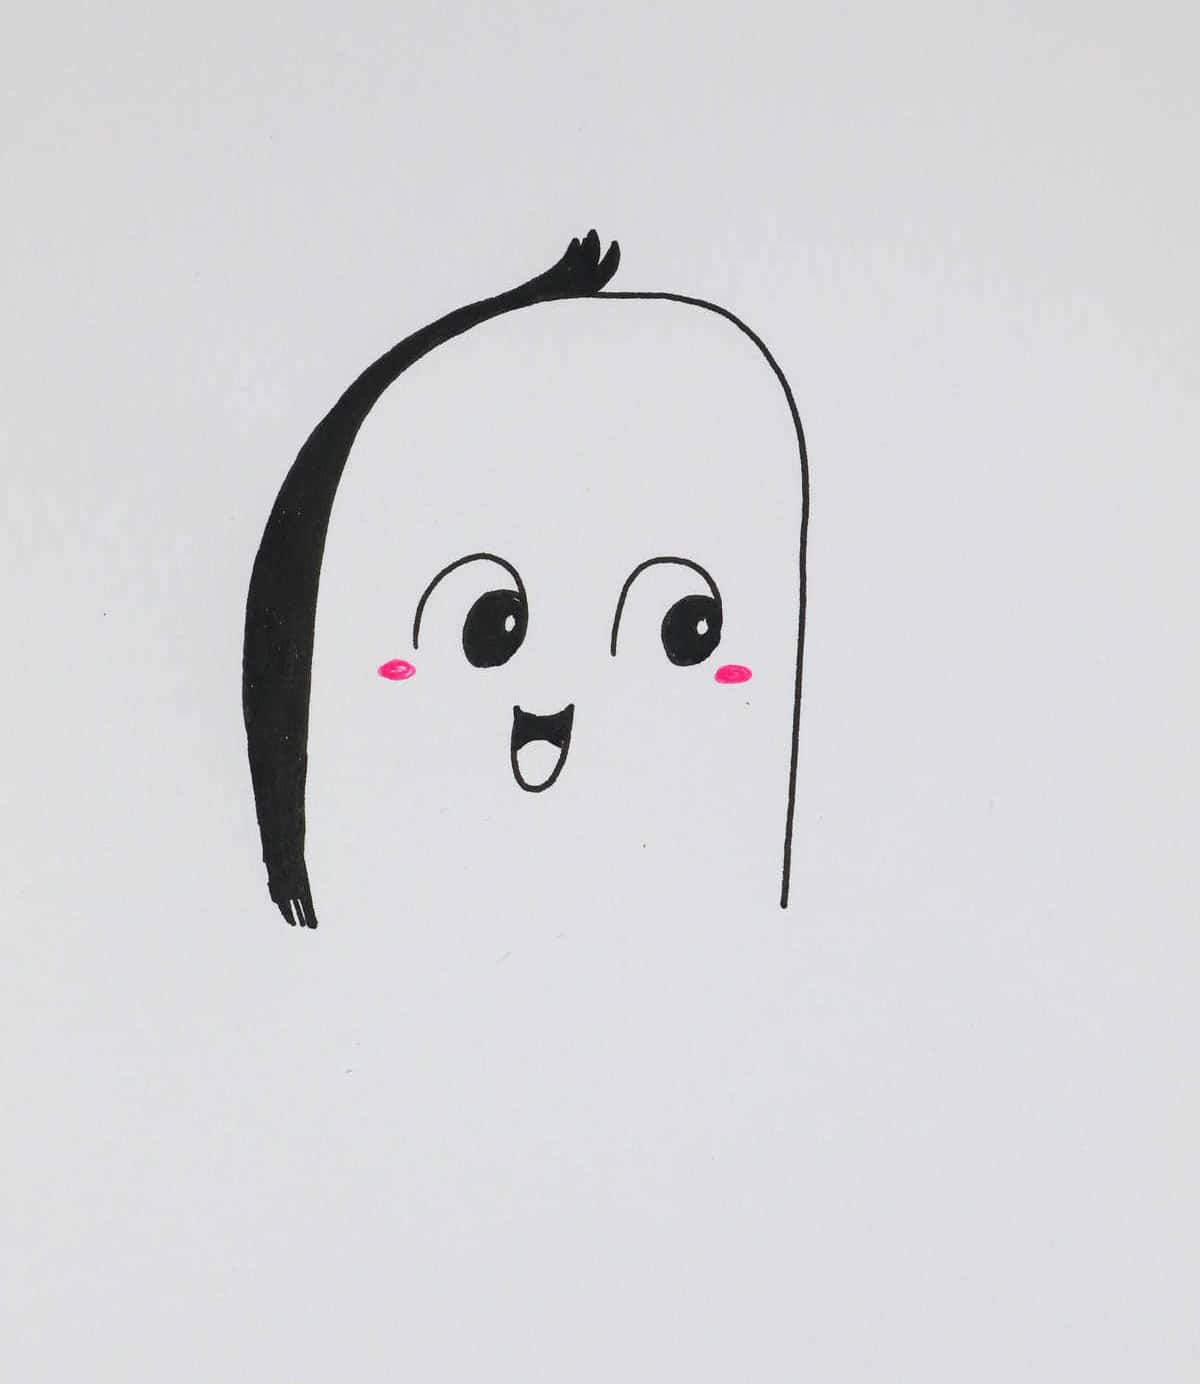
Let’s begin by sketching out the outline of the figure’s body, taking care to leave a subtle void for the eyes. This will give us room to add the ‘6’ shapes that will form the character’s gaze. As we fill in the face, be sure to maintain a small gap between the eyes and the nose, allowing for a touch of white to peek through. With the facial features in place, turn your attention to the mouth. Be mindful of leaving enough space for the tongue to be visible behind it.
Once you’ve defined the lips, move on to adding the cheeks, taking care to maintain their natural contours. Finally, bring your character’s locks into focus by drawing a few spiky strands atop the head. From there, allow them to flow naturally downwards, curving against the body as they go.
Face with Head Bandage

To bring our bandaged friend to life, start by drawing a reversed ‘3’ shape and then seamlessly integrate it into the body. As you move down the other side, complete the outline with a traditional ‘3’, setting the stage for the hair and headband that will follow. Next, add some flair with the hair, followed by the bandage itself. To achieve this combination effectively, be prepared to pick up your pen at varying points to create the illusion of the band being behind the hair.
Once you’ve completed the face, including the eyes, grimace, and arms, return to the drawing board and use a colored marker to fill in the band with any color that strikes your fancy. As I drew this picture, it felt like a moment of serenity. Enjoy these doodle ideas for your journal? You’ll love our collection of bullet journal ideas!
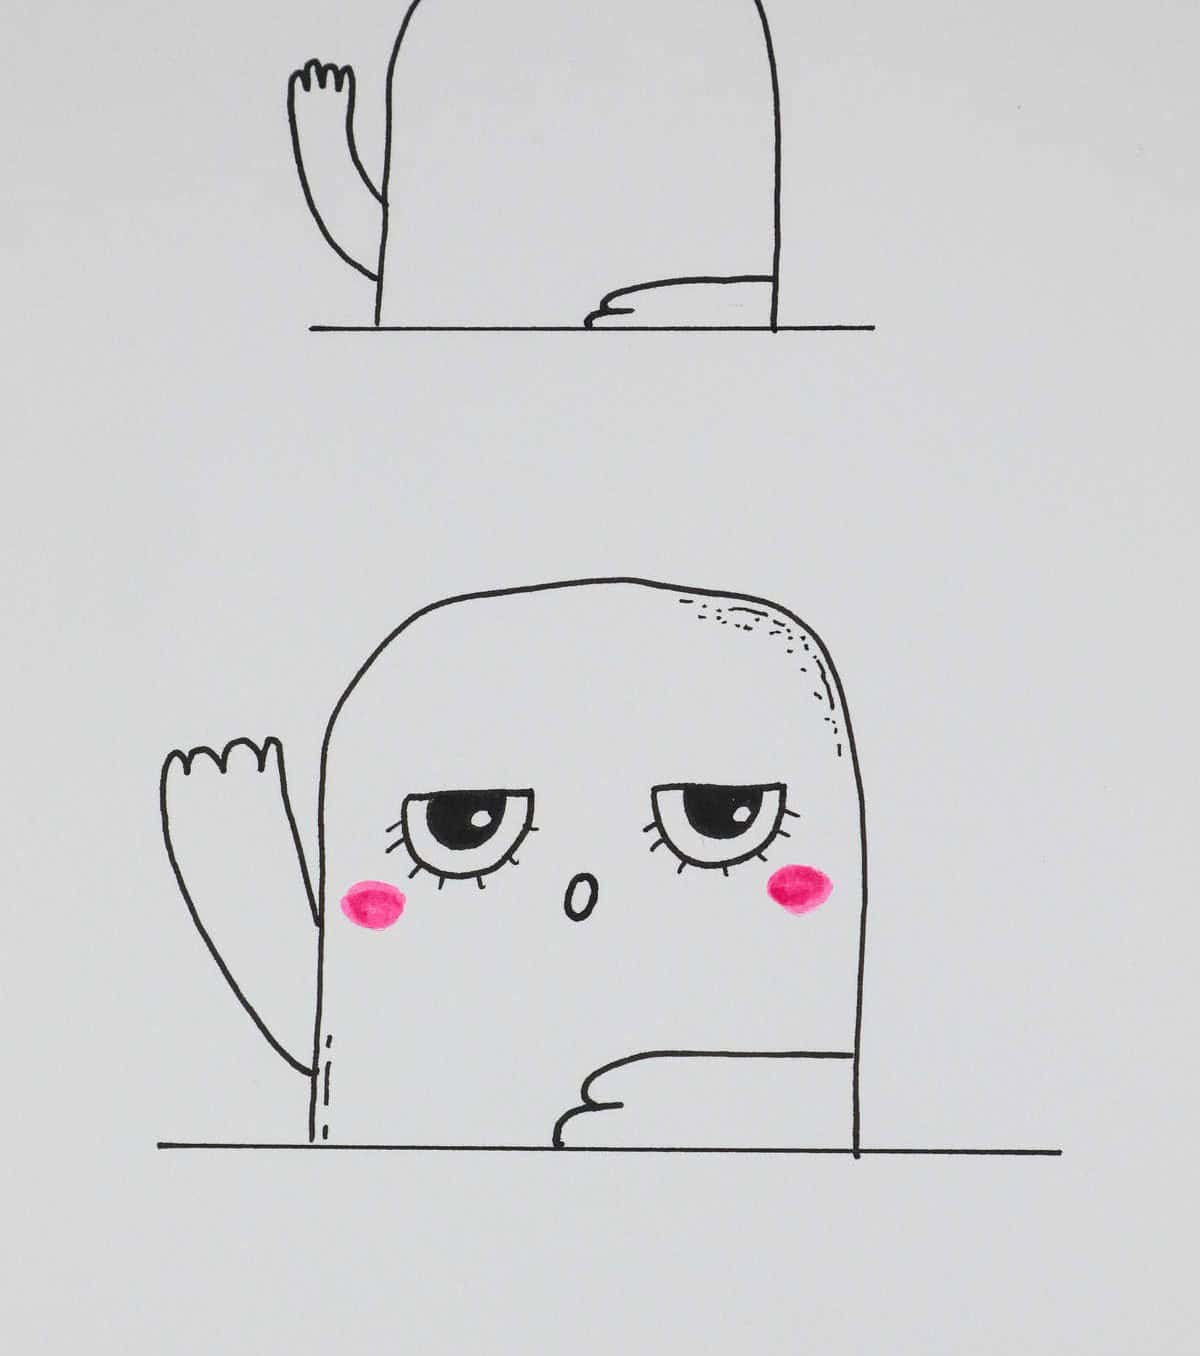
Upset Face
To bring this sorrowful expression to life, begin by crafting the facial features. Start with the body of the face and then pause to add some hair atop its head, giving it a fuller appearance. Next, define the eyes and create a frown by darkening any mouth-related details to emphasize the emotional depth. To take expressiveness to the next level, consider adding more nuanced details to the body itself.
Surprised Face
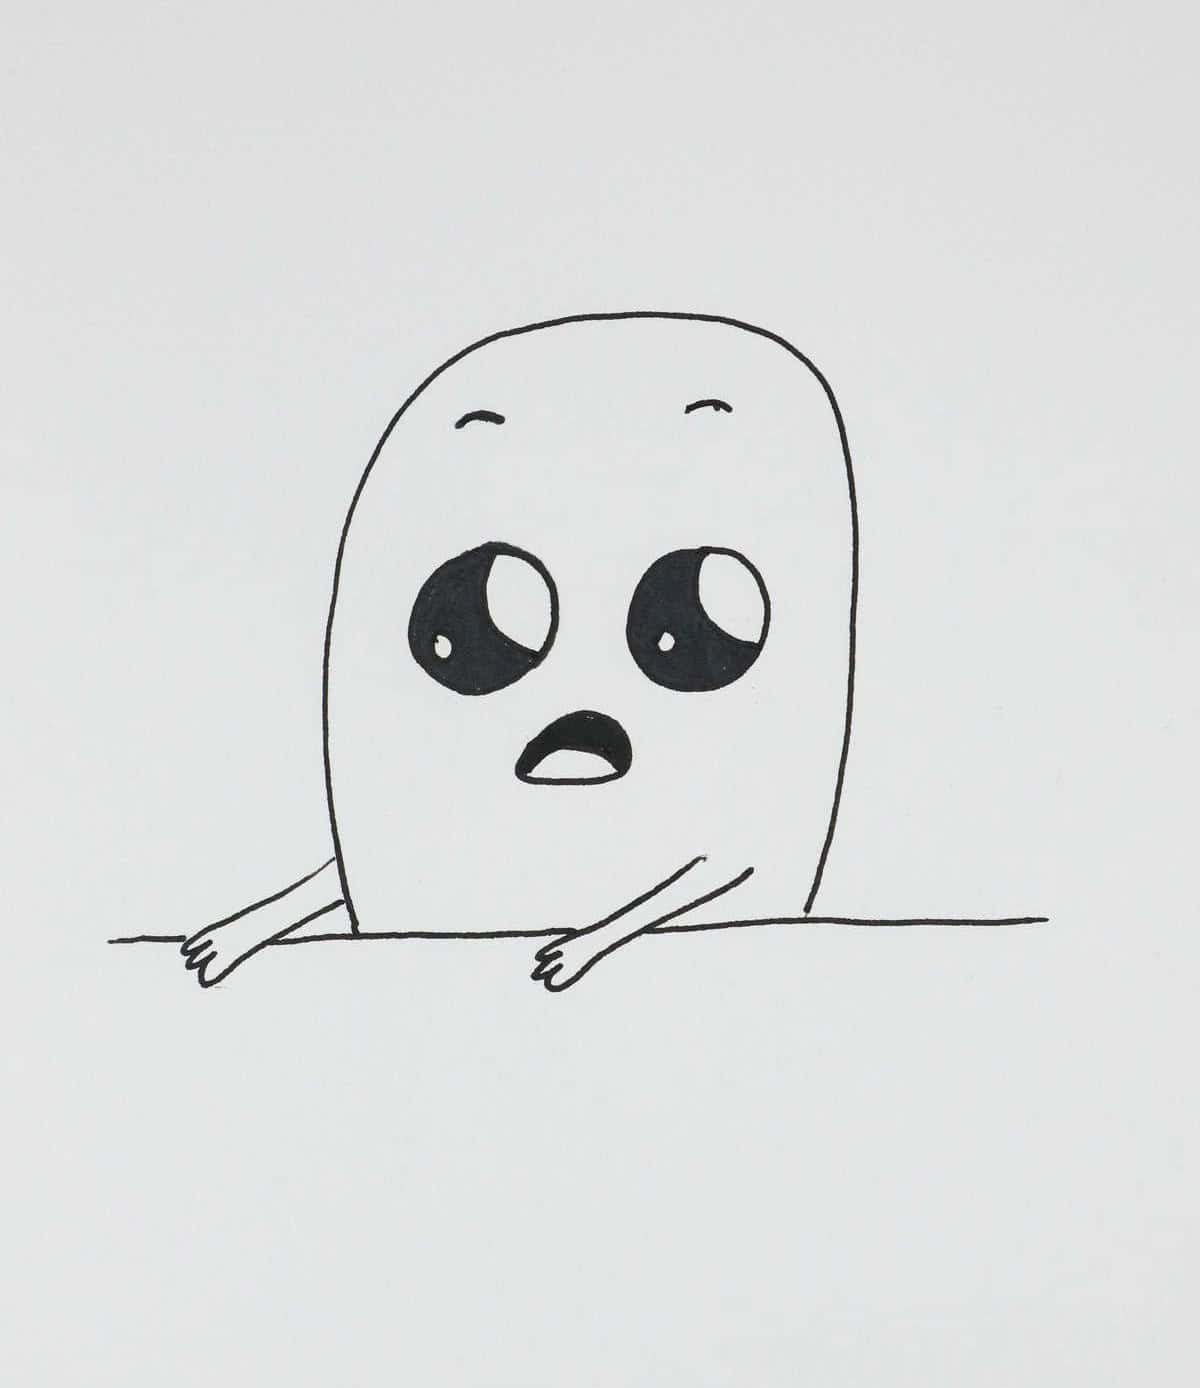
To bring your creation to life, start by crafting the arced shape of the body. Next, focus on creating the eyes that will be the focal point of your sculpture’s expression. This is where you’ll add the finishing touches to convey a sense of surprise and wonder, perhaps even capturing the ‘OMG!’ moment when something unexpected happens.
With the eyes in place, it’s time to tackle the eyebrows and mouth, working together to achieve that perfect look of shock and awe.
Once these details are complete, move on to the right arm, using the baseline as a guide to ensure proper spacing for the left arm. As you finish the second arm, take a step back to admire your handiwork and get ready to take your creation to the next level.
Celebrating Face
Bring your party animal to life! Start by sketching the arched body shape, then move on to those piercing peepers – draw two small circles for the eyes before filling in the rest of the character. This attention to detail will add depth and complexity to your design. From there, tackle the mouth, hair, and arms, finishing with a flourish of motion lines around the arms. Voilà! Your party animal is now ready to rock!
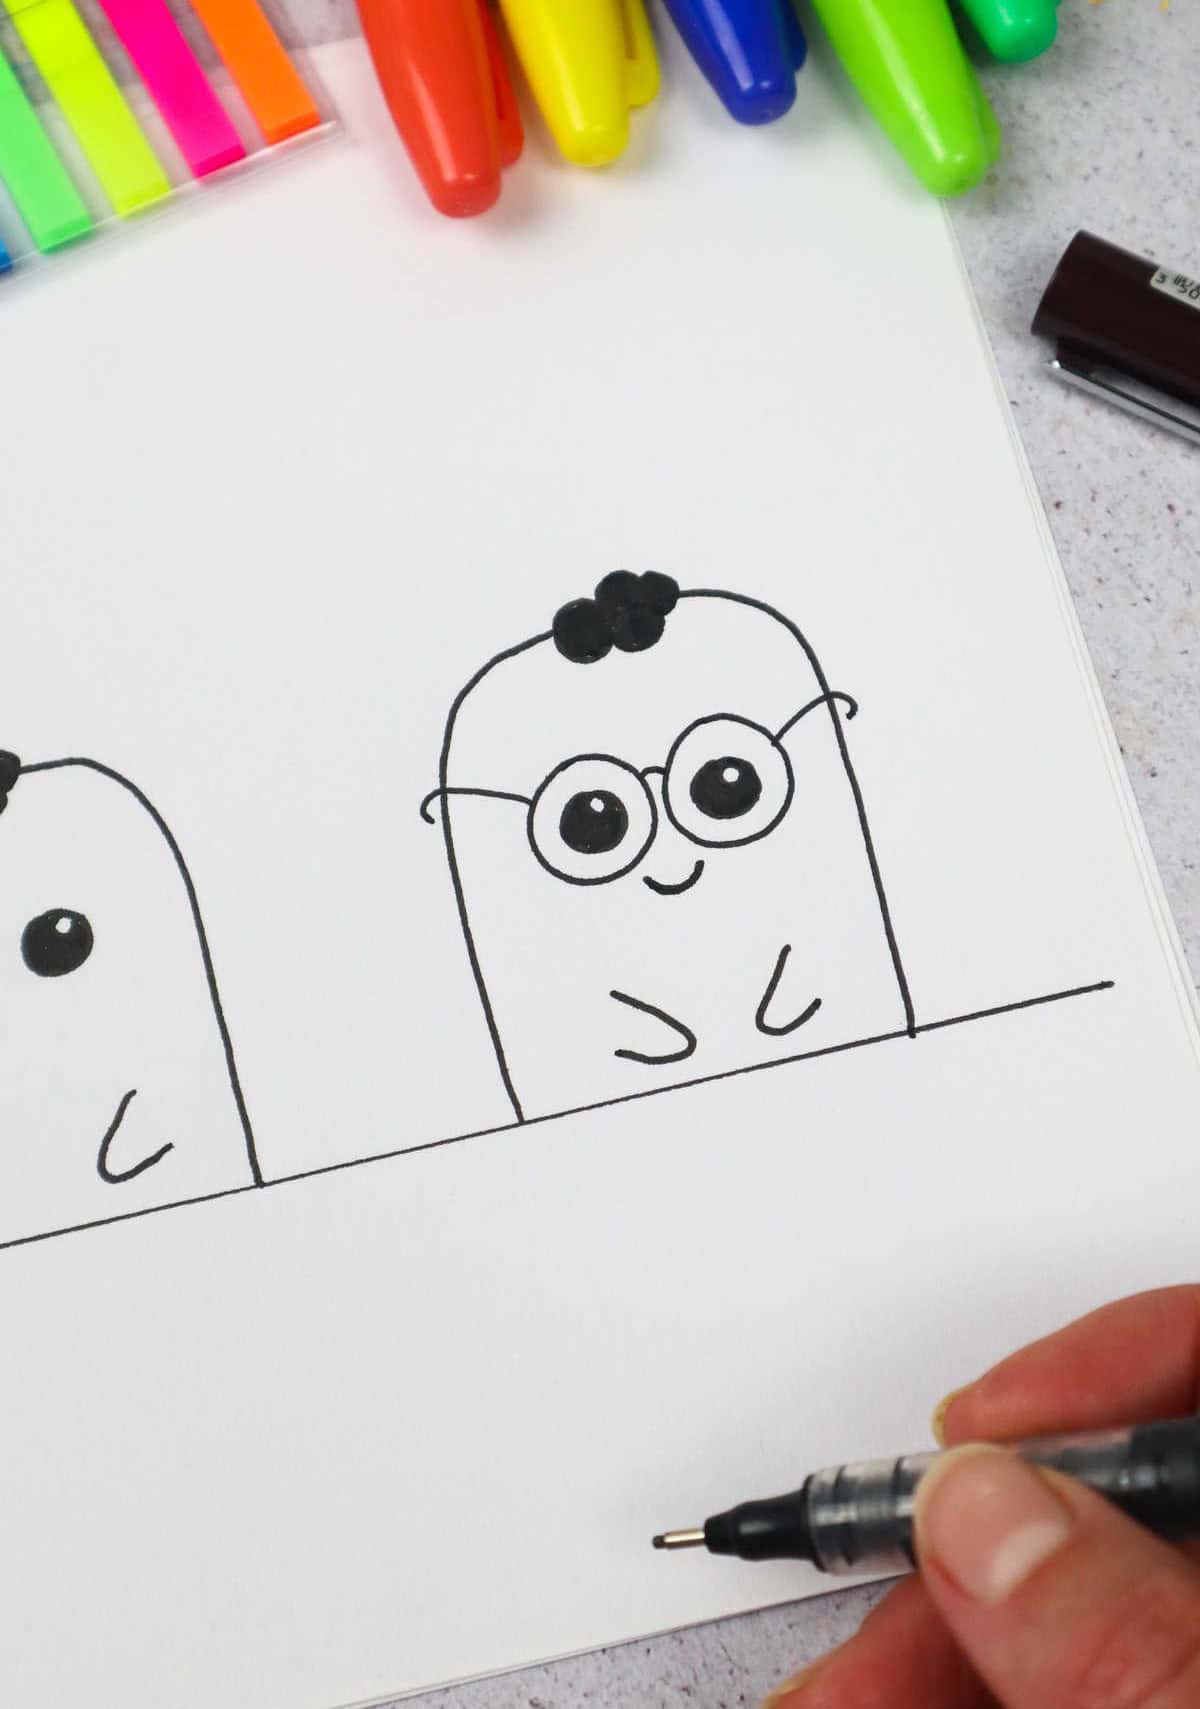
Nerdy Face
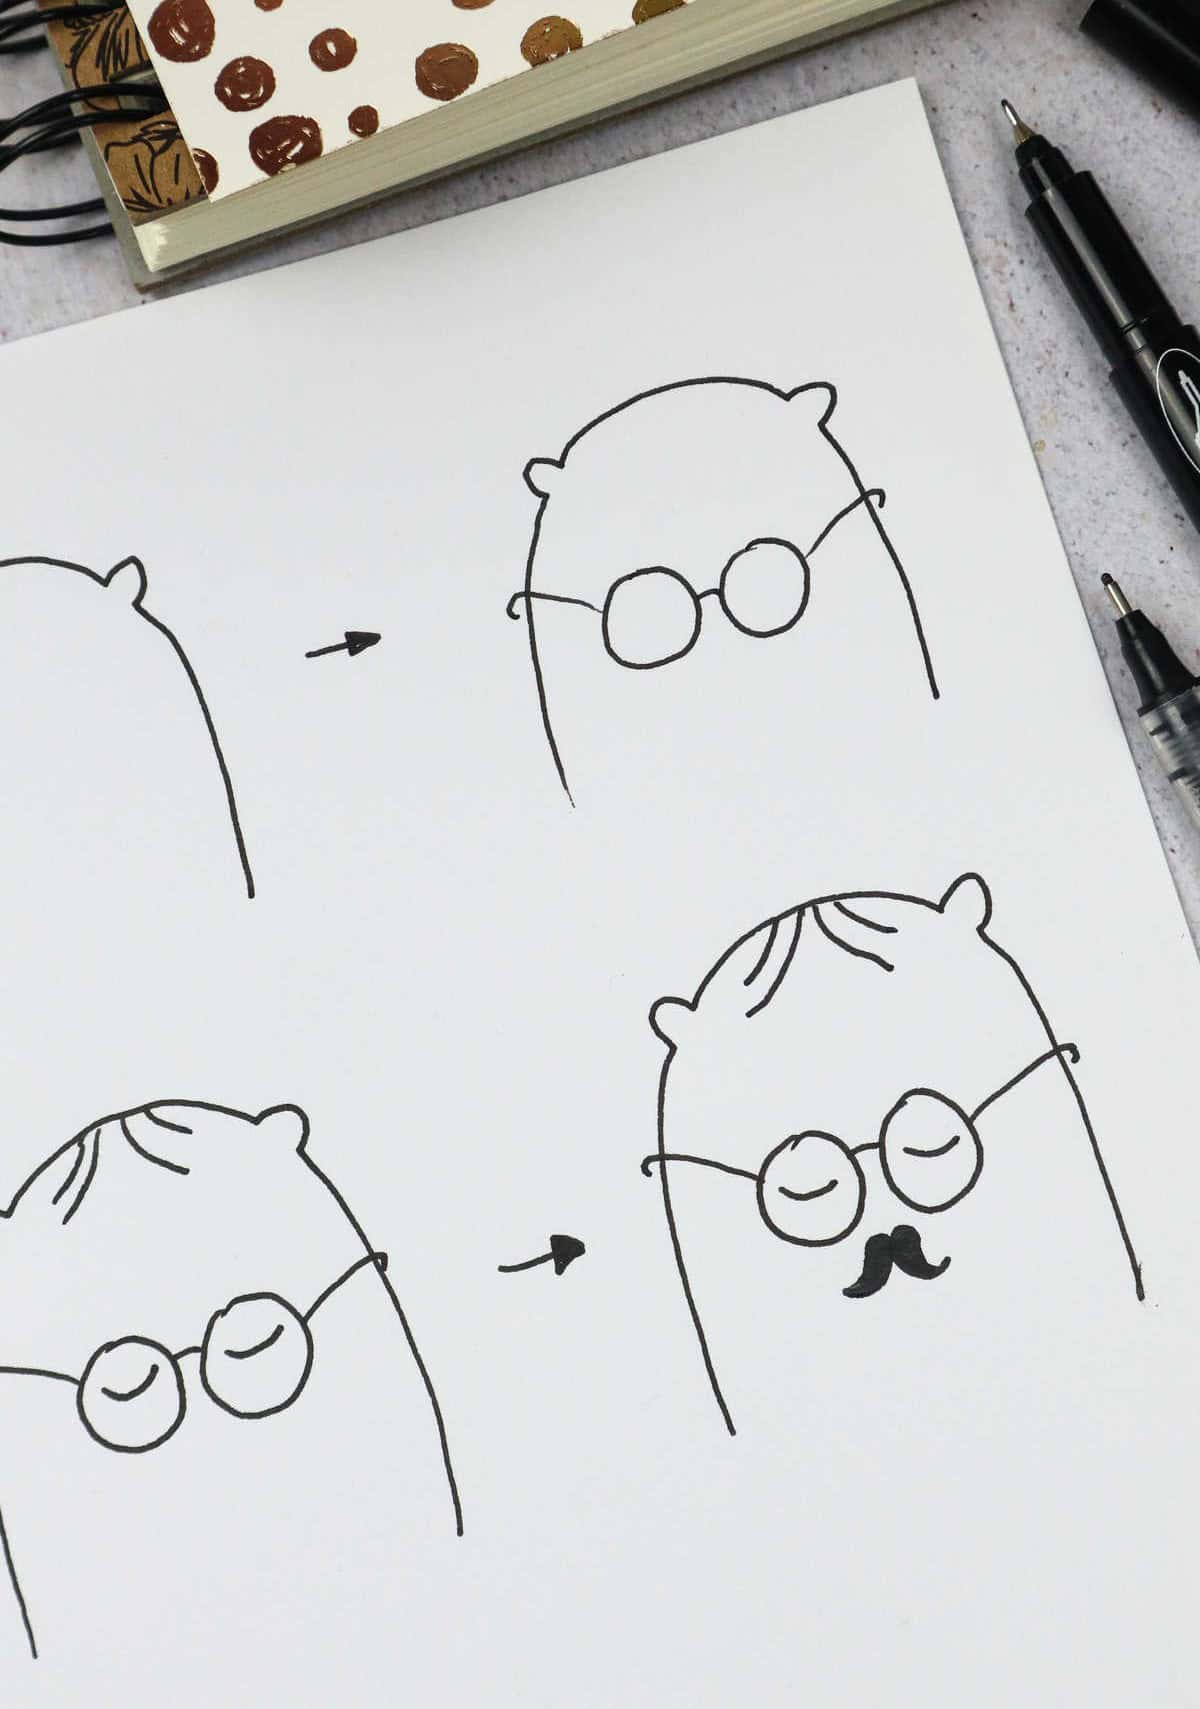
As we embark on this creative journey, let’s start by crafting the foundation of our studious friend’s visage. Begin by forming a subtle arc for the ears, gradually building up small arcs as you go. Once you’ve completed the outline, shift your focus to the facial features. Add glasses, positioning them parallel to the ears to ensure correct spacing. With the frames in place, return to define the eyelids, hair, and mustache.
This charming face doodle pairs perfectly with the simplicity of minimalist bullet journal spreads.
Cold Face
As you begin to sketch out your character’s physical appearance, start with the foundation – the body. Define the overall shape and structure before moving on to the finer details like hair. Once you have the basic outline in place, shift your focus inward to the face, starting with the eyes and working your way down to the mouth. Finally, add any additional flair with accessories or expressions.
Face Full of Joy
Begin by sketching a large candy cane on the left side of your page. Next, add two smaller bumps in the middle to create some visual interest. Then, draw a larger candy cane shape for the drawing’s body. From there, move on to creating the eyes, which will serve as the focal point of your illustration.
Grinning Face

To bring the facial features to life, begin by crafting the body of the character. Next, add a distinctive touch with a curved line that serves as the hairline. The arms, eyes, smile, and cheeks are then carefully added, taking care not to forget the crucial circles within the eyes, which will give your creation a warm and inviting gaze.
Cool Face
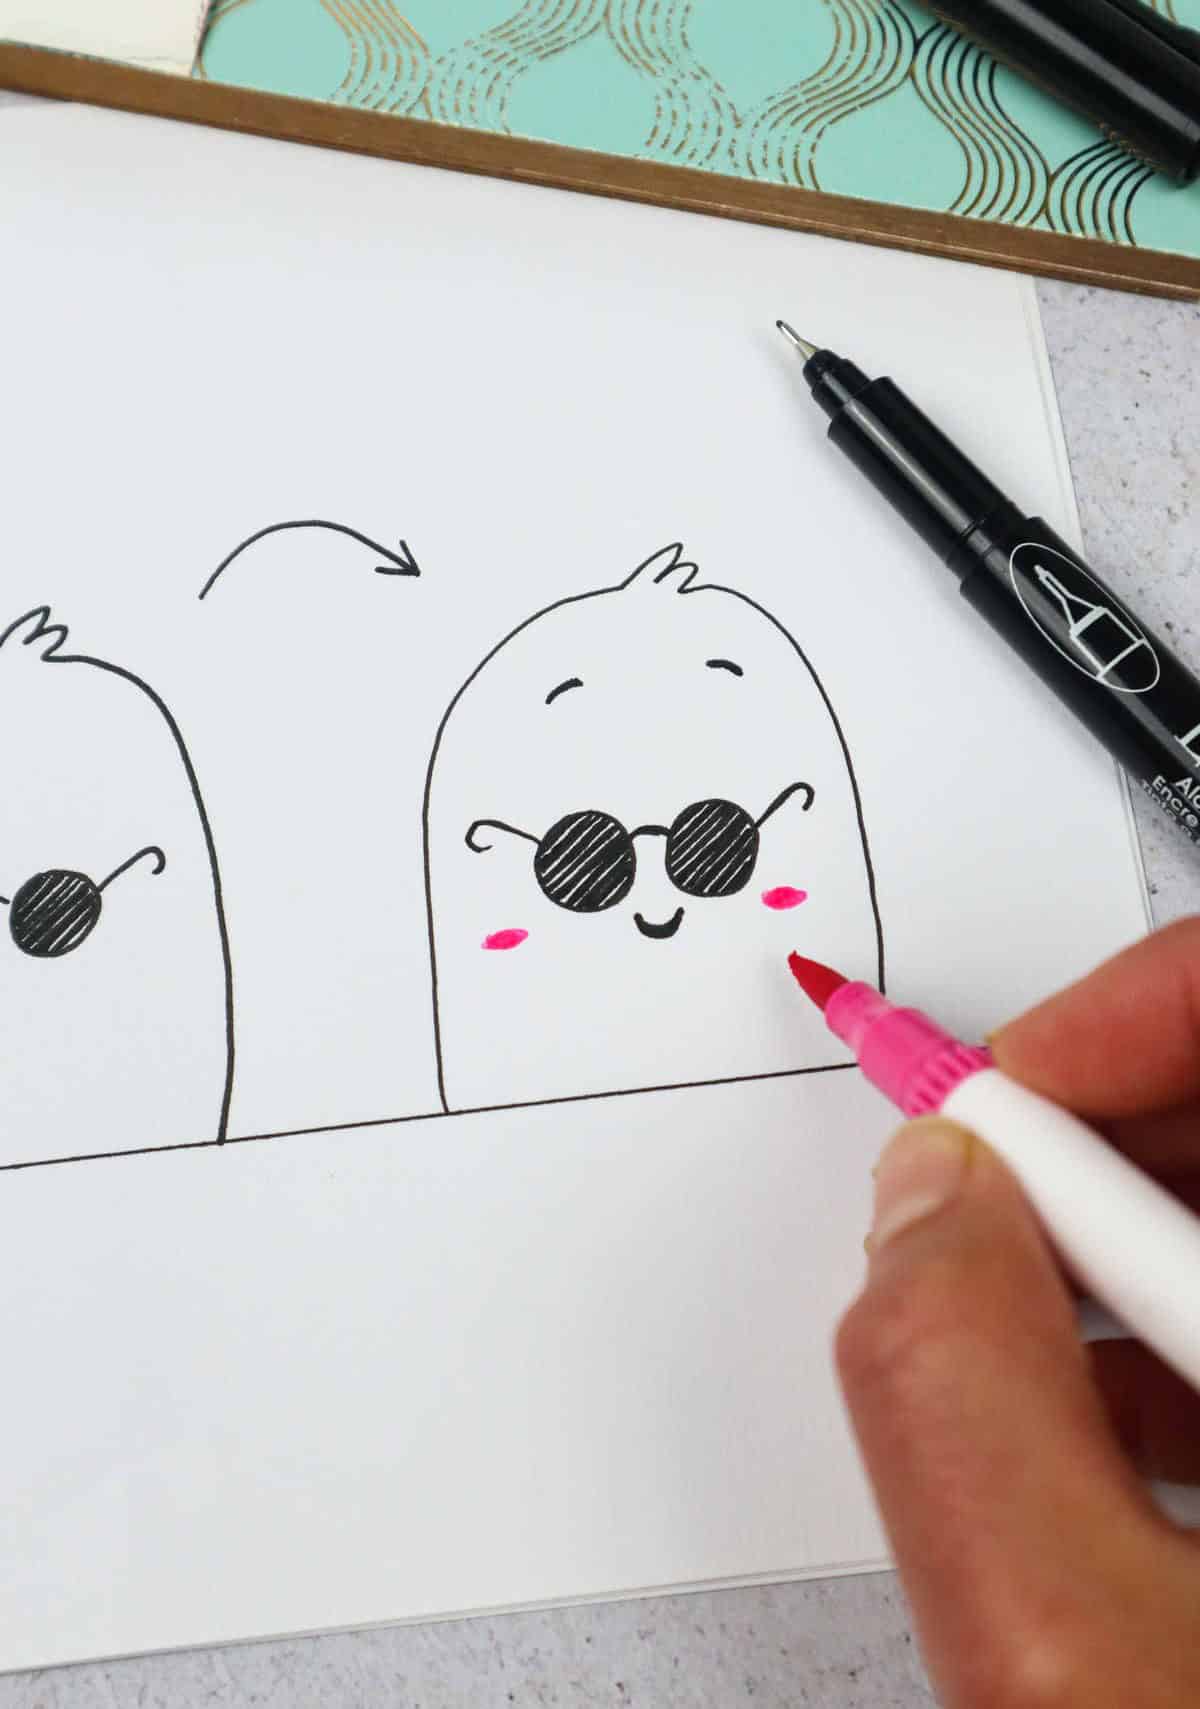
Starting with the basic arched shape, let’s take it up a notch by stopping just short of the peak to craft a set of luscious locks. With that foundation established, we’ll move on to crafting a pair of glasses, carefully filling in the details to transform them into sleek and stylish sunglasses.
As we continue along this creative journey, we’ll add some definition with the eyebrows, curate a radiant smile, and finally, give those cheeks a gentle flush for a truly one-of-a-kind facial masterpiece.
Beaming Face
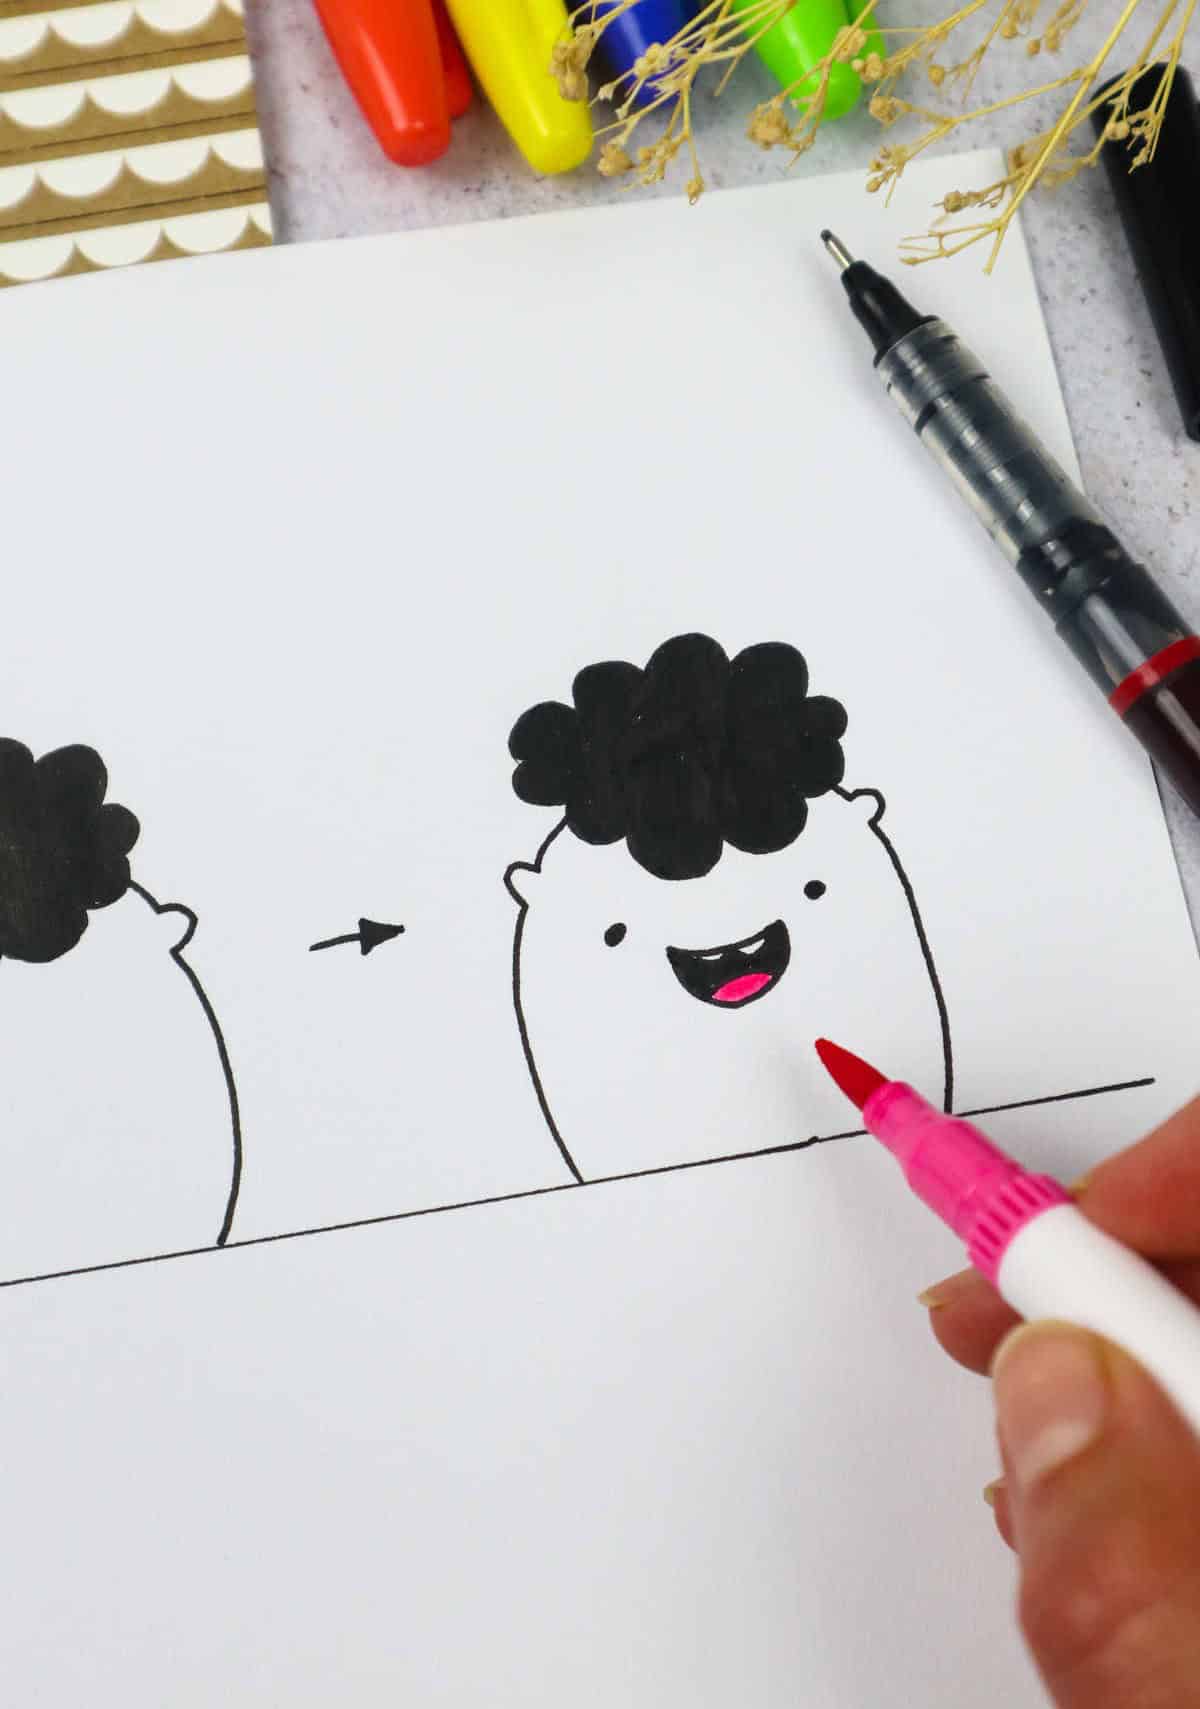
To bring your creature’s body to life, start by forming an egg-like shape, but with gentle arcs towards the top that will eventually become its ears. Next, craft a fluffy cloud-inspired hairpiece and add some color to give it personality. From there, move on to defining the facial features by creating its eyes and a toothy smile that will help convey its expression.
Cute Nerdy Face
To bring your cartoon character to life, start by crafting the overall shape with a rounded arc for the outline. This will provide a solid foundation for the rest of the features. Next, add the arms and a small tuft of colored hair to give your character some personality. Once you have the basic structure in place, focus on creating the eyes, eyeglasses, and smile. These details will help capture the essence of your character’s expression and personality.
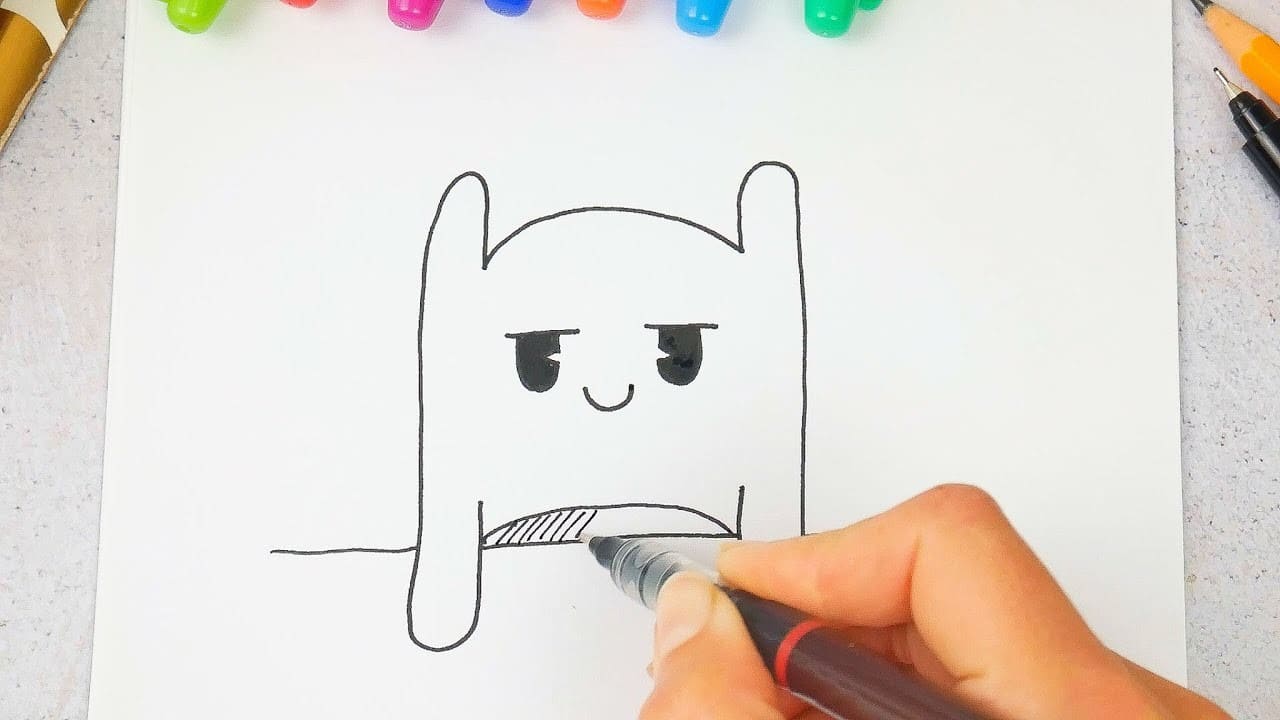
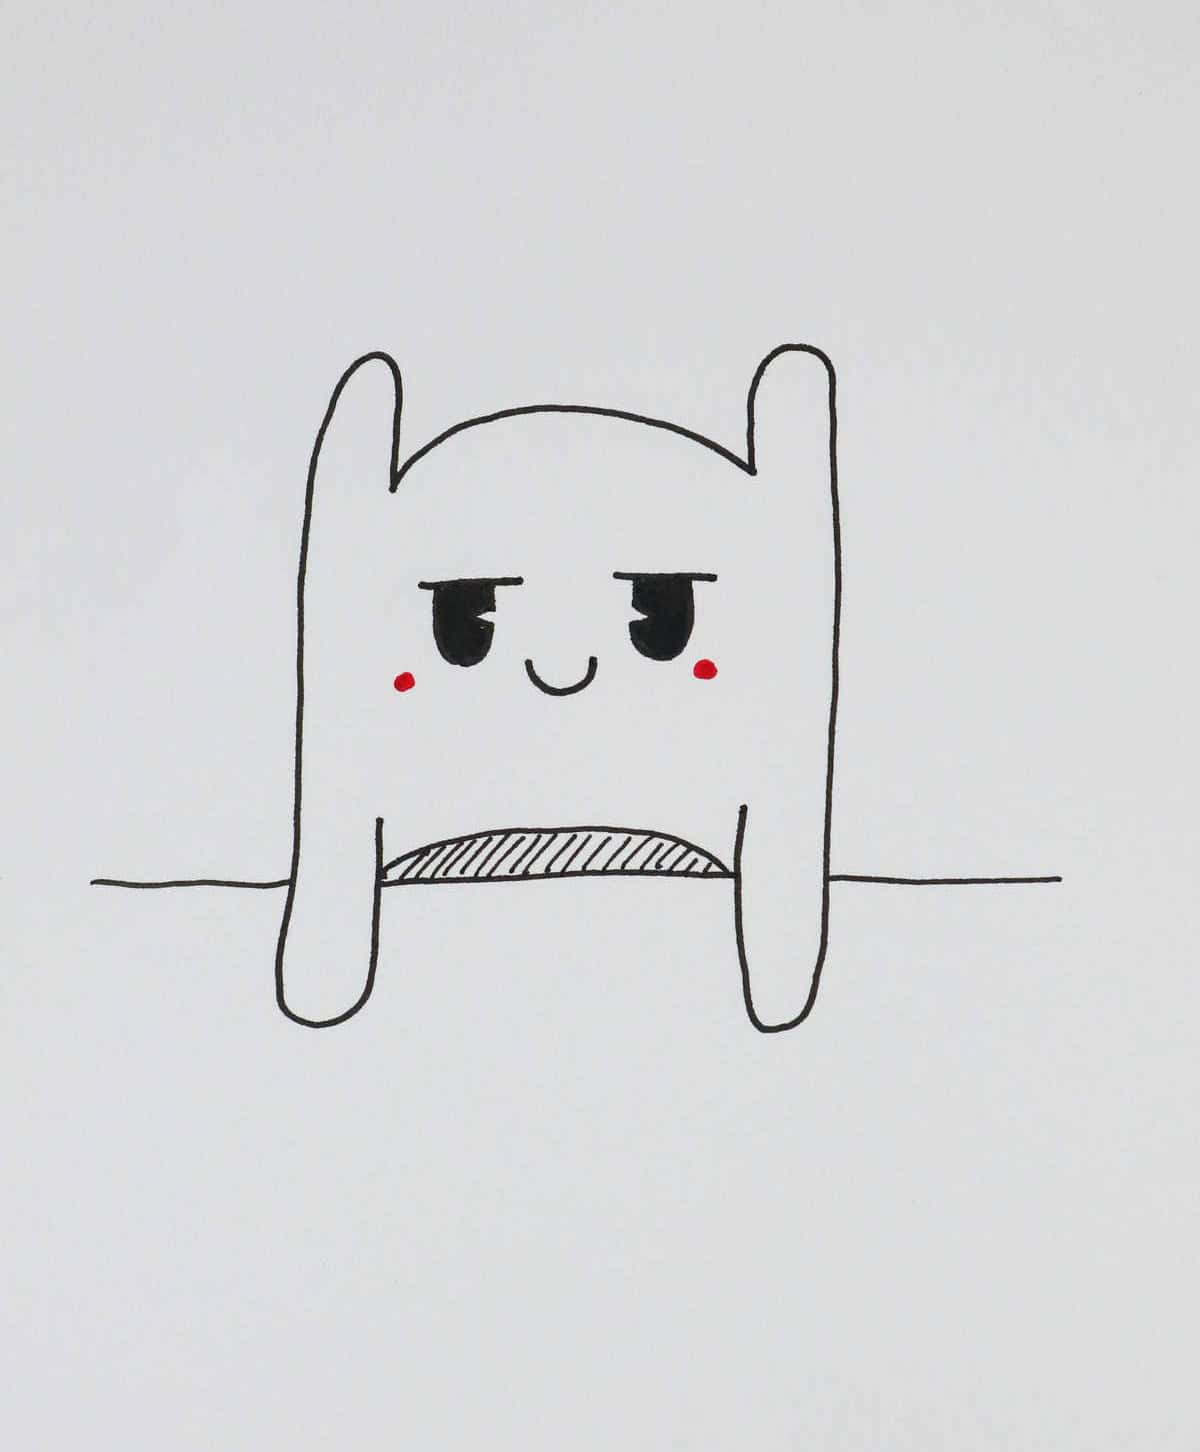
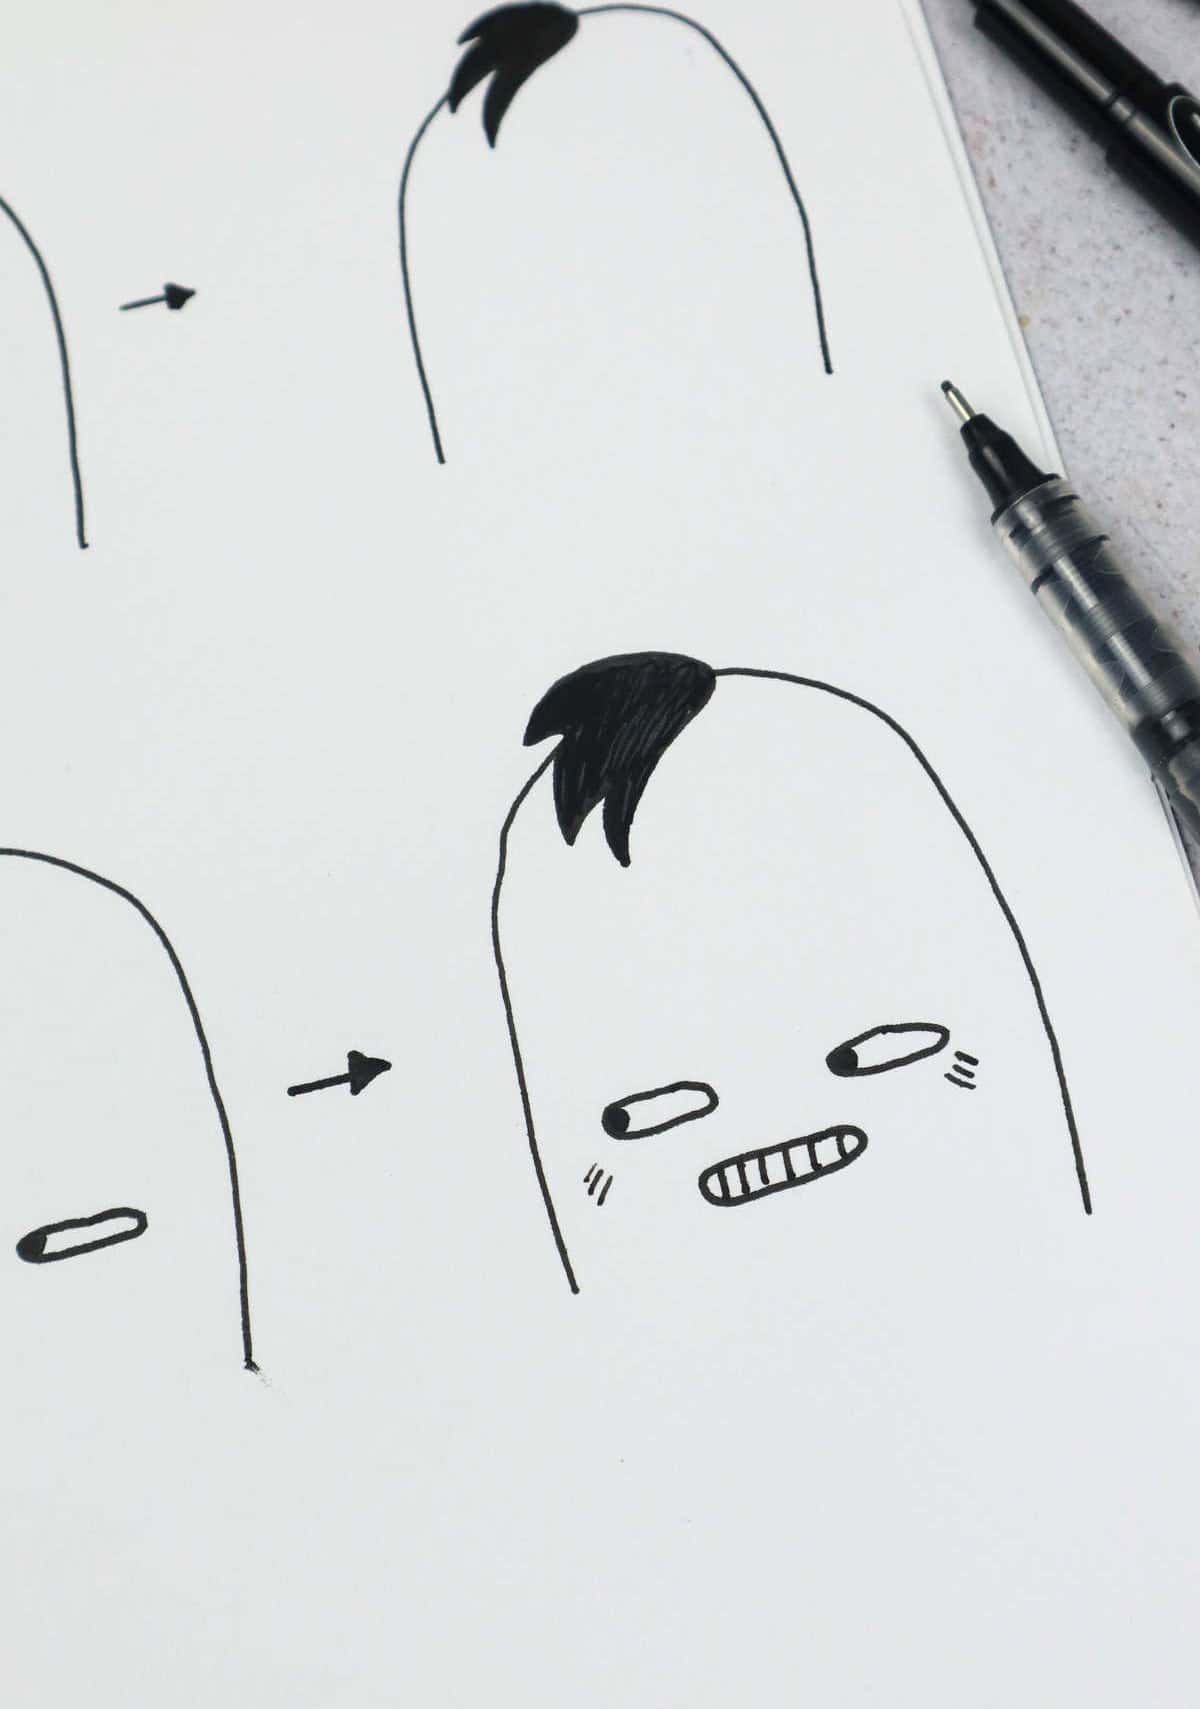
Painful Face

The illustration begins with a rounded, square shape, setting the tone for the rest of the composition. The subject’s facial features are then introduced, including the squinted eyes and mouth, which has been embellished with subtle hash mark details. The attention to detail on the body further adds depth and interest to the overall design.
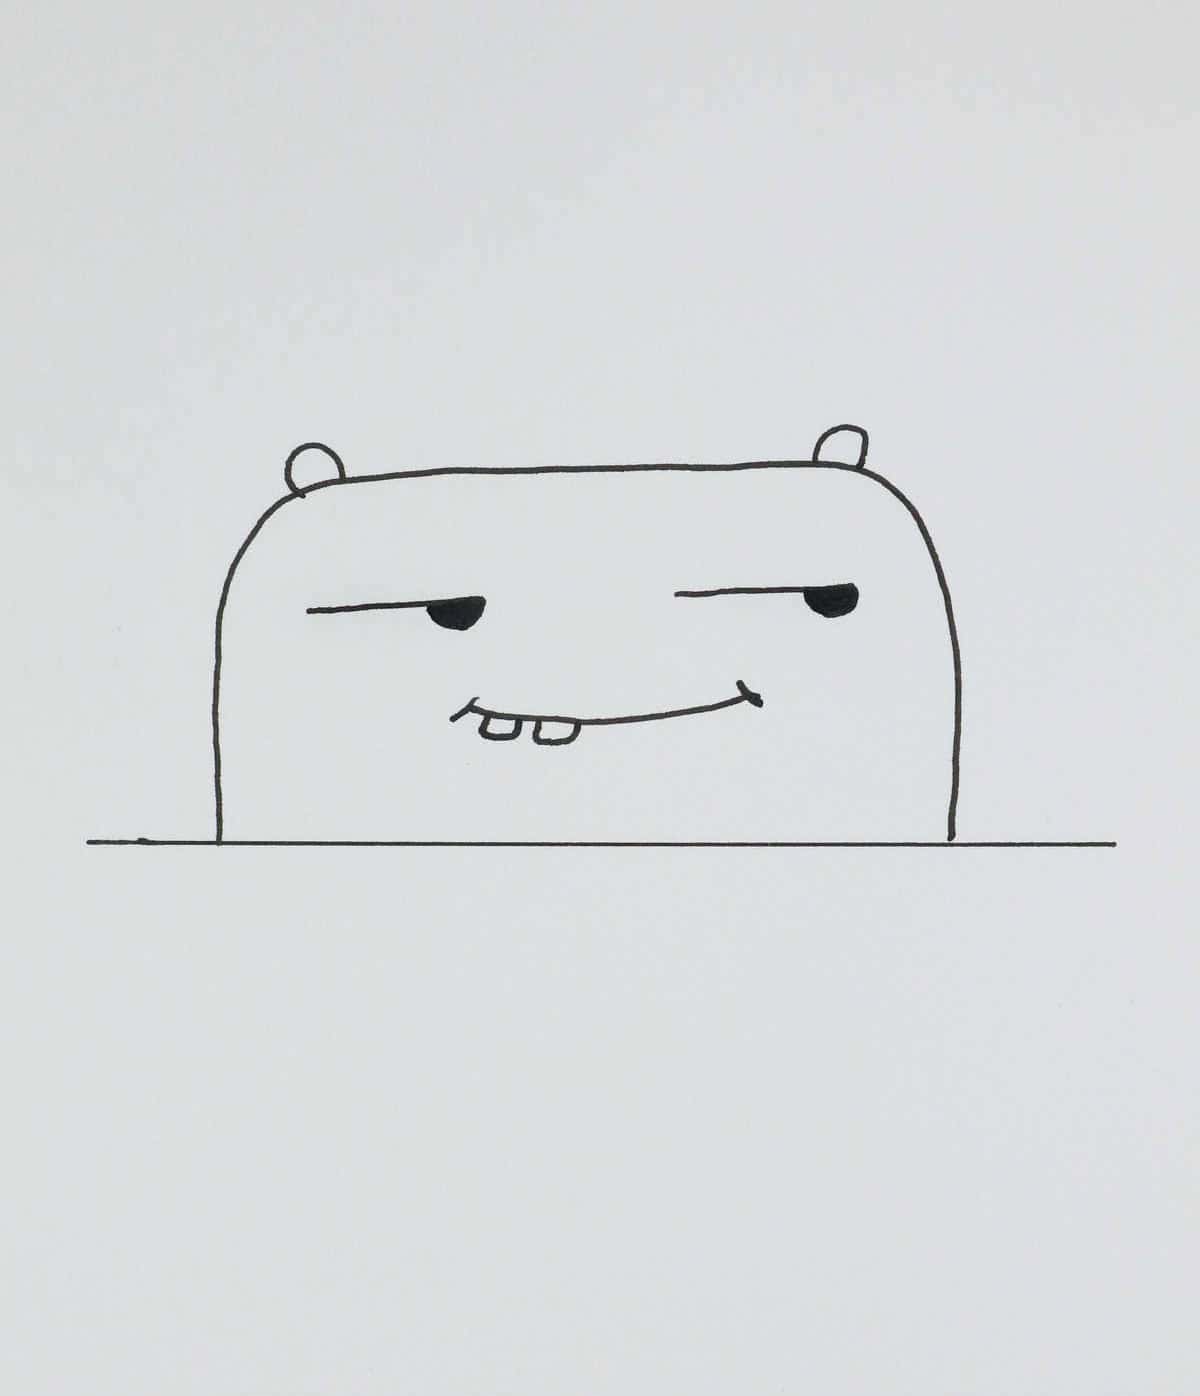
Mischievous Face
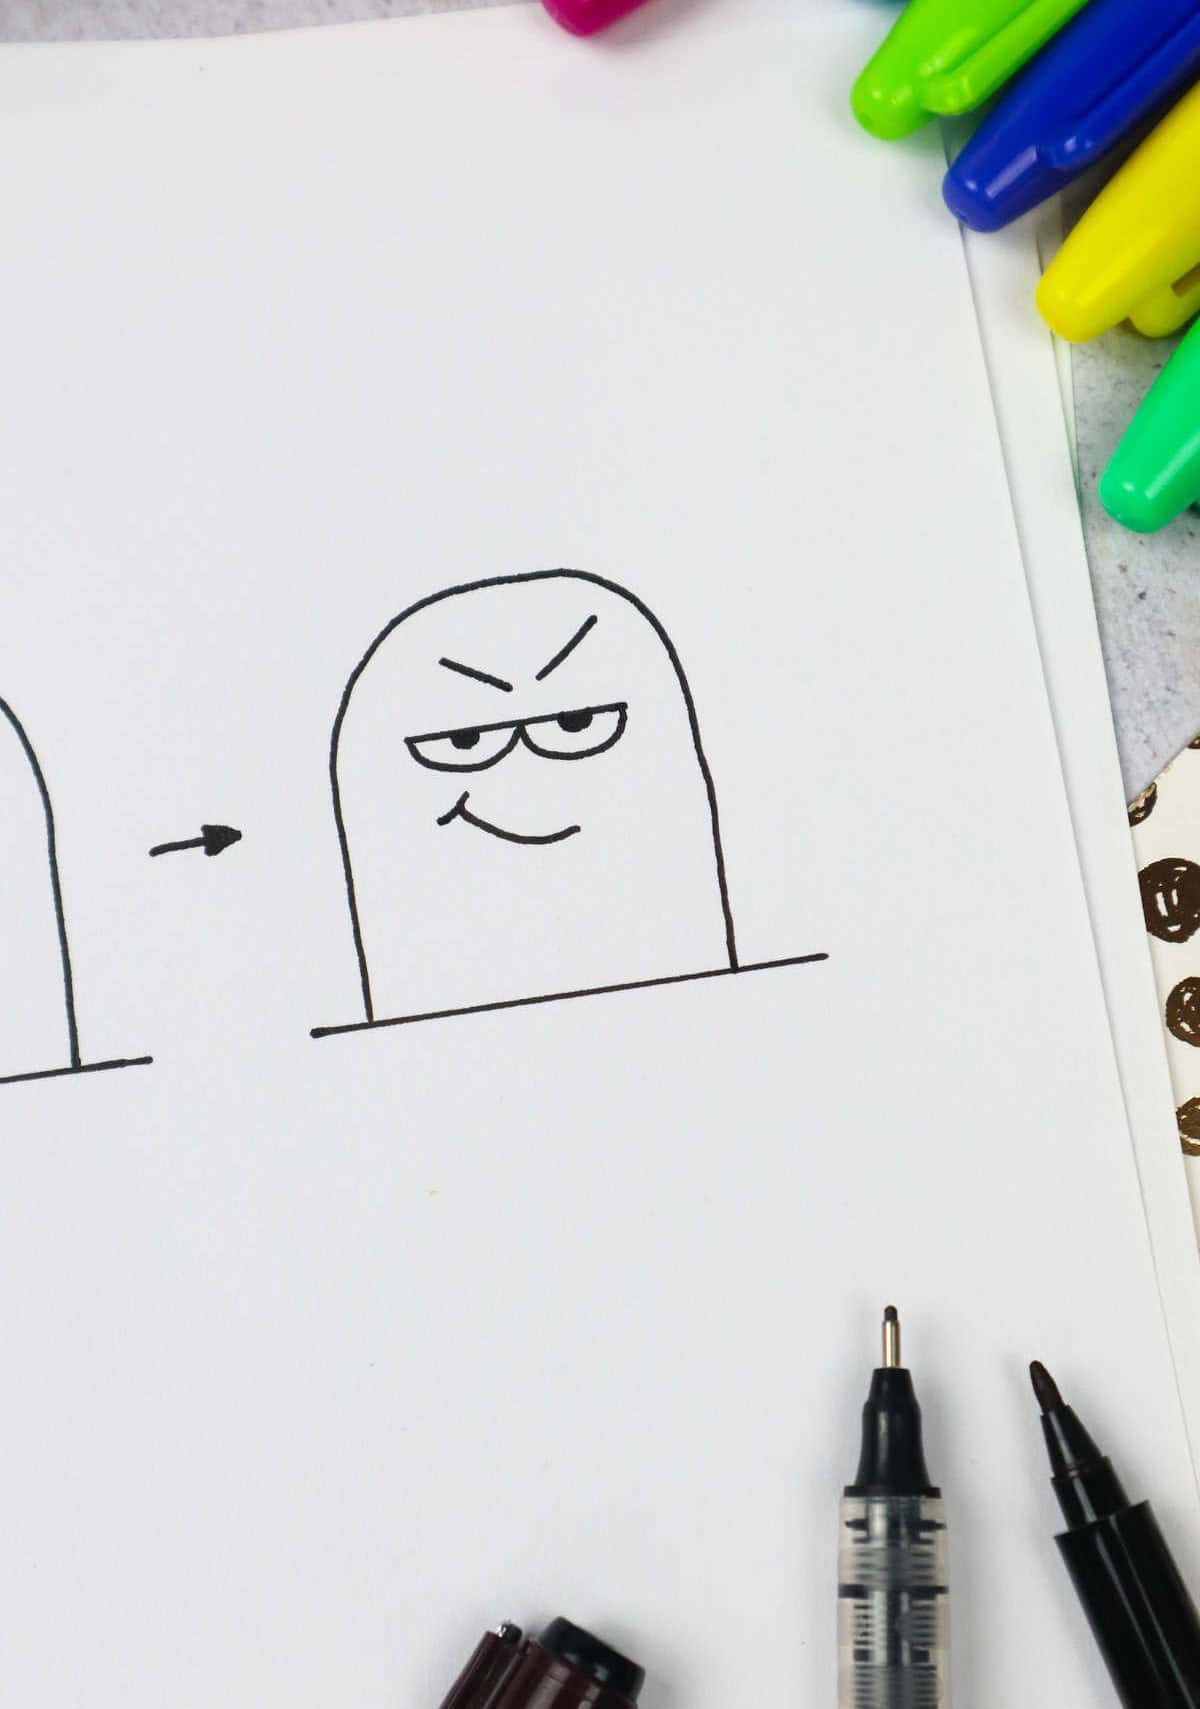
For a face that exudes unique character, we’ll begin by crafting an arc shape, consistent with our previous illustrations. This foundation will serve as the basis for the rest of the features to come into proportion. The eyes are next in line, and to achieve harmony, add half-moon shapes pointing downwards. Once the eye outline is complete, fill it in and bring the face to life by incorporating a wry smile and mischievous eyebrows that seem to convey a hint of playfulness.