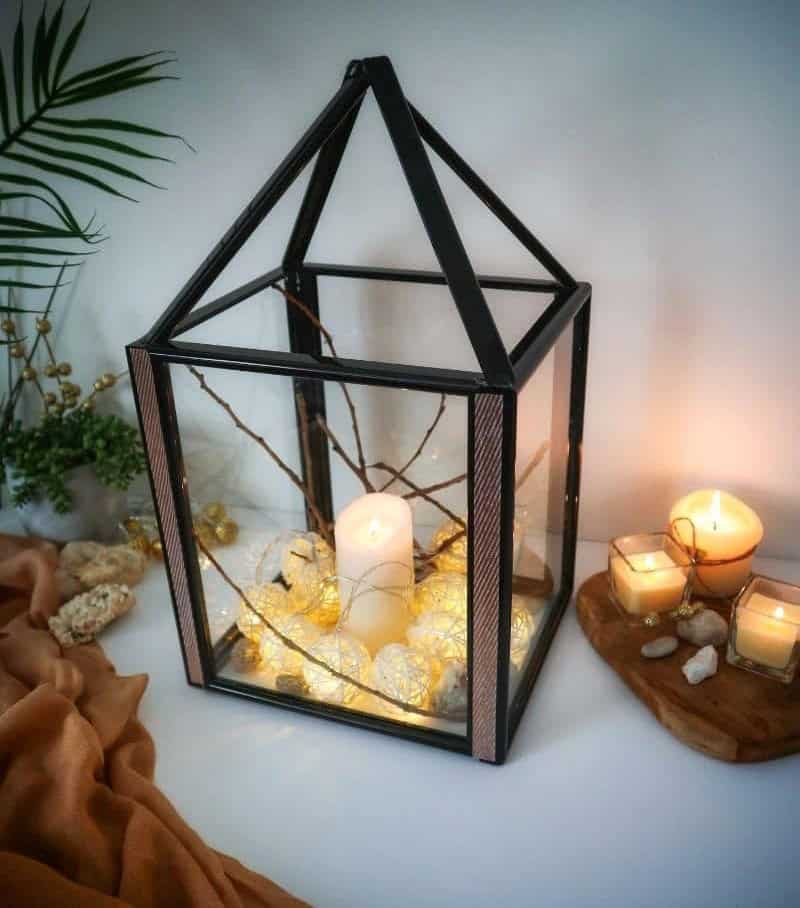

Crafting has long been a means for me – and I’m guessing many others – to create unique items for our homes that might otherwise be out of reach. The thrill of transforming something you spot online or in-store into a budget-friendly creation is a big part of the fun. Dollar stores, like my local Dollar Tree, are treasure troves for DIY enthusiasts on a shoestring. Case in point: this lovely lantern, which can be yours to make and enjoy without breaking the bank.
Supplies to Make the Lantern
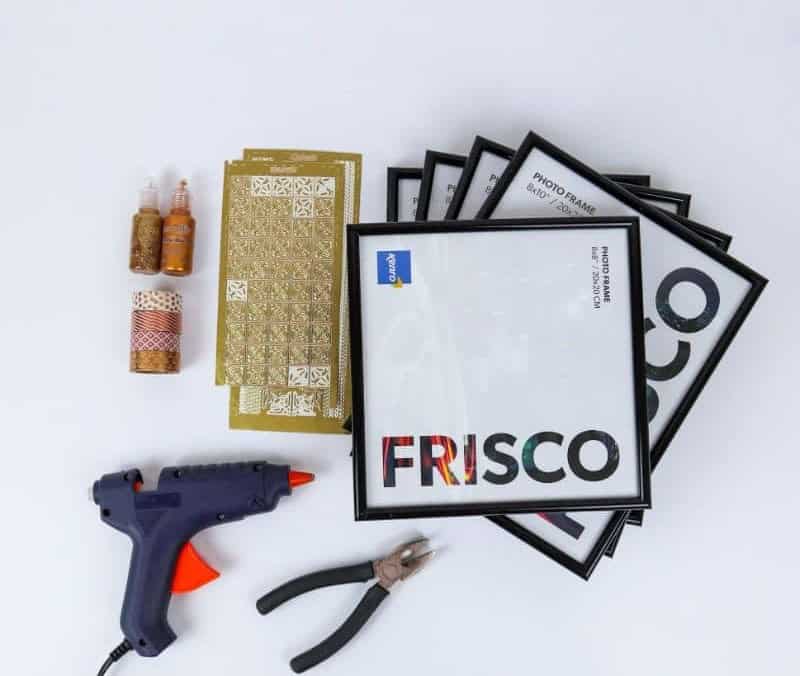
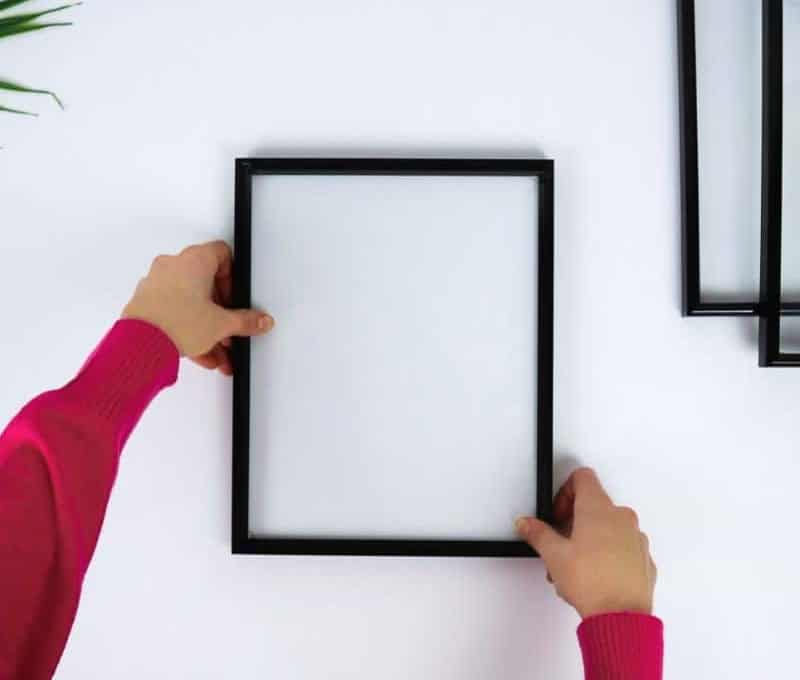
To create your DIY masterpiece, you’ll need the following materials: four 8×10-inch frames from Dollar Tree, or one 8×8-inch frame and two 8×10-inch frames if preferred. Additionally, a hot glue gun, pliers, and some decorative flair in the form of tape, glitter glue, sticky labels, or spray paint will give your project an extra wow factor.
How to Make Dollar Store Lantern
To create your own stunning lantern, follow this comprehensive guide that breaks down the process into manageable steps. Start by gathering the necessary materials and tools.
Step 1
To begin crafting, it’s essential to have the necessary materials at hand. Specifically, all that’s required is a hot glue gun, making it easy to get started. Simply position yourself in close proximity to a power outlet, and you’ll be well-prepared to tackle your project.
Step 2
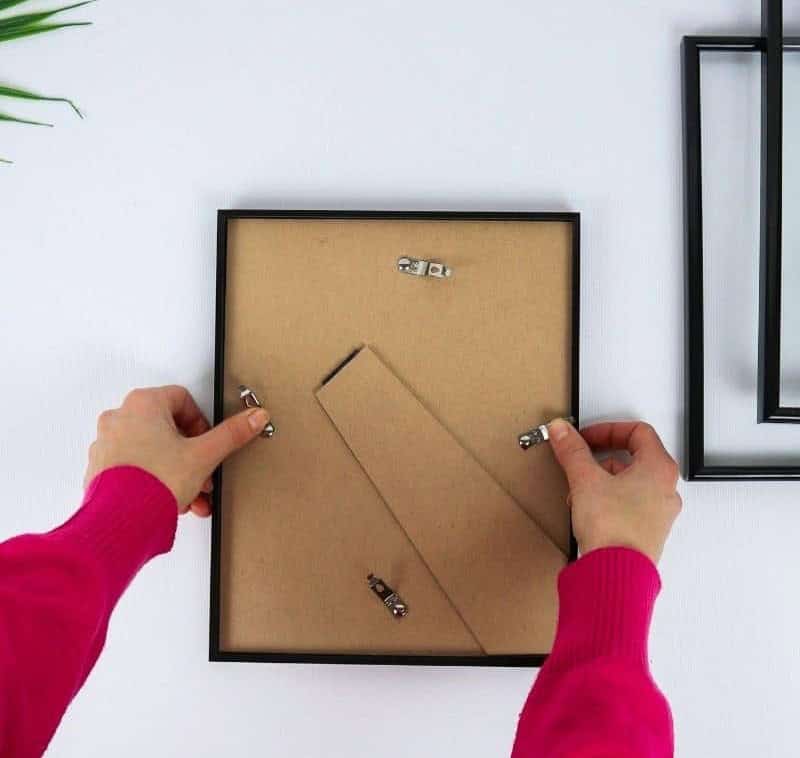
Begin by removing the wooden backs from both frame sizes, setting them aside for later use. If you’re unsure of their purpose or want to get creative, consider utilizing Mod Podge to transform them into freestanding artworks that can add a unique touch to any room.
Step 3
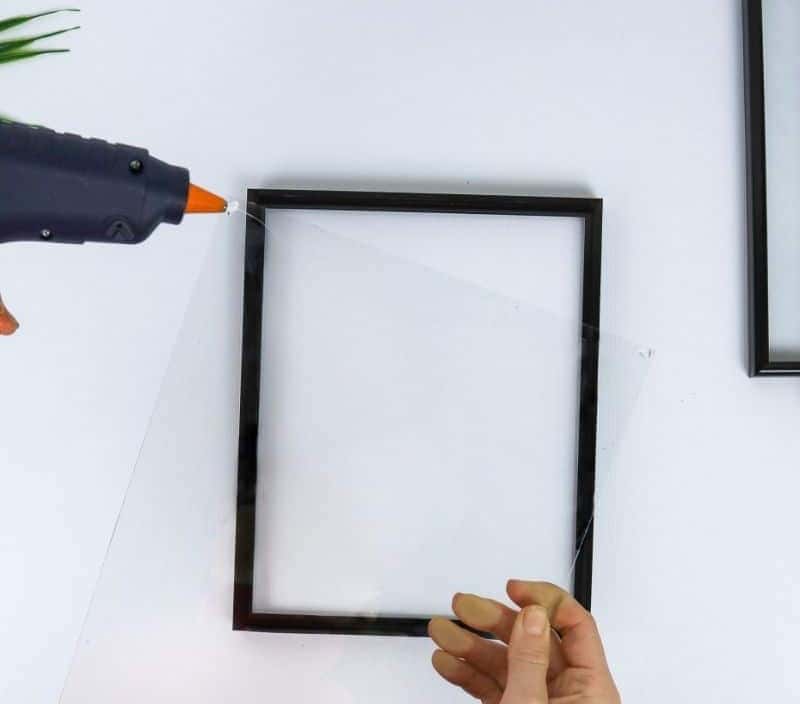
To ensure a secure fit, let’s add an extra layer of protection to prevent the glass from slipping or falling out of the lantern when placed upright. Using your trusty hot glue gun, apply a small bead of adhesive along the perimeter of each glass frame, making sure to cover the entire edge.
Step 4
Secure each of the smaller glass panes by placing them against the interior of their respective frames and applying gentle yet firm pressure to ensure a sturdy bond. Repeat this process for all four of these smaller components, leaving the larger ones untouched. Allow them to set before moving on.
Step 5

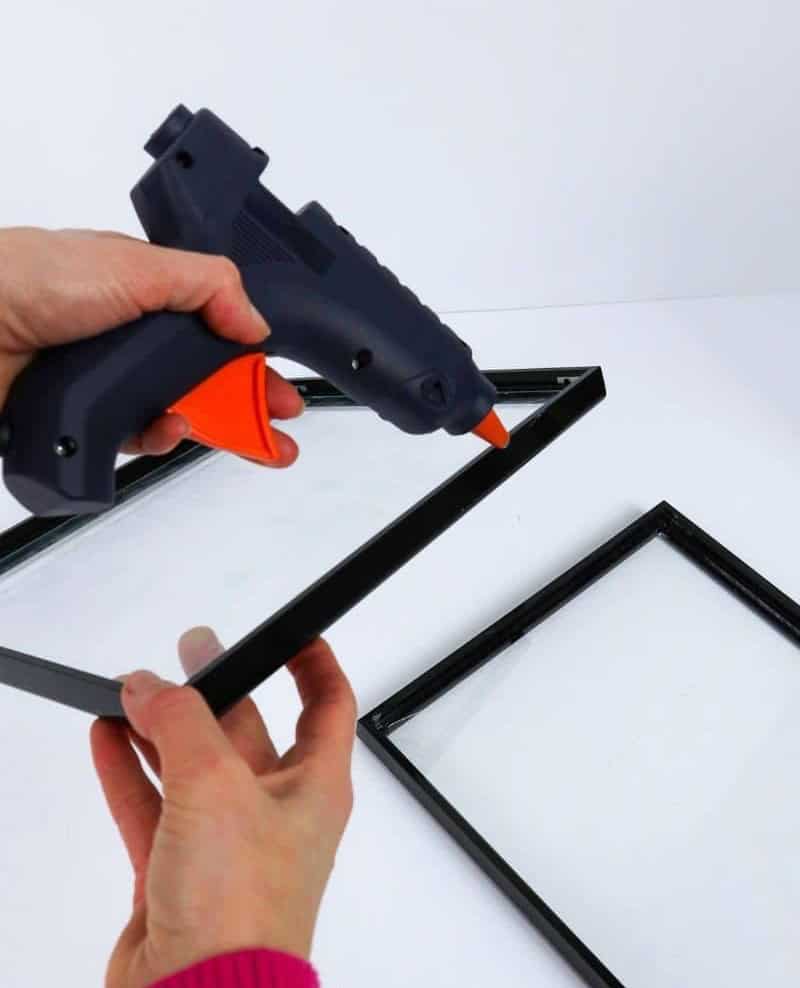
To build the lantern’s structure, start by preparing the frames for assembly. Take one of the frames and apply a thin bead of hot glue along its long edge, positioning it near another frame. Hold them together firmly until the glue sets, creating a rectangular shape that will form the base of your lantern. Repeat this process with the remaining frames, carefully aligning the edges as you go to ensure a sturdy and even structure.
Step 6
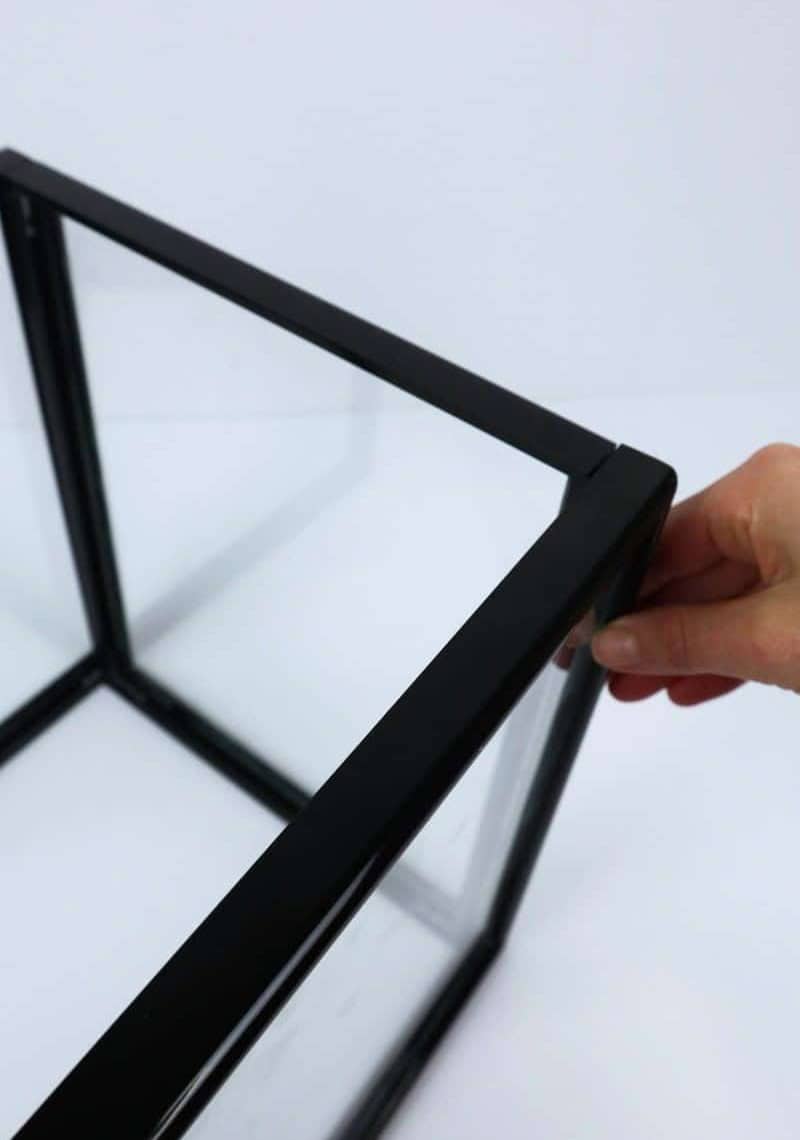
Assemble the frames by securing the long edges together in a precise 90-degree angle. To achieve this, consider using a reference point like the edge of a table or a specialized right-angle tool for added accuracy.
Step 7
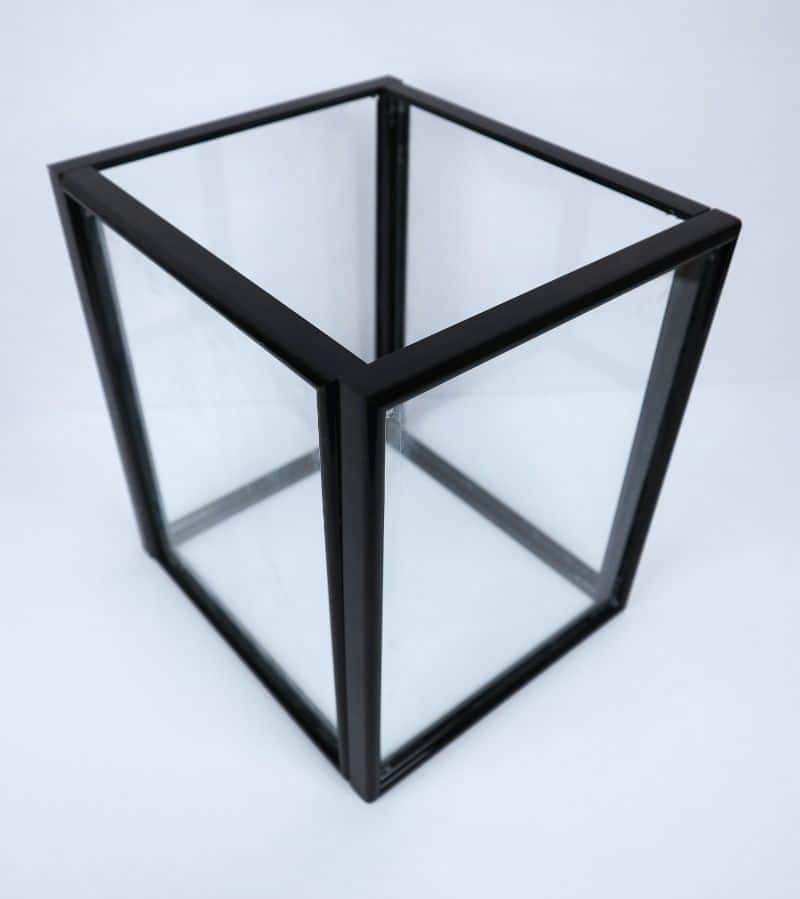

To ensure precise corners and accuracy, work on a flat surface such as a table or countertop. This will help prevent any slight deviations from throwing off your entire structure’s alignment. As you complete each corner, double-check that they meet at perfect right angles. Your finished product should resemble the desired rectangle.
Step 8 (Optional)
To add a floor to your lantern and create a designated space for ashes, you’ll need the glass from an 8×8 picture frame. Attach it to the bottom of the rectangle, allowing it to dry before flipping it over. This simple modification can elevate your lantern’s overall appearance and functionality. For those aiming to achieve a modern design, this step will suffice. However, if you’re looking to incorporate a farmhouse aesthetic into your lantern, continue reading for further guidance.
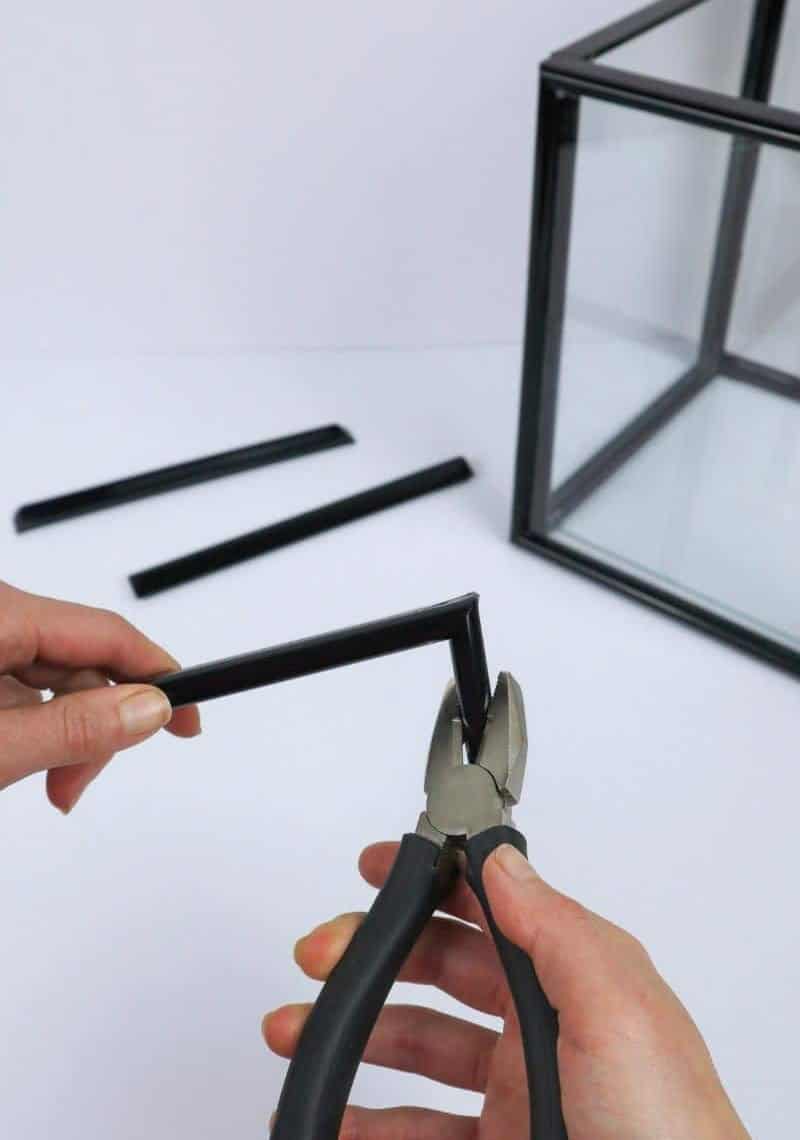
Step 9
When it comes time to create your arch, your pliers will be your trusty sidekicks – and let me tell you, this part of the process is incredibly fulfilling. The goal is to end up with four identical pieces, each measuring eight inches in length. If you’re working with a single 8×8 frame, you’ll want to use all four pre-cut pieces from that. On the other hand, if you have two 8×10 frames on your hands, simply disassemble them and harvest the eight-inch sections – it’s as easy as that.
Step 10


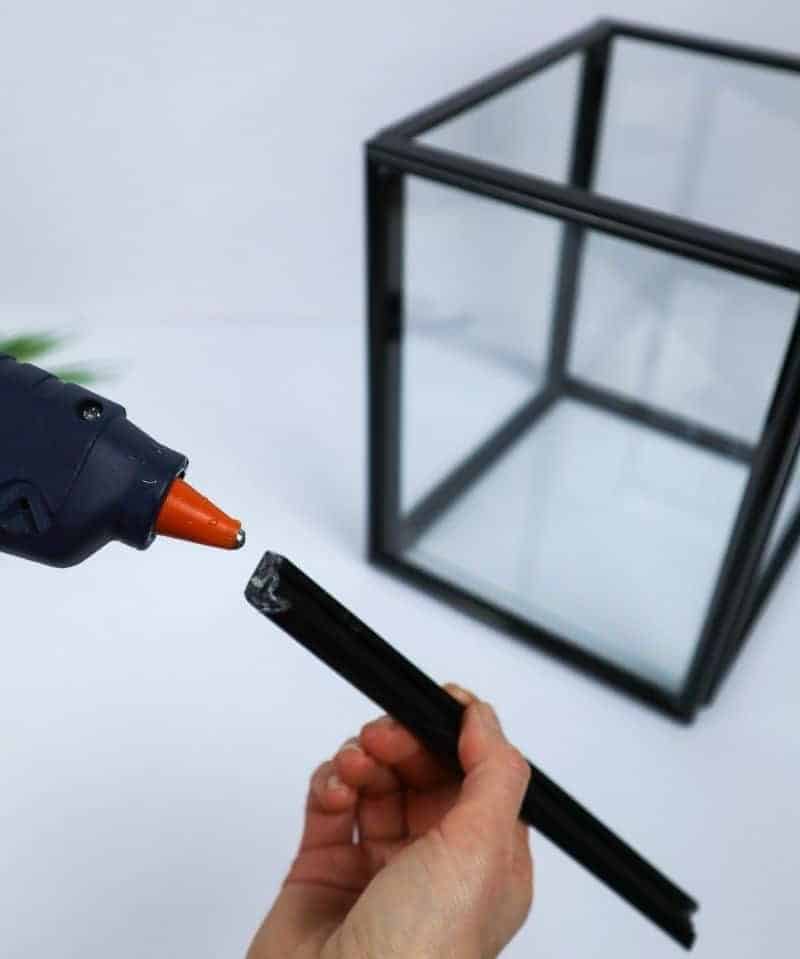
Begin by applying a small amount of hot glue to the end of one of the pieces, positioning it at an angle to extend from the lantern’s corner towards its center. This initial application will ultimately meet another arch piece, forming a secure and sturdy connection in the middle.
Step 11

For a seamless and stress-free experience, I suggest applying glue to both ends of the two pieces simultaneously, then attaching them to your lantern at the same time. This approach ensures precise alignment and eliminates potential issues down the line. Hold the pieces in place until they set and dry, ensuring a strong bond and a trouble-free outcome.
Step 12
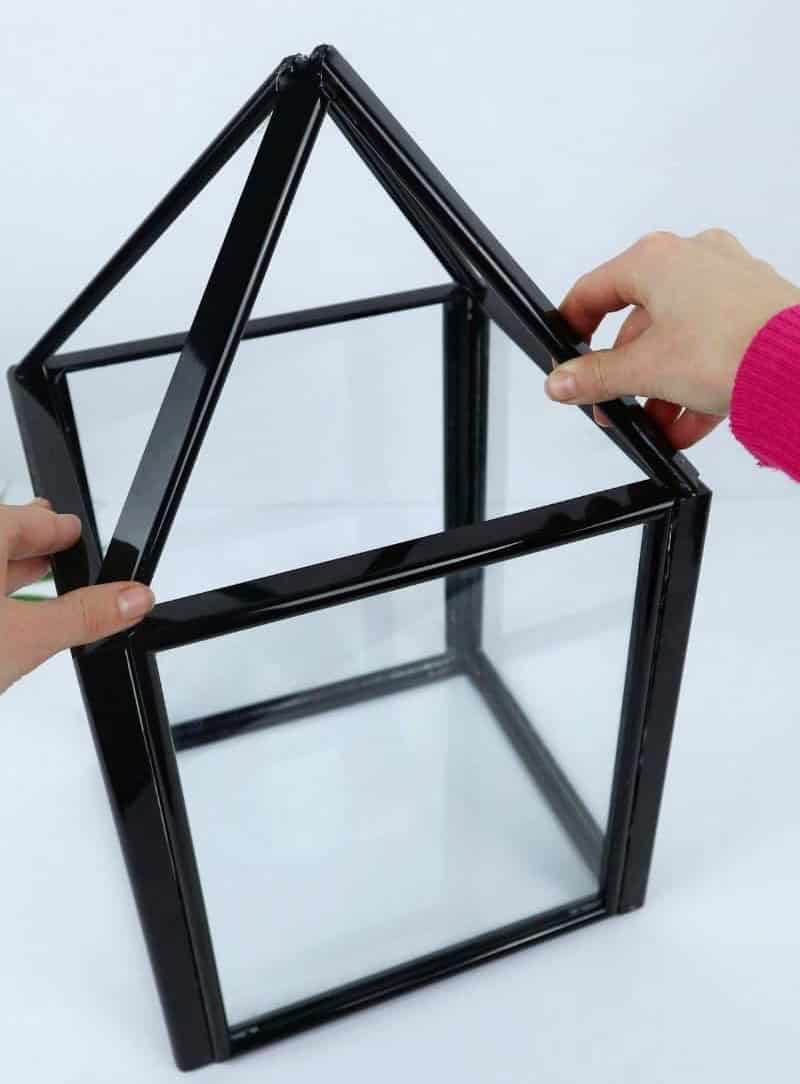
As you near completion, the structure begins to take shape. Secure the central support rod firmly, then carefully attach the next component, ensuring a precise alignment at its midpoint with the previously added pieces.
Step 13

To complete your lantern base, attach the final arch piece in place. For added stability, consider applying a small amount of hot glue to the area where the arch intersects with the rest of the structure. This is an optional step, but it can help ensure that everything stays firmly in place.
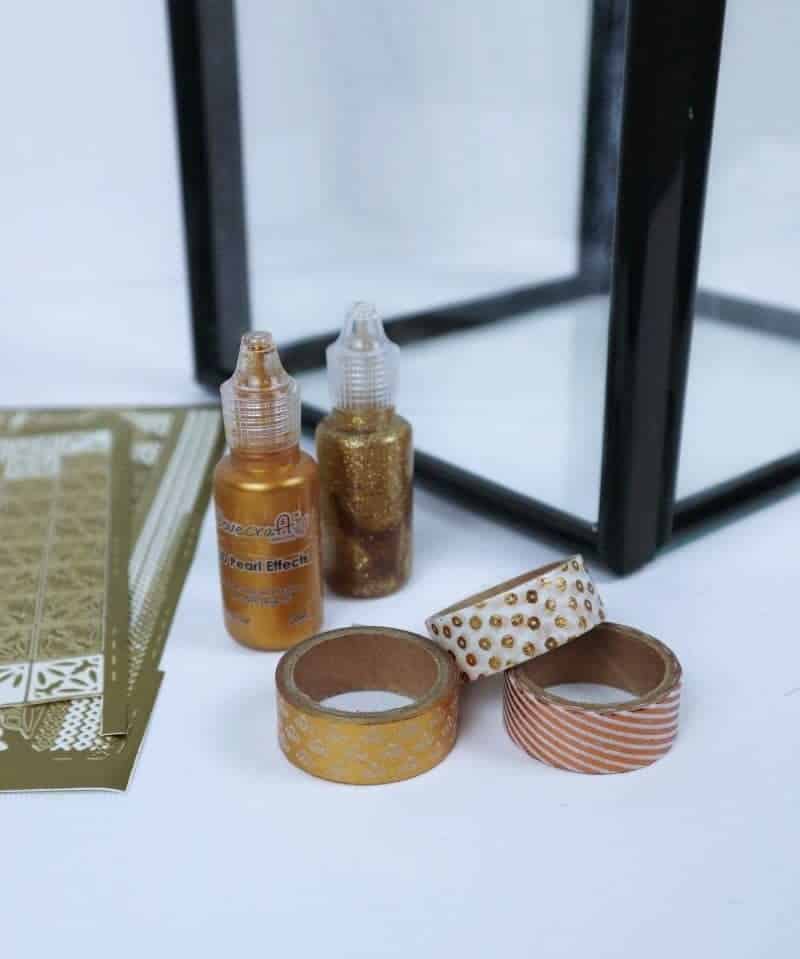
Step 14
As you prepare to unleash your creativity, gather the essential tools for transforming your space into a masterpiece. This includes an assortment of decorative elements such as stickers, washi tape, and other embellishments that will bring your vision to life.
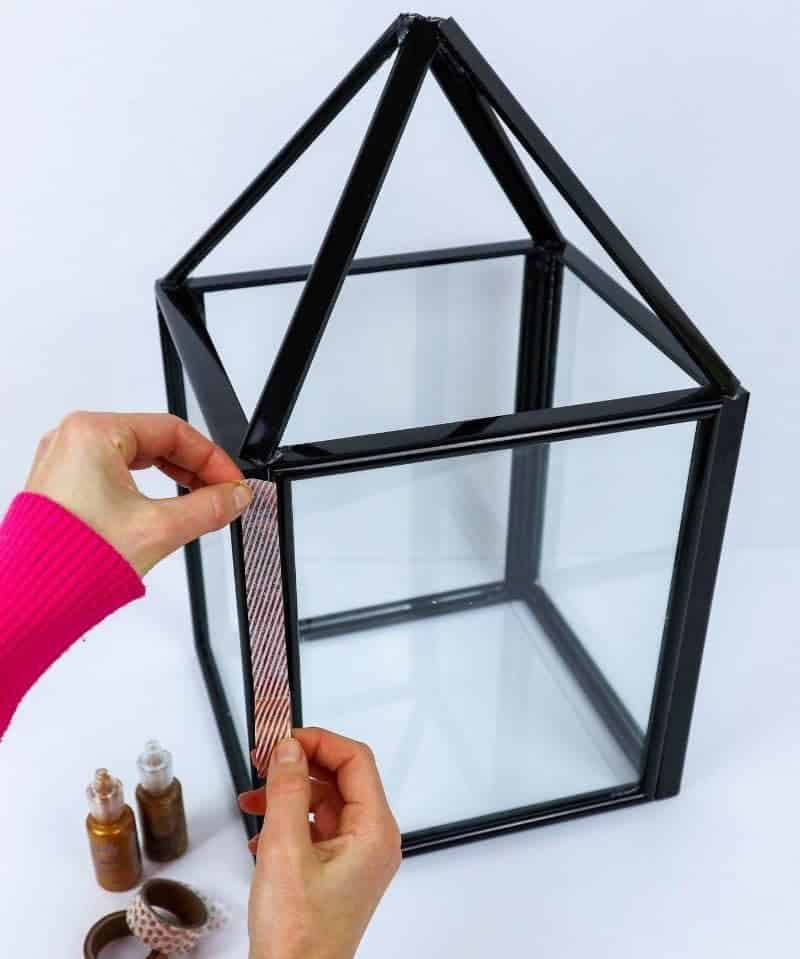
Step 15
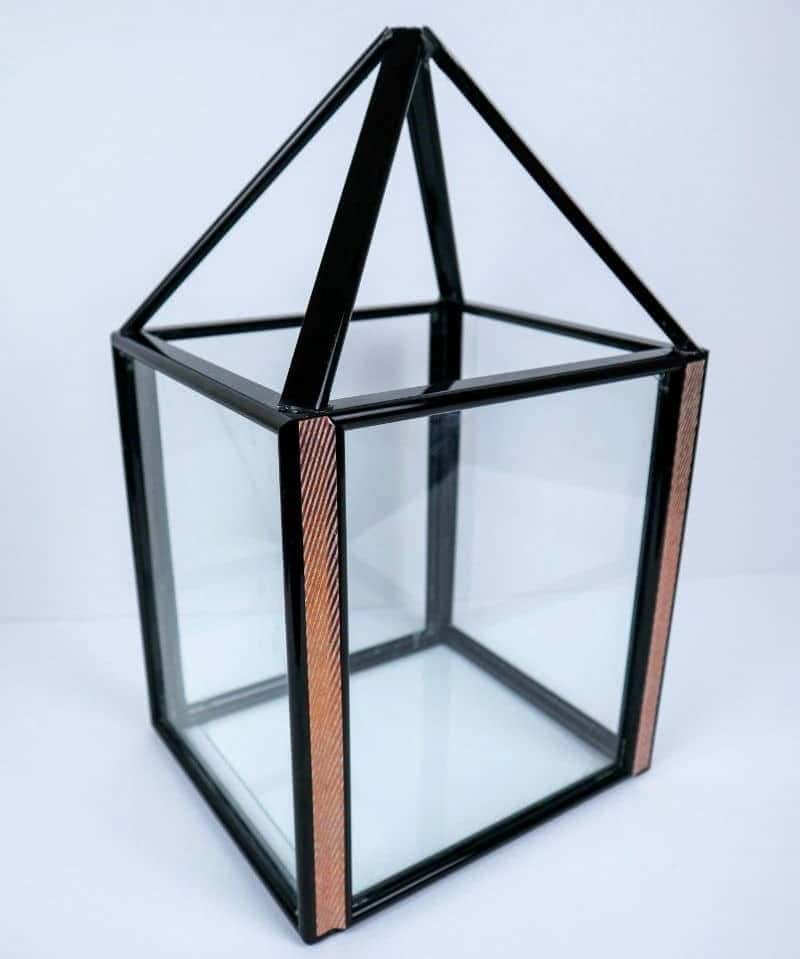
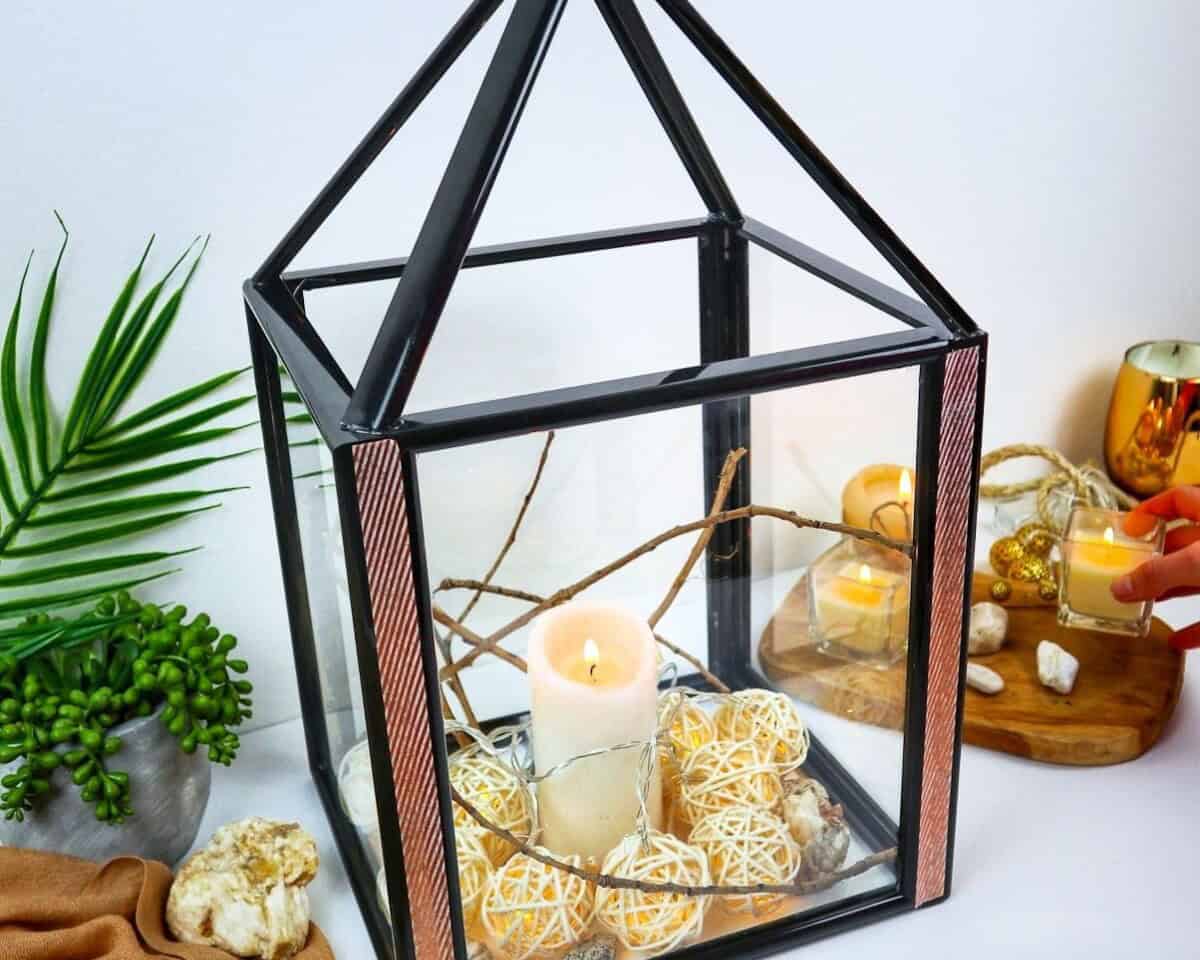
When selecting a decorative element for my lantern, I opted for washi tape. However, if you’re not planning to include candles within the lantern itself, there are several alternative options available to elevate its appearance. Burlap, ribbon, and even fake foliage wrapped around the arch can all contribute to a stunning visual display. Once you’ve completed the decoration process, your lantern is now ready for filling with your chosen items!
Where Can You Use This Dollar Tree Lantern?
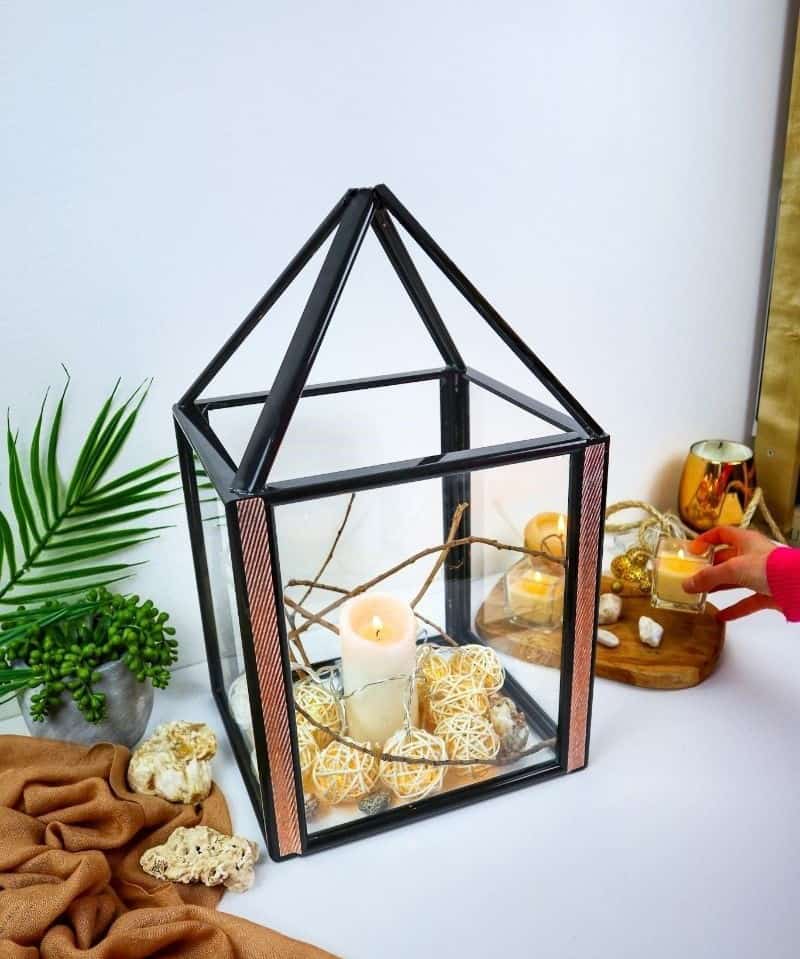
This versatile lantern offers endless possibilities for placement. Its adaptability allows it to seamlessly blend into various settings, from modernizing your workspace to adding a charming ambiance to your outdoor porch. I particularly enjoy the idea of filling it with succulents and using it as an exterior accent, as seen above, which brings a delightful touch of natural beauty that never fails to impress.
More Dollar Tree Crafts

Elevate your home decor without breaking the bank with these 21 creative DIY centerpiece ideas from Dollar Tree. From rustic wooden creations to elegant glass designs, we’ve got you covered for any occasion or style. For a more whimsical touch, consider our collection of genius planter ideas that will add a dash of personality to any room. When it comes to crafting for kids, our 20 cute and affordable crafts are perfect for little hands to get creative with. But don’t stop there!
Our frame crafts offer endless possibilities for personalized decor, while our DIY vase projects can transform your space with simple elegance. And if you’re looking to monetize your creativity, explore our list of 37 crafts to make and sell – the perfect opportunity to turn your hobby into a side hustle.
DIY Dollar Tree Lantern
CraftsyHacks. com contributor Karo shares a simple yet impressive DIY project to elevate your outdoor dining experience. With just a few basic materials from Dollar Tree, you can create a stunning lantern that will complement any setting. Whether you’re looking for a thoughtful gift or a unique decor piece, this hack is sure to impress. The best part? It’s quick and easy to make, requiring only 40 minutes of your time. So why wait?
Get crafting and add some warmth and ambiance to your outdoor space with this Dollar Tree lantern DIY project.
Equipment
To avoid the frustration that comes with a suddenly dimming screen, it’s essential to take preventative measures. One simple solution is to utilize hot glue guns and pliers. By carefully positioning these tools near your computer or device, you’ll be able to keep your screen aglow without having to worry about it going dark unexpectedly.
Materials 1x2x3x
To create your own unique DIY picture display, you’ll need the following materials: four 8×10 inch frames from Dollar Tree, and one additional frame that can be either an 8×8 inch frame or two smaller 8×10 inch frames. For added embellishments, consider using decorative tape, glitter glue, sticky labels, or spray paint.
Instructions
Start by preparing a flat surface and gathering all necessary materials. Begin by removing the wooden backs from the 8×10 inch frames and inserting the glass panels, allowing them to dry completely. Set aside the 8×8 frame (or two 8×10 frames) for later use. Next, glue the four 8×10 frames together along their long sides to form a rectangular shape, again allowing it to dry before moving on.
If desired, add a glass floor to the lantern by attaching the leftover glass from an 8×8 frame to the bottom of the rectangle. To create an arch for the lantern, disassemble any remaining frames and cut them into four 8-inch pieces using pliers. Apply a small amount of glue to one end of each piece and attach it to a corner of the lantern, ensuring they meet in the middle at an angle.
Once complete, you can choose to decorate your lantern with various materials, transforming it into a unique and functional piece for any room in your home.