As Easter approaches, many of us find ourselves craving creative ways to decorate our eggs. Rather than settling for the same old routine of plain colors or rushed solutions, why not challenge yourself to think outside the box? With a little inspiration, you can transform your Easter egg decorating experience into an exciting adventure. To get you started, here are 25 unique ideas to try this Easter:
Silky Tie-Dyed Eggs
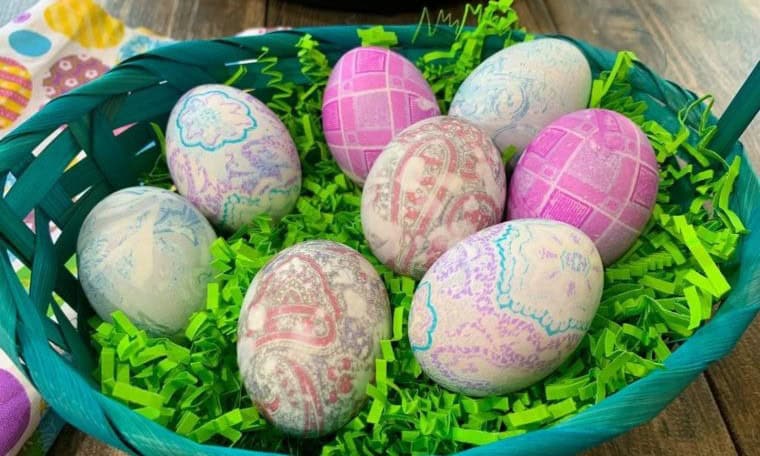
If you’re holding onto a stash of old silky ties or are willing to grab some from Amazon like these, you’re in luck! This DIY project is perfect for repurposing those old ties. First, cut the ties into smaller pieces. Then, wrap each egg with a tie of your choice and secure it with a rubber band. Next, add an extra layer of fabric by wrapping the eggs again, this time using pieces from a plain white t-shirt. Secure this layer as well.
To cook the eggs, fill a pan – ideally an instant pot – with water and add a splash of vinegar. Cook for 5 minutes, then let the eggs cool before removing the fabrics. The result is a set of unique and colorful Easter eggs.
She-Ra Easter Eggs

To create this unique project, you’ll need wooden eggs, high-quality acrylic paint that can be sourced from here, and a dash of creativity. Begin by mapping out your designs onto the eggs using a medium that allows for some flexibility, as the imperfections will ultimately add to the charm. Once you’ve outlined your characters, bring them to life with vibrant acrylic paint. To give your designs even more depth, use a black pen to sketch in additional details.
Don’t worry about precision – those minor mistakes can be corrected and will only enhance the overall character of the Easter eggs.
Minecraft-inspired Eggs
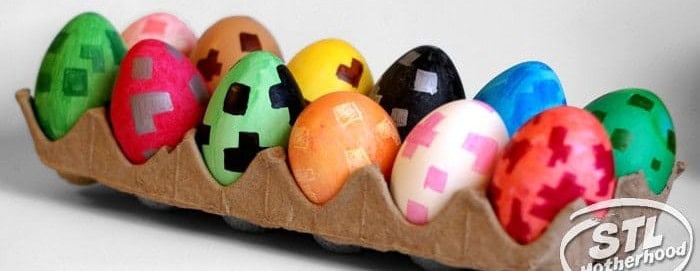
For families with little ones, this DIY project is sure to delight. You can opt for either natural or synthetic eggs, depending on your preference. To add some personal flair, feel free to get creative with markers, dyes, or pens – whatever medium you find most appealing. My recommendation would be to start by painting the entire egg a single color, then introduce patterns and hues of your choice.
The resulting creations will be vibrant and eye-catching, guaranteed to bring joy to both children and adults alike.
Oil-based Easter Eggs

For those who adore indulging in their Easter treats, here’s a creative way to decorate them without compromising on taste. To get started, you’ll need three simple ingredients: water, oil (opt for vegetable, olive, or canola), and food coloring. Begin by preparing individual bowls for each color, making sure they’re just large enough to accommodate the egg. Next, combine water, oil, and a few drops of coloring in each bowl, then carefully place your Easter egg inside.
Allow it to sit for 10 minutes before gently turning the egg and repeating the process until you’ve achieved the desired hue. Once done, remove the egg from the dye mixture and place it on parchment paper or a wire rack to air dry. To finish, wipe away any excess oil and voilà! You’ll have beautifully crafted, edible Easter eggs that can be enjoyed without compromise.
Balloon East Eggs DIY
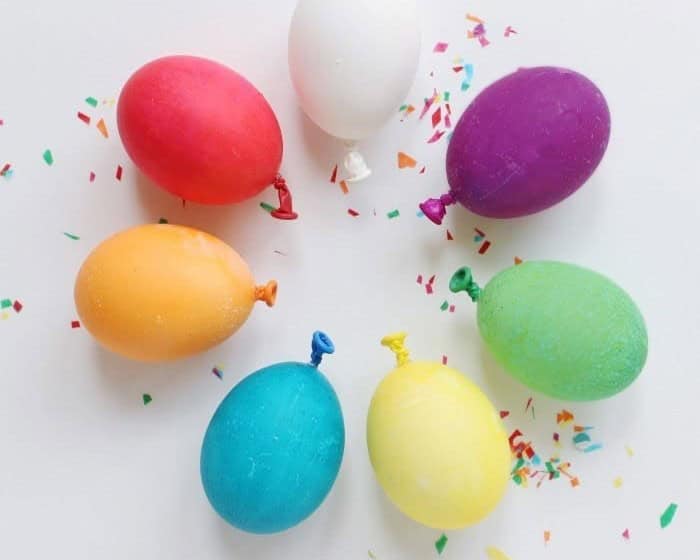
Add a playful twist to your Easter celebrations by turning ordinary eggs into whimsical balloons. Start by selecting vibrant balloons and using their tops as the base for this creative project. Next, dye the eggs in matching hues and attach the balloon caps to the egg tips, creating balloon look-alikes that are sure to delight both kids and adults alike. These unique decorations will add an extra layer of fun to your Easter egg hunt.
For more innovative DIY ideas, check out our collection of Easter decoration projects.
Disney Princess Themed Eggs
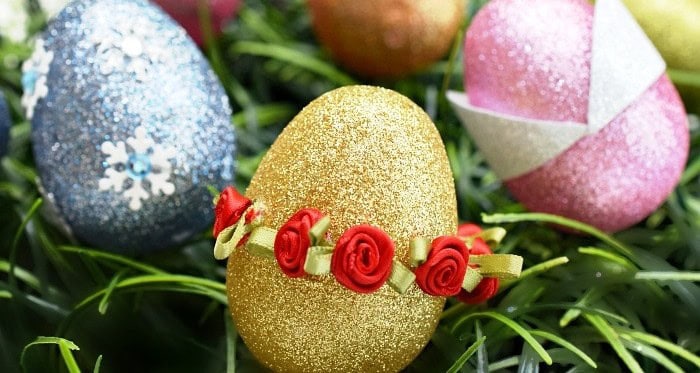
Are you a fan of both glitter and Disney? If so, this DIY project is tailor-made for you. While it may require some time and effort, the end result will be well worth the investment. The idea is to choose one or multiple Disney princesses as your inspiration and let your creativity shine. To get started, gather essential materials like glitter, craft supplies, and a reliable glue gun – much like this excellent model found here.
For instance, if you’re aiming to create an Elsa-inspired egg, simply dip it into blue glitter, then add some strategically placed snowflakes using your trusty glue gun. Voilà! You’ve just created an eye-catching Elsa egg that’s sure to delight both kids and adults alike.
Armenian Style, Naturally Dyed Easter Eggs
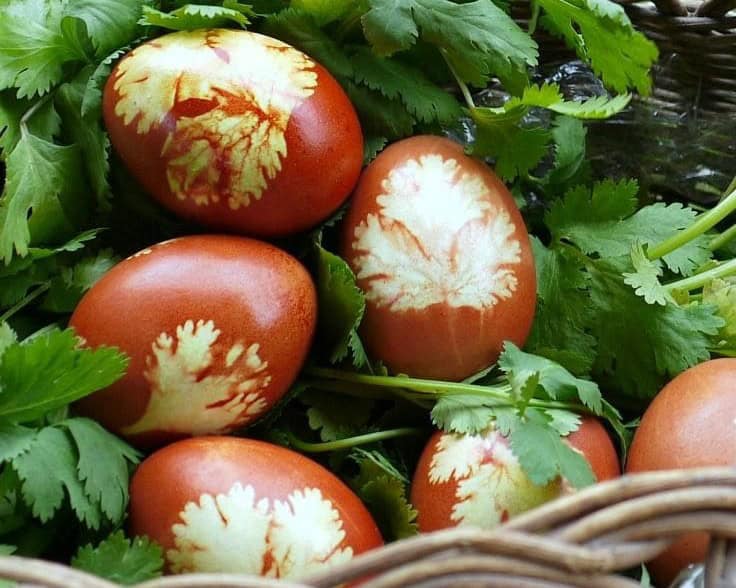
Across the globe, cultural heritage is cherished in various forms. Countries like Armenia, Serbia, Greece, and Russia have a rich tradition of naturally dyeing Easter eggs, which not only yields a unique aesthetic but also boasts health benefits. To replicate this process, gather onion skin and boil it for 15-20 minutes or until it releases its vibrant colors. Then, collect parsley leaves or any other plant with distinctive leaf shapes and attach them to the eggs.
Wrap the eggs in cut-out nylon, securing them with a rubber band. Submerge the eggs in the onion-infused water, ensuring they are fully covered to allow for optimal color absorption. Once done, carefully remove the nylon and parsley leaves, and finish by gently rubbing some oil onto the eggs to impart a subtle shine.
Take It To The Next Level With Sgraffito
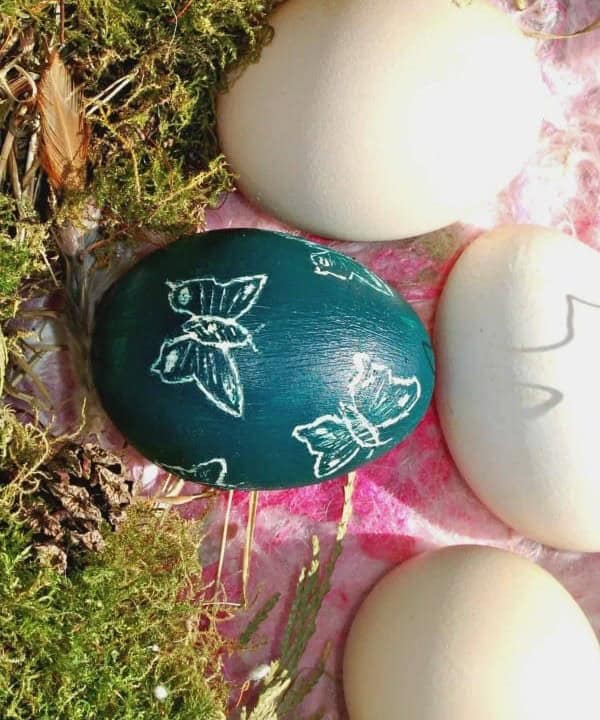
Sgraffito is a unique artistic technique that involves layering paint and then intentionally scratching it off to reveal previously concealed images or designs. This creative process can be applied to various mediums, including eggs. To create sgraffito art on Easter eggs, start by applying multiple layers of paint in the colors you prefer.
Once these layers have fully dried, use a sharp object like a toothpick or stylus to gently scratch away sections of the paint, revealing the underlying colors beneath. This technique can be used to create intricate designs and patterns, such as flowers, butterflies, and hearts, adding an extra layer of visual interest to your Easter eggs.
Go To Infinity And Beyond With Toy Story Eggs
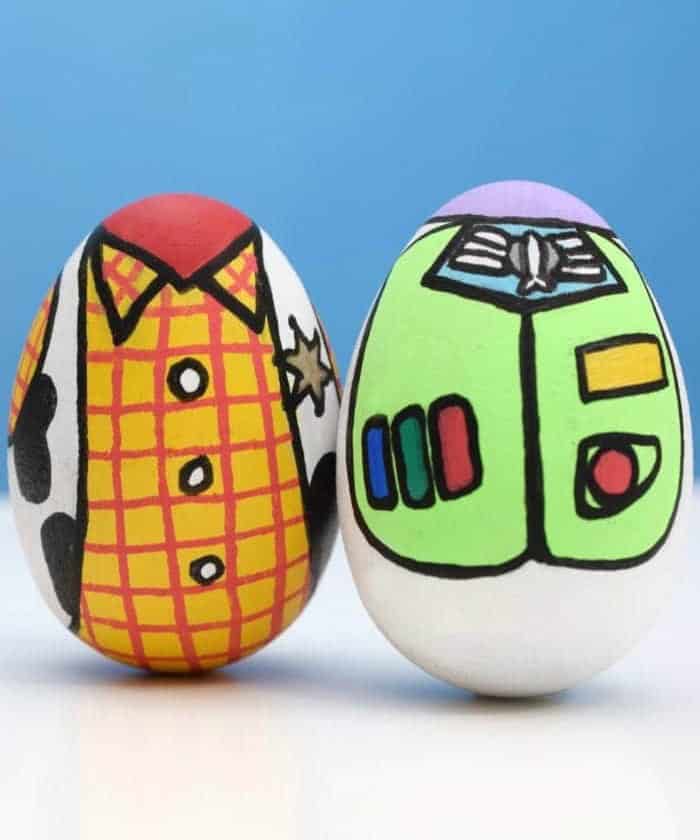
Bring out the inner child in you and let’s get creative! Let’s dive into the world of Toy Story, where imagination knows no bounds. Choose your favorite characters from the beloved franchise – Woody, Buzz Lightyear, Jessie, or Rex – and let your artistic side shine. Start by sketching out your design with a pencil, then transition to acrylic paint for a vibrant finish.
Don’t worry about making mistakes; in fact, you can even intentionally add some imperfections to give your egg a unique, handmade charm. And if you do accidentally make a mistake with the black pen, don’t stress! It’s all part of the creative process and can actually add an interesting texture to your design. Get ready to unleash your inner artist and have fun!
Dress Up Your Easter Eggs with Fabric
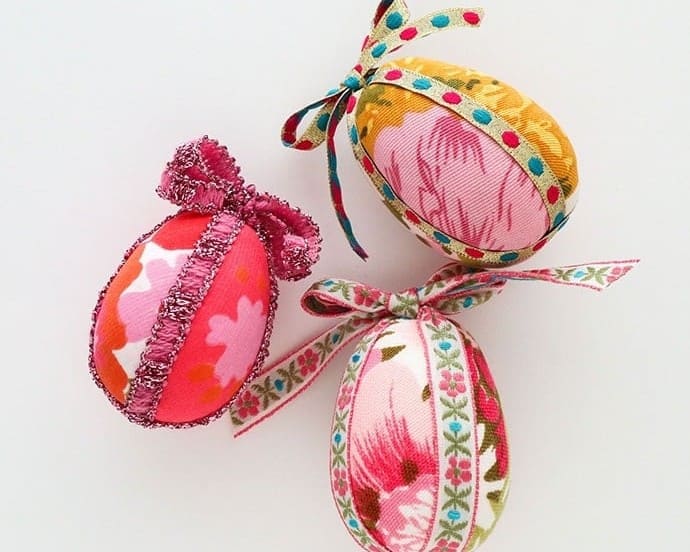
Transforming old clothes into creative Easter decorations is a fantastic way to repurpose and reuse. By cutting out small pieces, you can wrap and glue them onto eggs to create unique and personalized designs. Feel free to get creative with patterns, adding bows or buttons for an extra touch of elegance. This DIY project makes for a wonderful centerpiece or addition to your Easter baskets, sparking conversations and memories.
Go Casual with Denim
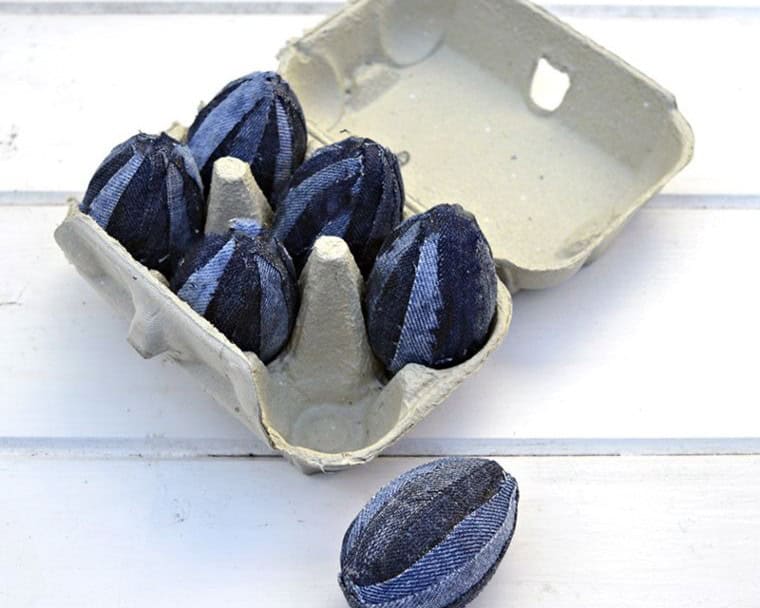
When it comes to upcycling old clothes, jeans are a great starting point. Not only do they offer endless creative possibilities, but they also retain their unique charm even when repurposed. One innovative way to give new life to jeans is by decoupaging them onto ceramic eggs. Simply apply glue to the denim scraps and adhere them to the eggshell. The result is not only visually striking but also a conversation-starting piece that can be reused year after year.
Decoupage Easter Eggs
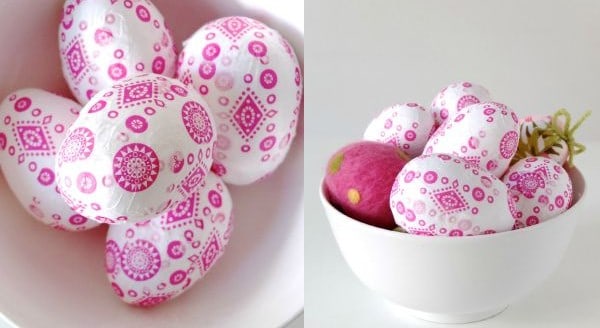
Bring creativity to your crafting with the art of decoupage. This unique technique involves applying cut-out paper designs onto various objects, elevating their aesthetic appeal. You’re free to add other embellishments to create a truly one-of-a-kind piece. To get started, gather wooden, plastic, or styrofoam eggs as your canvas.
Make Little Bunnies
As Easter celebrations are in full swing, it’s not uncommon to see bunny-themed decorations and treats filling homes with whimsical charm. Why not take the traditional Easter egg decorating to the next level by transforming them into adorable bunny eggs? With just a few simple materials, including fabric for ears and feet, paint, and tiny pom poms for tails, you can bring this creative idea to life. For added inspiration, consider incorporating these cute details into your DIY Easter wreaths.
Table Decoration with Egg Shells
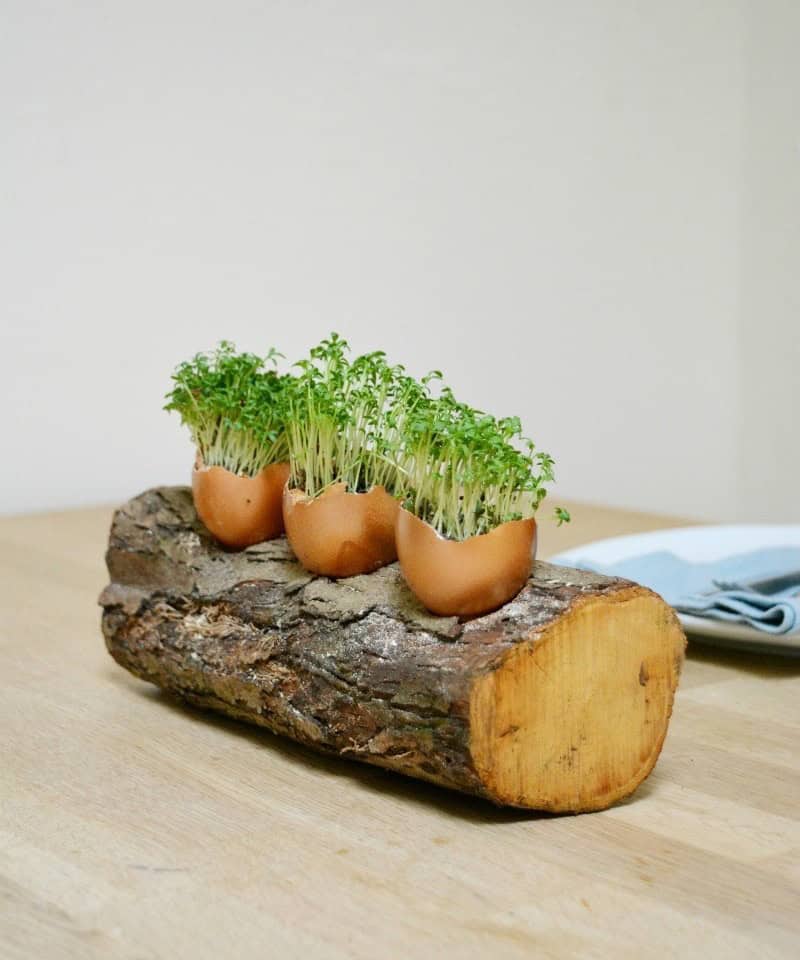
Transform leftover eggshells into a stunning centerpiece by upcycling them. Start by preparing a base, such as a piece of wood, and drill holes where the eggshells will fit snugly. Next, fill each shell with a mixture of soil and seeds or plant small seedlings already in soil. This DIY project offers incredible versatility, allowing you to grow either flowers or spices, which will thrive and add a touch of elegance to your table.
Easter Egg Floral Decoupage Garden
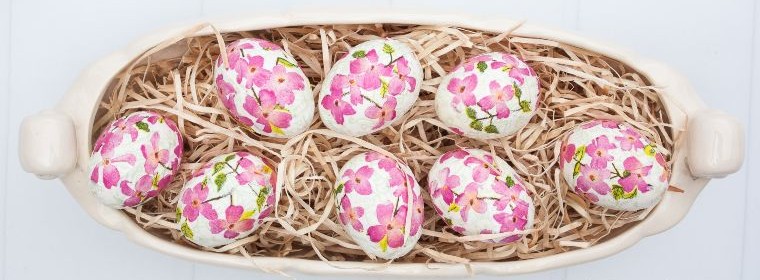
As spring is in full bloom, Easter arrives with its vibrant colors and sweet sentiments. If gardening isn’t your forte, you can still bring the beauty of flowers into your home through a unique and creative endeavor – making floral Easter eggs. To get started, grab some paper featuring a lovely floral design and let your imagination run wild.
Whip Up Colorful Design for Your Easter Eggs
What makes this DIY project truly special is its simplicity and ease of execution. To get started, you’ll only need a handful of ingredients and about 20 minutes of your time. The process begins by combining a store-bought whipped topping with a few drops of food coloring to create a vibrant hue.
Next, simply submerge hard-boiled eggs in the colored mixture, using a muffin tin – like this one, which offers just the right balance of containment and depth – to keep them secure while they soak up all that deliciousness. Once the excess topping has been removed, your eggs are ready to be enjoyed or shared with friends and family.
The Nightmare Before Christmas Easter Eggs
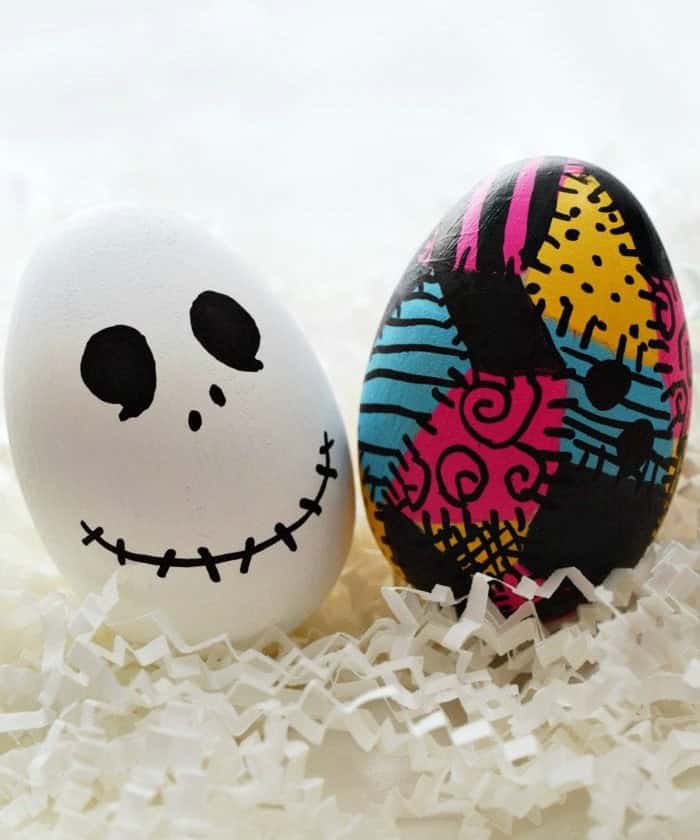
While some may not consider Easter their top holiday, there’s still plenty of creative freedom to incorporate other themes into your decorations. One idea is to draw inspiration from Halloween and its eerie charm. Take the whimsical world of The Nightmare Before Christmas as a starting point and let your imagination run wild. To bring this theme to life, grab some basic art supplies like paint, wooden eggs, or even a fine-tip pen.
Let the characters from this beloved movie guide you in creating unique and spellbinding designs that blend the best of both holidays.
Create Egg Shell Planters
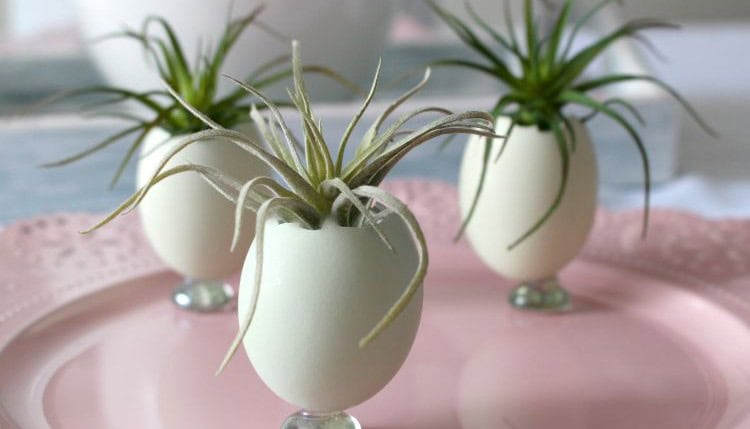
For a unique and low-maintenance eggshell planter idea, consider using air plants instead of traditional soil and seeds. This approach eliminates the need for messy soil and tedious planting, making it a great option for those who want a clean and easy solution. To get started, you can purchase small air plants like these or visit your local floral shop to find the perfect specimen.
Easter Eggs: Star Wars Edition
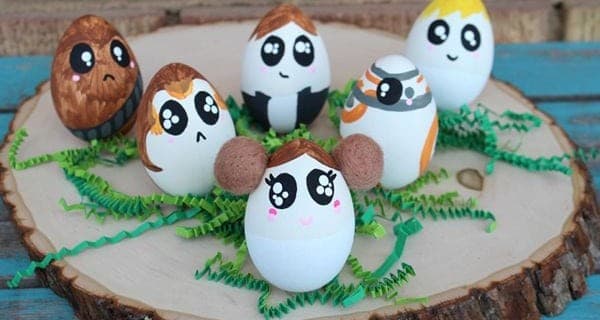
Elevate your Easter egg decorating game by incorporating your favorite movie into the design. If you’re a fan of Star Wars, this is an excellent opportunity to showcase beloved characters like Princess Leia and Chewbacca. With a vast array of options at your disposal, you can select the perfect pairings to bring a touch of intergalactic fun to your Easter decorations.
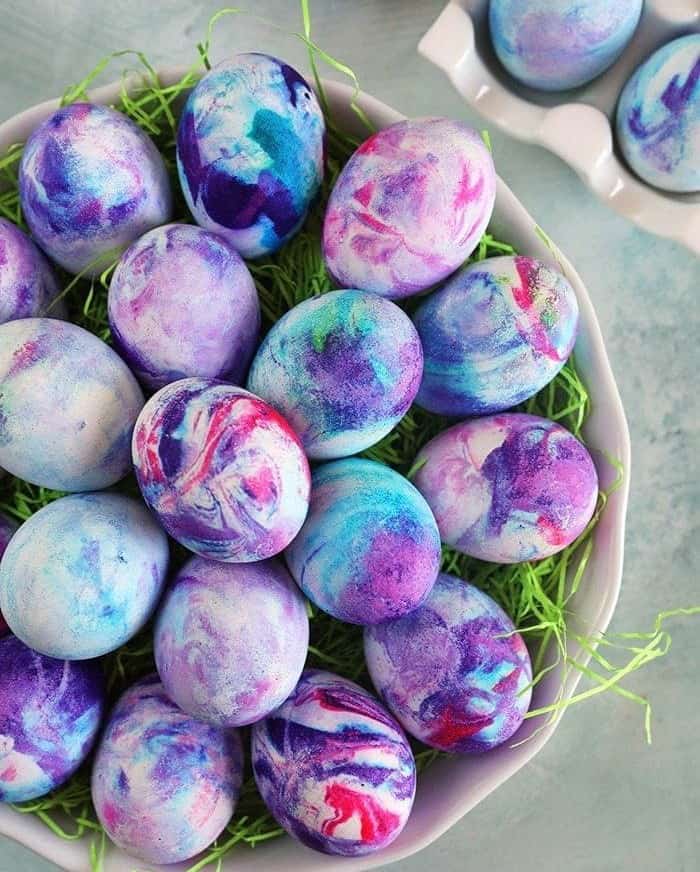
Marbled Easter Eggs

Transform your Easter eggs into mesmerizing masterpieces with a simple yet effective technique. By carefully layering paint in a cup, you can achieve a stunning effect reminiscent of marbles. Start by adding a single drop of paint to the center of the cup, then gradually build up layers in the same manner until you have enough to coat an egg. To add an extra level of complexity and visual interest, use a toothpick to create intricate patterns within the paint.
Once you’ve achieved the desired consistency, pour the mixture over your previously prepared eggs, which should be placed on a cooling rack to allow the paint to drip off and settle into a smooth, even finish.
Easter Egg Cone with Ice-Cream

Transform your space with a refreshing twist on traditional Easter decor. Create unique and delicious-looking ice cream Easter eggs that require minimal materials and effort. To get started, gather a few basic supplies: paint, brushes, and hard-boiled eggs. For added convenience, opt for brown or wooden eggs, which can be easily mistaken for the iconic ice cream cone. This clever DIY hack will save you time and add a playful touch to your Easter celebration.
DIY Bath Bombs Easter Eggs
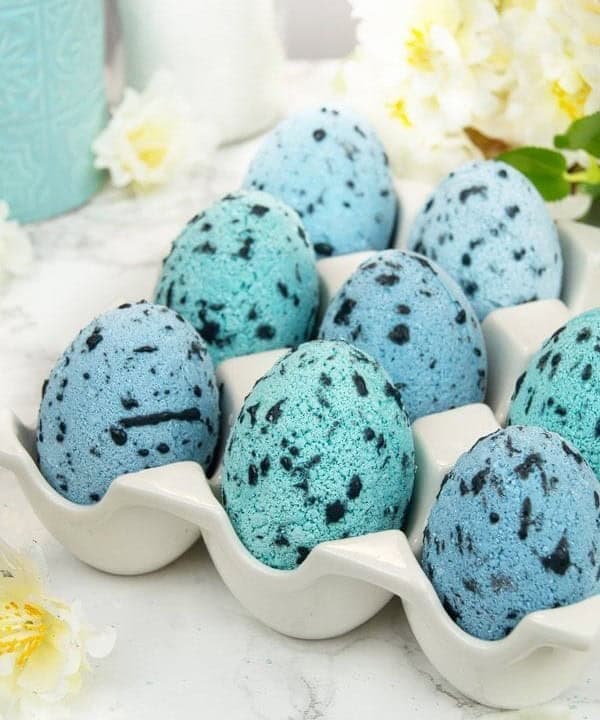
Elevate your Easter gathering with a thoughtful gift for friends and family – bath bomb Easter eggs are an innovative treat that’s sure to delight. To start, prepare the bath bomb mixture by mixing it well, then pour it into plastic craft eggs that can be opened. Allow the mixture to sit overnight before decorating if you wish. For an added twist, infuse your bath bombs with a refreshing scent by adding a few drops of essential oil to the mixture.
This will not only create a pleasant aroma but also add a unique and charming touch to your Easter gift. You can find a variety of essential oils here.
Easter Egg Library
For book lovers, creating a personalized Easter egg library is an exciting project. To start, gather pages from old books, cut them into smaller pieces, and attach them to the eggs using a strong adhesive. You can use real eggshells or opt for plastic craft eggs – both options offer unique results. The idea of transforming discarded book material into artful Easter eggs will surely delight bibliophiles and anyone who appreciates creative repurposing.
Light It Up with Easter Egg String Lights
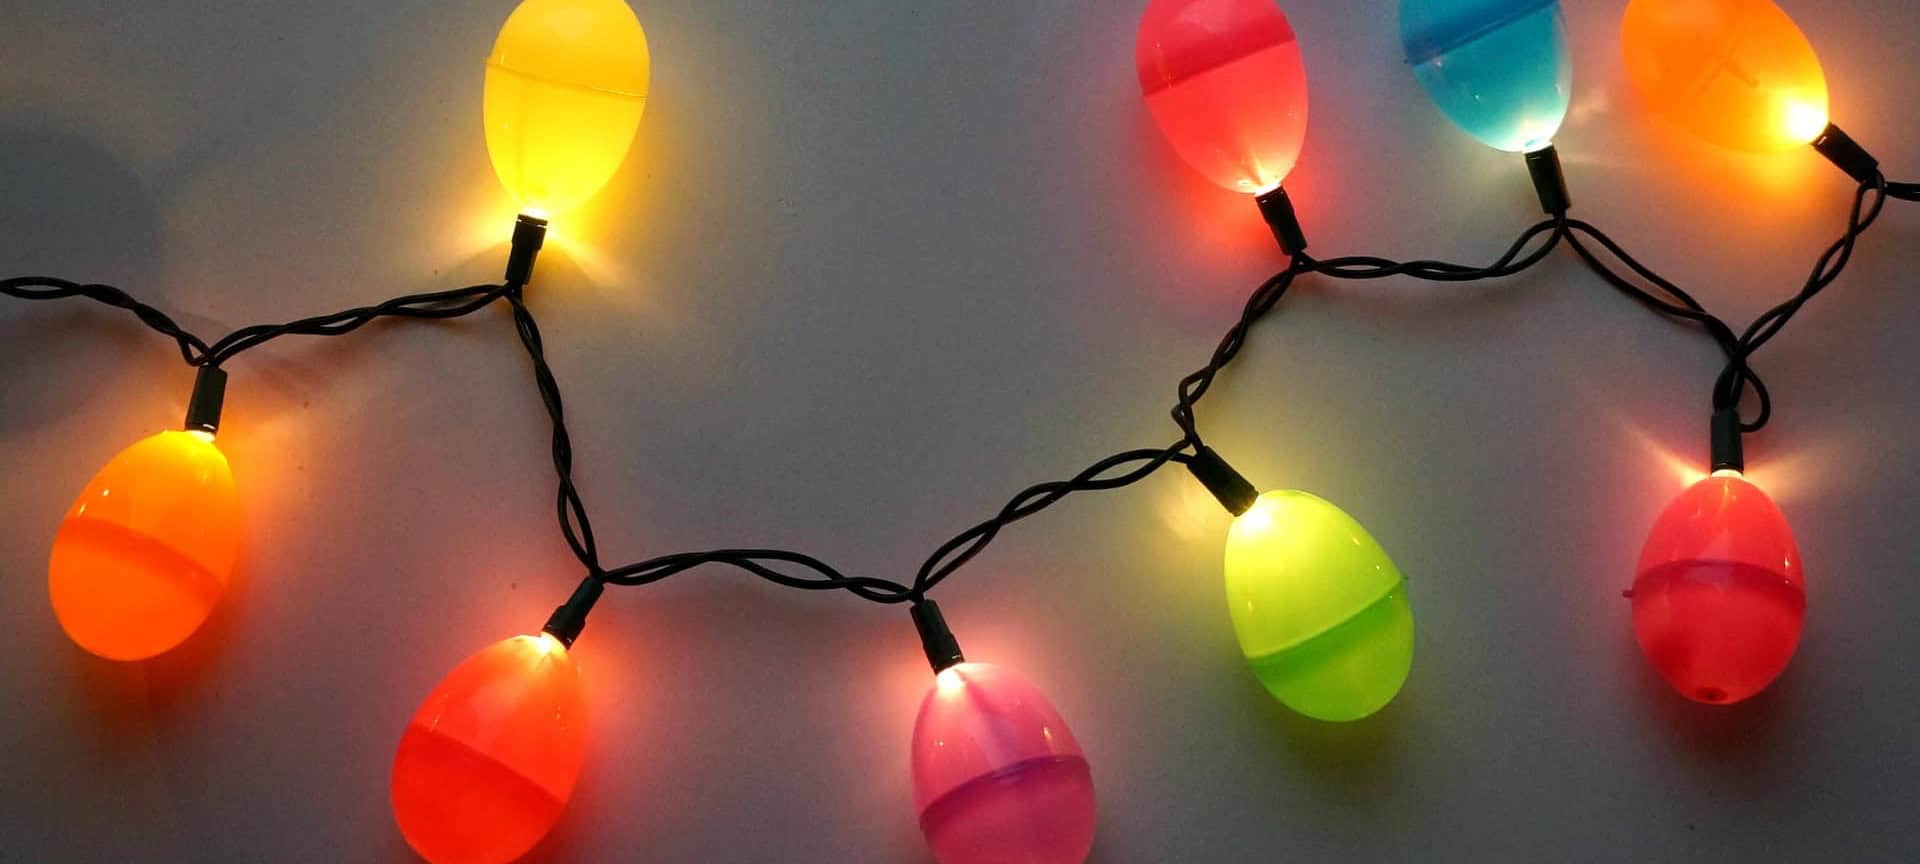
Easter eggs are not just for decoration – they can also add a creative twist to your home decor. One such way is by incorporating string lights into your Easter display. To create this unique look, you’ll need some plastic craft eggs, a drill to make holes for the lights, and string lights. Simply wrap each light with an eggshell and you’re ready to go! For an added pop of color, use colorful plastic eggs that will match the festive tone of Easter in your home.
This fun and easy craft is perfect for trying out with your kids.
Keep It Safe with Natural Colors
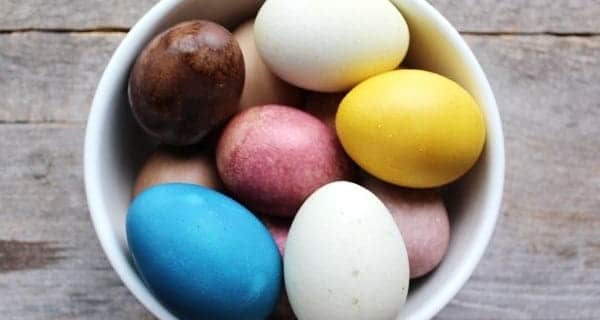
If you’re an Easter egg enthusiast who prioritizes natural ingredients, this DIY project is a great fit. To create your own all-natural Easter eggs, start by gathering a few simple ingredients: vegetables and pantry staples like vinegar, water, and eggs. For a brown hue, try adding coffee to the boiling water, while beets will yield a vibrant red color. Turmeric, on the other hand, can produce a lovely yellow shade.
Simply add your chosen ingredient to the water, bring it to a boil, then submerge your eggs and wait for the desired level of coloring.
Conclusion
While browsing through these creative and fun DIY Easter egg ideas, which one catches your attention the most? Are you planning on giving some of them a try?