
Transforming ordinary rocks into charming photo displays is a delightful way to infuse your home with personal touches and cherished memories. As a printing enthusiast, I relish the tactile experience of flipping through framed photos, but I also appreciate the flexibility of swapping out images on rocks to match my mood or the season. My abode is aglow with framed family portraits and treasured memories, alongside a few special rocks that double as photo holders.
These DIY wonders allow me to effortlessly change up the visuals, keeping my space fresh and meaningful. Read on to discover how I brought this creative concept to life.
You’ll Need

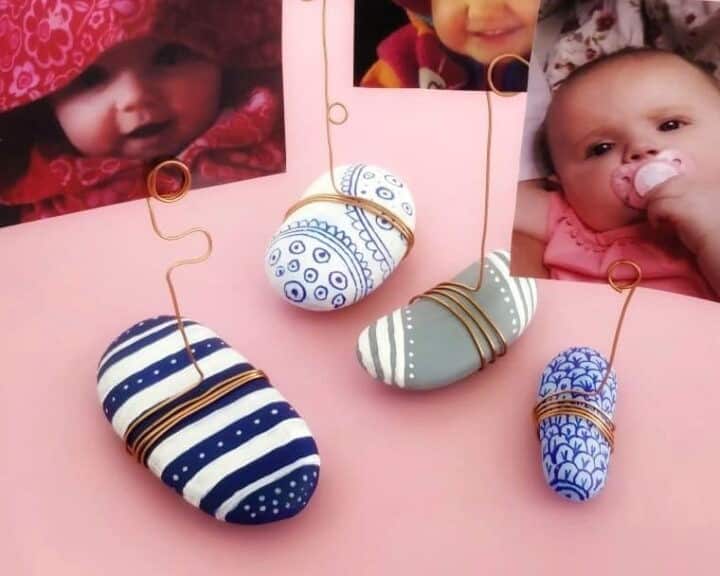
To create a visually appealing and textured design, you’ll need the following materials: smooth stones with varying shapes and sizes; acrylic paint in your preferred colors; needle-nose pliers for shaping and manipulating small objects; copper wire (18 gauge) for creating unique textures and embellishments; a pen, marker, or wooden stick for adding fine details and lines to your art piece; and paintbrushes of different sizes and styles to apply the acrylic paint with precision.
How to Make DIY Rock Photo Holders
STEP 1

When preparing to create unique photo holders, start by gathering all the necessary equipment. I recommend incorporating a variety of rock shapes to add an extra layer of personality to each holder. Use smaller rocks for smaller photos and larger ones for enlarged images. Begin the creative process by painting your chosen rocks with a solid color that reflects your personal style.
To take your design to the next level, consider applying a base coat of white paint beforehand to make subsequent colors truly pop.
STEP 2

Following the initial coat’s drying process, it’s common to apply additional layers of paint to reach a fully opaque color. As you build up the desired hue, take a step back and let the painted rocks sit for a bit to permit the finish to fully cure.
STEP 3


The beauty of this step lies in its versatility – you’re free to unleash your creativity and let your imagination run wild. From classic stripes to playful polka dots, whimsical illustrations, or even mosaics, the design possibilities are truly endless. The only limit is your own creative genius. Once you’ve achieved your desired design, set the rocks aside to allow the paint to dry completely.
For an added layer of protection and longevity, consider applying a clear acrylic sealer, such as those available online, to preserve your unique design.
STEP 4

To create a perfectly coiled copper wire design, start by wrapping the wire around your chosen base material – be it a wooden stick, pen, or marker – in a consistent motion. Aim for three to five revolutions, taking care not to wrap it too tightly. The ideal tension should allow you to effortlessly slide the wire off its anchor point once you’re done.
STEP 5

Ensure that the remaining portion of the electrical cable is properly secured and trimmed to a suitable length, typically ranging from 2 to 3 inches.
STEP 6

To shape the copper wire into the desired form, grasp the blunt end of your needle nose pliers firmly and position them at the point where you want the wire’s length to terminate. Then, carefully bend the remaining portion of the wire to create a precise 90-degree angle, ensuring a sturdy foundation for your subsequent crafting endeavors.
STEP 7

To secure your wire, take hold of a small object that provides stability – often referred to as a ‘anchor’ or ‘stop’. Then, wrap the horizontal section of the wire snugly around this anchor, making sure it’s firmly in place.
STEP 8


To achieve optimal results, consider repeating the rolling process a few times to guarantee a sturdy and secure bond between the materials. With that in mind, take pride in your handiwork – you’ve successfully crafted a one-of-a-kind DIY rock photo holder that’s sure to impress!
STEP 9


As we wrap up our rock holder creation, there’s one more step to further embellish its character. This optional step is crucial to execute before shaping the wire at a 90-degree angle and wrapping it around the rock. Employ your pliers to craft unique patterns on the wire. I experimented with curved lines for one of my rocks and a small full-loop for another, allowing my creativity to shine through.
The resulting patterns not only add visual interest but also give the wire a three-dimensional appearance, as if they’ve taken on a life of their own.
Other Ways to Use DIY Rock Photo Holders

These versatile rock holders not only showcase your favorite photos but also serve as a creative solution for keeping reminders, artwork, and inspirational quotes within reach. For instance, you can use one to display postcards from your travels or add a few to your bookshelves as decorative accents. Our hallway table features two of these holders – one for daily reminders like ‘don’t forget soccer practice’ or ‘pick up my coat from the dryers,’ and another for collecting mail with the kids.
Instead of cluttering the fridge with artwork, consider using a rock holder to showcase your kids’ smaller creations. You can also create separate ones for each study table to hold mini calendars or sweet notes from family members. In my home office, I like having one on my desktop that holds inspirational quotes written on little cards – it’s easy to switch them out daily. These rock holders are perfect for incorporating into party décor as well.
Imagine using 12 of these to showcase your favorite photos of the celebrant for each of their first 12 months at a first birthday party, or as place cards for tables with smaller rocks and cards. The possibilities are endless! Can you think of other creative ways to use these beautiful rock holders? Share your ideas in the comments below.
Other DIY Projects for Your Home


Transform your space with creative and budget-friendly projects! For those who love crafting, there are numerous DIY ideas that can be made from everyday materials. Start by creating unique picture frames using paper, a perfect solution for displaying cherished memories without breaking the bank. If you’re looking to add some natural charm to your home decor, try wrapping yarn around a glass vase or flower pot for a beautiful and rustic touch.
And if you’re in need of inspiration for decorating on a dime, look no further than our list of 20 dollar store decorating ideas. Additionally, there are plenty of fun and creative projects that can be enjoyed by both teens and adults alike. For the young at heart, we’ve curated a selection of 40 cute DIY crafts perfect for teen girls. Meanwhile, grown-ups can get in on the fun with our compilation of 20 craft projects designed to bring joy and relaxation.
DIY Rock Photo Holders
To create these charming DIY rock photo holders, you’ll need to invest just 10 minutes of prep time and a total of 4 hours and 40 minutes. The active crafting time is approximately 30 minutes, leaving plenty of room for relaxation in between. With minimal effort, you can bring a lovely decoration to your home and display cherished memories.
Equipment
When it comes to crafting and DIY projects, having the right tools can make all the difference. A well-stocked arsenal of essentials can help you tackle any task with ease. For instance, a needle nose pliers, pen or marker, and even a wooden stick can be surprisingly versatile and useful in various applications. You might need them to shape small materials, create precise marks, or even just as makeshift paintbrushes. But what about when you’re working on a project that requires intense focus?
It’s easy for your screen to go dark due to inactivity, which can disrupt your workflow and cause frustration. To prevent this from happening, make sure to take steps to keep your screen awake and ready to use whenever you need it.
Materials
To create a unique and eye-catching decorative piece, one can combine seemingly disparate elements like smooth stones, acrylic paint, and copper wire (specifically, 18-gauge). The tactile quality of the stones provides an interesting contrast to the fluidity of the paint, while the copper wire adds a touch of industrial chic. By carefully arranging these materials, an individual can craft a visually striking piece that showcases their creativity and resourcefulness.
Instructions
To bring your decorative rocks to life, start by fully painting them with acrylic paint in your desired color. For a brighter hue, apply a base coat of white paint first and build up multiple layers until you achieve the desired shade or opacity. Once painted, use acrylic paint again to add additional designs and embellishments. Next, take the copper wire and wrap it around a wooden stick or marker for approximately four to five turns.
Remove the wire from the stick and straighten the bottom section to about 2-3 inches in length. Use pliers to mark the desired length and then bend the remaining wire at a 90-degree angle, creating a sturdy anchor. If you’re feeling creative, now’s the time to add some funky decorations to the wire before shaping it into an angle. Finally, wrap the horizontal portion of the angled wire around your rocks for two to four times to ensure stability and secure your DIY rock holder in place.