Kickstart your drawing adventure or guide the little ones in the world of art with these clever drawing tricks! By dedicating time and space to unleash your creativity, you’ll be amazed at how these hacks can elevate your skills from the start. Drawing is an excellent way to express yourself, but it can be daunting for some to develop their style or techniques.
That’s why I’m excited to share 21 drawing hacks that will empower you to take your artistry to the next level and tackle projects that once seemed out of reach. To get started, gather your essential tools like vibrant markers, graphite pencils, a reliable notebook, and versatile pens. You might also find a roll of tape helpful in adding an extra layer of creativity. For a more in-depth look at these hacks, check out my YouTube video and be inspired to try something new.
Pair of Owls
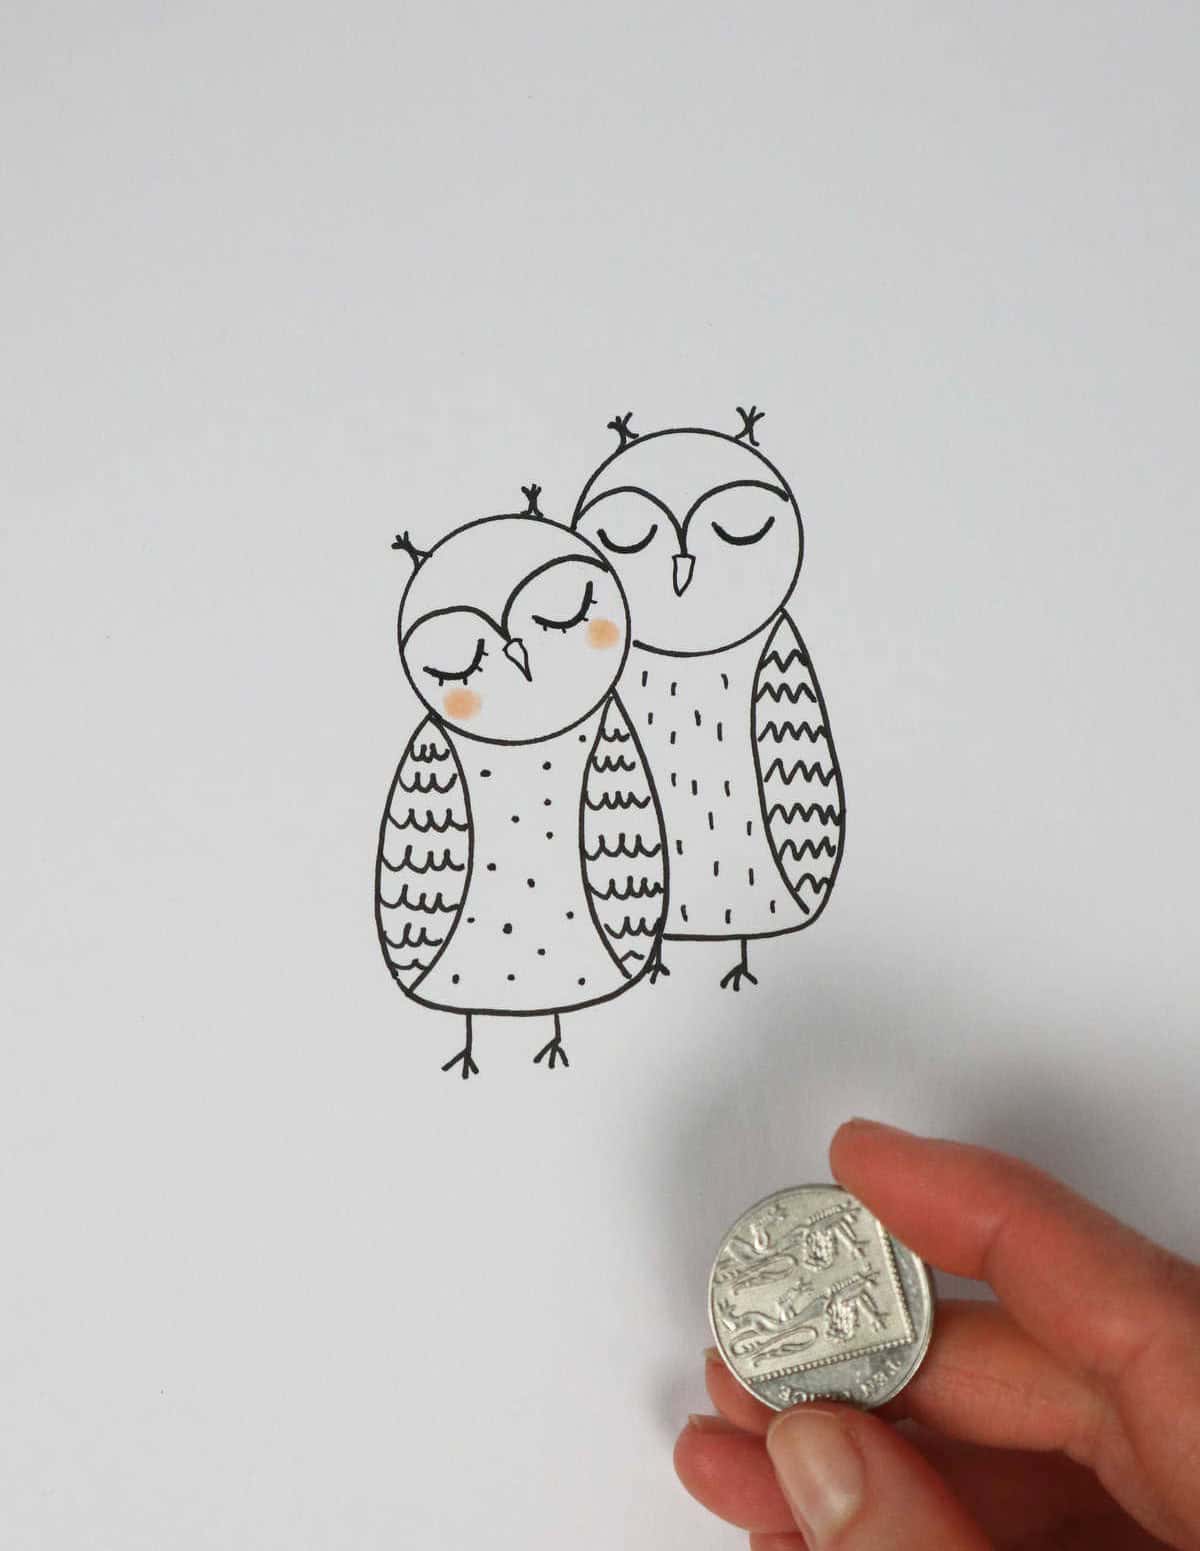
Owls have captivated our imagination, making them a delightful subject for artistic expression. Drawing these nocturnal creatures can be an enjoyable and fulfilling experience, especially when done with children. To begin, sketch two circular shapes using a coin as a guide for the owls’ heads. Next, create the bodies by drawing two ovals that connect to the heads. Add some personality to the faces by incorporating eyes, beaks, and feathers. Then, use gentle curves to bring the bodies together.
Finally, add wings and tail feathers to complete the illustration. This charming project is an excellent way for kids to explore their creativity and develop their drawing skills.
500 to Sleepy Cat
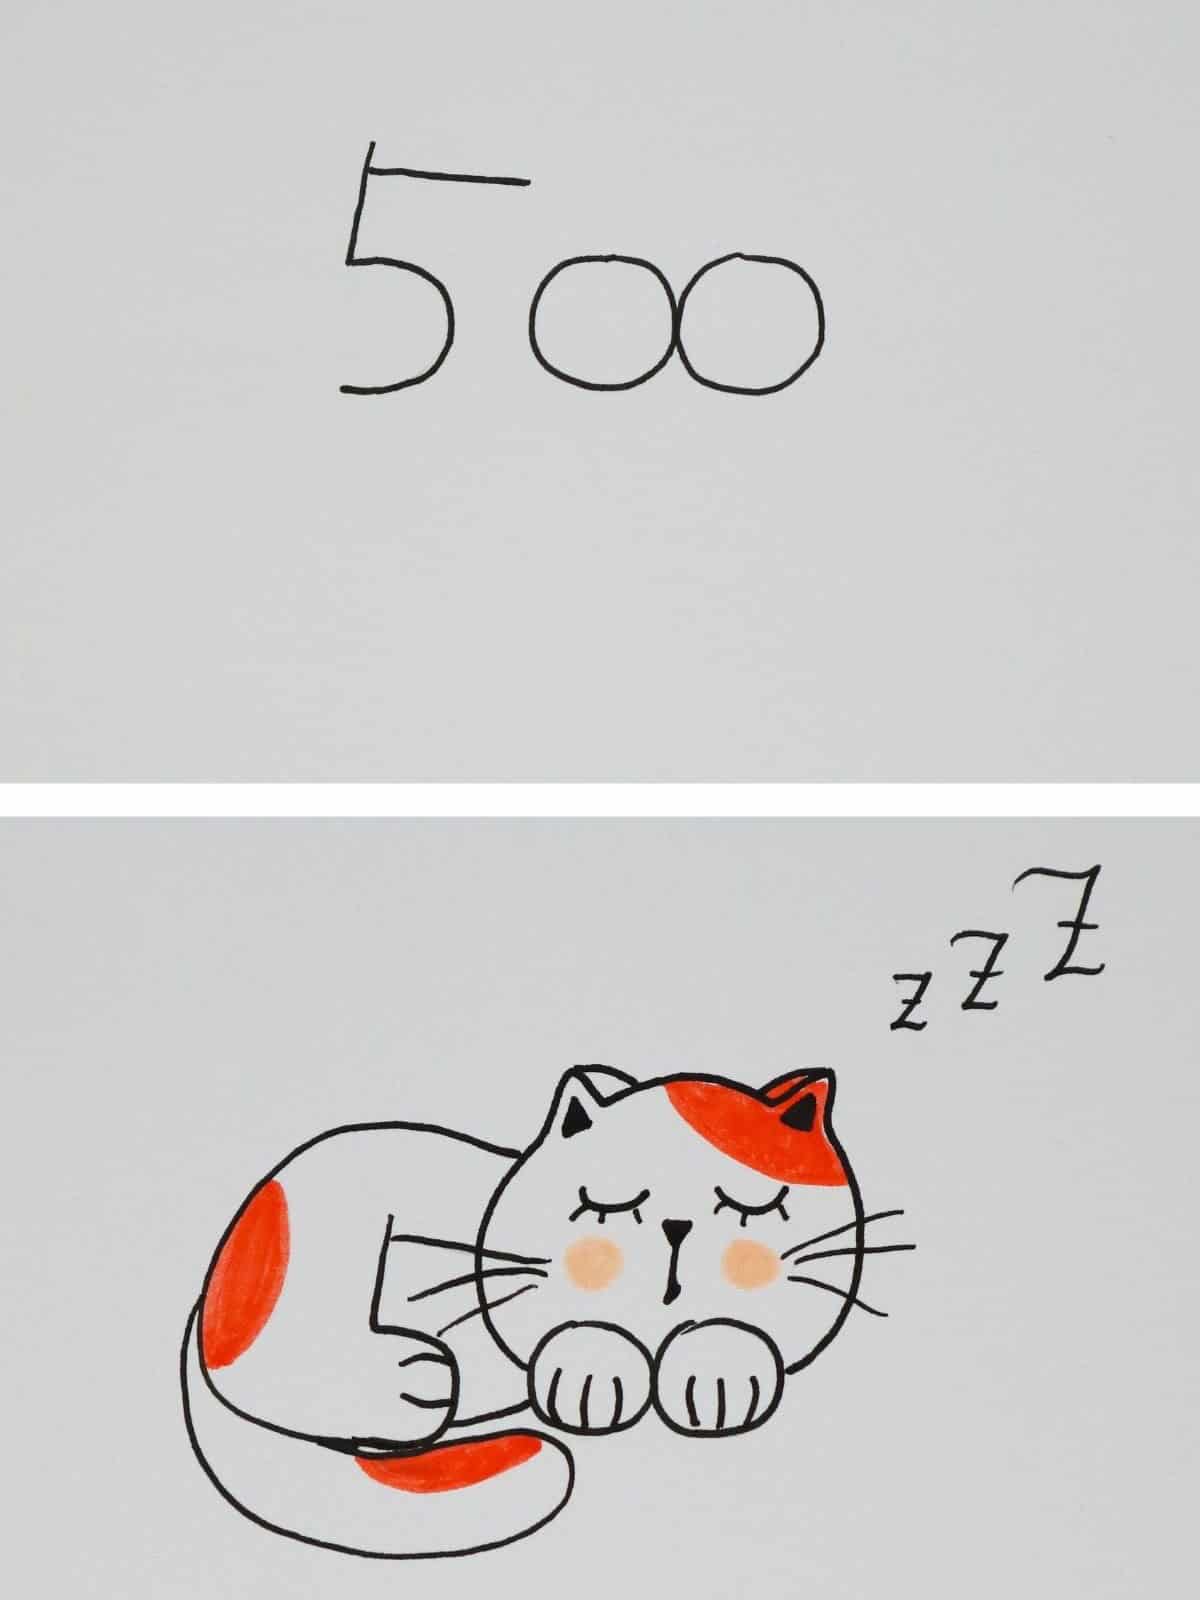
To create a charming and snoozing feline, start by using the number 500 as your foundation. Begin by rendering the number 5 as the cat’s back leg and belly, before utilizing the 0s to craft each front paw. Next, add some additional lines to form the head shape, followed by curved strokes that radiate from the body to convey a sense of relaxation and slumber. This unique approach will yield a delightfully sleepy cat that you’ll be thrilled with!
For more creative and whimsical cat drawing ideas, be sure to explore our blog for inspiration.
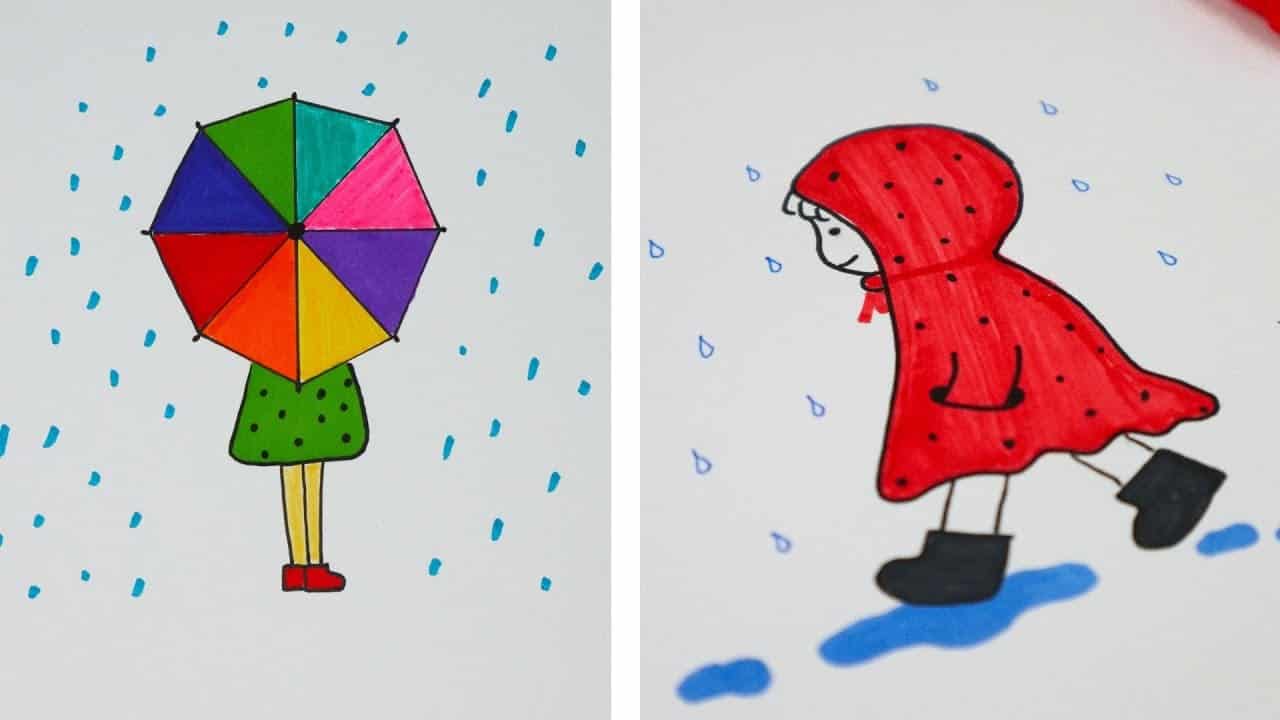
R to Girl in a Raincoat
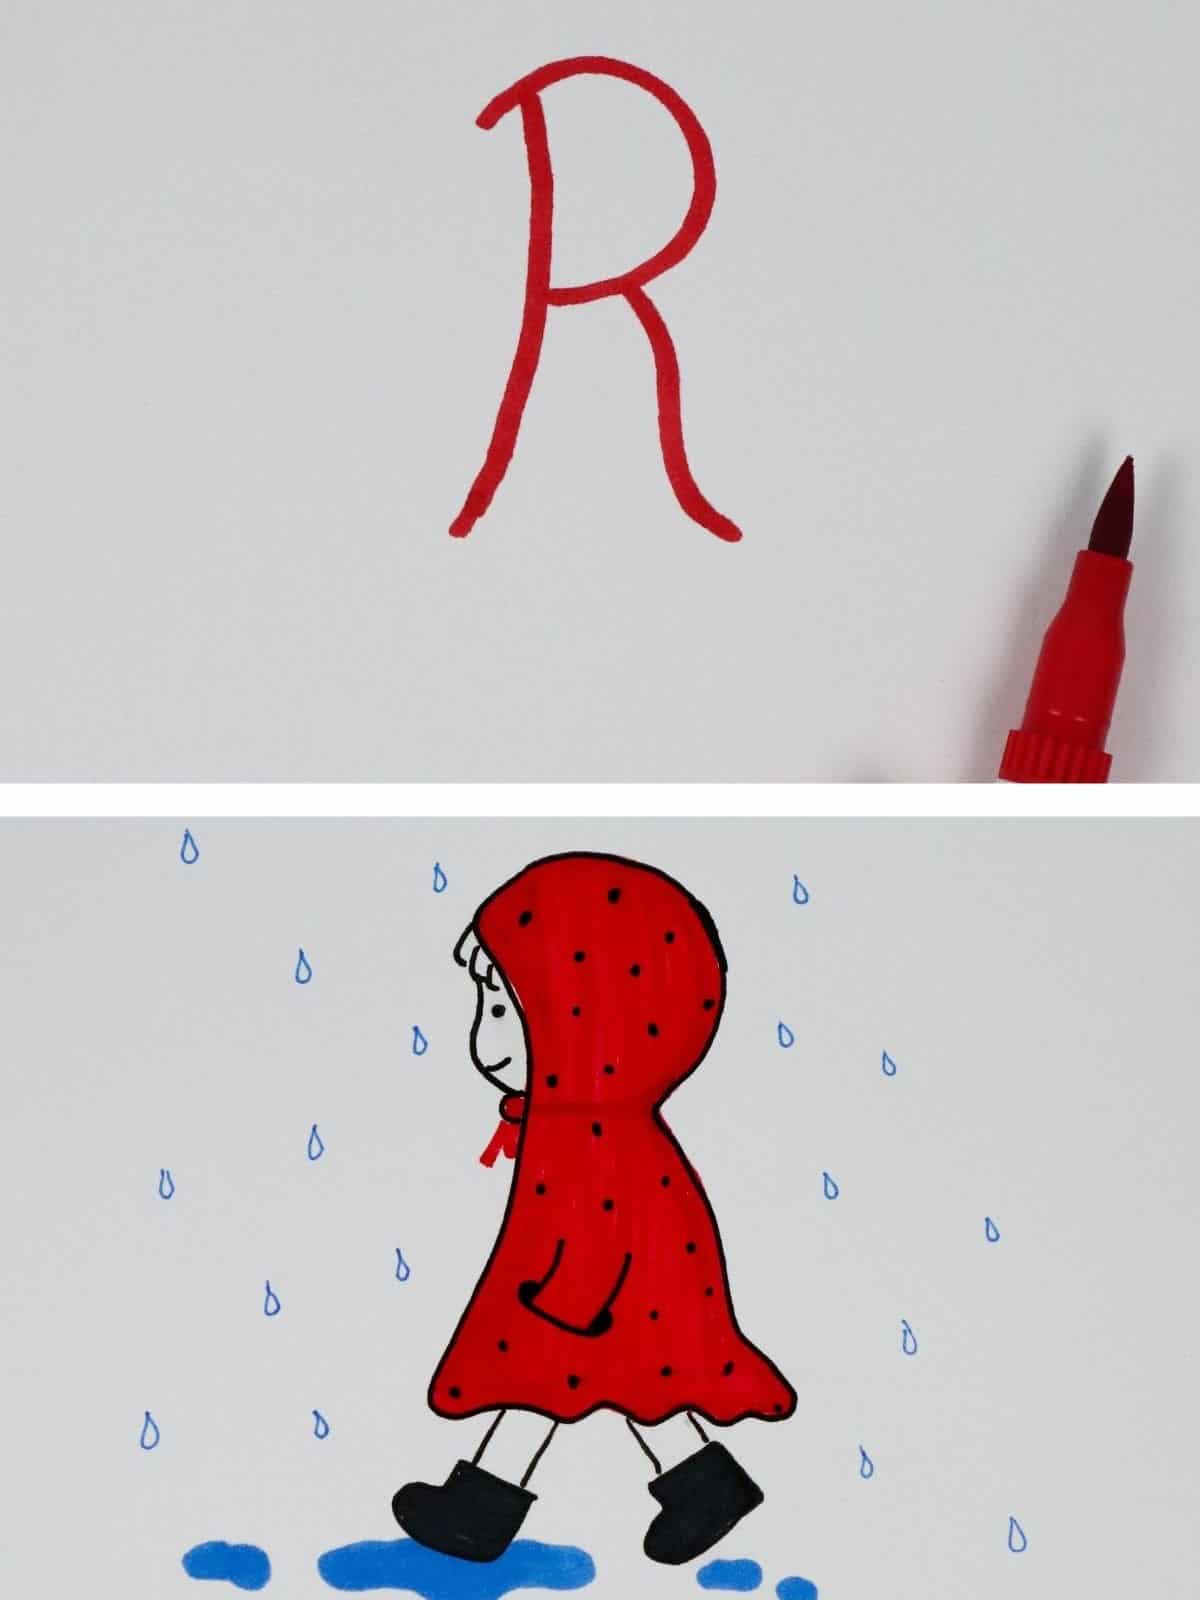
Begin your artistic journey by using a capital letter R as a foundation for drawing a girl in a raincoat. Start by sketching the letter R at the desired scale of your subject, then gradually build upon it by adding curves to form the head and body. Next, incorporate arms and legs to bring your drawing to life. Subsequently, envelop the body with the raincoat, allowing its shape to guide your strokes.
To add a finishing touch, refine the facial features and hairline, imbuing your artwork with personality and character.
Sheep in Motion
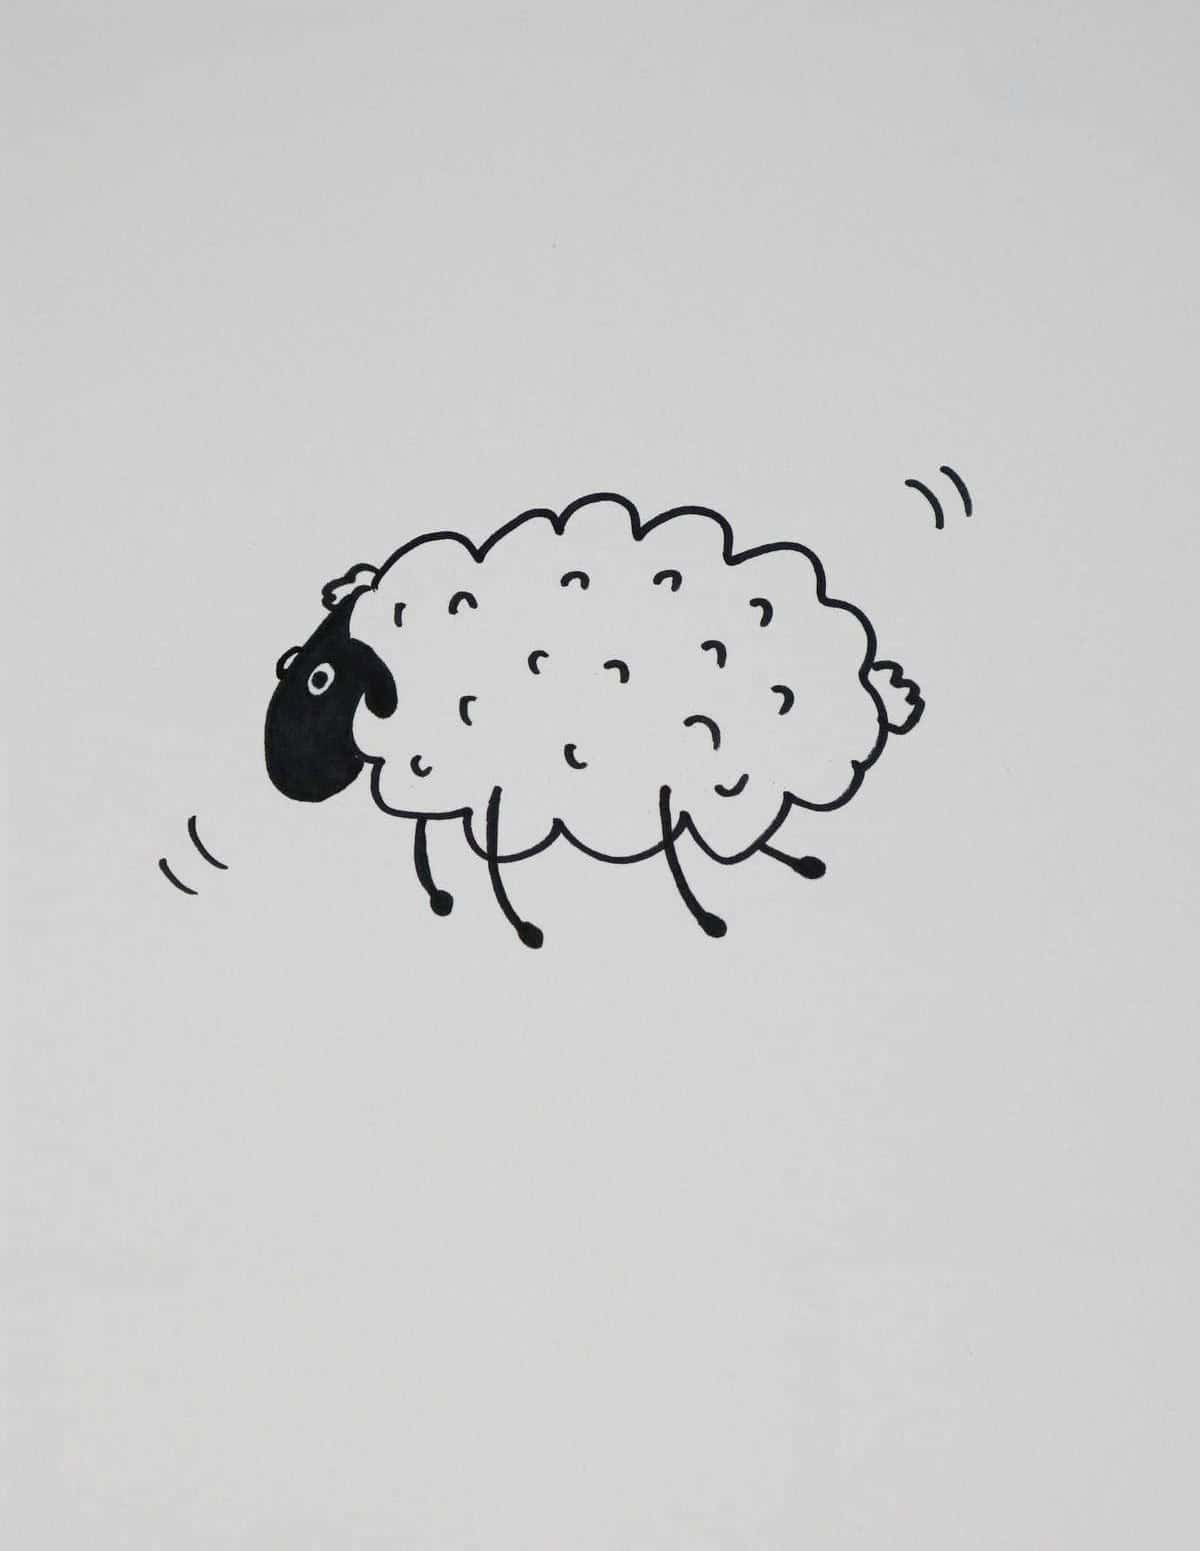
While capturing the dynamic essence of a sheep in motion might seem daunting at first, it can actually be a very enjoyable experience. To get started, define the body and head of your subject, then use gentle curves to convey the fluid movement of its legs. Next, incorporate subtle motion marks that suggest the direction of the sheep’s movement. Finally, add some textured fluff accents radiating in various directions to complete the piece.
With these basic elements in place, you’re free to add any additional details that bring your scene to life.
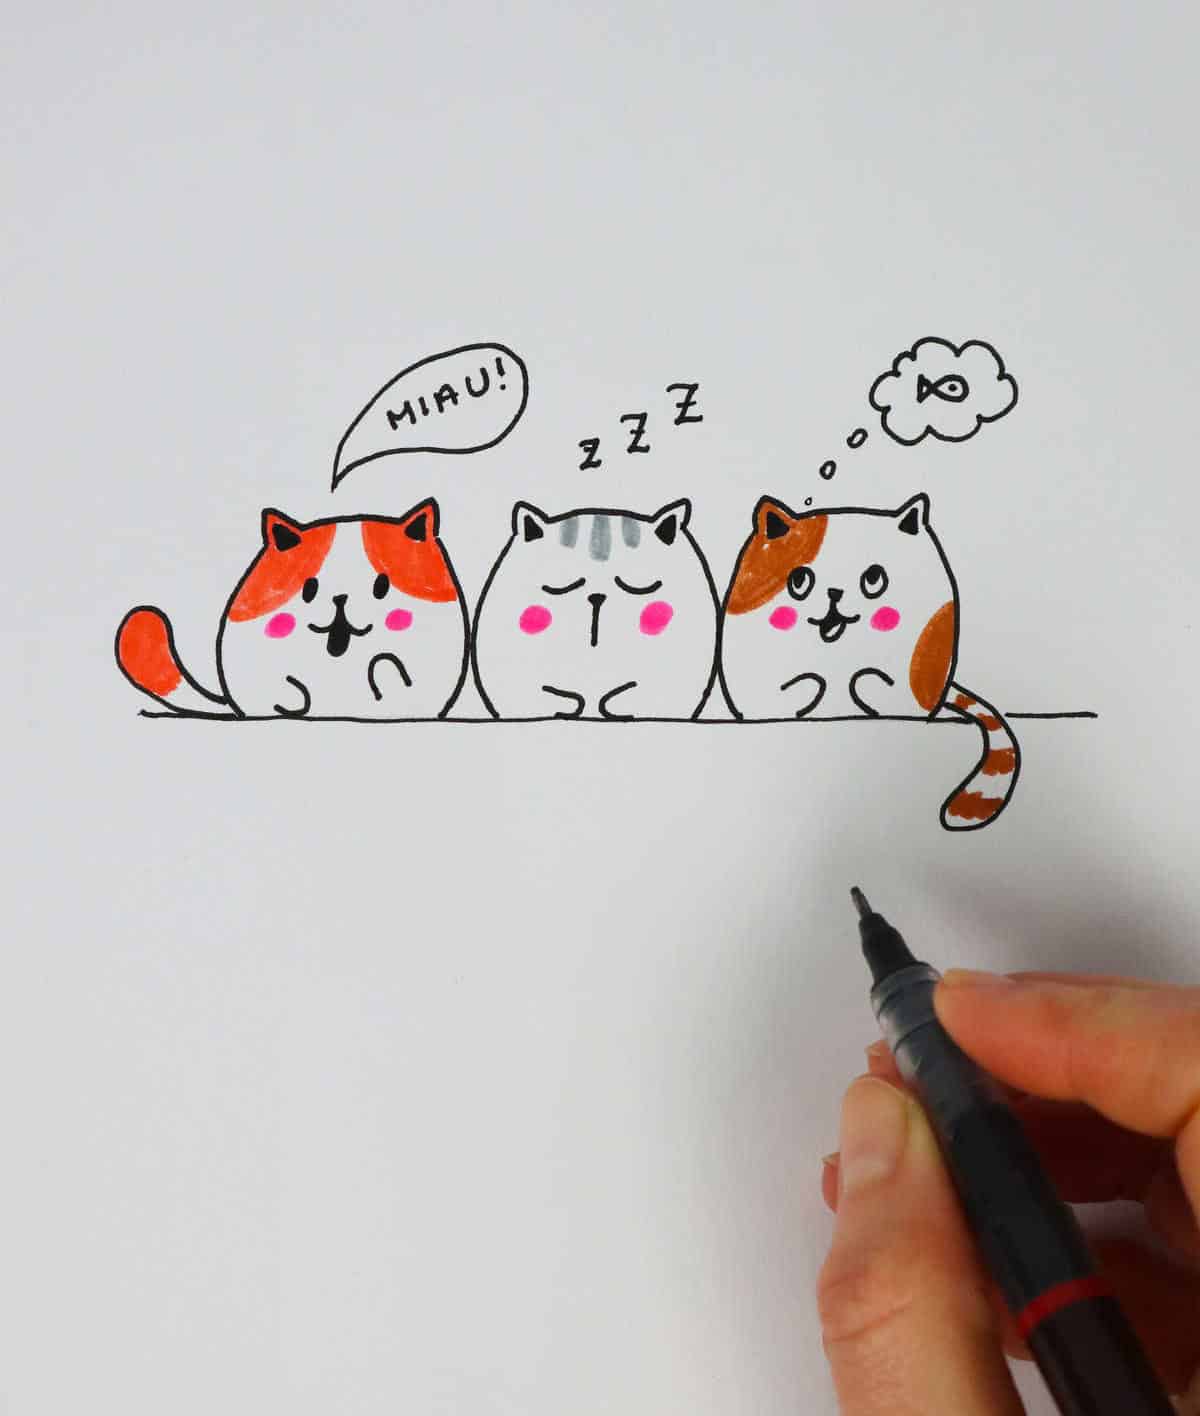
Cat Trio
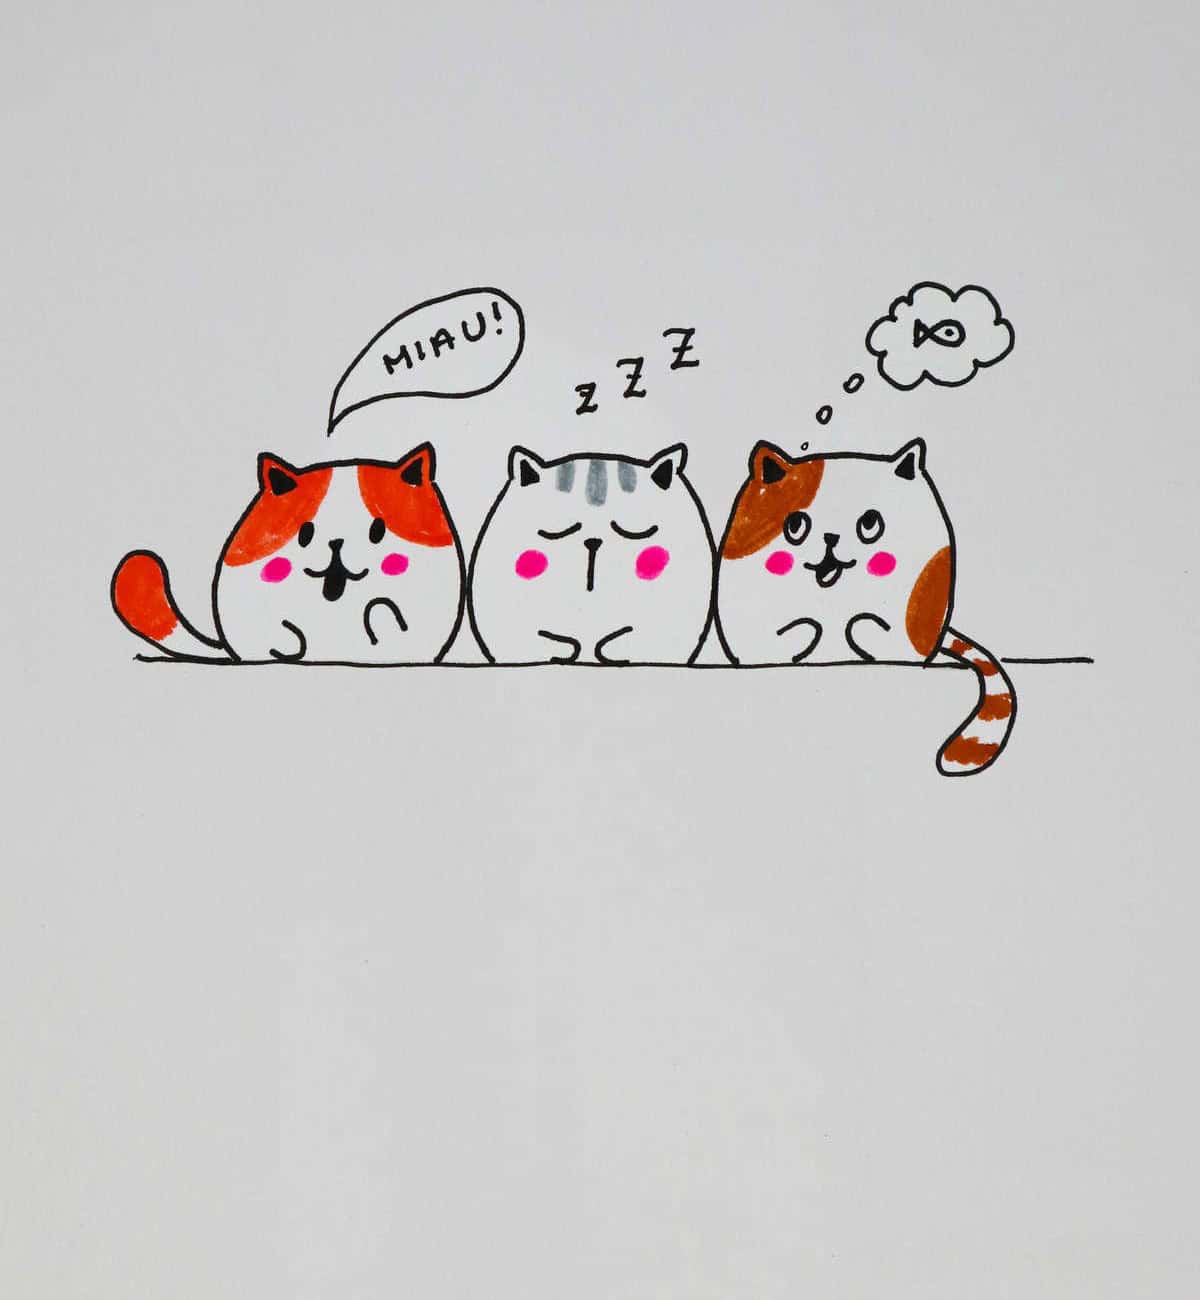
To bring your drawing of multiple cats to life, start by sketching three rounded shapes for the bodies. Keep in mind that these circles don’t need to be perfect – a bit of wobble or irregularity can add character to your feline friends. Once you have your base shape drawn, focus on adding facial features such as eyes, noses, and mouths. The eyes should be the focal point of each cat’s face, so make sure they’re proportionate and expressive.
After that, move on to drawing paws and tails, which can add a sense of movement and energy to your artwork. Finally, don’t forget to add some fluffy fur details to give your cats their signature softness and cuteness.
Pair of Doves from Two “2s”
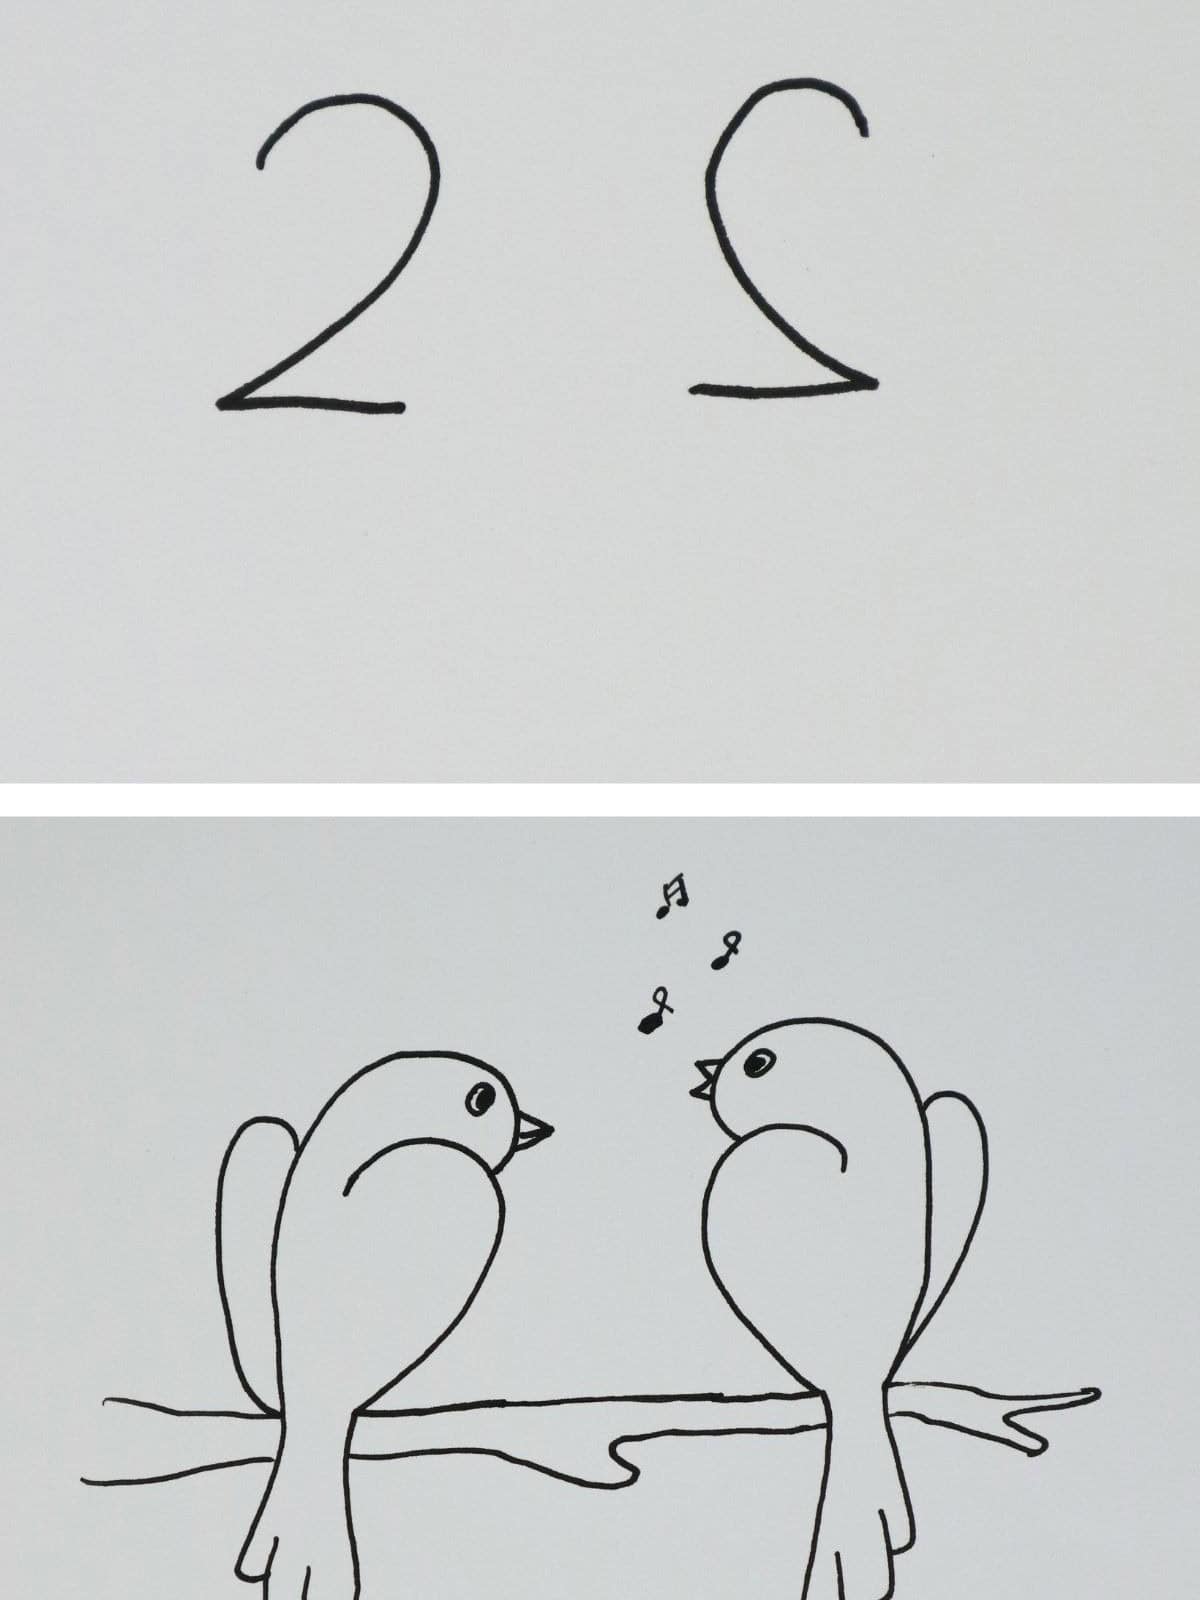
When attempting to bring a pair of doves to life on paper, start by establishing the foundation with two number twos. Begin by drawing one ‘2’ in its standard form, while the second ‘2’ is drawn backward, positioned wherever you desire on the page. This unique approach sets the stage for crafting the birds’ heads, bodies, and subsequent features. Next, add curved lines to define the doves’ facial structures and torsos.
Then, incorporate wing and tail elements before finally embellishing the faces and feathers with subtle details, thereby completing the overall drawing.
S to Duckling
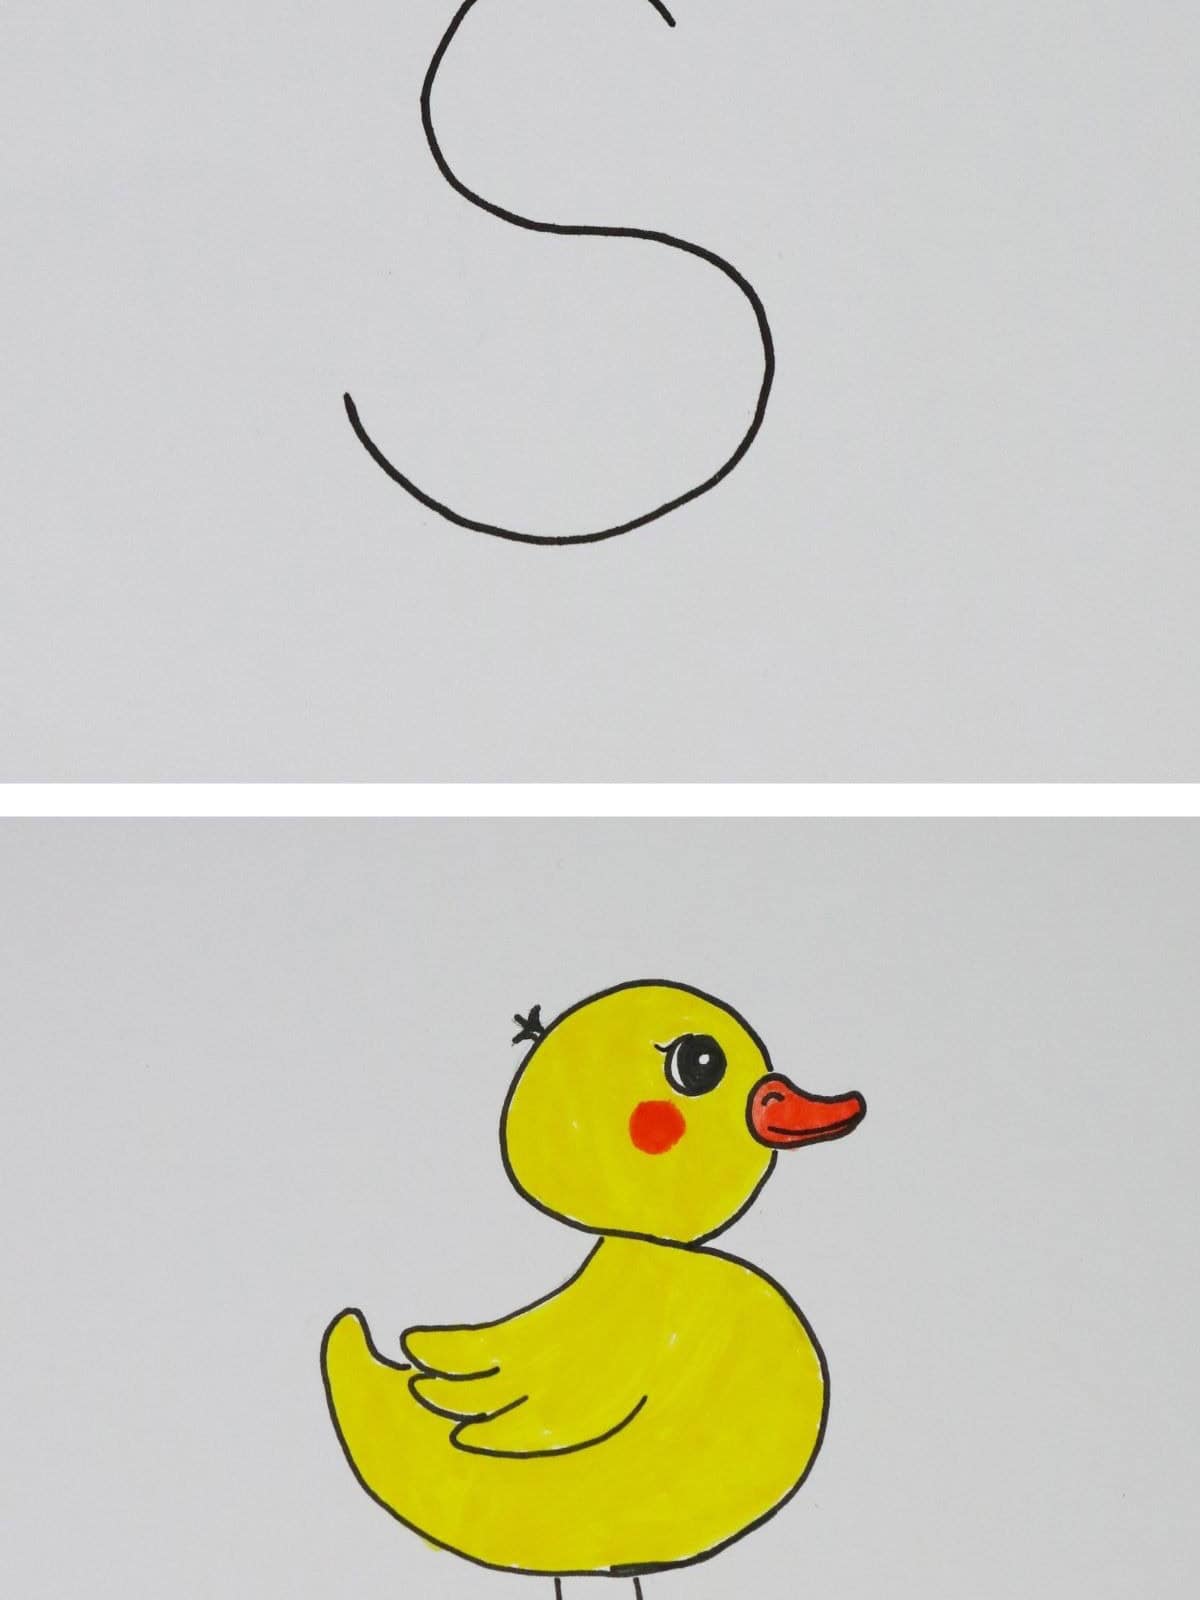
To craft a charming duckling, begin by sketching the letter S, scaling it to the desired size for the bird. Next, add gentle curves to shape the head and body, forming the foundation of your quacking friend. From here, incorporate wings and legs to complete the duck’s silhouette. The finishing touches come in the form of facial features and feathers, which bring the duckling to life with a playful personality.
When you’re done, consider incorporating these other adorable animal drawings into your doodles for a delightful menagerie.
Friends at the Zoo from Four “3s”
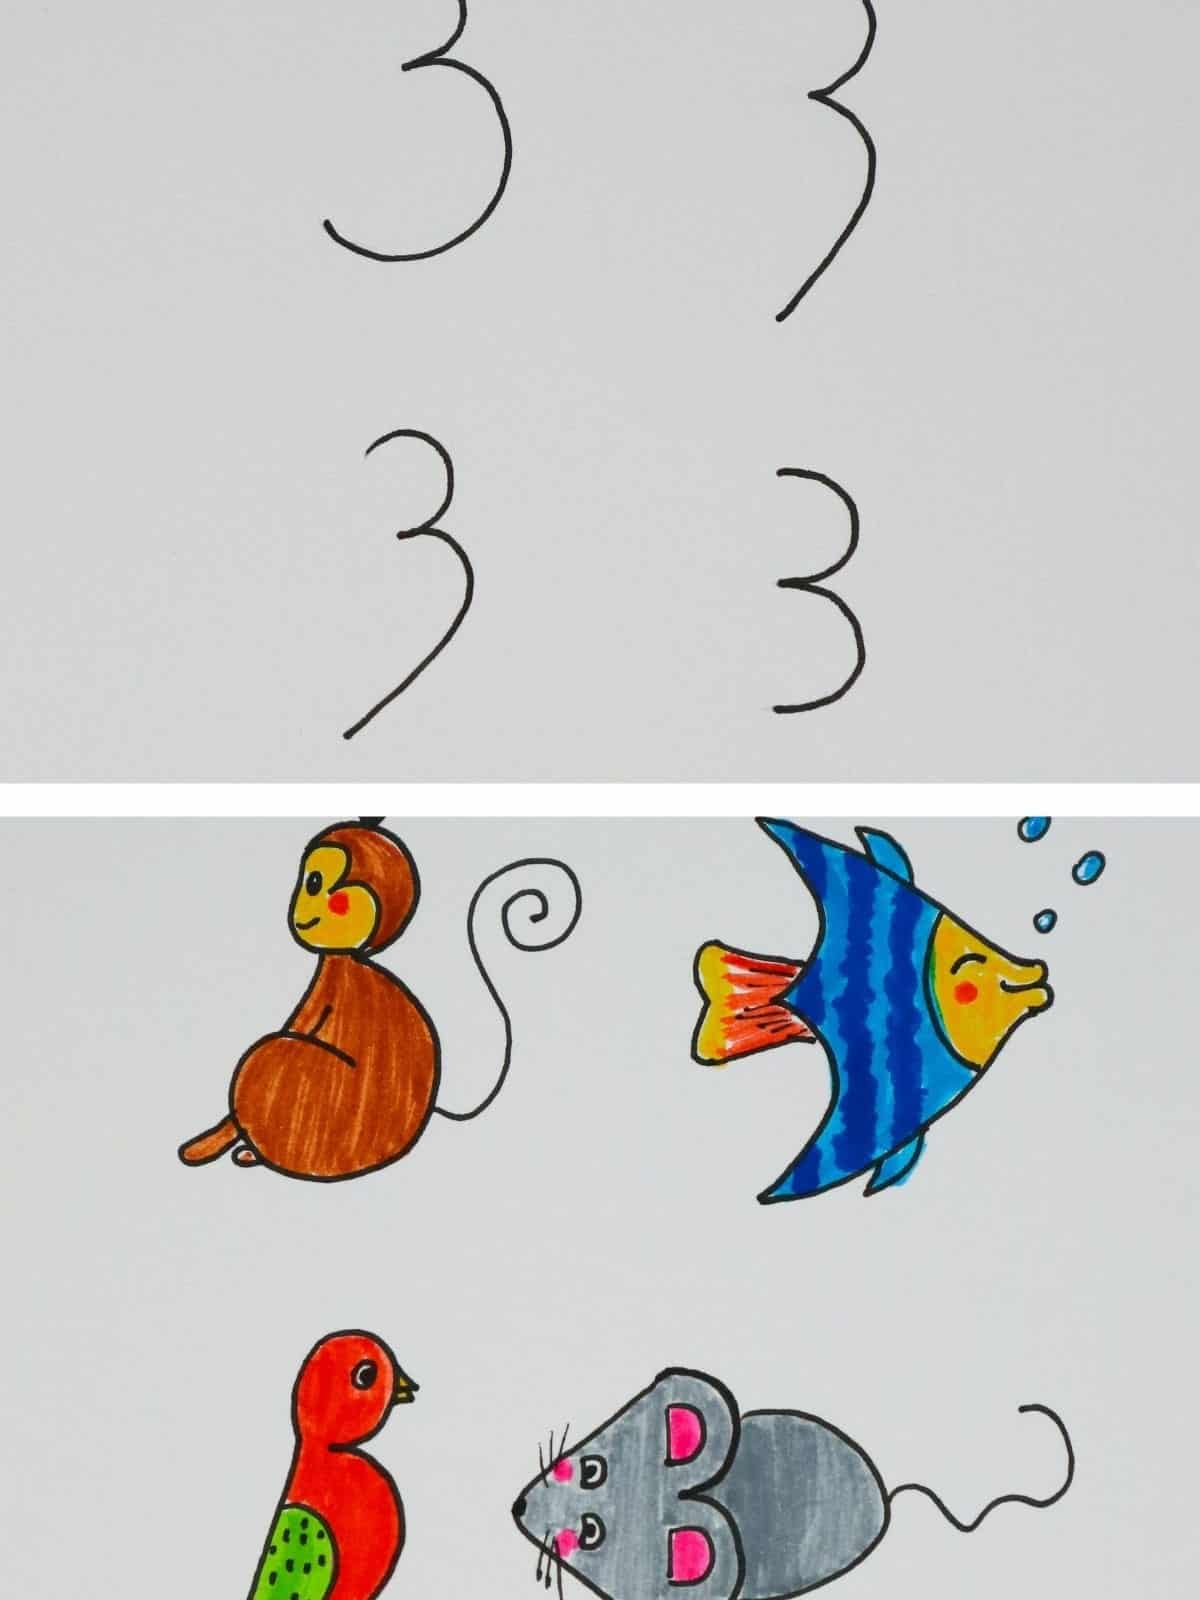
Unleash your creativity by taking on a fun challenge: drawing a group of animals at the zoo! Begin by utilizing the four 3s as a starting point. For each animal you’d like to recreate, replicate the initial three shapes and then build upon them with simple lines to complete the rest of the creature.
To add some visual interest, include details on the faces and bodies before bringing forth distinctive features such as tails, facial expressions, or other distinguishing characteristics that set one species apart from another.
Excited Dog from “b” and “d”
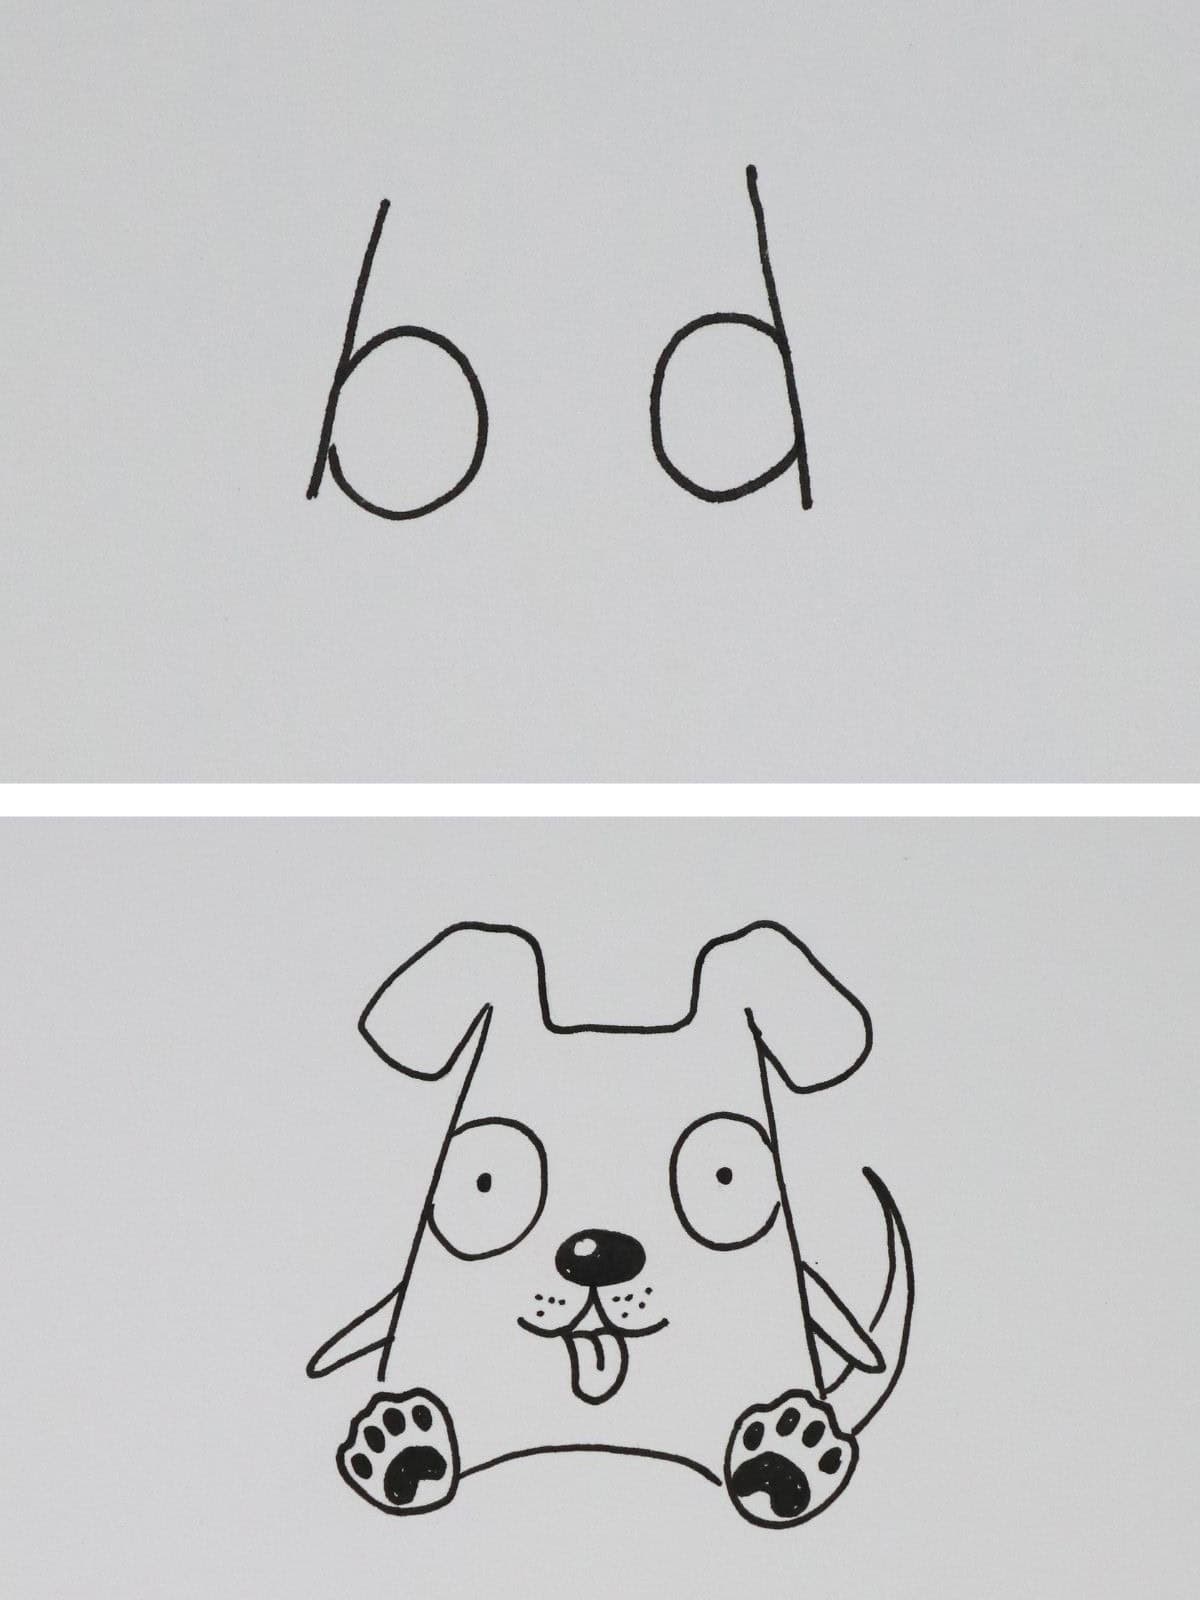
To bring a lively canine to life on paper, start by combining the letters ‘b’ and ‘d’, with their lines converging towards each other. This foundation will serve as the base for the dog’s body, allowing you to extend the lines upwards towards the ears and downwards towards the paws. Next, create a small circular shape for the nose and add some subtle dots to represent the eyes. From here, it’s time to add the defining features that give your excited dog its energy: paws, ears, tails, and arms.
Finally, take the opportunity to add finer details to the face and fur, conveying the dog’s enthusiasm through expressive markings.
Holding hands for World Peace

To achieve a minimalist aesthetic, begin by creating circular objects to represent the people. Then, use different colored circles for their bodies. Next, position a globe at the center of the design and add the final details. To create realistic shadowing, rub pencil lead onto a Q-tip and apply it at various angles to mimic the shading effect.
A “t” to Protect from the Rain
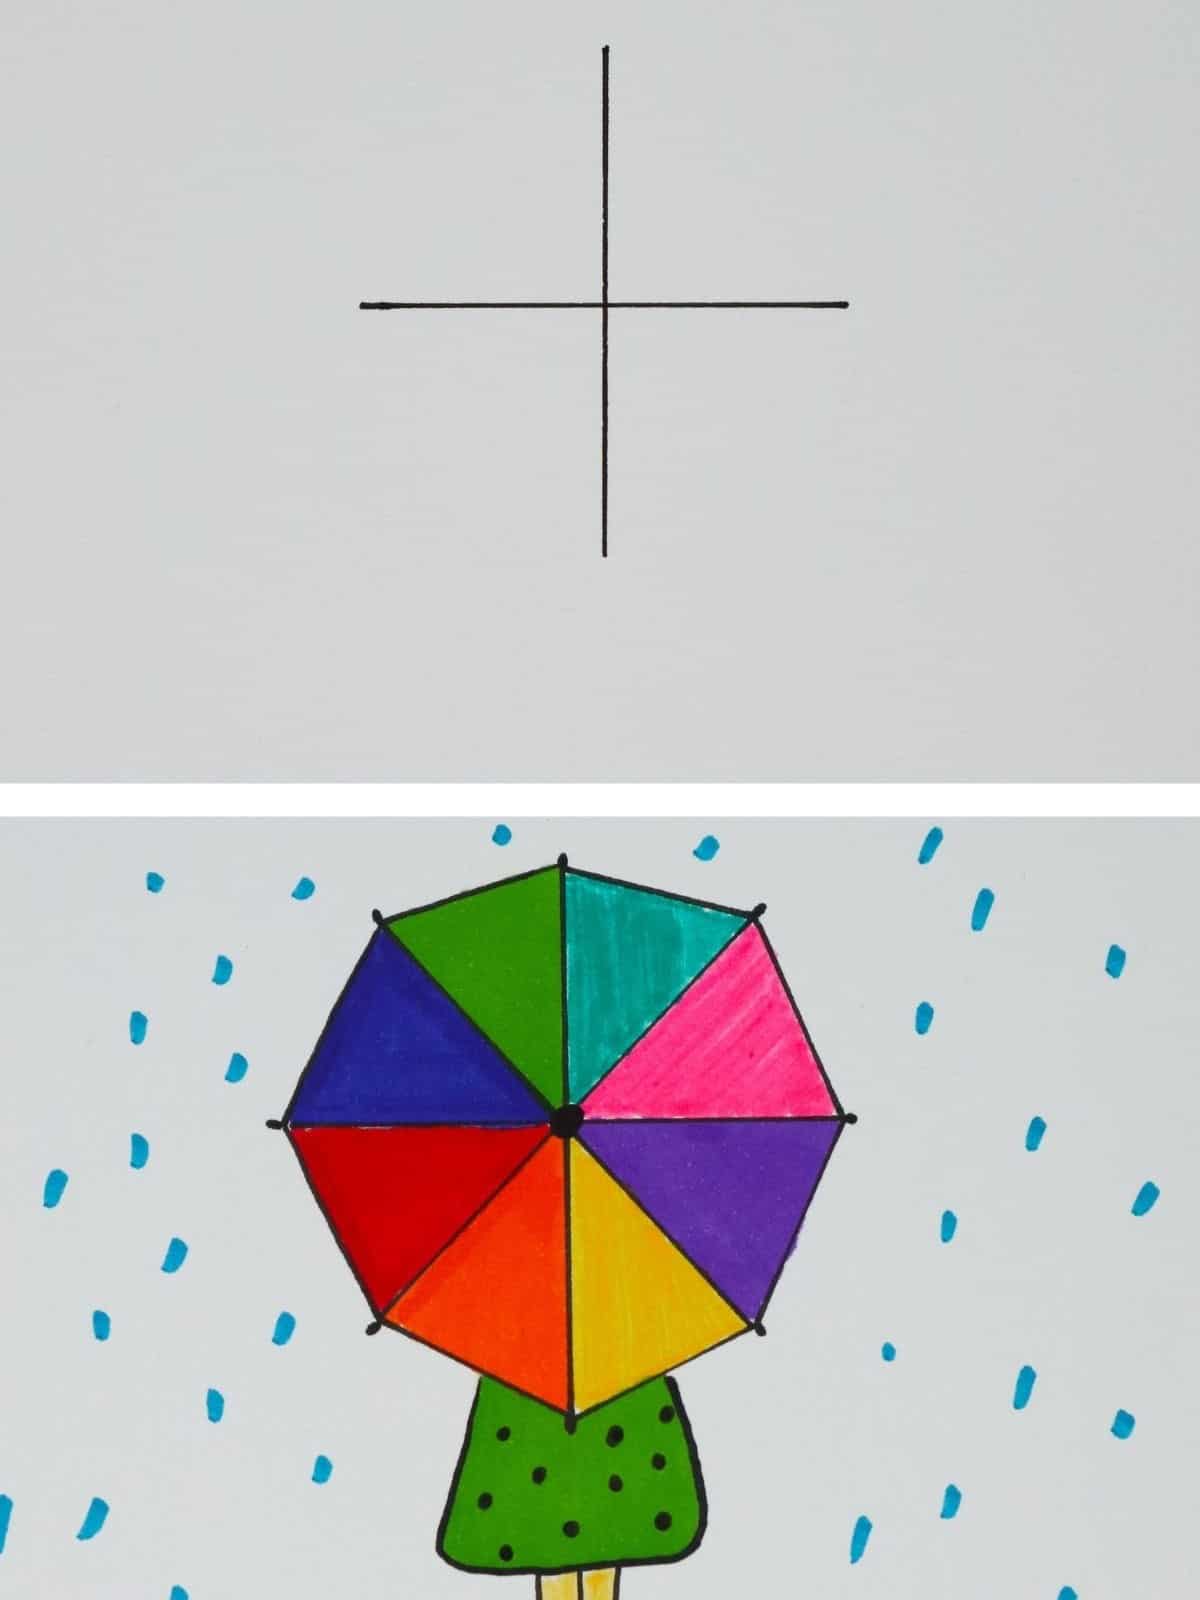
When creating a drawing of someone holding an umbrella on a rainy day, begin by sketching a lowercase ‘t’ shape for the foundation. Next, add the spokes that make up the majority of the umbrella’s structure. From there, bring in the legs, making sure they protrude from the bottom of the umbrella. Once you have the basic framework in place, connect the points at the top to complete the umbrella’s shape.
Finally, refine your drawing by adding any additional details, such as textures or shading, to bring the scene to life.
From Outlines to Kids

To create engaging illustrations of children, begin by crafting a foundation with the word ‘UH’ written vertically, with a subtle flair at the base of the ‘H’ for female figures. From here, bring your characters to life by adding defining facial features such as eyes, nose, and mouth. Next, add some texture with hair and clothing, opting for simplicity or incorporating vibrant colors to suit your artistic vision.
Trees Found at the Park
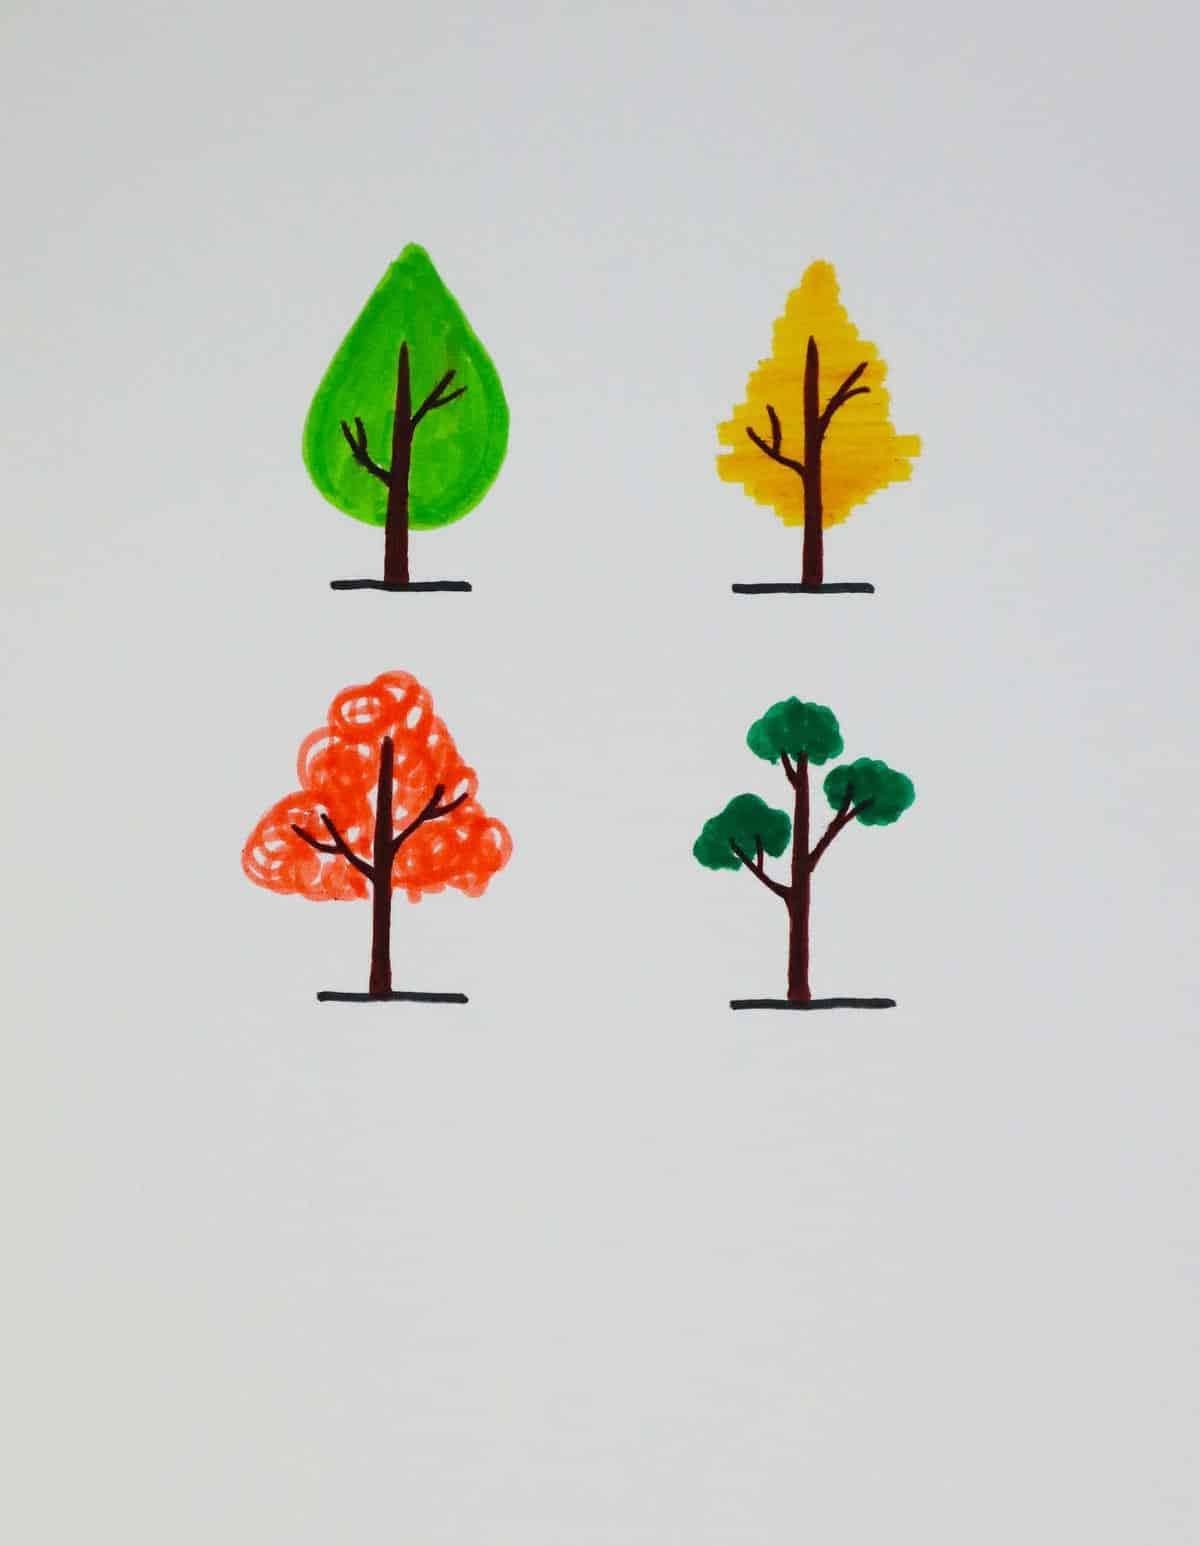
Drawing trees can be a calming and creative outlet. Begin by sketching the trunk and branching structure, followed by a series of curved lines that build upon one another, forming the tree’s canopy. Consider adding a raindrop or small-scale curly leaves to add visual interest. To convey the depth and texture of the foliage, use a range of colors, from vibrant greens to warm autumnal hues. These simple yet charming tree drawing ideas offer a fun and therapeutic way to express yourself.
Minimalist Feather
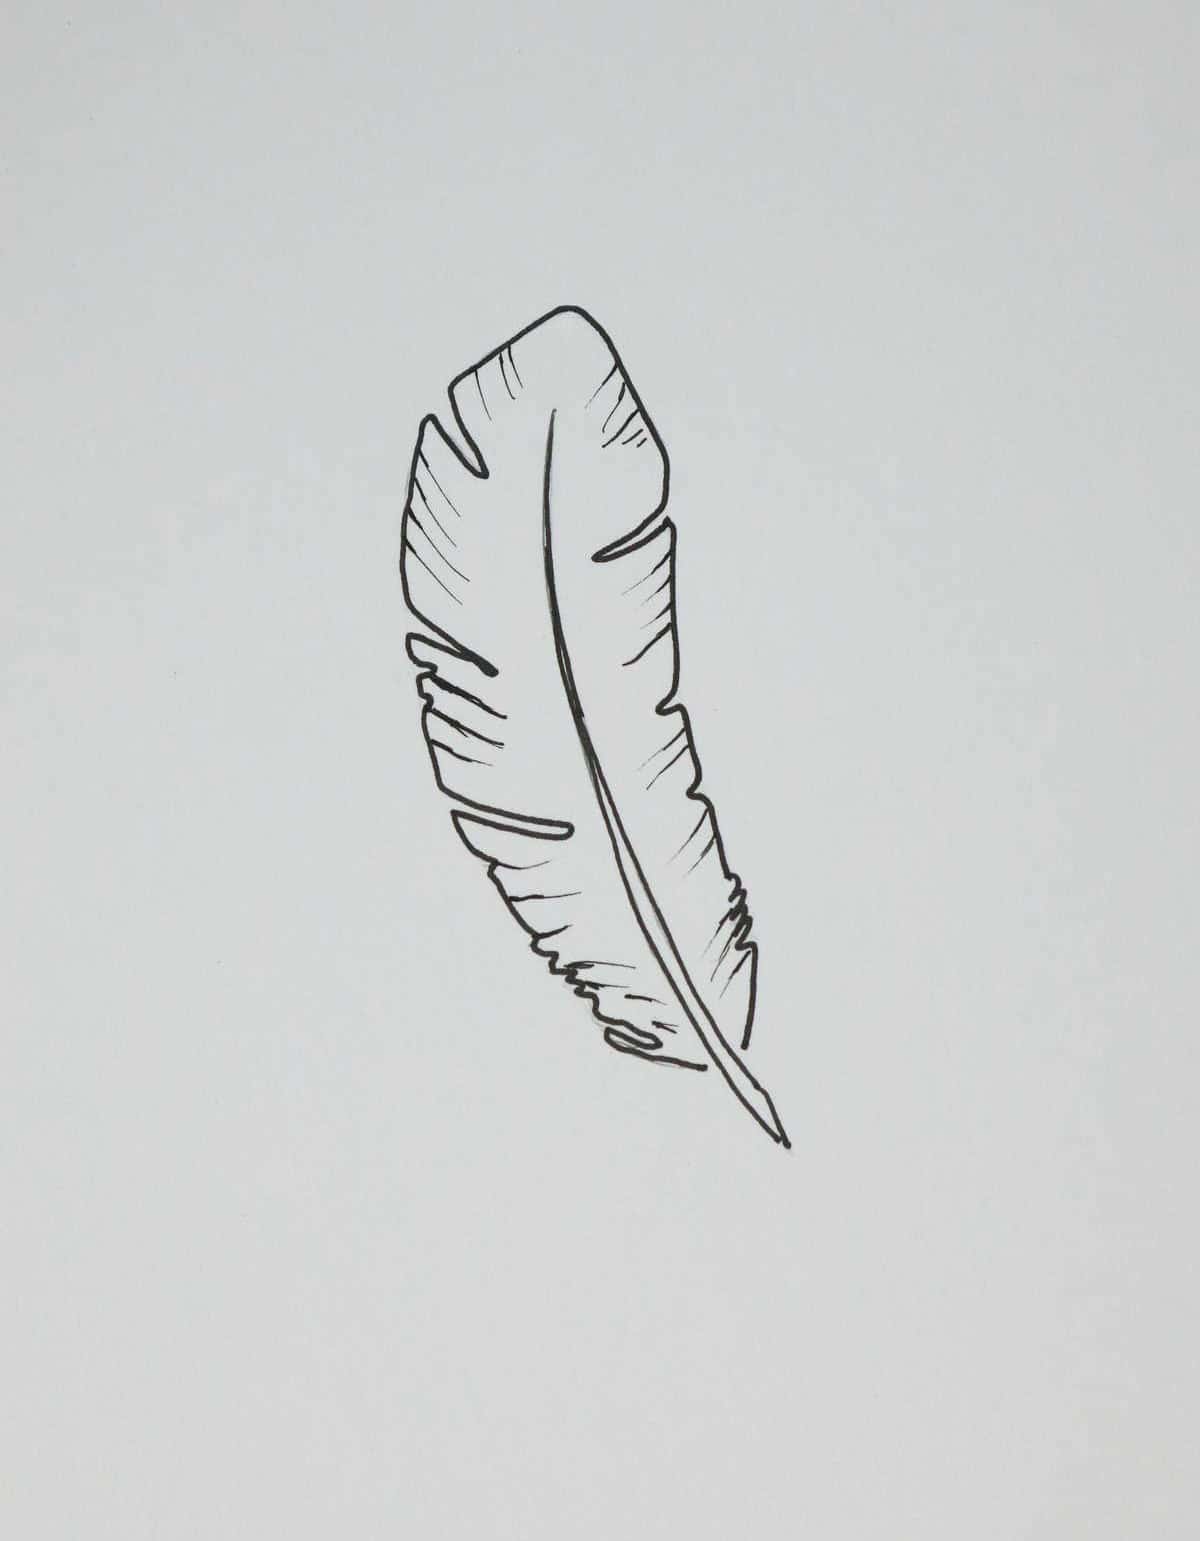
To create a minimalist feather design, begin by sketching the shaft’s curved silhouette, starting from the top and extending downwards in equal proportions. As you draw the full feather shape, incorporate subtle indentations to achieve a more natural appearance. Use gentle strokes to capture the textured patterns on the outer edges, resulting in an elegant and understated feather.
I Can Count to 9 and Draw Real Fine
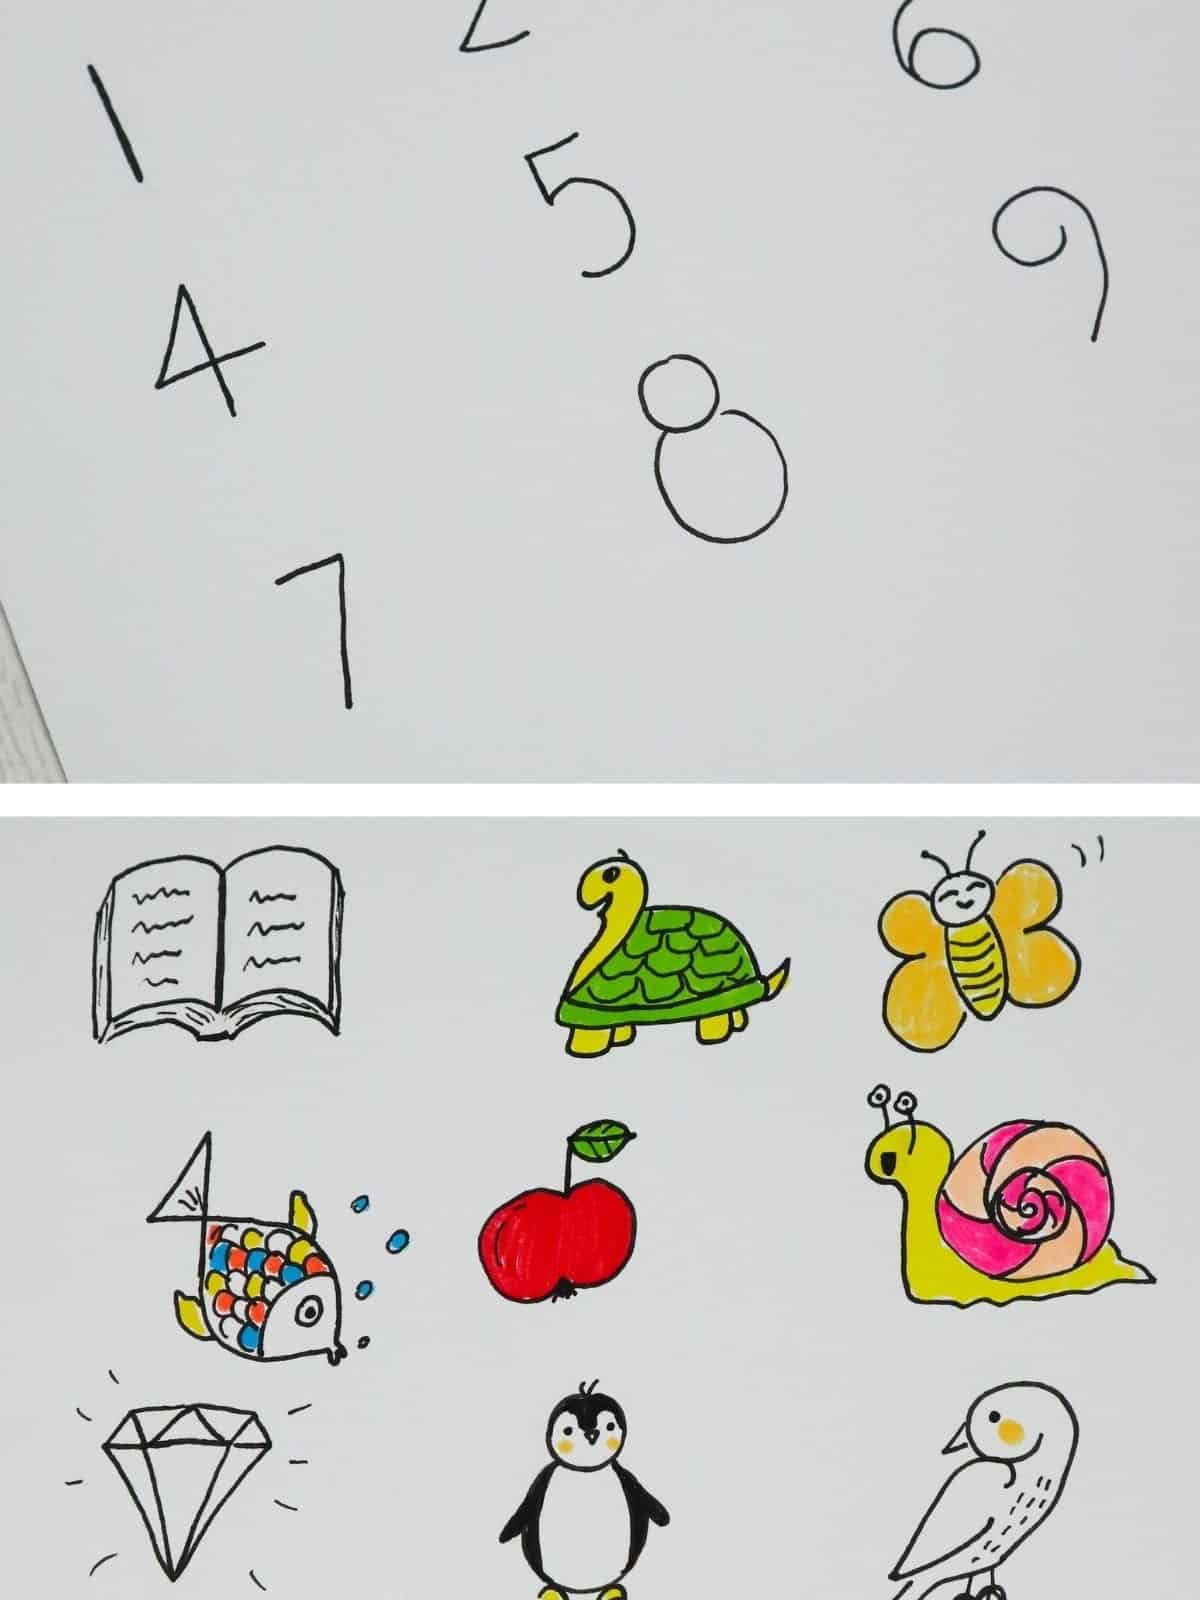
To create an array of characters, begin by writing out numbers one through nine. This foundation allows you to build a solid foundation for each individual. Use varying colors or patterns to differentiate each character, making it easier to distinguish between them. Finally, add some embellishments like cheek color or animation lines to infuse your drawings with a sense of fun and playfulness, bringing the entire series to life.
16 ‘Boy,’ Am I Glad to See You
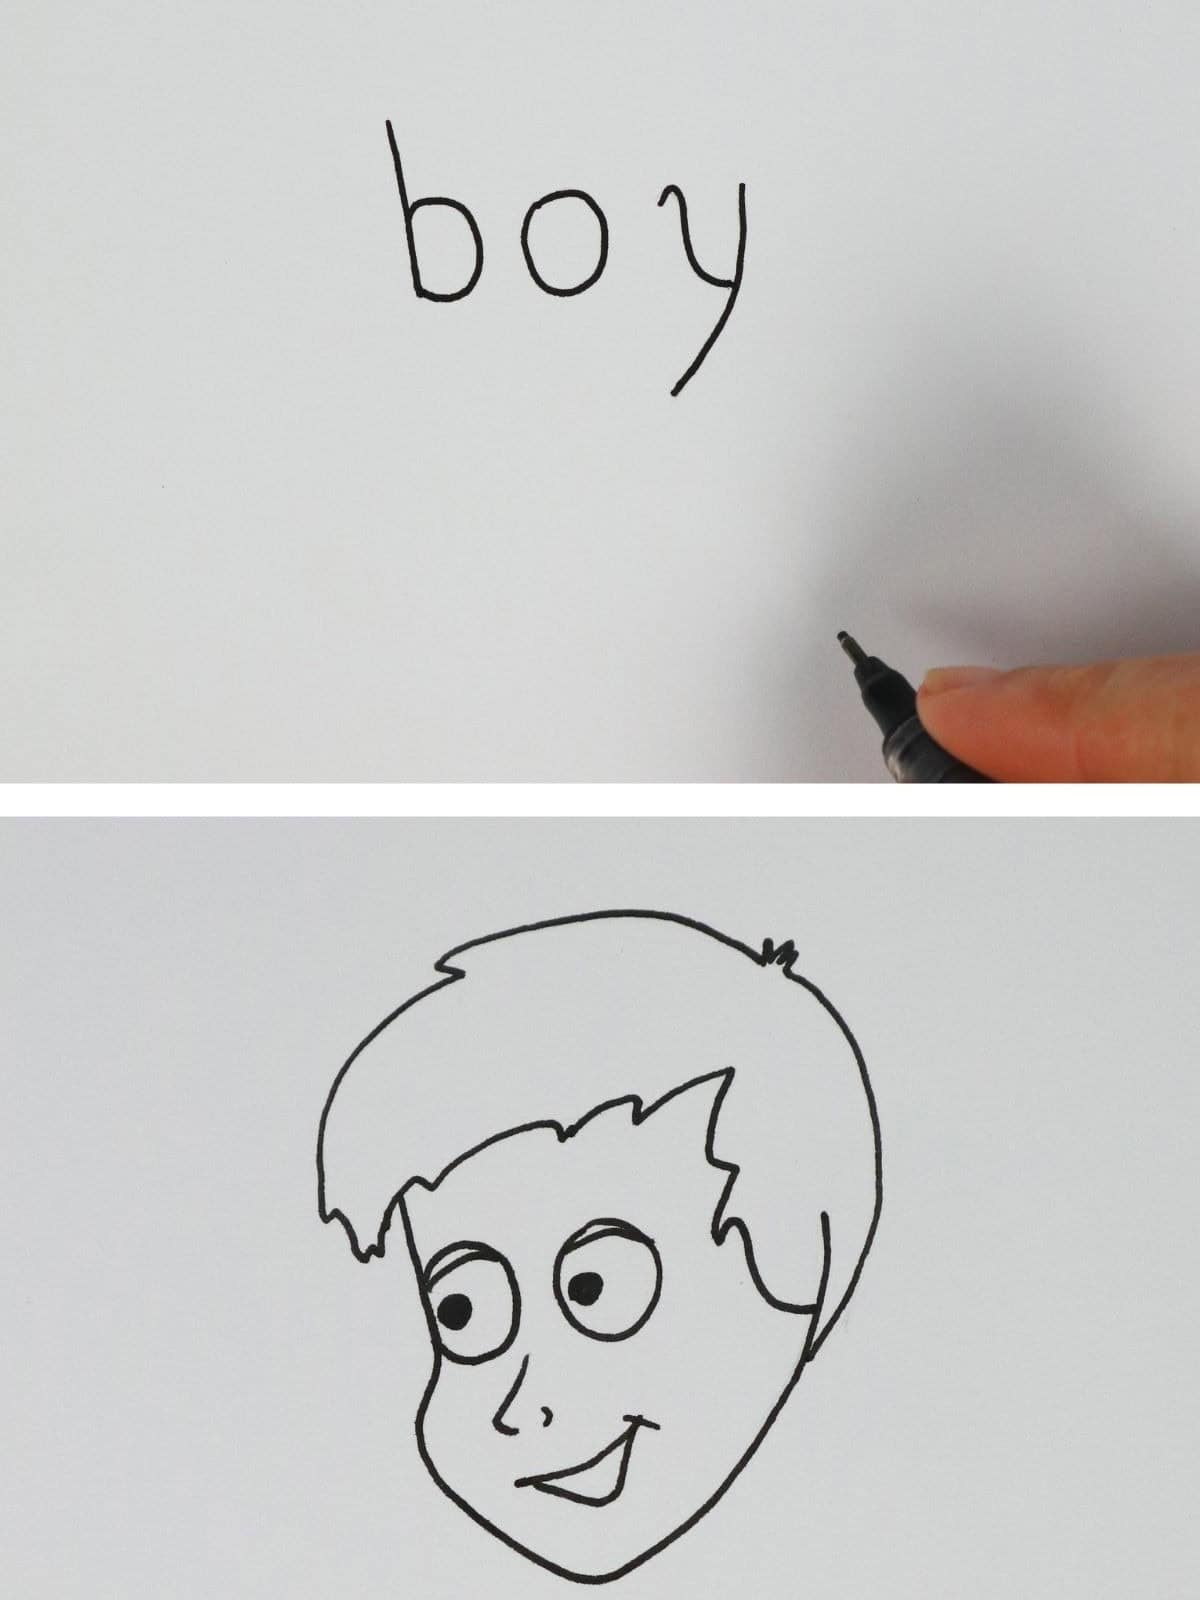
Begin your cartoon head by crafting a captivating facial expression. Start with the face itself, adding defining features like eyes, nose, and mouth. Next, bring your character to life with a dash of personality – curly hair can convey excitement, while straight locks suggest calmness. To add depth and emotion to their gaze, incorporate curved lines that subtly suggest a range of feelings, from joy to curiosity.
Rising Star
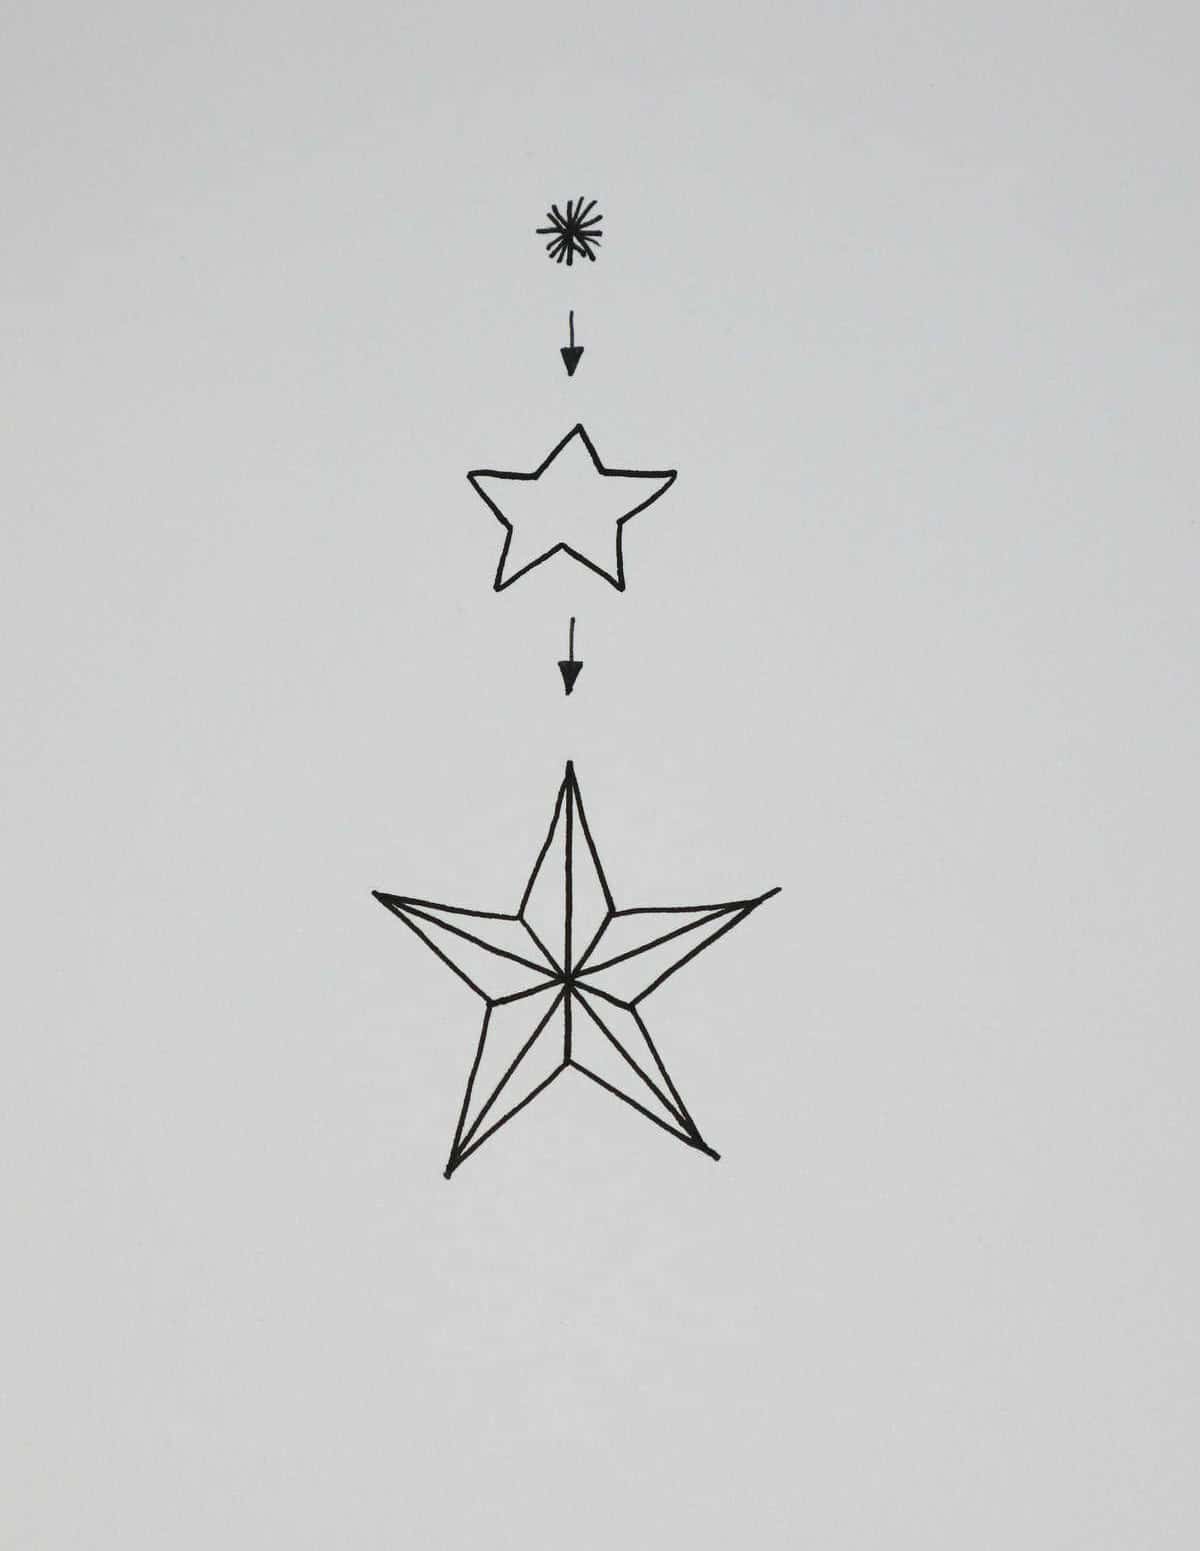
To create a rising star, begin by sketching the smaller asterisk, gradually adding more lines to achieve a burst effect where the points of the star radiate outward. The second stage involves crafting triangles, starting at the top and working your way down. Ultimately, for the largest star, combine the two techniques, starting with the starburst and then extending each angularly, as if connecting the dots.
Love to Smell the Roses
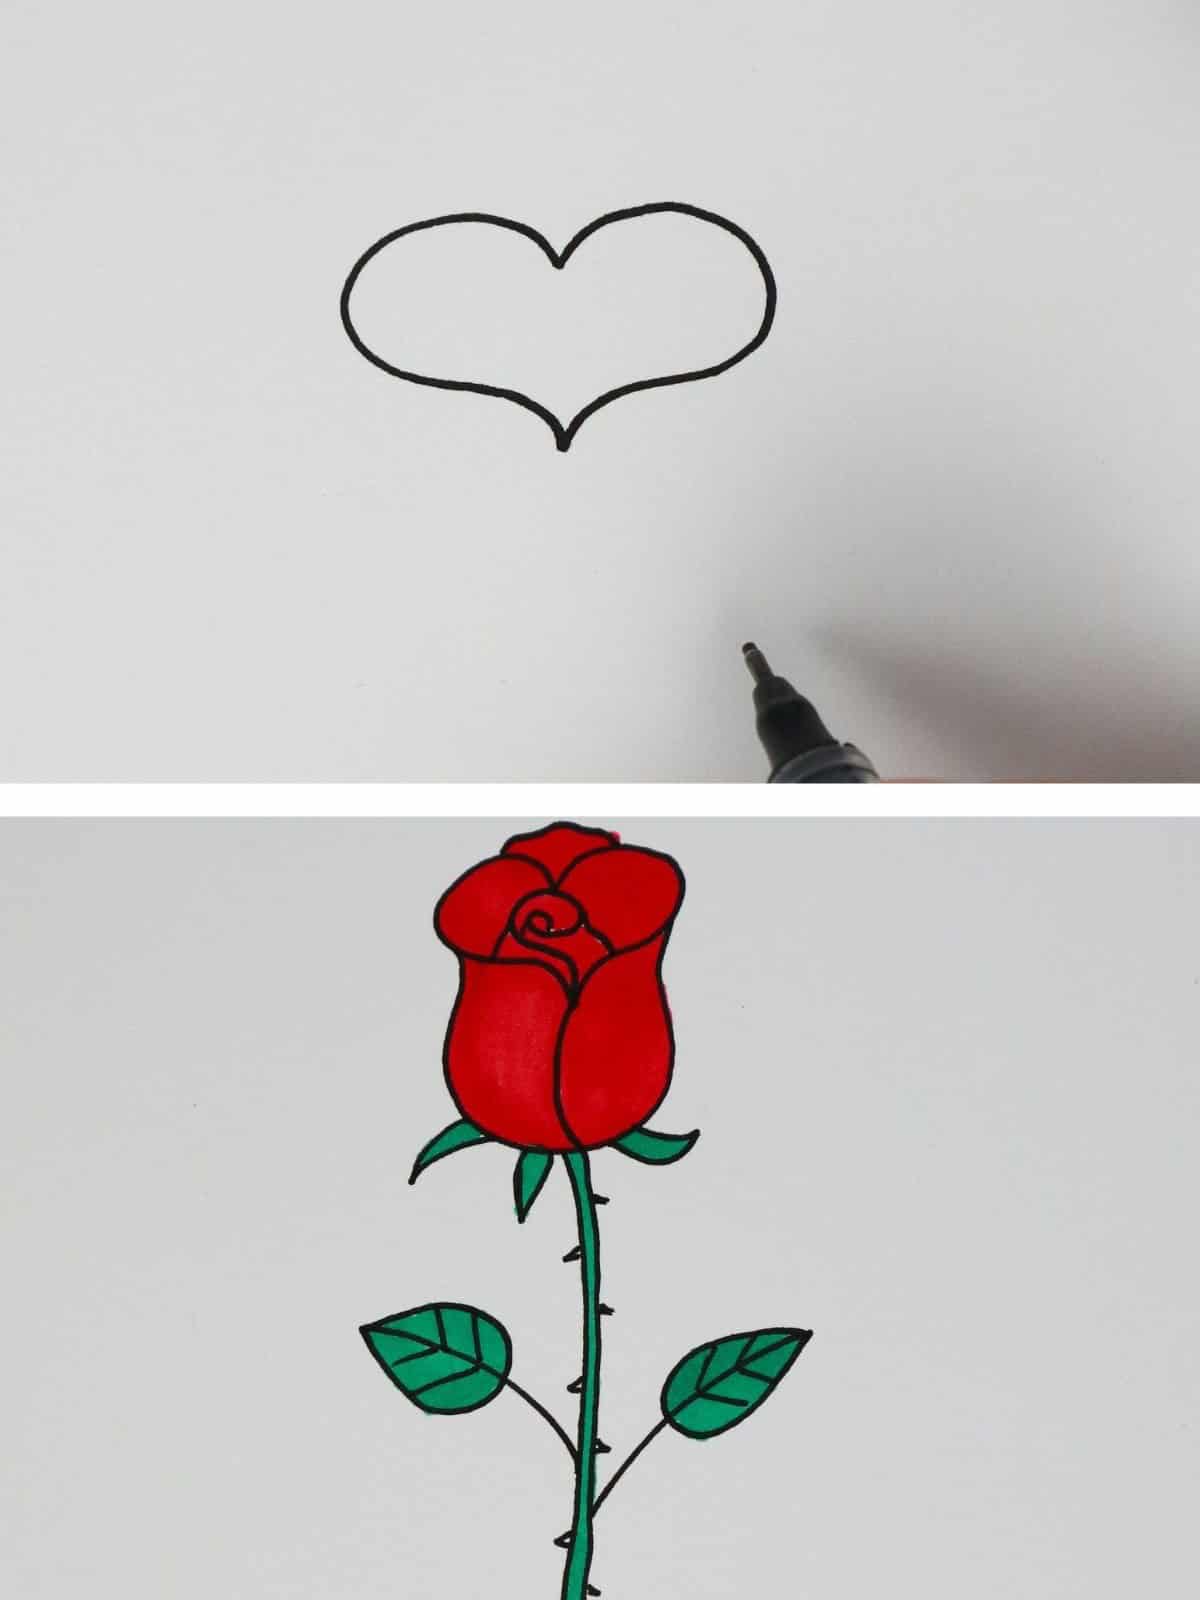
To craft a lifelike rose in your preferred medium, begin by sketching the outer petals using a heart shape as the foundation. From this base, create the curved body of petals by adding gentle lines that gradually increase in size towards the center. Add the inner details and any additional petals to complete the overall structure. Next, focus on creating the leaves and stems that support the rose, paying attention to their subtle textures and varied hues.
To imbue your drawing with a sense of vibrancy and romance, experiment with a range of pink and red shades, blending them seamlessly to create a truly captivating representation.
Pocket Full of Daisies
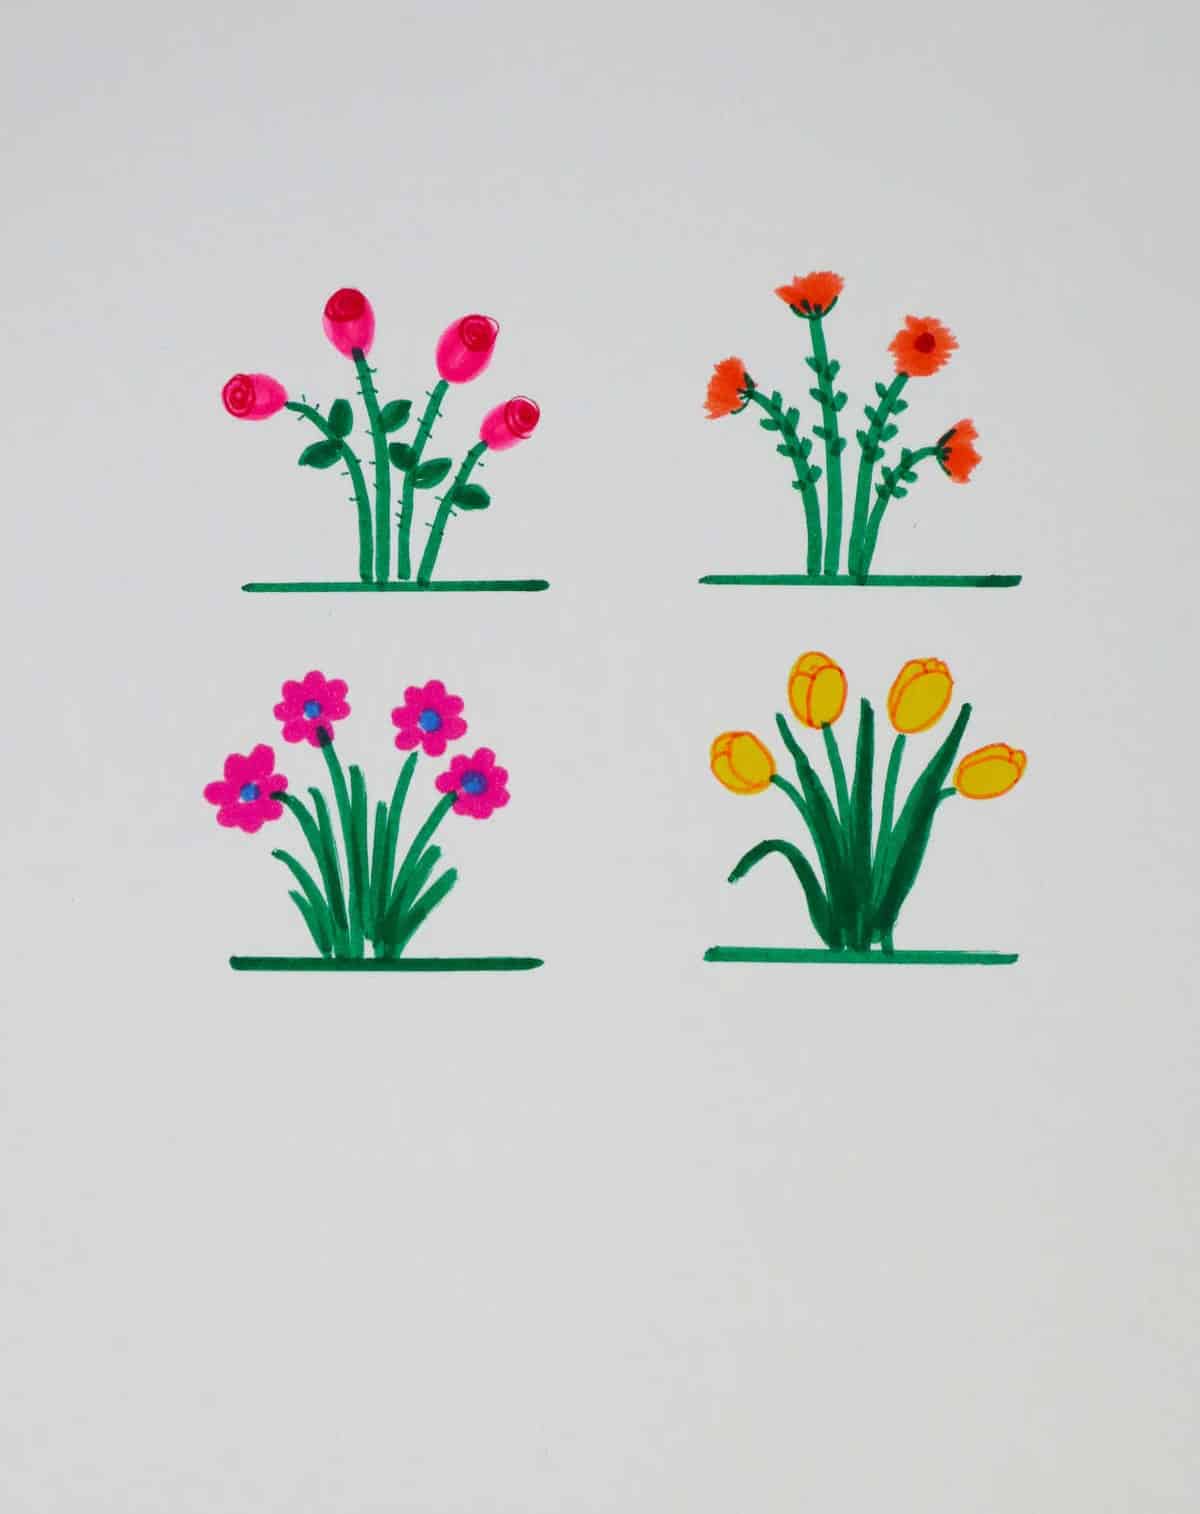
To create a series of one-of-a-kind flowers, begin by crafting a foundation of straight lines or singular stems as desired for your drawing. Next, add multiple stems to provide variety and visual interest. Then, carefully place individual petals along each stem, followed by subtle detailing to bring the blooms to life. To achieve a fresh and cheerful appearance, utilize a range of fine pens in varying shades.
Honey to The Bee
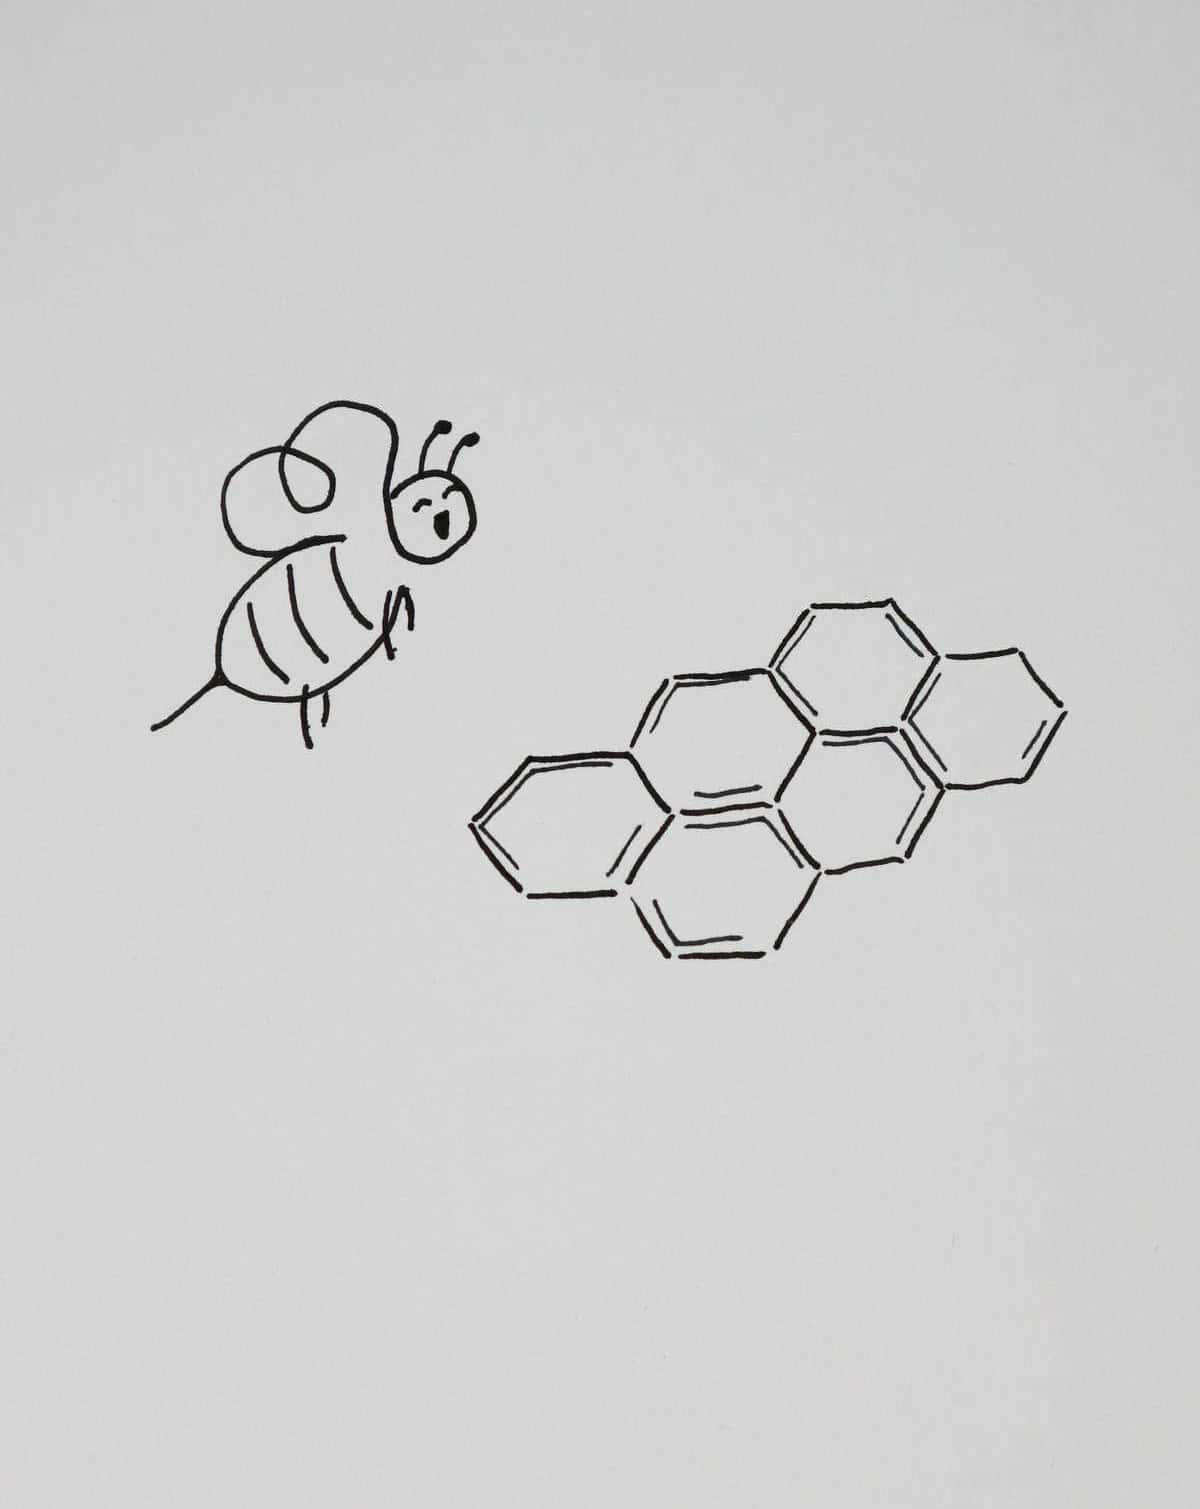
To create a bee drawing, begin by sketching its distinctive wings with a gentle downward slope, mimicking the shape of the letter ‘3’. As you move towards the head, use smooth strokes to fill out the rest of the body. Next, add finer details such as eyes, antennae, and a stinger using light, deliberate touch. Finally, incorporate some honeycomb patterns to complete the scene. Feel free to add multiple bees or other elements to make your drawing more dynamic.
Butterfly by Tape
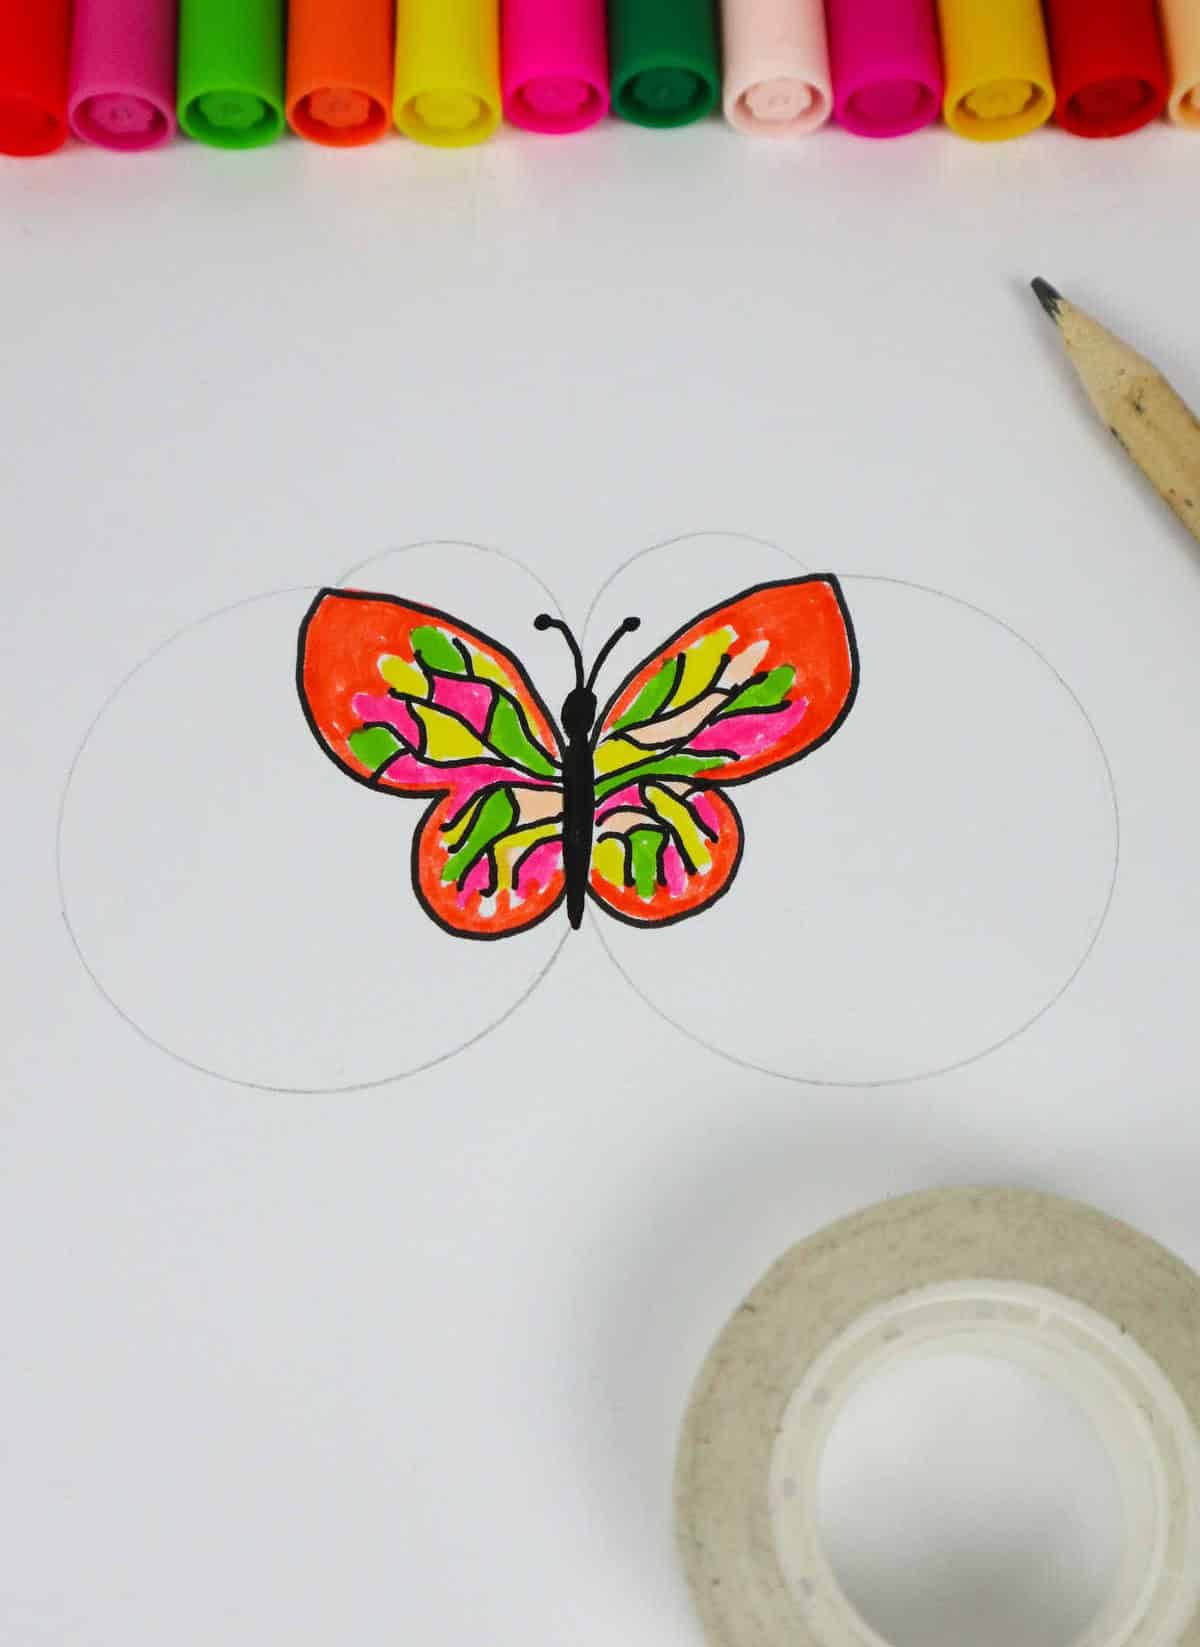
To craft a stunning butterfly drawing with tape, begin by laying out two identical circles on paper using the roll. This foundation will serve as the base for your insect’s wings. Next, create a smaller circle and place it beneath each of the original medium-sized circles. You’ll then add an even smaller circle underneath these, resulting in a layered effect that mirrors the natural structure of butterfly wings. Once you’ve established the wing outline, move on to crafting the body and antennae.
To give your butterfly some flair, incorporate different colors into your design. Finally, erase any pencil marks once you’ve added all the necessary details to complete your insect. For an added layer of visual interest, consider creating butterflies of varying sizes using different tape widths – this can add depth and dimensionality to your overall composition.