Rock painting – a timeless hobby that brings out the kid in all of us! Whether you’re young or just young at heart, love for this creative activity is universal. I still cherish memories of my childhood days spent collecting and painting rocks with friends. It was an adventure that involved scouting out the perfect rock, getting creative, and unleashing our imagination. With so many possibilities, we’d often find ourselves searching high and low for the ideal stone to bring a design to life.
The thrill of the hunt and the joy of bringing a concept to reality were just as exciting as seeing the final product take shape. So, if you’re ready to get crafty and tap into your inner child, let’s dive into 41 rock painting ideas that are sure to inspire! From whimsical animals to vibrant designs, these projects offer endless possibilities for self-expression and creativity.
DIY Rock Photo Holders
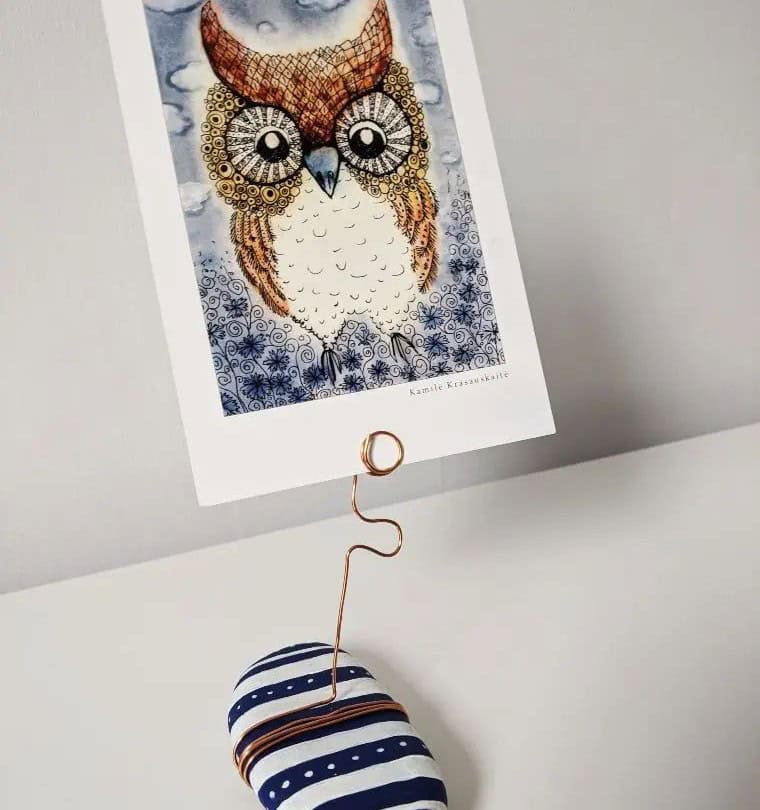
What makes these rock photo holders truly special is their dual-purpose nature. By combining a fun painting project with a functional item, you get the best of both worlds. To turn your painted rocks into photo holders, you’ll need some sturdy wire. A copper wire would be an excellent choice for this project. Simply twist the wire into coils, leaving enough room at the top to insert a picture.
These unique pieces would not only add a touch of elegance to any party but also make lovely take-aways for your guests.
Flower Painted Rocks
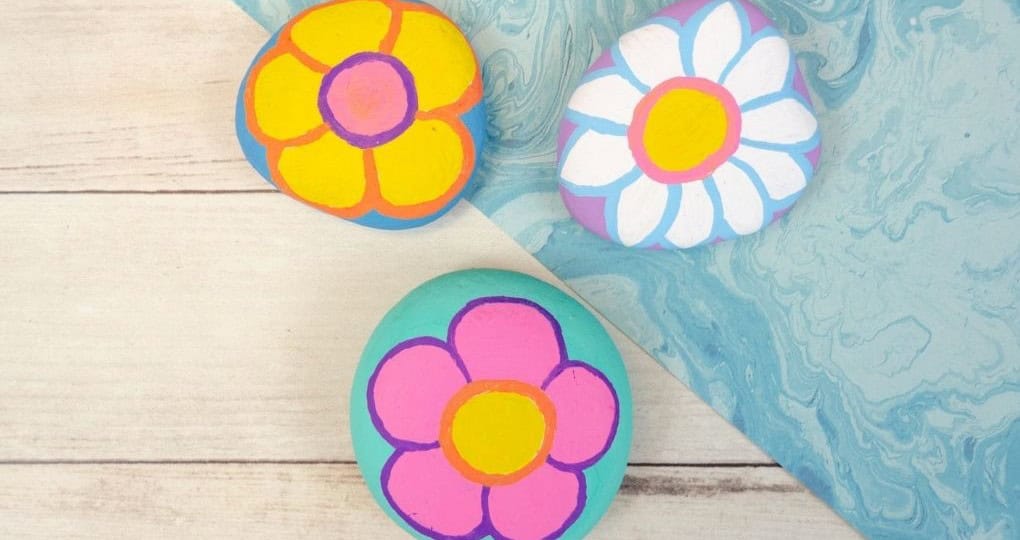
While seemingly disparate, the worlds of rocks and flowers can be harmoniously merged through the art of painting. The ruggedness of stones can serve as a beautiful canvas for vibrant floral designs. This unconventional combination not only breaks free from traditional boundaries but also allows for creative experimentation. With paintbrushes at hand and a palette full of colors, we can bring forth stunning flower-adorned rocks.
To add an extra layer of depth, consider applying a base coat before bringing your floral masterpieces to life.
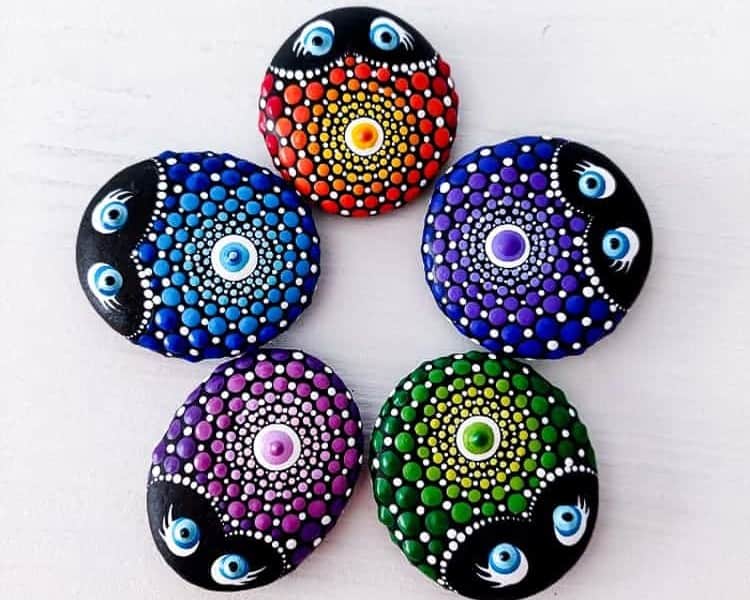
DIY Dot Painting
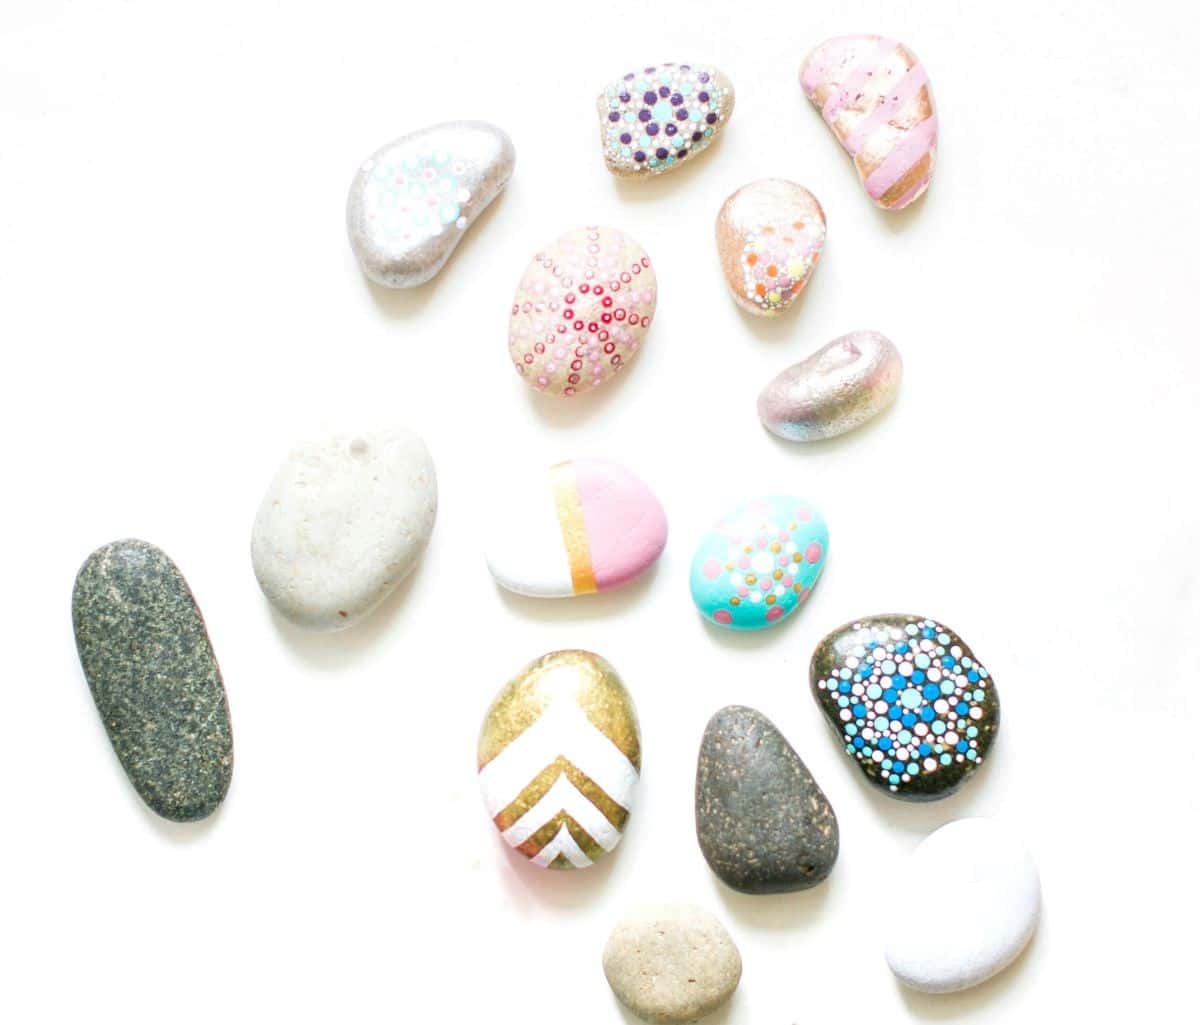
The phenomenon of dot-painting has taken the world by storm over the past couple of years. It’s not hard to see why – this calming and creative activity offers an unbeatable combination of relaxation and fun. The repetitive motion of painting dots in a symmetrical pattern, reminiscent of intricate mandalas, can be incredibly therapeutic. To get started, simply put on some energizing tunes (rock music works well) and begin transforming ordinary rocks into stunning works of art.
For those looking to take their dot-painting experience to the next level, consider investing in a comprehensive dot painting kit. These kits are easily accessible online.
Autumn Leaf Painting
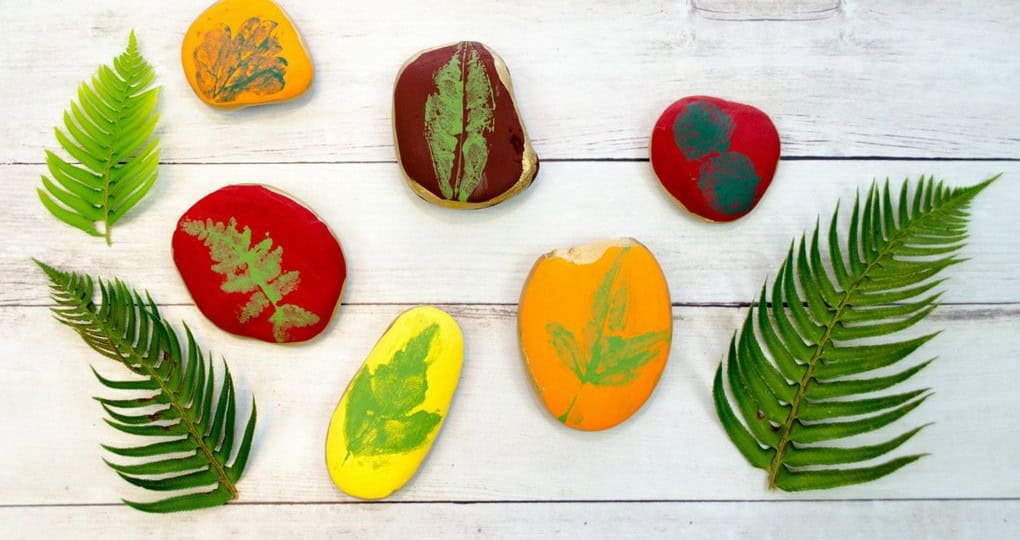
There’s something undeniably captivating about fall. The vibrant hues of crimson, goldenrod, and burnt orange create a kaleidoscope of color that’s impossible to ignore. As the leaves rustle in the gentle breeze, they seem to dance across the landscape before slowly falling to the ground. I’m drawn to preserving these fleeting moments of beauty, much like setting a moment in time on a stone canvas.
To bring this ephemeral artistry indoors, gather your favorite fallen leaves from your backyard or nearby park. With them, you can craft a one-of-a-kind DIY leaf candle holder that embodies the essence of autumn’s cozy charm.
Mix and Match Stone Snowmen
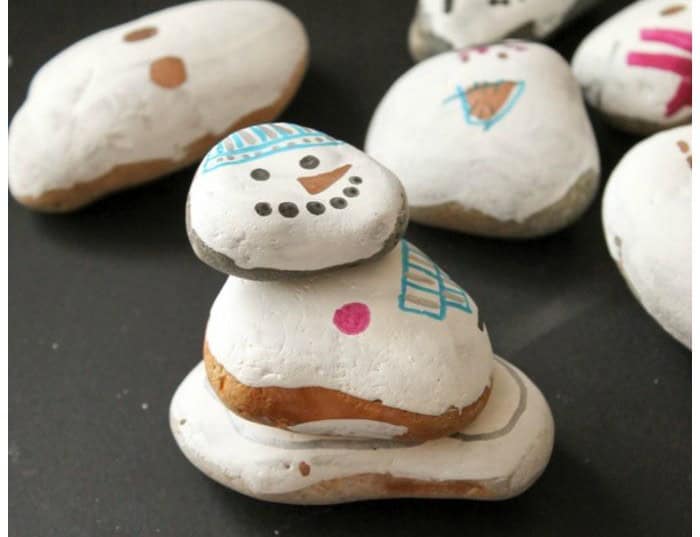
There’s something undeniably charming about creating unique snowman designs through mixing and matching patterns. The possibilities are endless, allowing for a high degree of creativity and experimentation. You can craft happy-go-lucky snowmen, grumpy ones, tall and slender ones, or even towering structures with multiple tiers. It’s all about the art of combination and how you choose to express yourself.
This activity is particularly well-suited for toddlers and younger children, but I’m a grown-up myself and I’d still have a blast playing with mix-and-match snowmen! For more fun and creative ideas, be sure to check out our collection of 27 easy Halloween crafts designed specifically for toddlers.
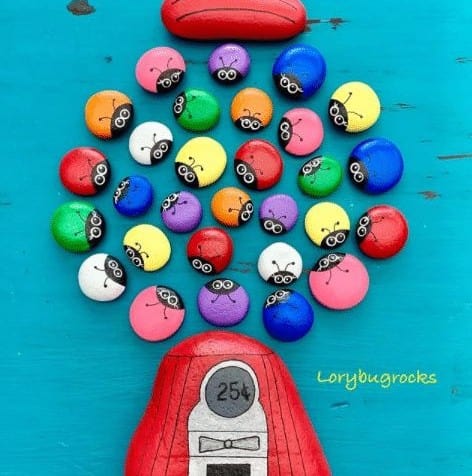
Buzzing Bee Painted Rocks
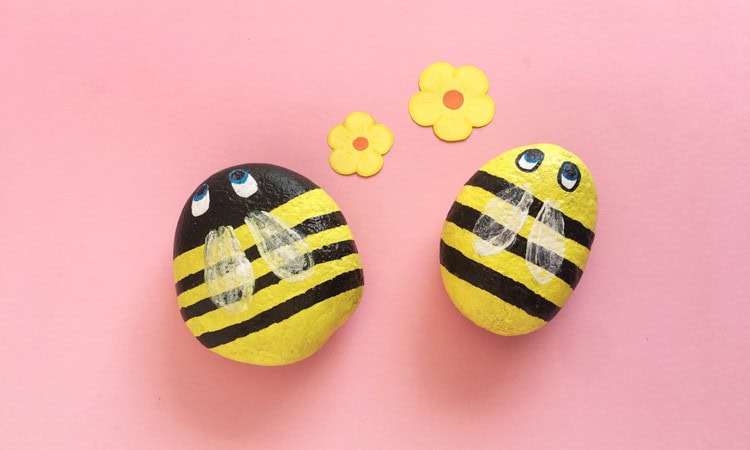
Rocks might seem like an unlikely medium for creative expression, but they can actually make for a great canvas – especially when it comes to recreating bees with your kids. Look for smooth, rounded pebbles that will provide a perfect base for your artistic endeavors. The round shape of rocks bears a striking resemblance to the bodies of bees, making them an ideal subject matter for painting.
You and your children can have a blast adding yellow and black stripes to the rocks, creating a fun and educational experience. To add the finishing touch, be sure to grab some white paint or a paint pen from a craft store. This will allow you to add realistic wings to your bee creations.
Painted Frankenstein Craft
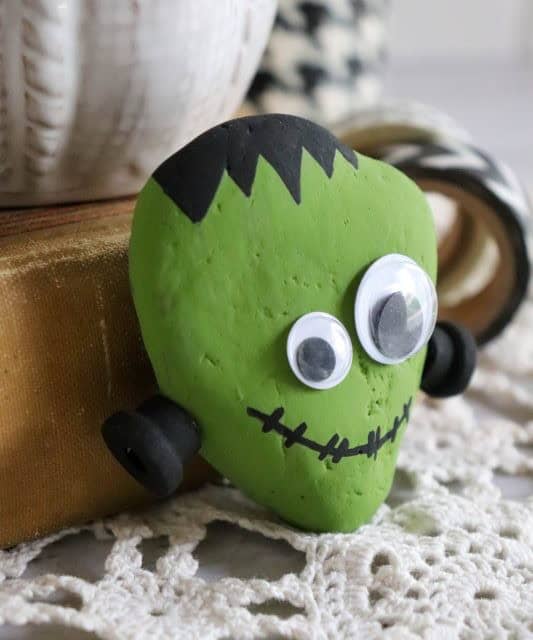
As Halloween draws near, you’re likely preparing a plethora of spooky-themed craft projects and decorations that your kids can’t wait to dive into. To add some monstrous fun to your repertoire, consider letting them unleash their creativity on a Frankenstein-inspired rock painting project. This adorable activity is sure to delight both kids and adults alike, especially when paired with the added details of googly eyes that give the monster a more playful, three-dimensional appearance.
Additionally, you can elevate the design by attaching small wooden spool halves to the rock’s sides for a charming, textured finish. For more kid-friendly craft ideas like this, explore our collection here.
Weather Story Stones
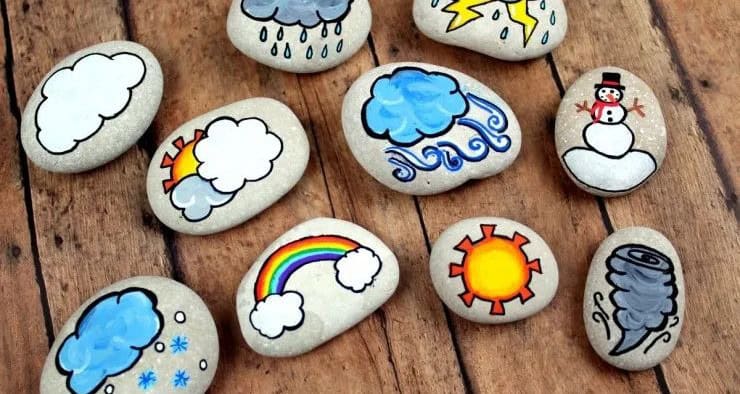
Learning about the changing seasons is an essential part of a toddler’s educational journey. To make this process engaging and informative, utilizing weather stones as teaching tools can be highly effective. By leveraging these visual aids, parents or educators can explain the scientific principles behind various weather patterns, making for a memorable storytime experience. The classic tale of ‘It was a dark and stormy night…
‘ is a great way to initiate discussions about the unpredictable nature of winter weather, setting the stage for future exploration of seasonal changes.
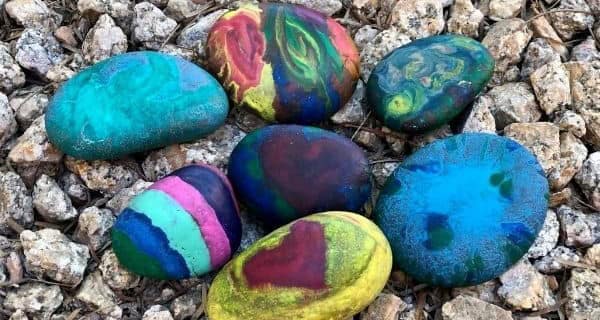
Rainbow Mix And Match Rocks

When it comes to learning experiences for kids, rock painting is an excellent way to introduce them to the world of colors. One engaging approach is a mix-and-match game, where children can familiarize themselves with various hues and shades. As they gain more experience, you can guide them in experimenting with color combinations. For instance, combining blue and yellow stones would result in a beautiful shade of green.
By involving your kids in the process of discovering these color combinations, you’re fostering their creativity and problem-solving skills. Explore additional summer crafts ideas to continue nurturing their artistic side.
Angry Birds
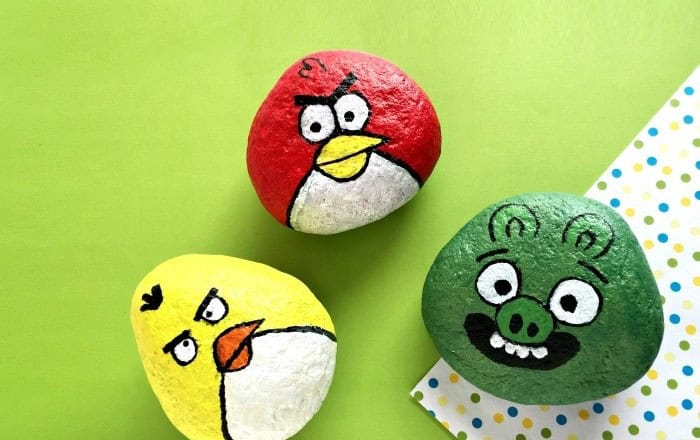
The nostalgia-inducing memories of catapulting Angry Birds in those classic games come flooding back! However, instead of launching them into the air, we’re about to bring the birds down to earth – quite literally. You’ll need a few essential supplies to turn your stones into angry avian art: permanent markers, a sealer for long-lasting protection, acrylic paint, and a set of brushes. Once you have all your materials ready, it’s time to get creative!
Choose the perfect stone for each Angry Bird design and then unleash your inner artist to bring them to life with vibrant colors.
Forky Painted Rocks
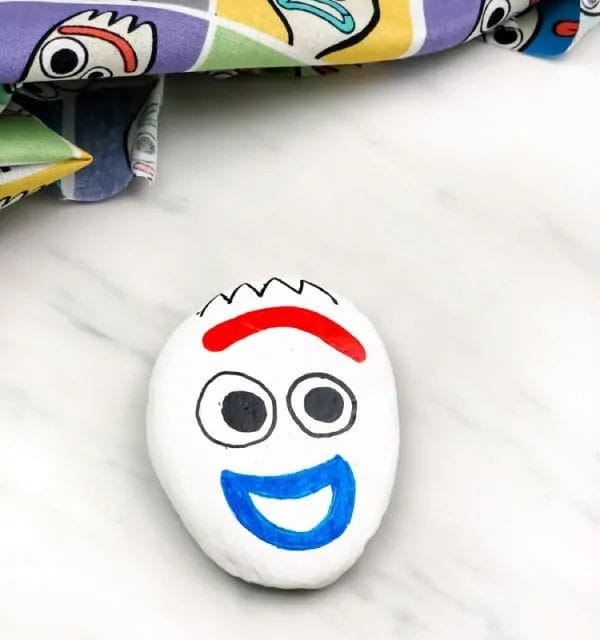
Start by preparing your rocks for painting. This involves applying multiple coats of white acrylic paint to ensure a smooth, even finish. Aim for at least three or four coats and allow each layer to dry completely before moving on. While you’re working on the rocks, consider letting your kids get creative with some paint pens. These can be a great way to add fine details and precision to their Forky designs.
As you work, don’t forget to lay out a generous supply of newspapers to catch any stray drips or spills. With a little patience and planning, you’ll be well on your way to creating some truly unique and personalized decorations.
Hot Rocks
Working with hot rocks is an incredibly fun and rewarding experience. The process is surprisingly simple: just heat up some rocks in an oven and let your creativity shine by drawing on them using melted crayons. As the wax melts, you’ll be mesmerized by the vibrant colors and textures that emerge. To ensure safe handling of the heated rocks, don’t forget to grab a pair of trusty oven mitts before getting started. Simply place the rocks on a tray, heat them up, and let your imagination run wild.
When it’s time to unleash your artistic side, grab hold of some melted crayons and get ready to create something truly unique.
Zombie Halloween Painted Rocks
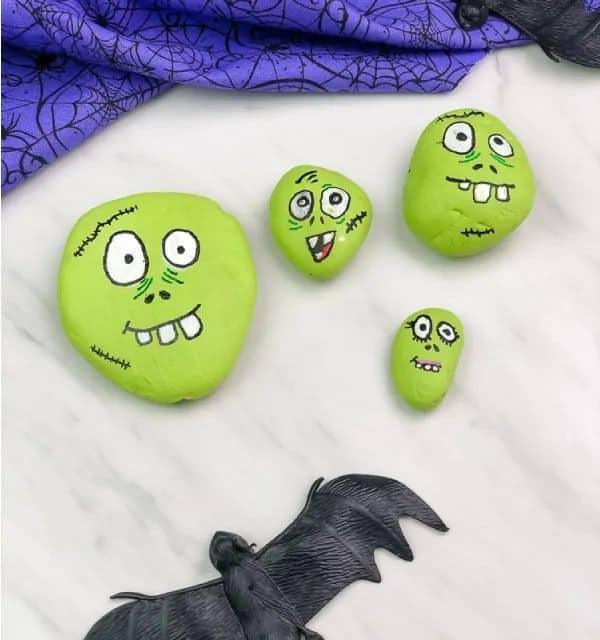
Set up a fun and cozy atmosphere for your little ones by providing them with a plate of treats to snack on while they work on their Halloween-themed crafts. This could be cookies, lemonade, or even a bowl of popcorn. Once everyone’s settled in, it’s time to get creative! Have your kids paint Halloween monsters and creatures onto rocks using acrylic paints.
To add some extra details, you can also let them use markers or white paint pens to draw over their designs, giving them the freedom to create more precise and intricate features. With an endless supply of spooky subjects to choose from, this activity is sure to be a hit with your mini monsters.
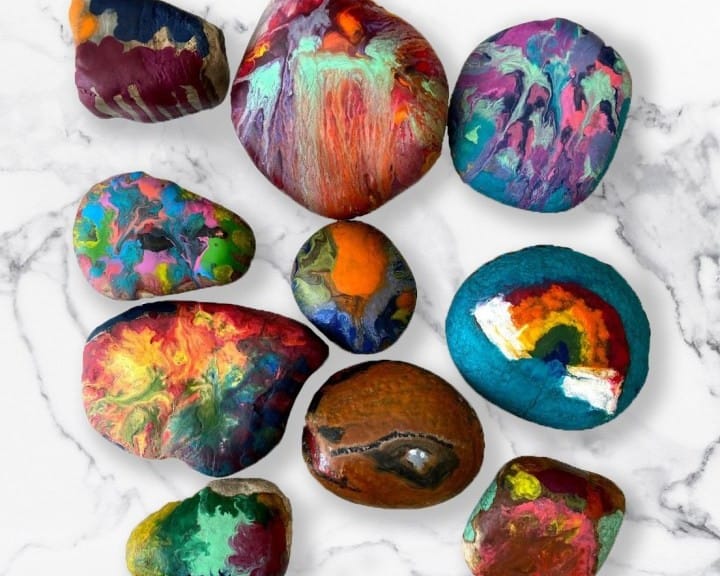
Glittery Galaxy Rocks
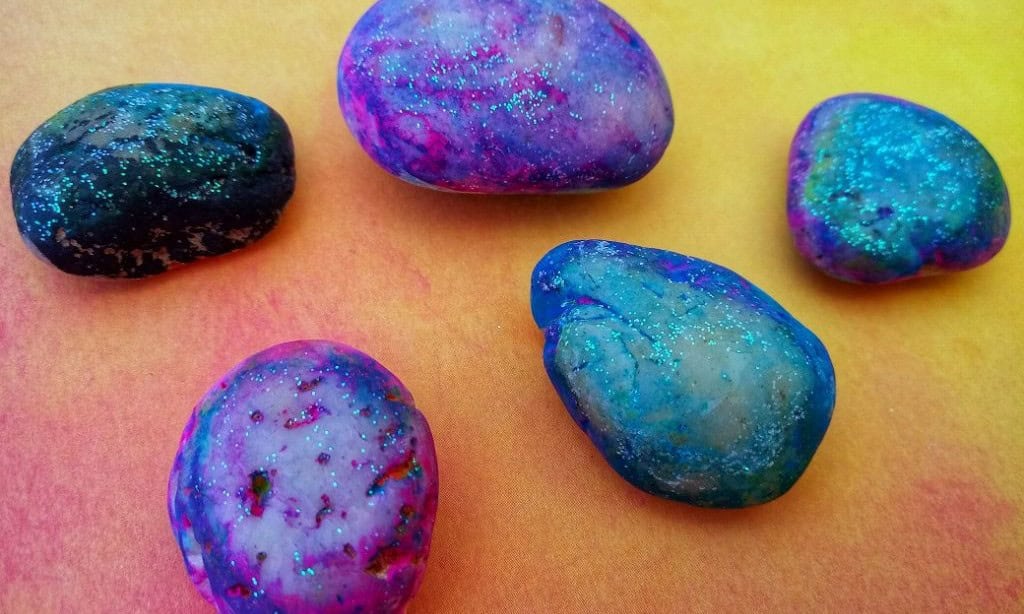
My fascination with sparkly galaxy rocks never fades. It’s unlikely you’ll outgrow this interest, is it? The vastness of space offers endless inspiration for recreating its beauty on rocks. When painting the galaxy, I relish the freedom to experiment with countless color combinations and patterns.
Galaxy rocks are a canvas waiting for your creativity to run wild.
With glitter glue from [insert link], parchment paper from [insert link], and clear acrylic varnish from [insert link], you’re ready to unleash your imagination.
Toy Story Alien Rock Painting
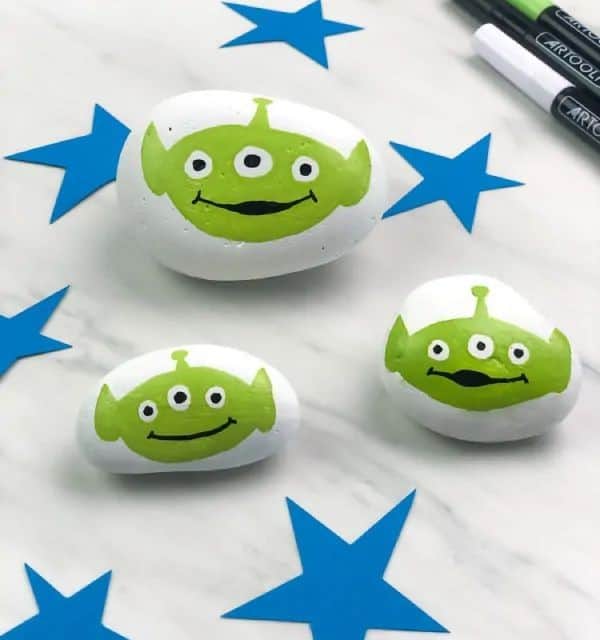
The 1995 film Toy Story was a game-changer in animation, blending seemingly disparate elements into a cinematic masterpiece. The movie’s array of characters – from the ordinary to the extraordinary – provides an endless wellspring of creative inspiration. This project invites you to tap into that imagination by bringing to life the endearing three-eyed alien creatures that captured audiences’ hearts.
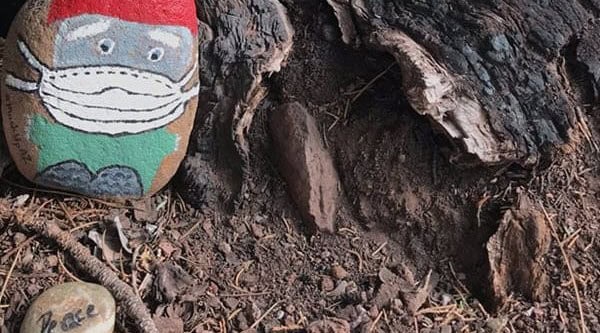
Kindness Rocks
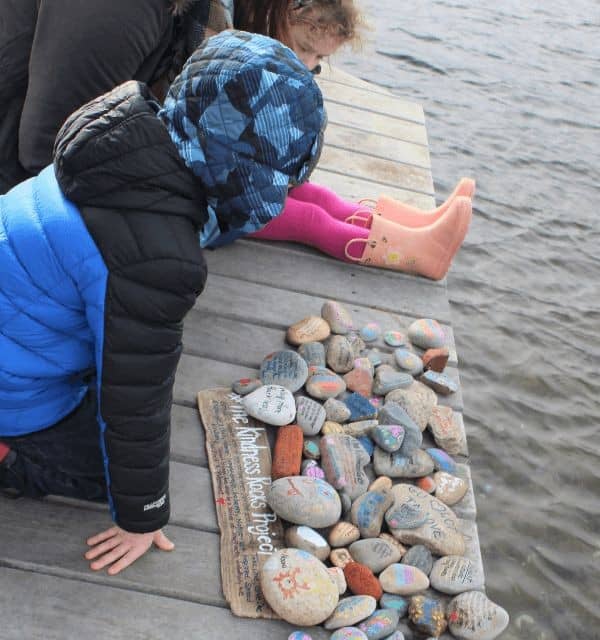
Crafting time with kids isn’t just about having fun; it’s an opportunity to teach valuable life lessons. A great example of this is creating kindness rocks, which carry inspirational quotes and affirmations promoting kindness and its spread. This simple yet effective way of spreading positivity is an excellent method for instilling in children what truly matters in life.
Furthermore, if you encounter someone being kind, simply tossing a kindness rock their way can encourage them to continue exhibiting good behavior. This lighthearted project is also enjoyable for adults, serving as a reminder that even small acts can make a significant difference.
Marbled Rocks
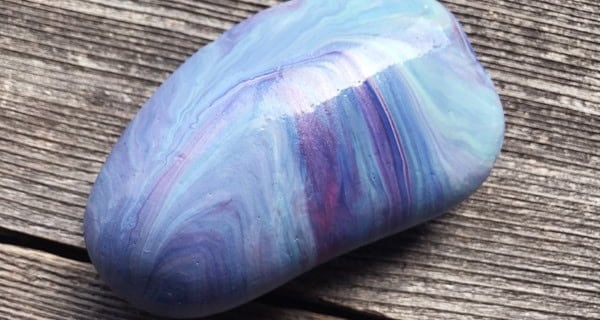
I’m obsessed with marble-finish on rocks – it’s the perfect blend of glossy and classy. And the best part? Achieving this look is surprisingly effortless. To recreate this stunning effect, you can try one of three methods: tilted, swirled, or my personal favorite, dipped. Take a closer look at each method to decide which suits your style. You can always experiment with multiple techniques – after all, it’s all about finding what works best for you.
Depending on the method you choose, you’ll need to gather specific supplies. Once you’ve finished painting, don’t forget to seal your masterpieces with a layer of acrylic spray sealer to ensure long-lasting results.
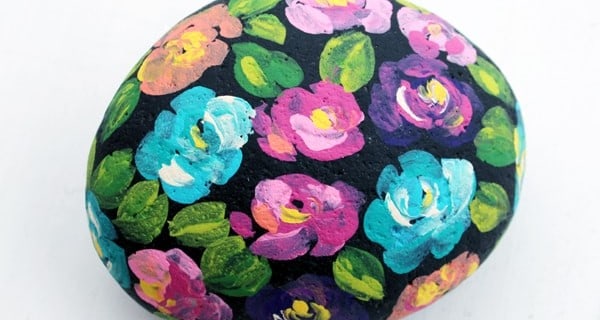
Flower Painted Rocks
While the previous flower-painted rock project was delightful, it did lean towards the cartoonish side. This new design takes a more subtle approach, evoking the beauty of cherry blossoms, daffodils, and daisies. To achieve a better angle when painting, I recommend using slanted brushes, which are specifically designed for rock painting. You can find these ideal tools here. By incorporating them into your project, you’ll be able to add a touch of elegance to your handiwork.
Butterfly Rock

The stunning beauty of this rock is almost mesmerizing. Its smooth edges evoke an uncanny resemblance to an eggshell, don’t they? The quality of the rock or pebble can make all the difference, particularly when creating a delicate piece like this butterfly-painted one. To achieve optimal results, it’s essential to select the finest rock possible.
Additionally, considering you’ll be working with watercolors, investing time in practicing with this medium beforehand will greatly benefit your artistic endeavors. This preparation will enable you to effortlessly bring those butterflies to life on canvas.
Sheep Painted Rocks
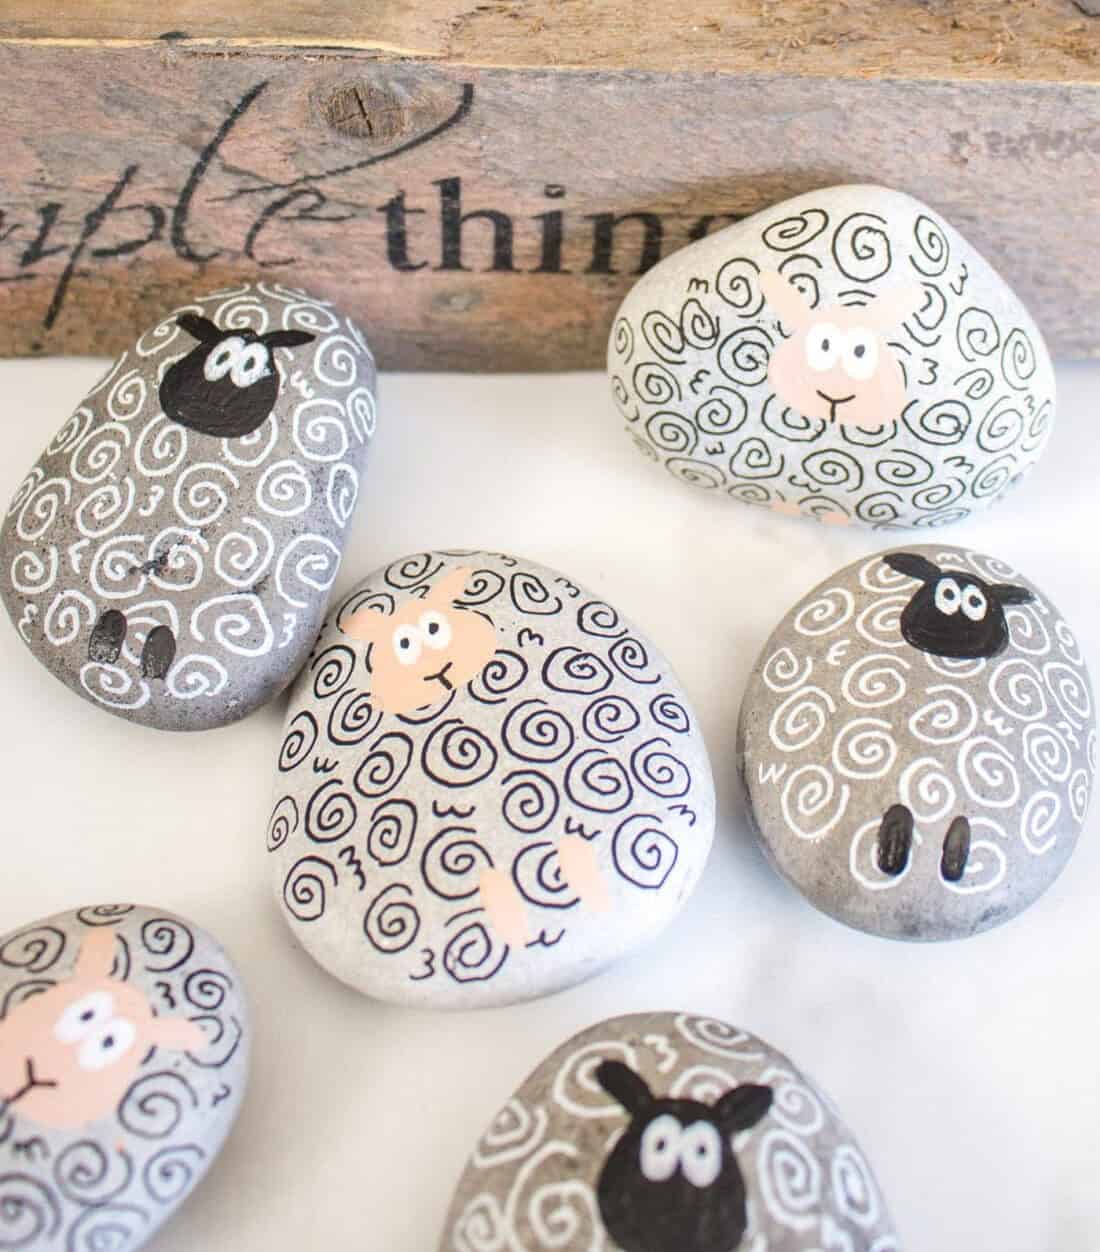
These aren’t your average sheep, but rather endearing creatures with a unique charm. Their curly wool invites creativity, allowing you to add colorful details with markers. The process of painting rocks begins by preparing them for art. Start by ensuring the surface is smooth, clean, and dry. Then, achieve a weathered appearance by applying watered-down black paint and wiping away excess with a paper towel.
This subtle finish provides an ideal backdrop for adding curly lines and bringing your design to life. When depicting the face, aim for simplicity without sacrificing expression. Avoid cartoonish features, instead opting for a more realistic, yet still whimsical, representation.
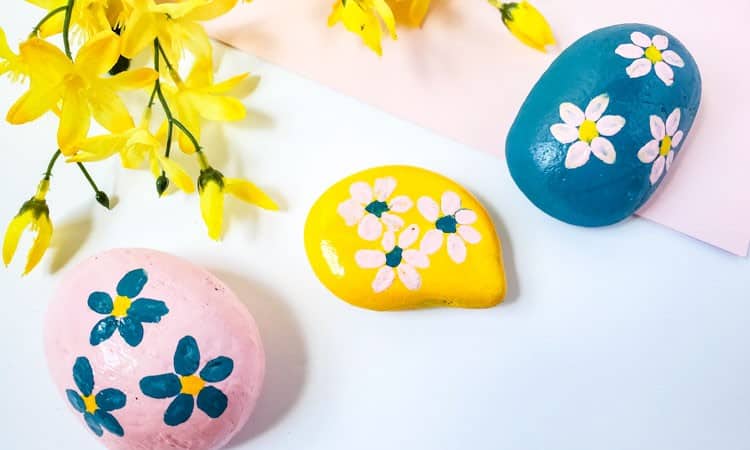
Spring Floral Painted Rocks
Imagine being surrounded by vibrant, kaleidoscopic blooms that seem almost otherworldly in their beauty. The rocks’ dazzling array of blues, pinks, purples, and yellows is a sight to behold! To take your floral arrangement to the next level, consider adding a pop of neon paint from that unique supplier. This subtle yet striking touch will not only make the flowers stand out but also add an air of whimsy to the overall design.
Surprisingly, achieving this stunning look doesn’t require any special painting skills – even beginners can recreate these breathtaking flowers with ease. As you may recall, a slanted tip brush was instrumental in creating crisp edges when painting; for this project, however, a round paintbrush from that specialized store will be your trusted ally. If you’re eager to explore more budget-friendly creative endeavors like this one, take a look at those inspiring Dollar Store crafts.
Painted Rock Chicks
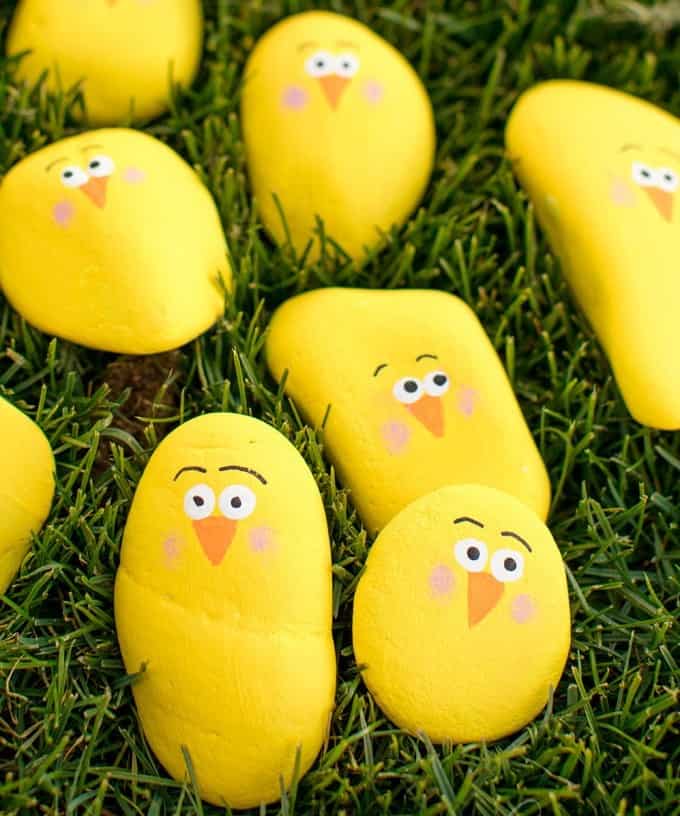
While I may have piqued your interest with ‘rock chicks,’ let me clarify – we’re actually creating adorable depictions of baby chicks on rocks. These tiny, yellow-feathered friends are sure to bring a pop of color and whimsy to any room they occupy. If you’re looking to recreate this effect, you can easily find a vibrant yellow paint like the one featured here.
When it comes to adding the finishing touches, consider adding a subtle hint of pink next to each chick’s beak – this will give them a charming rosy glow and bring out their adorable features.
Ladybug Rock
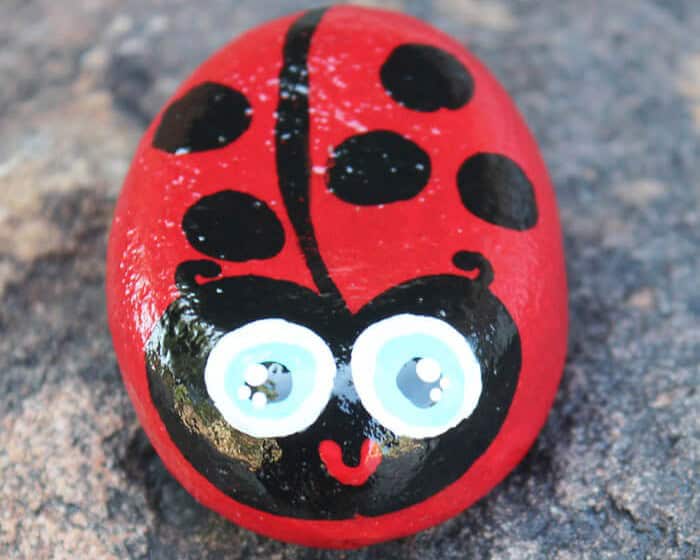
As promised, I’m thrilled to introduce the ultimate rockstar of childhood memories – the humble ladybug! For many of us, painting a ladybug on a rock is an iconic rite of passage, and I’m no exception. My warmest summer afternoons have been filled with the joy of creating countless ladybugs on stones, each one a testament to the magic of creativity. If you haven’t had the chance to experience this simple yet delightful activity, now’s the perfect time to give it a try!
Gather your trusty paintbrushes and a few bottles of red and black acrylic paint. Don’t forget to lay out some newspapers for easy cleanup and have a stash of paper towels or napkins on hand – things can get messy, after all! As you embark on this fun-filled adventure, I invite you to explore more inspiring ladybug crafts here.
Painted Spider Rock
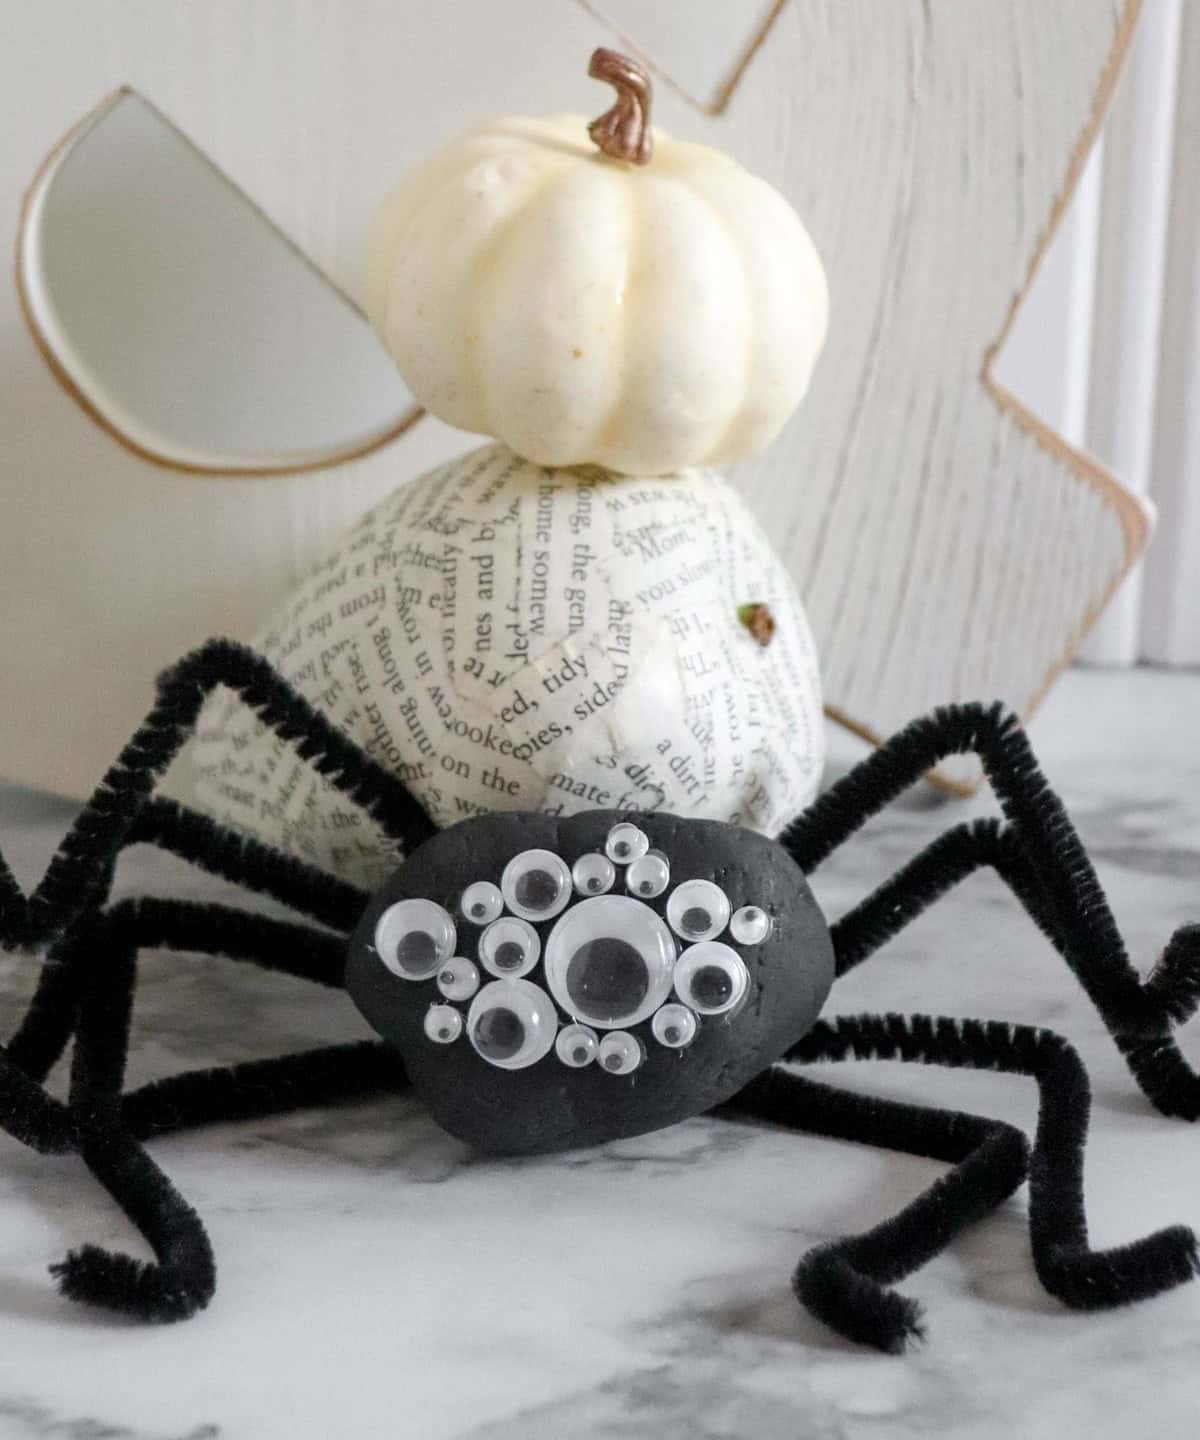
When it comes to painting on rocks, spiders are just as natural a choice as ladybugs and bees. They deserve a spot on your list of insect-inspired rock art. The key is finding the right rock – one that’s flat and wide in the middle works best. Next, grab some googly eyes and glue them onto the surface. For the legs, black pipe cleaners are an eerie, spindly, and hairy way to bring those eight-legged friends to life.
Even if you’re not a fan of creepy crawlies like me, it’s hard to deny that spiders make for great craft inspiration. Take some time to explore these spider crafts and see what creative ideas you can come up with.
Rainbow Striped Rock Photo Holder
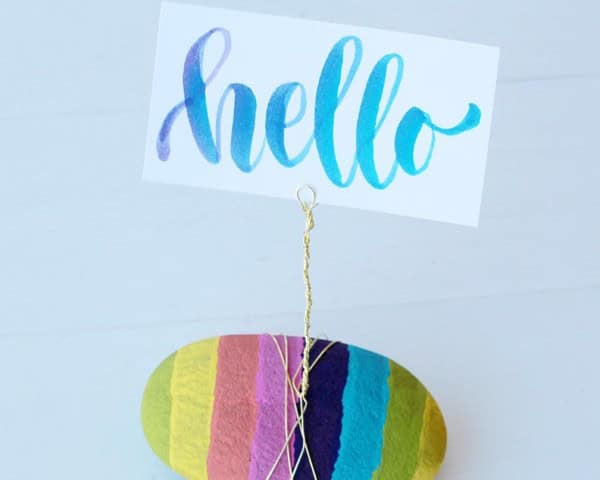
Here’s another creative way to utilize photo holders. The classic rainbow-striped design is always a crowd-pleaser, making it an excellent choice for any occasion. But did you consider the versatility of these holders? They can serve as not just picture displays but also placeholders for name cards. Simply swap out the photo with a name card and voilà! You’ll be all set. These quirky and colorful name cards are sure to delight kids at birthday parties or any other celebration.
Hand Painted Halloween Rocks
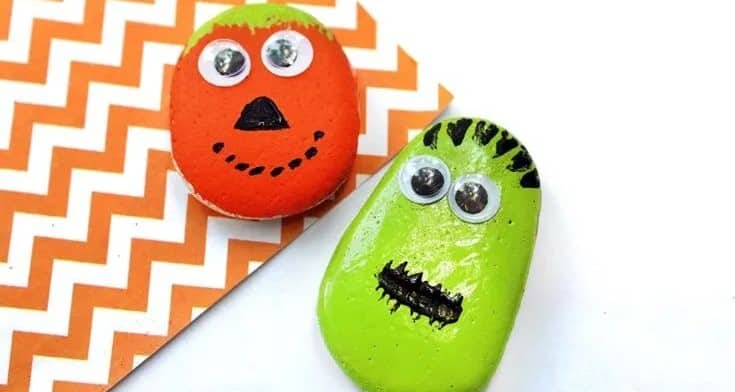
While we’ve explored Halloween-themed rock painting ideas previously, this particular design is geared towards a younger audience, making it an excellent option for kids. The simplicity of the design is one of its greatest appeals – all your little ones need to do is apply a base coat and add a few squiggly lines to create the mouth and nose, as shown here.
Additionally, the overall aesthetic is not too spooky, making it more accessible to younger children who might be intimidated by monster designs. To further soften the look, you can incorporate googly eyes, effectively toning down the ‘monsters’ and making them less intimidating. For more inspiration on creating a unique Halloween atmosphere, explore our collection of decorations!
Fish Painted Rocks
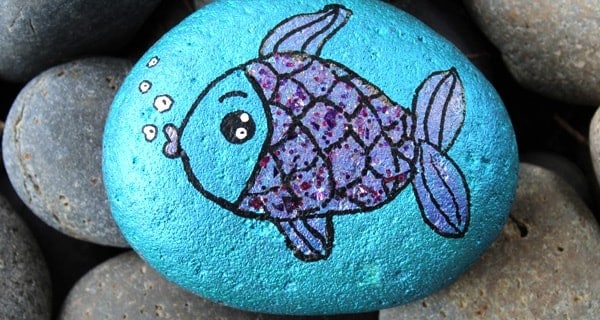
If you have a small pond or birdbath, consider transforming it into an underwater art gallery with painted fish rocks. To achieve this, use water-resistant paint specifically designed for rock painting. This will not only add vibrant colors but also create a unique and whimsical touch to your aquatic feature. For a fun and interactive experience, place the painted rocks among the real fish, creating a delightful surprise for both kids and adults alike.
Glittery Heart Rock Craft
Begin by thoroughly cleaning and rinsing flat rocks, then lay them out on a flat surface to air dry. To protect your work surface, place a few sheets of newspaper beneath the rocks as they dry. Next, adorn the rocks with hearts using your preferred medium, followed by a generous application of white glue. Carefully pat the edges to ensure any excess glue is absorbed. Before the adhesive has a chance to set, it’s time to add the pièce de résistance – an abundance of glitter.
You can opt for classic white or clear, or introduce a pop of color with colored glitter poured liberally over the glue.
Mandala Ladybug
As we revisit our previous exploration with the dot painting kit, let’s unleash its creative potential once more. This time, let’s bring together the world of mandalas and ladybugs. To begin, select a flat and smooth rock that will serve as the canvas for your artwork. When it comes to dot painting, a smooth surface is crucial in order to achieve a clear and vibrant pattern. Before diving into the design, don’t forget to apply a base coat to the stone to provide a sturdy foundation for your art.
Baby Yoda Rock Art
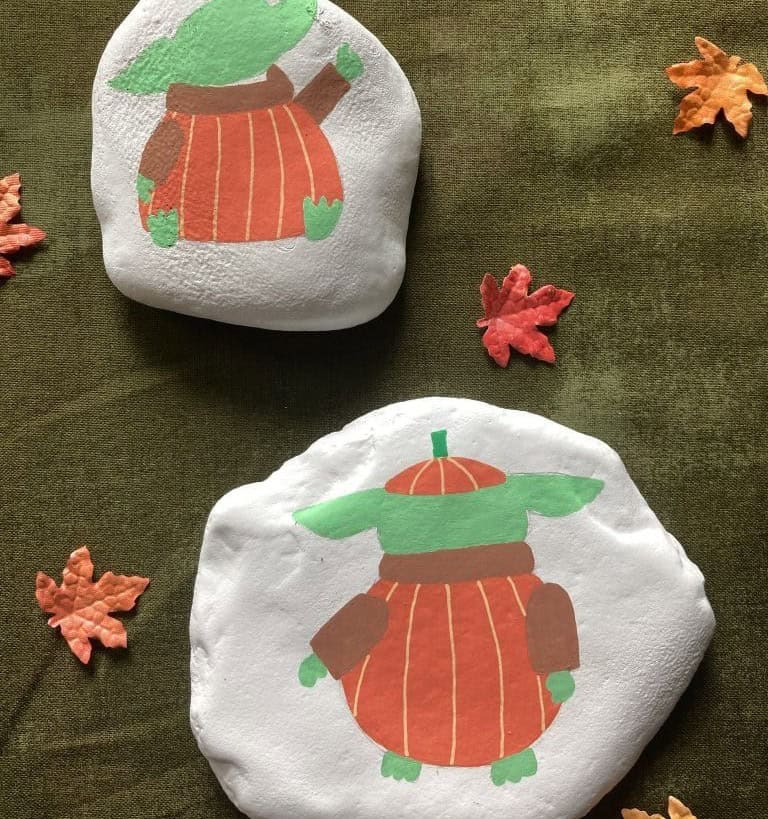
As soon as Baby Yoda appeared on our screens, I knew he was going to win my heart. Who wouldn’t fall in love with the wise and witty Yoda, reimagined as an adorable infant? Painting Baby Yoda is surprisingly straightforward – all it takes is a keen eye for proportion and capturing those iconic ears. But, why stop there? Halloween is just around the corner, providing the perfect opportunity to give Baby Yoda a seasonal makeover.
I mean, can you imagine him decked out in a pumpkin onesie, sporting a tiny pumpkin hat, and clutching a trick-or-treat bucket filled with jack-o’-lanterns? It’s a vision that’s equal parts playful and precious, and one that has me squealing with delight!
Halloween Ghost Rock Craft
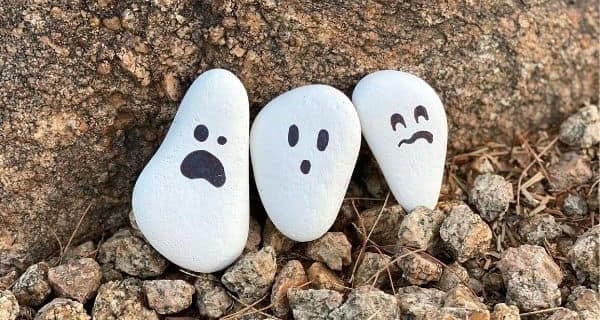
As you near the end of your Halloween rock-painting journey, one final creative challenge awaits: capturing the essence of ghosts. Unusual stone shapes can be transformed into ethereal spirits with a few coats of white paint. The smooth surface of pebbles or odd-shaped stones provides an ideal canvas for this project. After applying at least two to three layers of white paint, use a black permanent marker to bring your ghostly creations to life by adding their eerie faces.
Before you know it, you’ll have a dozen or more ghostly companions to help set the mood for a spooktacular Halloween celebration.
DIY Garden Rock Markers For Garden
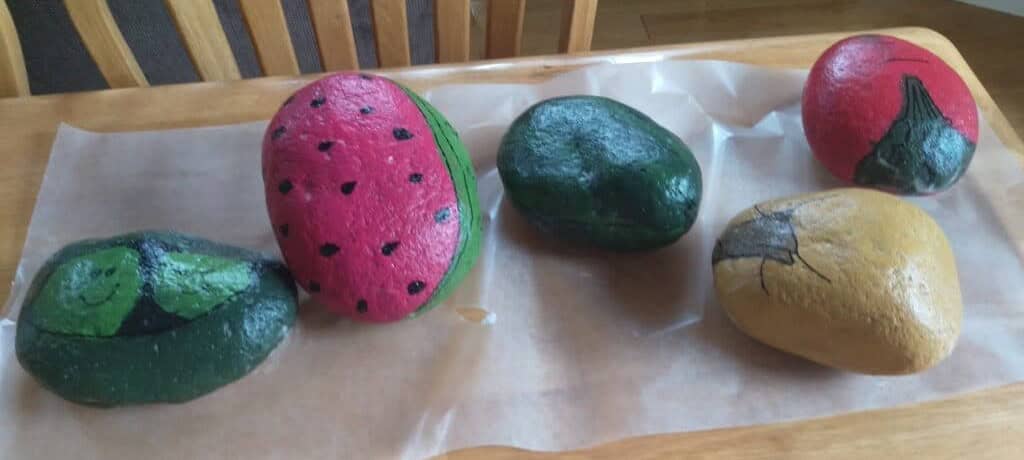
For a garden to truly thrive, it’s essential to have a system in place for identifying the various plants. While vegetable gardens can be easily managed with simple labels, flower gardens can be a different story altogether. To avoid confusion and make maintenance a breeze, consider incorporating decorative rock markers that blend seamlessly into your outdoor space.
But why stop at simply labeling?
Take it to the next level by transforming these rocks into miniature representations of your fruits and veggies! Paint strawberry rocks, tomato-shaped stones, melon-patterned pebbles, potato-themed pavers, or any other design that tickles your fancy. This creative approach not only adds a touch of whimsy to your garden but also makes it easier to keep track of your plantings.
The possibilities are endless when you combine art and gardening!
Melted Crayon Rocks
Let’s revisit a creative project that combines art and heat – similar to our heated rock painting craft. If you’re a parent, chances are you’ve accumulated a stash of broken crayons from your little ones’ artsy endeavors. Instead of disposing of them, let’s breathe new life into this waste material with a fun and easy DIY project.
To get started, preheat your oven to warm up the stones (yes, just like baking cookies!).
Once they’re ready, carefully remove them from the oven using oven mitts to avoid any accidental burns. Next, place the heated stones on a paper plate for a stable ‘canvas’.
Now it’s time to get creative! Grab a broken crayon and begin ‘painting’ your masterpiece onto the stone. As you do, be mindful of the melting point of the crayon – it will start to melt when it comes into contact with the hot rock. So, take your time and enjoy the process.
Rock Garden Markers
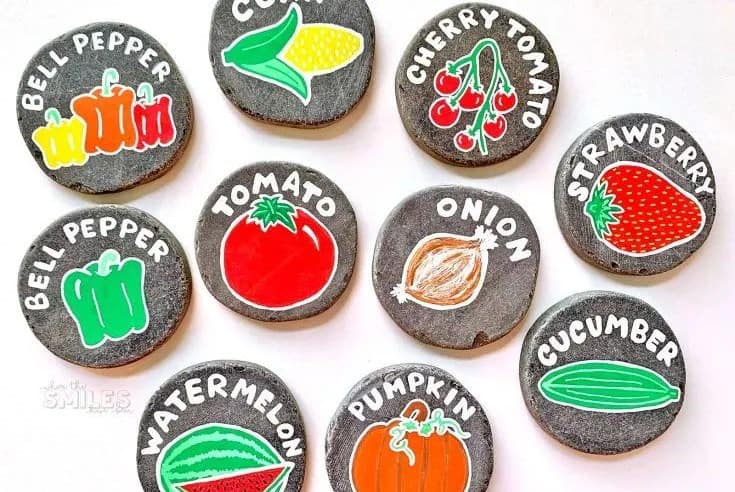
Another creative way to mark your gardens is by painting the actual plant names or symbols onto the rock itself, rather than painting a larger design. You can also use white paint or pens to add an extra layer of clarity and make it easy to identify which plants are which. For example, you could use these flat rocks as garden markers. They have a natural badge-like shape that makes them perfect for this purpose.
Rock Dip Painting
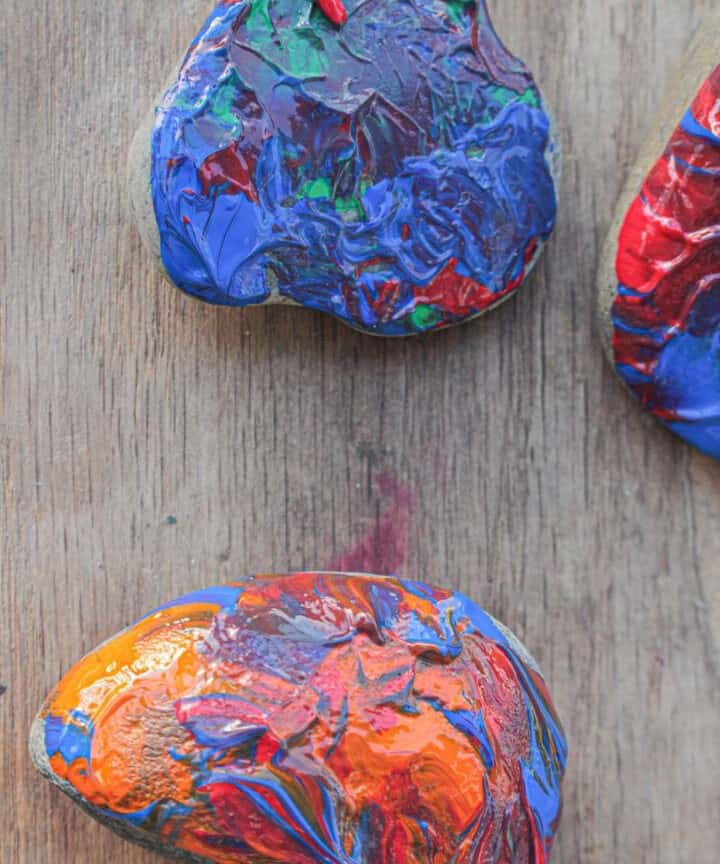
Imagine transforming ordinary rocks into mesmerizing works of art, reminiscent of Jackson Pollock’s splattered masterpieces or Van Gogh’s whimsical brushstrokes. By layering different colors of paint and swirling them around on a paper plate or plastic tray, you’ll create unique patterns that can be transferred to the rock itself.
Once you’re satisfied with your design, place a flat rock over it, hold it in place for a brief moment, and then carefully lift it off, preserving the intricate details. To add an extra layer of fluidity to your marbled effect, consider using a pouring medium. Meanwhile, wooden skewers will come in handy for mixing and swirling the paint, allowing you to achieve the perfect blend of colors.
As you work on this project, be mindful not to smudge the pattern with a fingerprint, and once complete, let it dry on a flat surface.
DIY Tic Tac Toe Travel Game
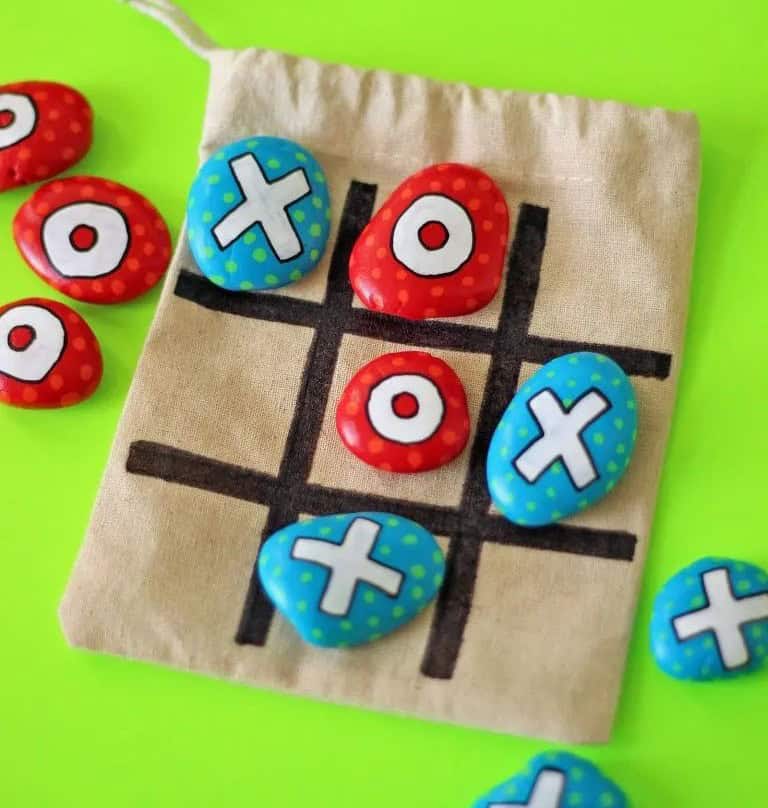
Let’s take a moment to acknowledge the ingenuity behind this craft project. For me, it stands out as a standout item on this list, even surpassing the mix-and-match snowmen in appeal. To get started, grab a small canvas bag and use it as your board. A black Sharpie will come in handy for creating a grid on the fabric. Aim for thick, visible lines that’ll guide your rock-painting process.
Once you’ve completed the grid, you can begin transforming the rocks into their designated X’s and O’s, using colors like red for X and blue or green for O to add an extra layer of visual interest.
Rainbow Colored Ladybugs
When it comes to painting rocks for a craft project, the possibilities are endless! Who says ladybugs have to be red with black polka dots? With an open mind and a willingness to let creativity flow, you can bring your imagination to life on those smooth stones. Go ahead and think outside the box – or should I say, outside the rock! Choose rocks that are rounded and ready for their close-up, and don’t worry if they’re not perfectly round.
After all, ladybugs come in all shapes and sizes, so why not our painted versions? Take inspiration from nature’s own masterpieces and create your own unique designs, or go wild with bold colors and patterns. The world is indeed your oyster, and these rocks are just the canvas waiting for your artistic touch. If you’re looking for more ideas to get your creative juices flowing, be sure to check out these 21 ladybug crafts and see what inspires you!
Star Wars Painted Rocks
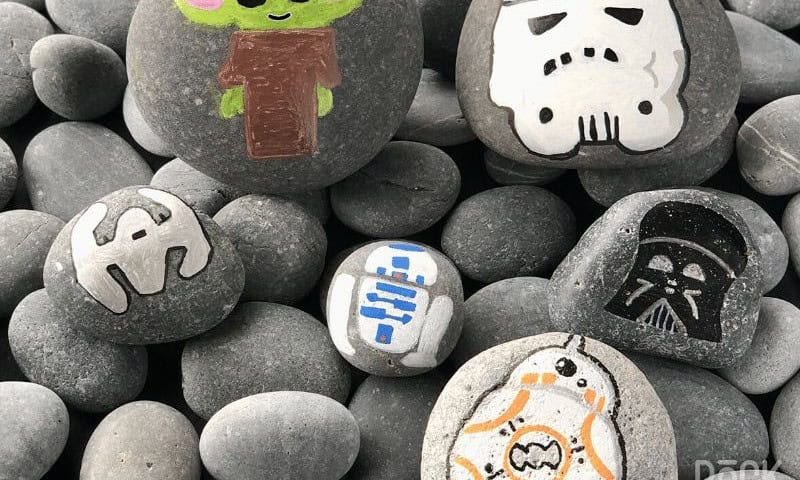
For any Star Wars enthusiast or parent looking to engage their young ones in a fun activity, now’s the perfect opportunity to build an extensive collection of beloved characters. By following these easy-to-follow instructions, you can create an impressive array of Star Wars figures alongside iconic vessels like the Enterprise. The power of Star Wars has a remarkable ability to bring out the kid in anyone, regardless of age.
Whether you’re a seasoned artist or just starting out, this project is designed to be accessible and enjoyable for all skill levels.
Painted Penguins
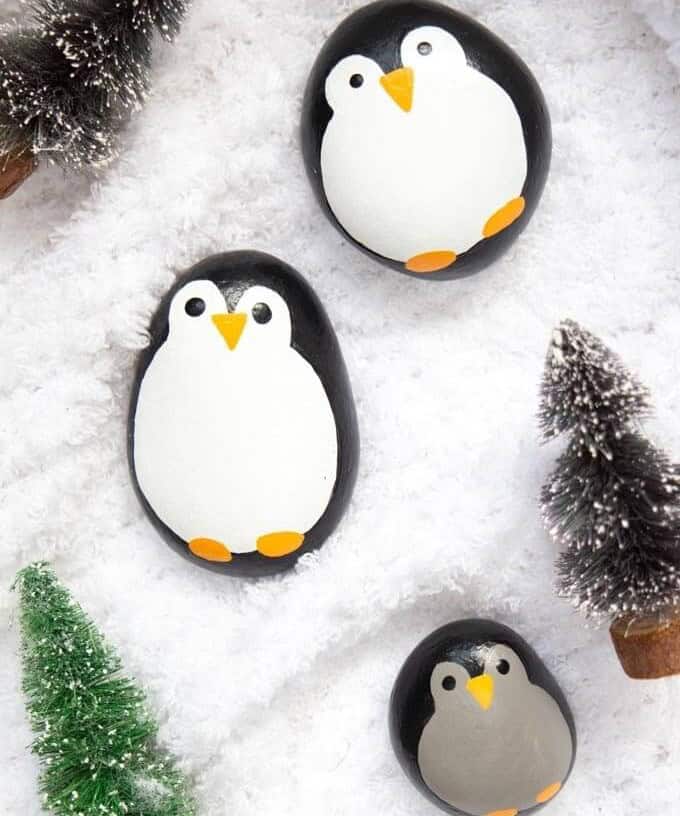
Penguins may appear cute and cuddly, but they’re a species like no other. Their quirky nature has fascinated many, including us. One peculiar aspect of penguin behavior is their obsession with finding the perfect pebble or rock to present to their mates. It’s an intriguing ritual that’s unlike anything else in the animal kingdom.
If you share this fascination, then you’ll love learning about a creative way to express it: painting penguins onto rocks!
Not only is it a unique hobby, but it’s also a wonderful way to connect with nature and celebrate the peculiar charm of these fascinating birds. So why not give it a try? And who knows, you might just find yourself as obsessed as those penguins searching for the perfect rock gift.
To learn more about other fun and creative ways to express your love for penguins, check out our collection of penguin crafts!
Camping Activity
Camping trips from my childhood were all about making the most of our free time. We’d venture out into the wilderness, collecting an assortment of natural treasures like leaves, branches, and stones. But what to do with those stones on a rainy day at camp? That’s when we’d bust out the paints and brushes and get creative, transforming our finds into miniature masterpieces. And let’s not forget the leaves and twigs – perfect for adding some extra flair.
The type and size of the rocks would dictate the level of detail we could achieve, but the real joy came from sharing this activity with friends, laughing and chatting as we brought our natural treasures to life.
Monster Rock painting
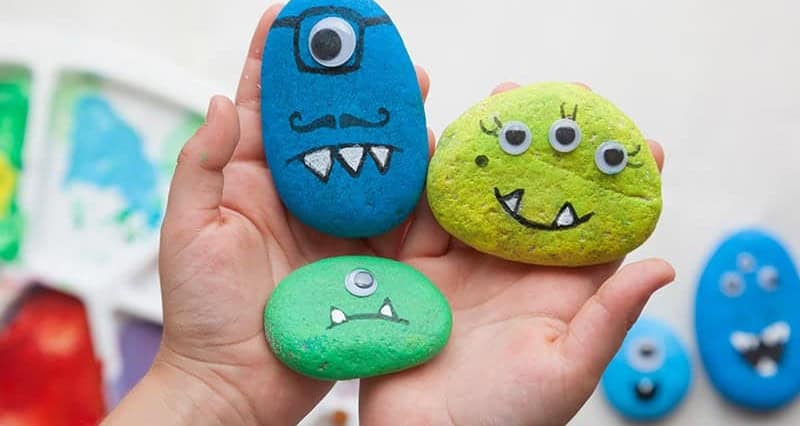
As we conclude this list of Halloween monster rock painting craft projects, let’s create one final set that’s perfect for younger kids to join in on the fun. To make it, you’ll need five differently shaped stones and five distinct colors. Paint each stone with unique features, colors, and markings, adding a touch of personality to each monster. Consider giving your creatures different physical characteristics, such as unequal eyes or fangs.
You could even create twins or a single-eyed monster – the possibilities are endless! For more creative ideas, be sure to check out our collection of [20 easy Halloween crafts for kids](url).