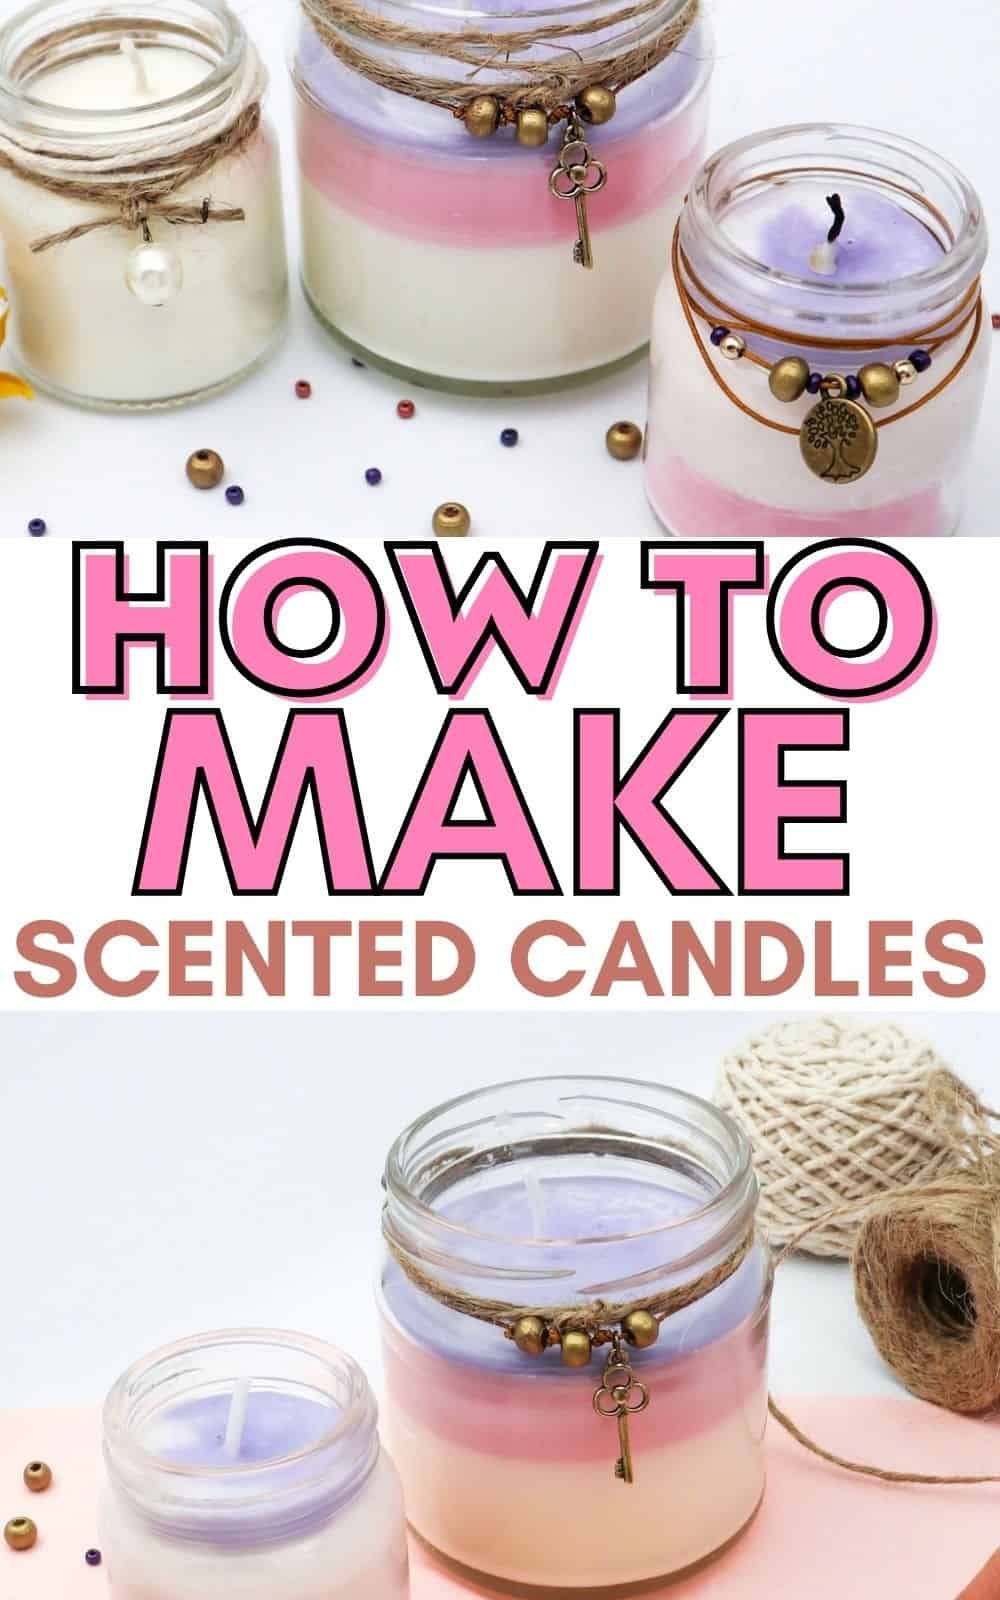
Transform your space with a personalized touch by crafting your own scented candles! Not only are these DIY creations an enjoyable activity, but they also make for thoughtful gifts or unique decorations. The best part? You can never have too many – and once you start making them, you’ll find yourself wanting to scatter them throughout your home. In fact, I’ve got a dozen or so scattered around my living room, with double that amount in my bathroom and bedroom.
Scented candles have the power to instantly transform a space into a cozy retreat. By lighting just a few, you can evoke the ambiance of a spa, making it the perfect way to unwind after a long day. Of course, you could always purchase scented candles online or at stores, but there’s something special about creating your own. And with old candle jars waiting to be recycled, this DIY project is the perfect excuse to get creative!
What You’ll Need for Candles
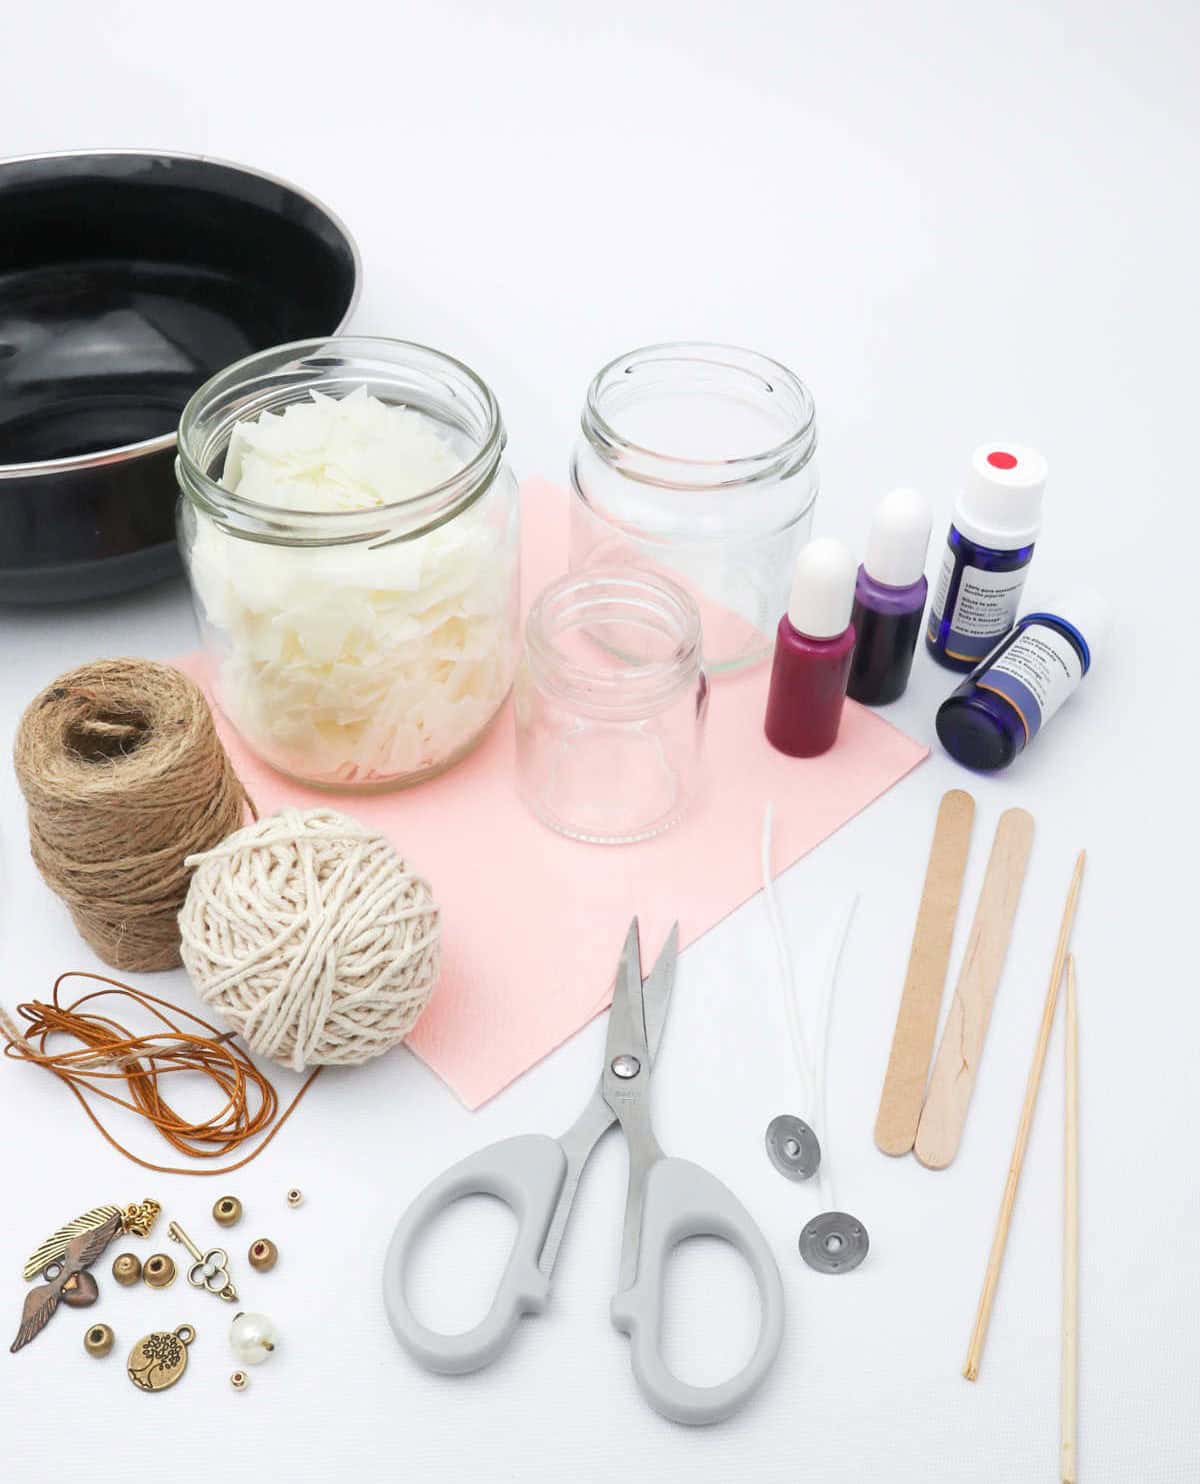
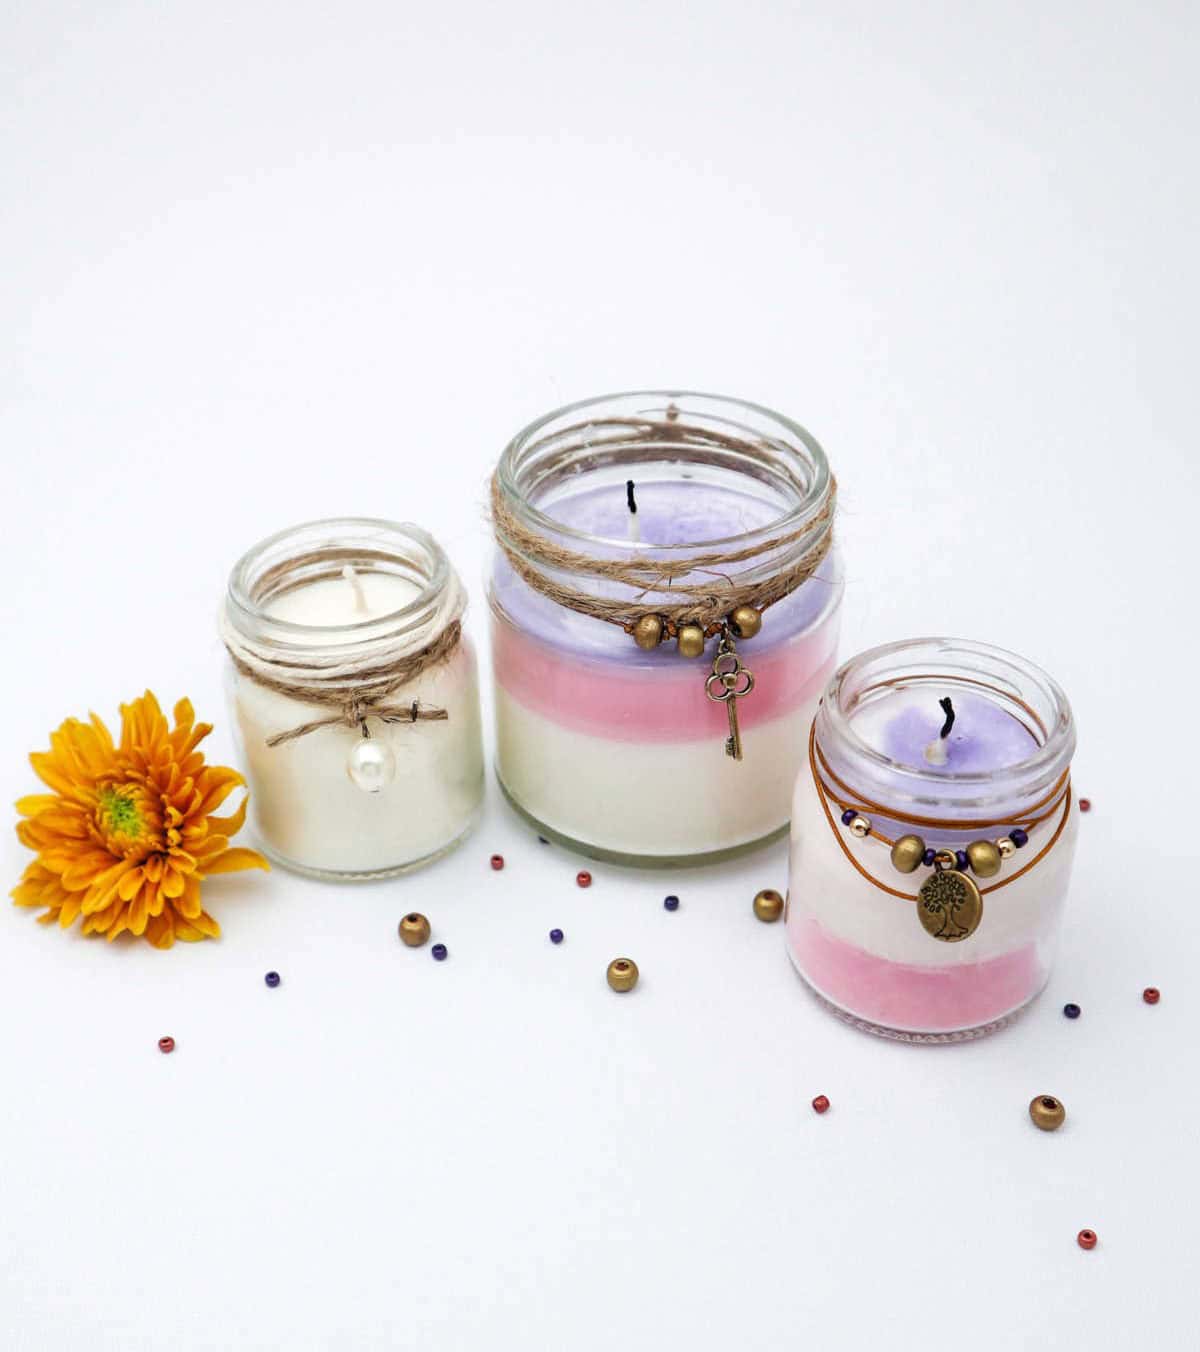
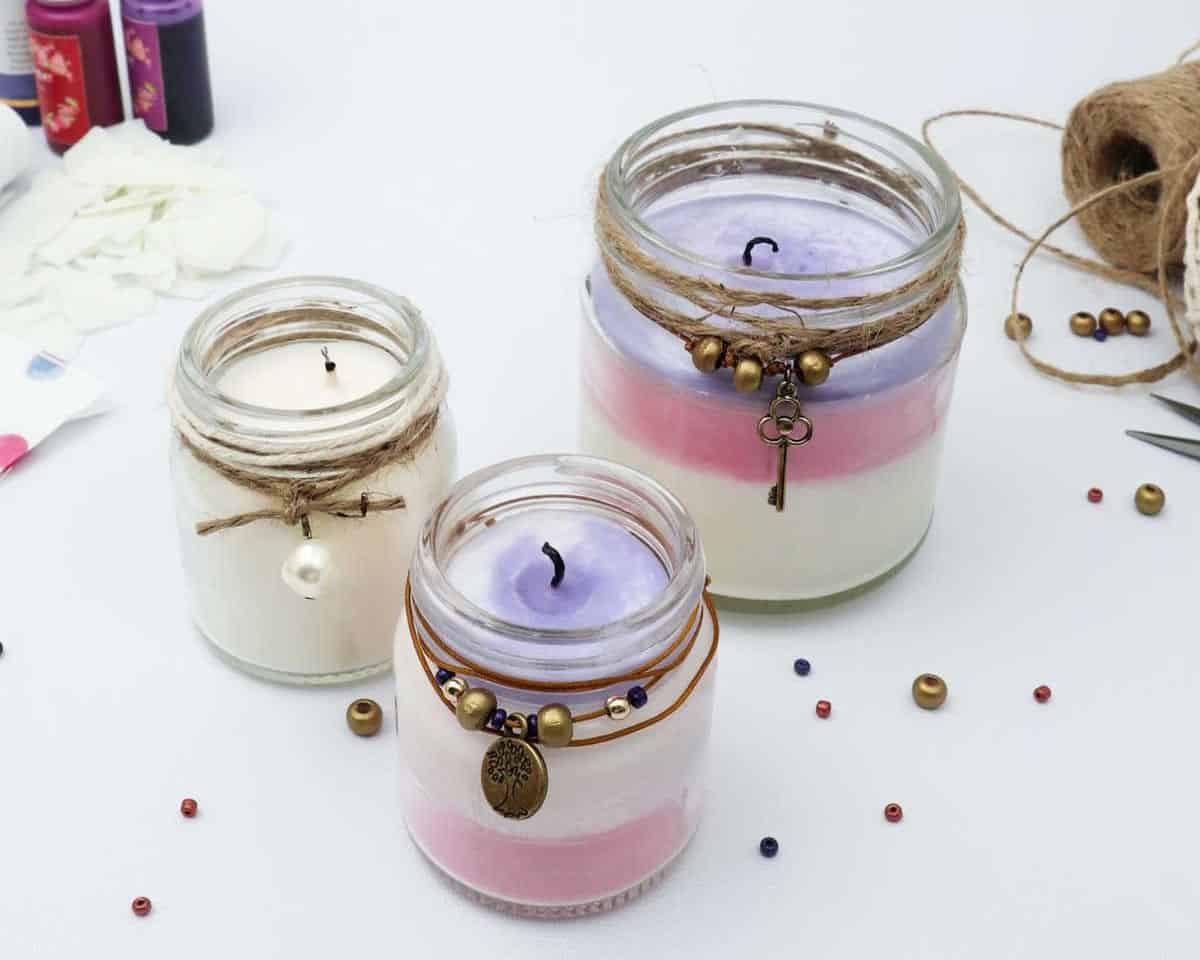
To craft your DIY scented candles, you’ll require the following materials: a collection of mason jars, soy wax flakes serving as the foundation for your candle’s core, wooden skewers and lolly sticks used to shape and stabilize the wick, scissors for trimming and precision, essential oils responsible for imbuing your creations with their distinct aromas, candle dye adding a pop of color, candle wicks ensuring a smooth burn, an old pot doubling as a makeshift melting vessel, jute twine providing a rustic touch, and charms or beads (optional) to personalize each unique piece.
With these supplies at the ready, you’ll be well on your way to creating your own bespoke scented candles.
How to Make Scented Candles
While many people may think that crafting candles from scratch requires specialized skills or equipment, the truth is that making candles at home can be a surprisingly straightforward and accessible process. With just a few basic materials and some simple steps, anyone can create their own unique and personalized candles.
Step 1
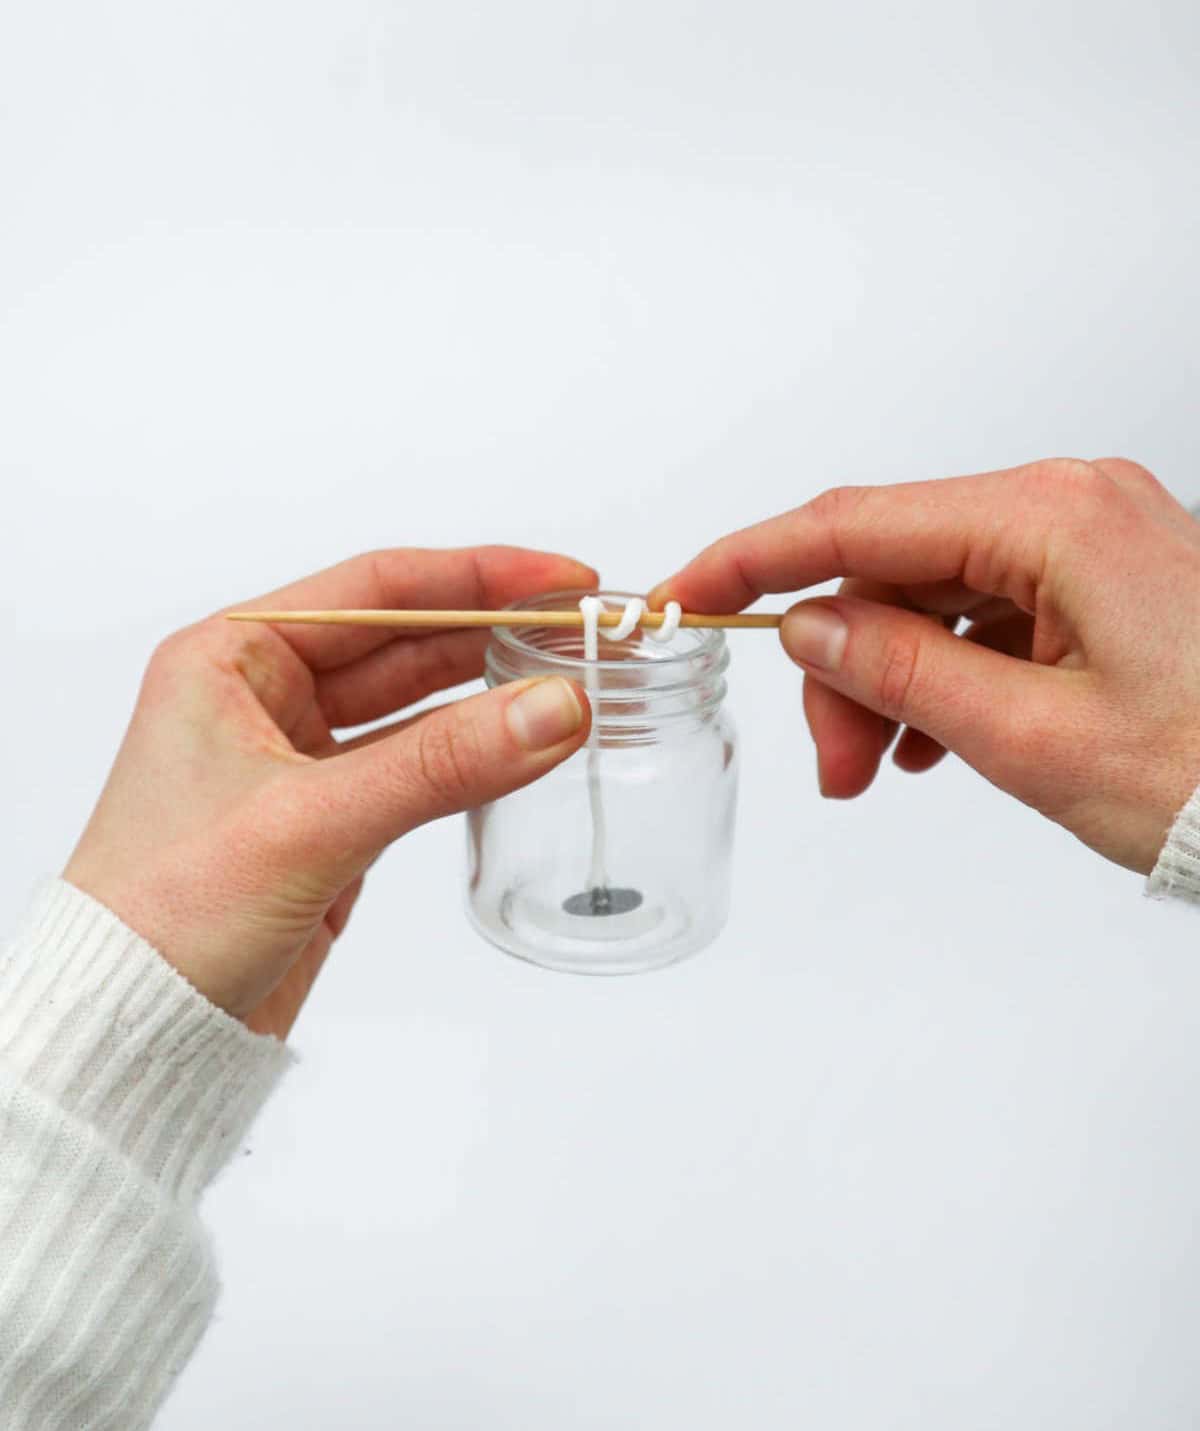
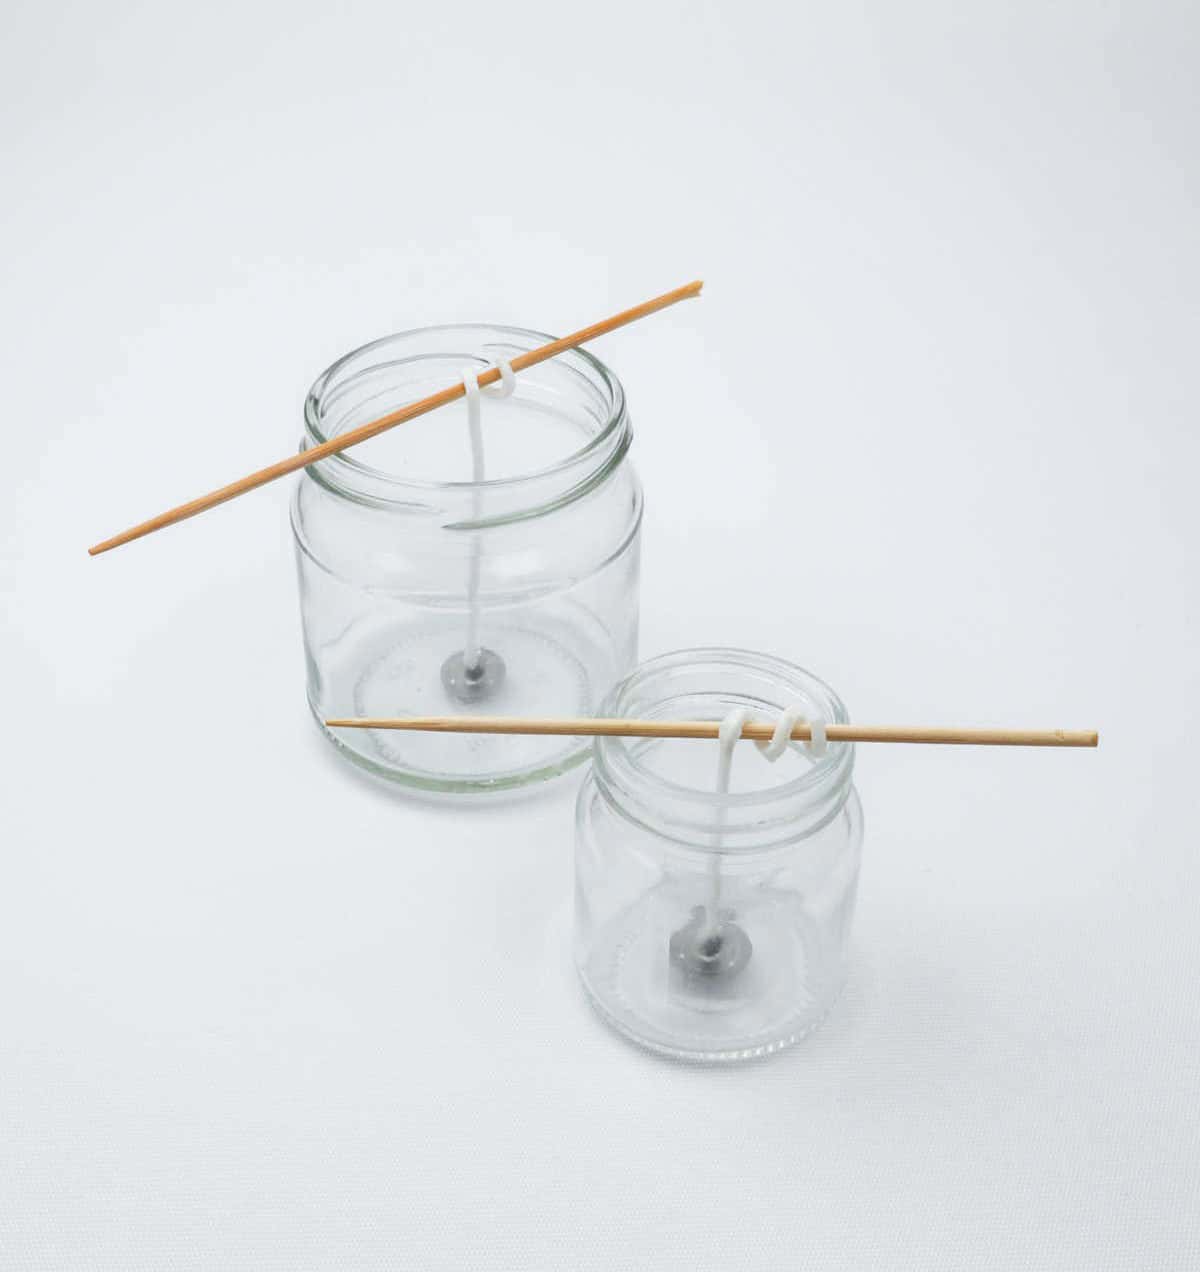
Before proceeding, ensure you’ve selected the desired jar and thoroughly cleaned and dried its interior. Next, procure a wooden craft stick or lolly stick and wrap the wick around it. Allow the end to rest at the bottom of the jar, where the flat metal base can sit comfortably. Finally, balance the stick on the rim of the jar and make any necessary adjustments to keep the wick securely in place.
Step 2
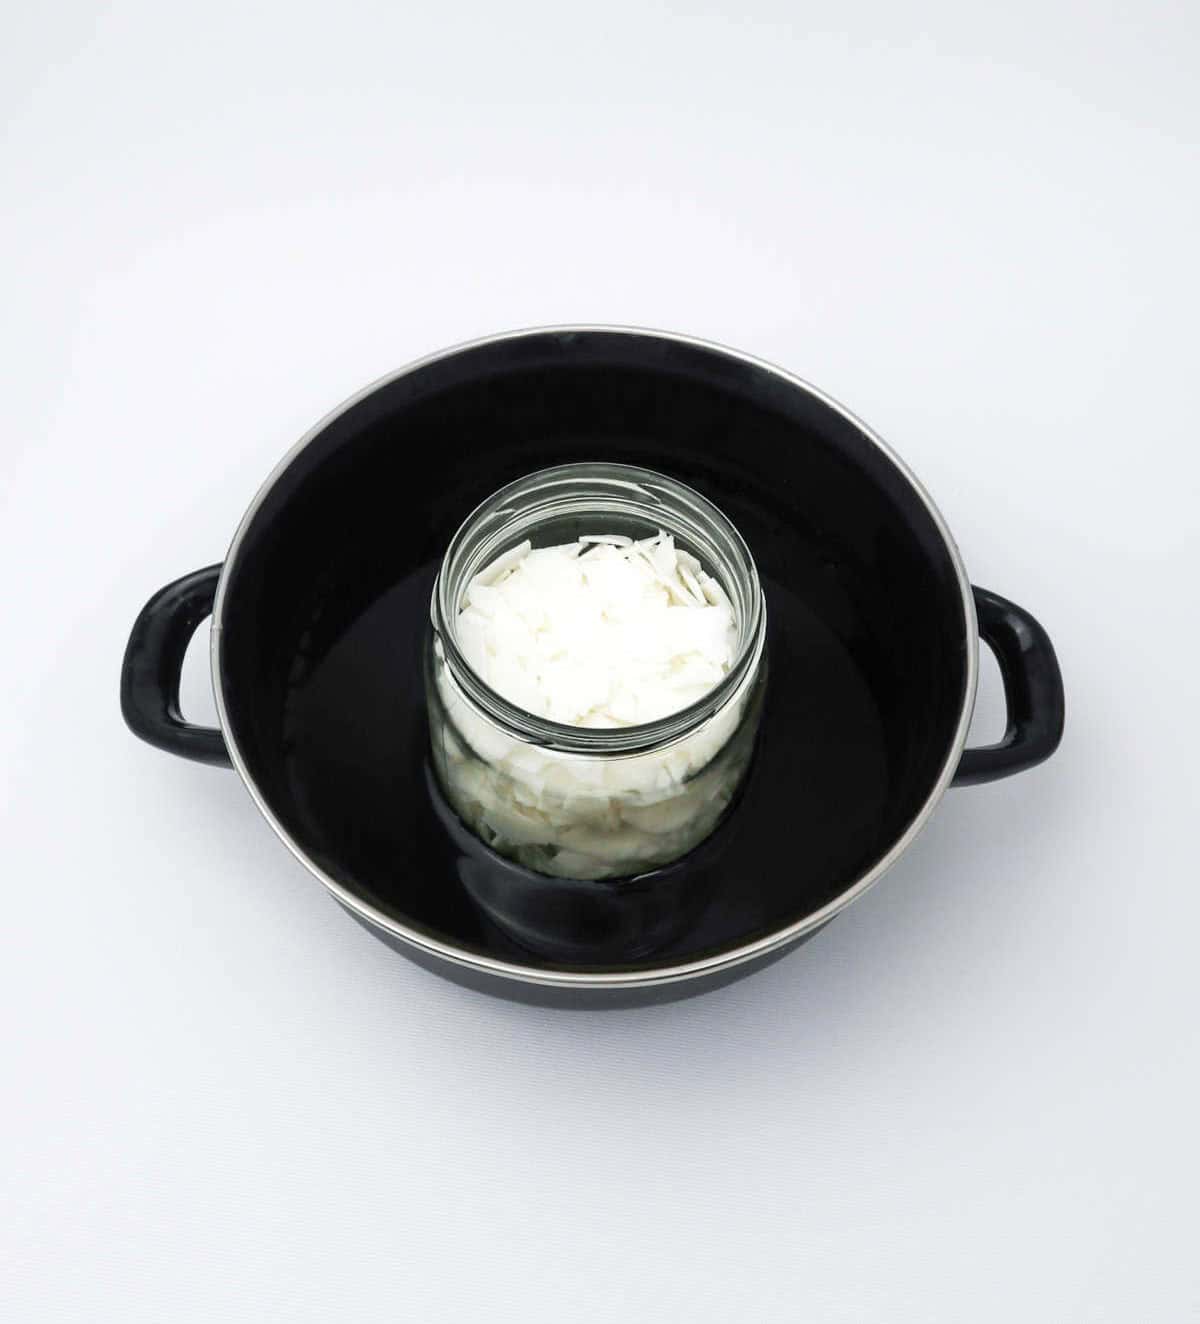
To begin the process, bring a deep-sided pot filled with enough water to accommodate the wax. However, instead of placing the wax directly into the water, carefully transfer it to a heat-resistant glass container, making sure not to let the two come into contact just yet.
Step 3
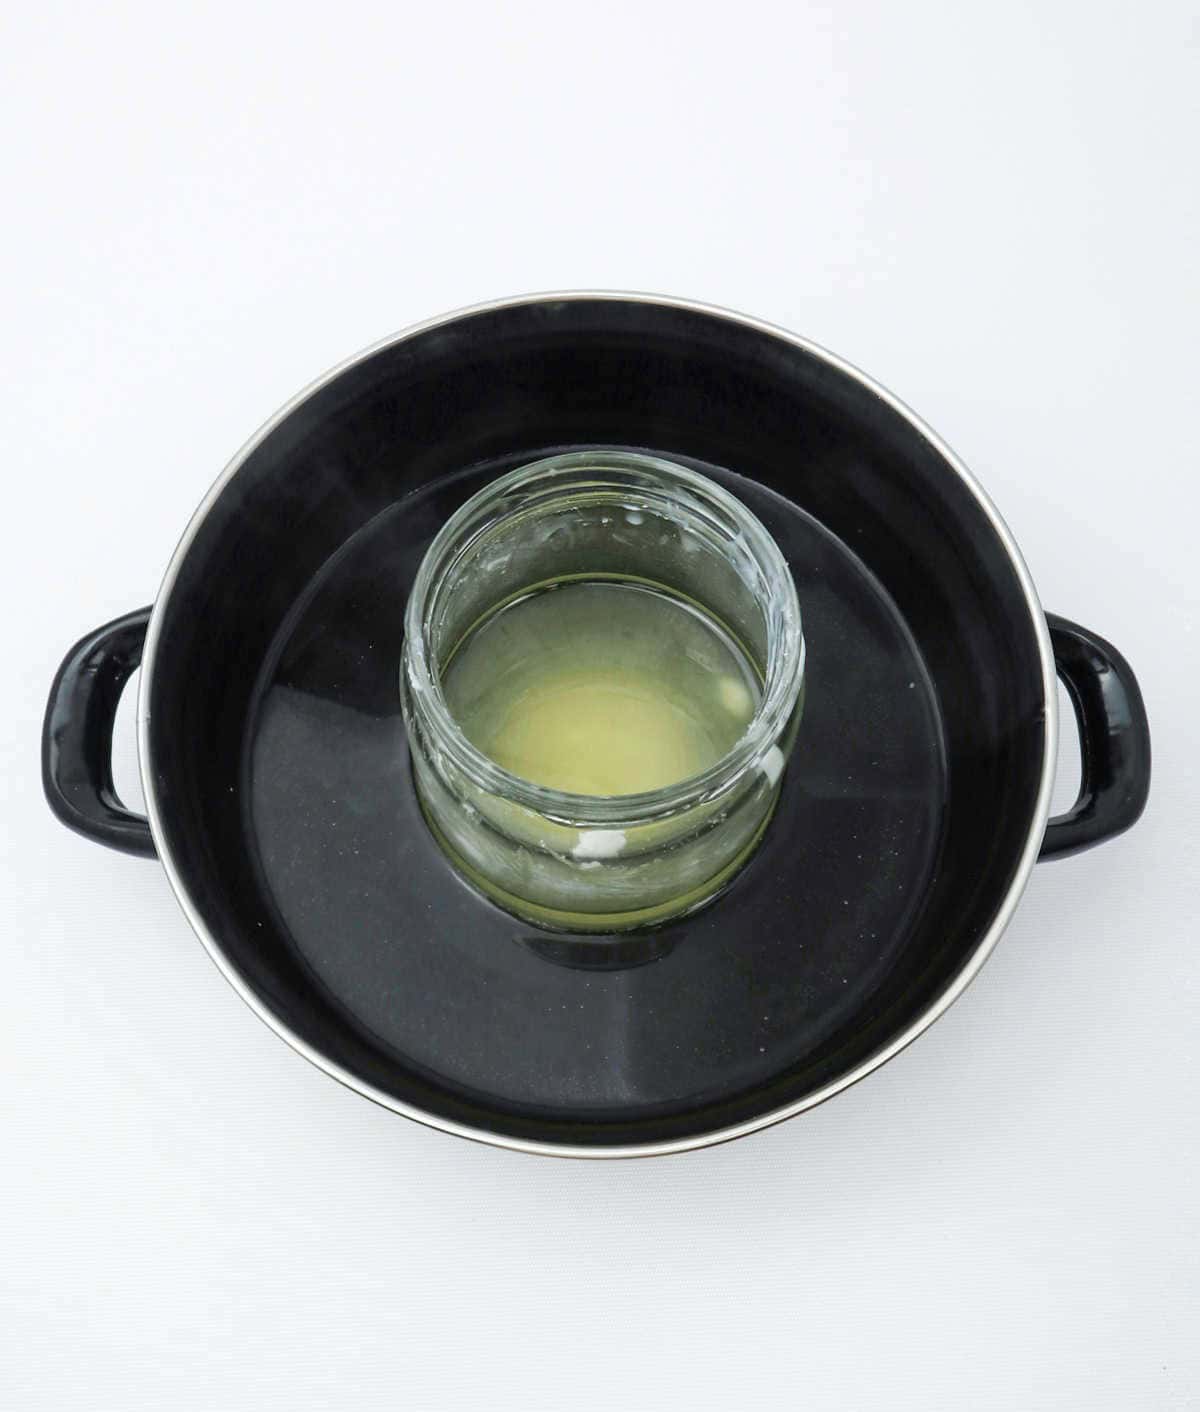
As you bring the water to a rolling boil, the wax will start to dissolve effortlessly. To ensure a smooth process, use a spatula or spoon to gently whisk away any stubborn lumps that form, continuing to stir the mixture until it reaches your desired viscosity.
Step 4
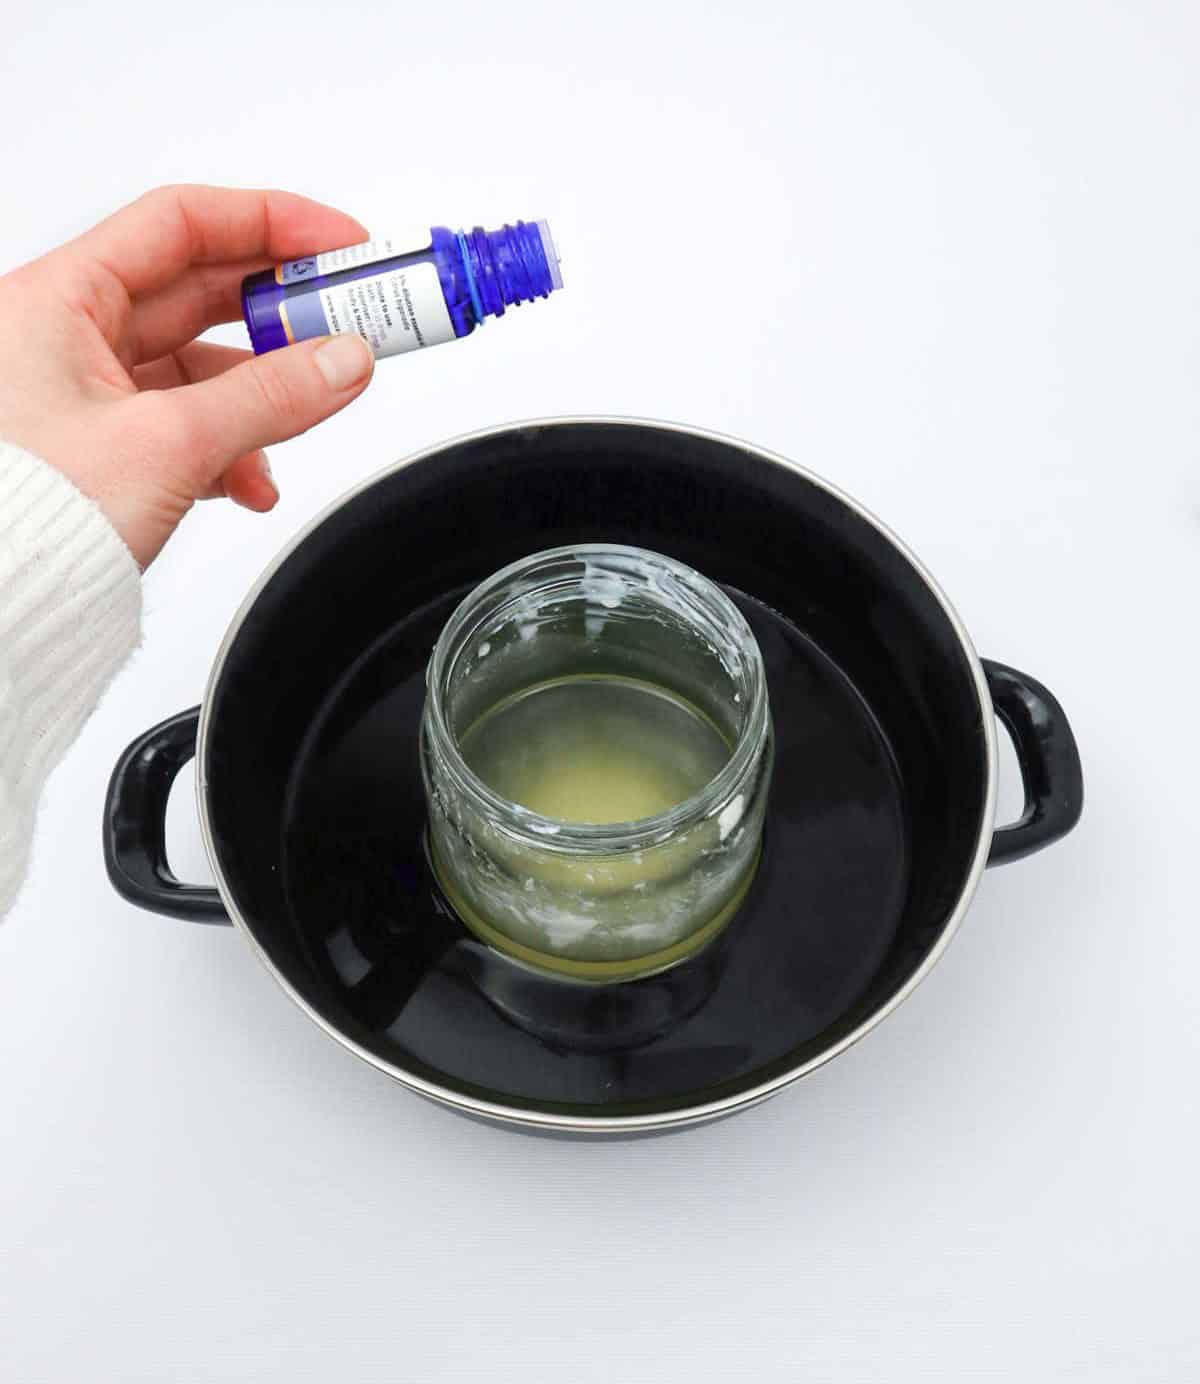
As you blend the essential oils into the melted wax, take a moment to appreciate the aroma that’s emerging. The fragrance is a key component of your final product, so make sure to give it a good stir as the two combine. Once the mixture is well combined, you’re ready to pour your wax into its desired form.
Step 5
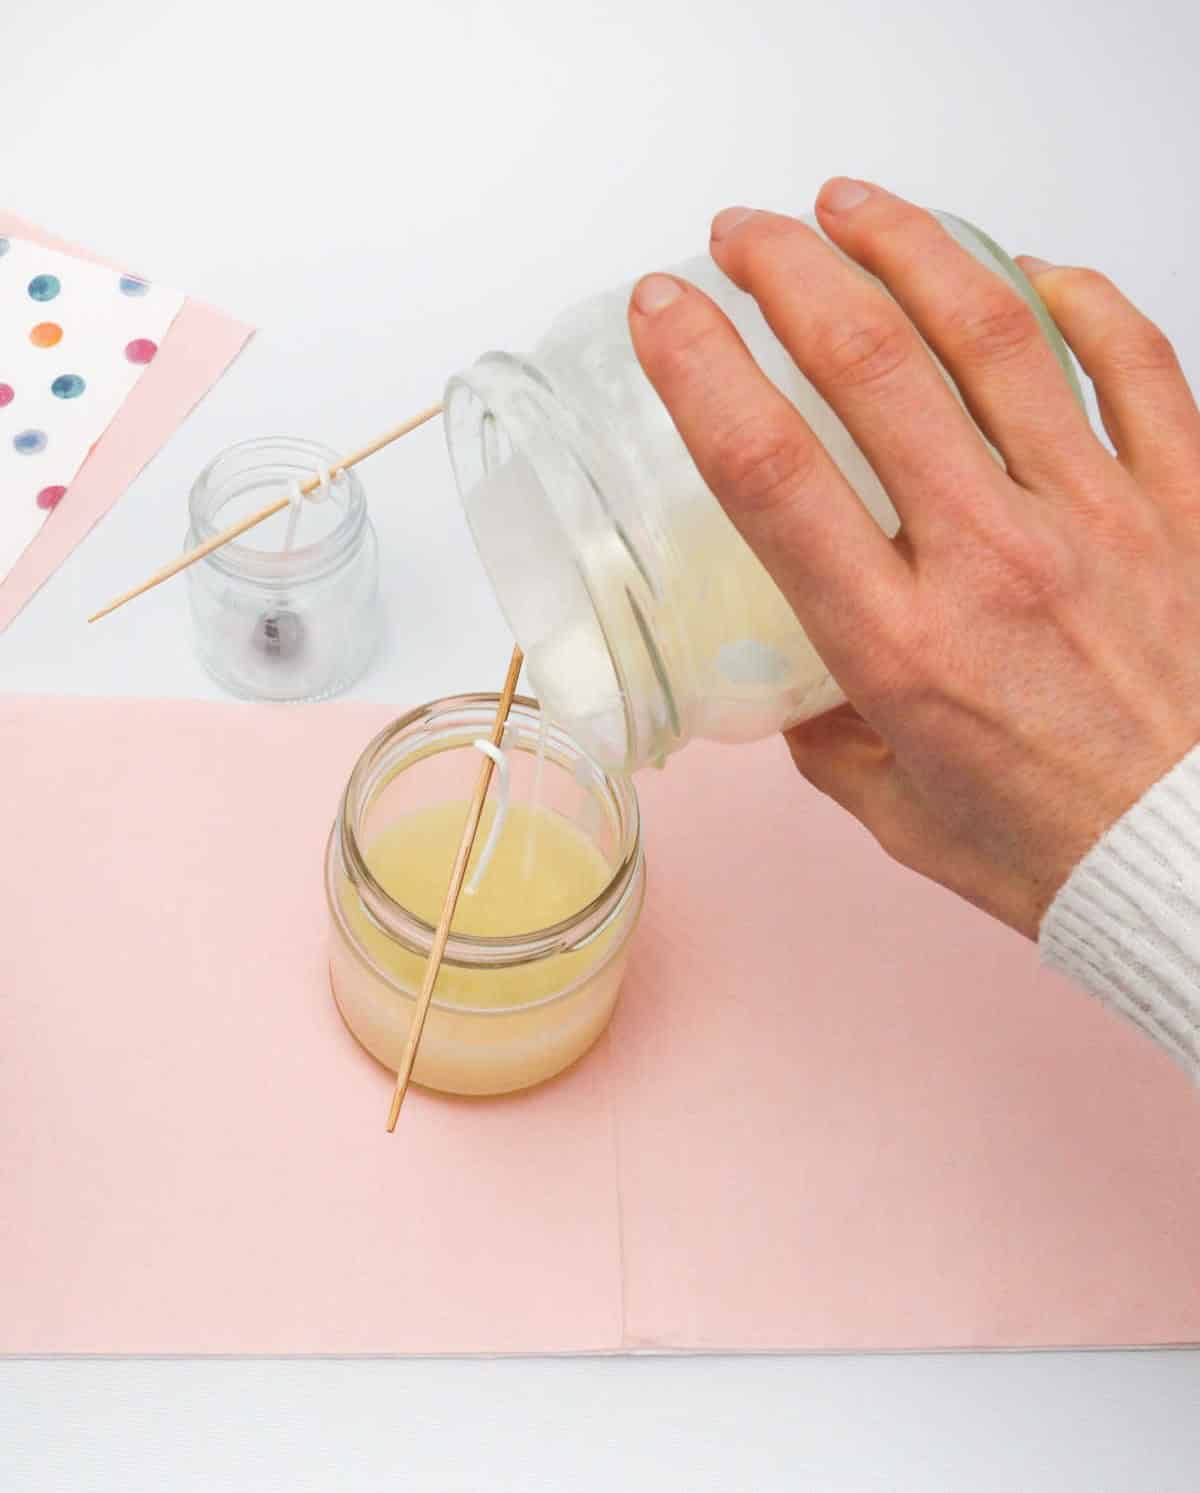
As you work with molten wax, be cautious when pouring it into containers. Ensure the jar is fully filled and take a moment to clean the rim thoroughly, eliminating any residual spills or drips.
Step 6
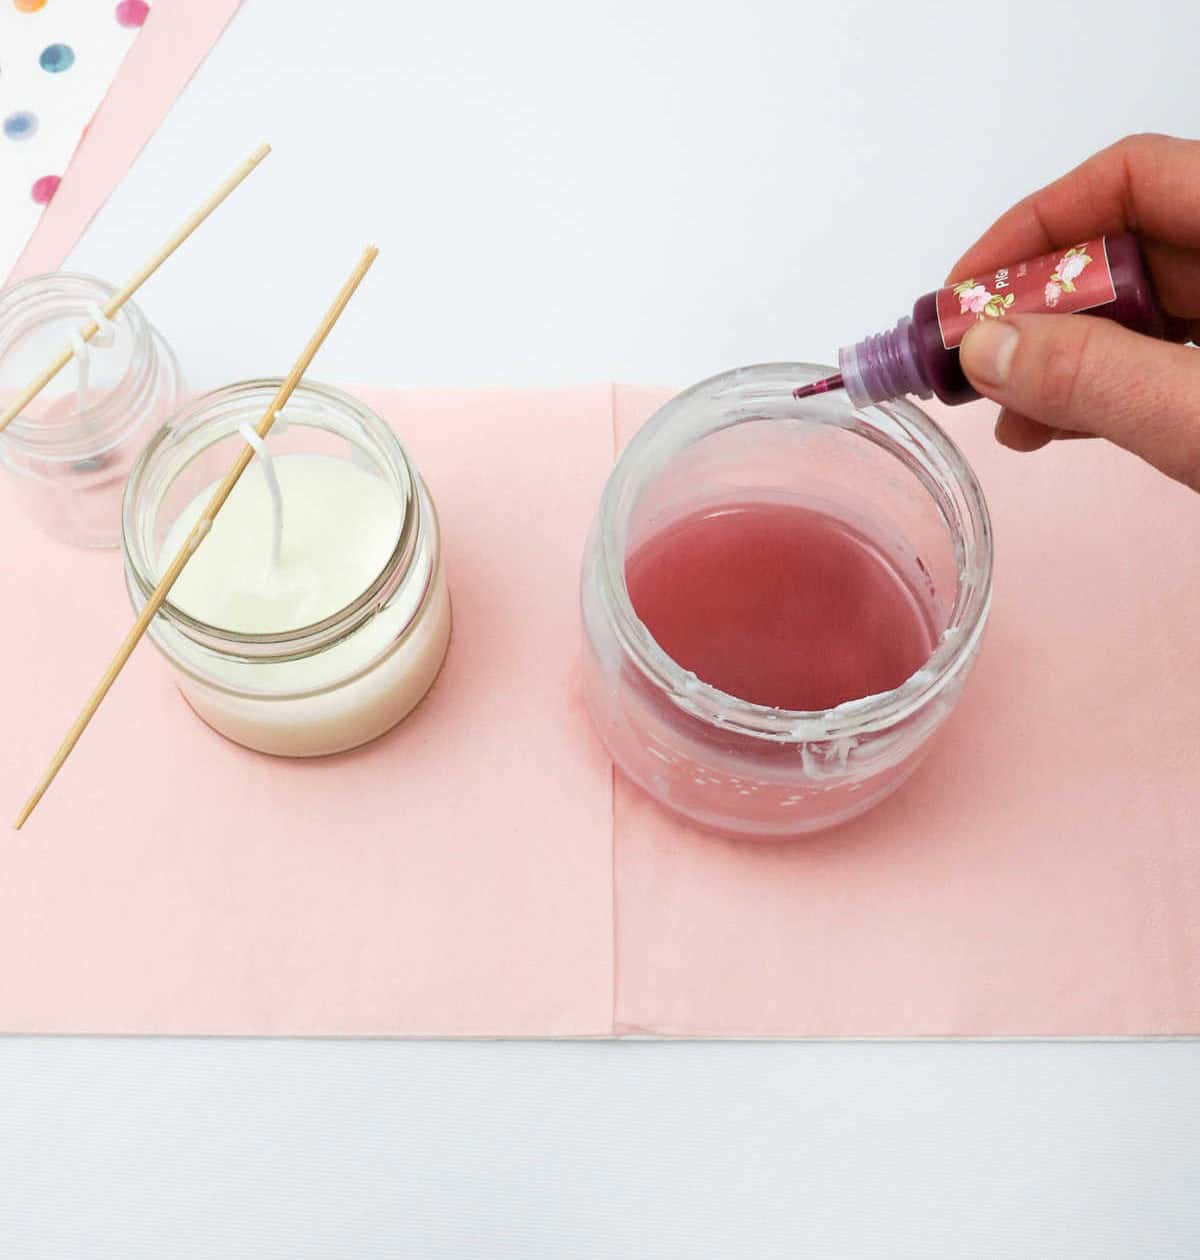
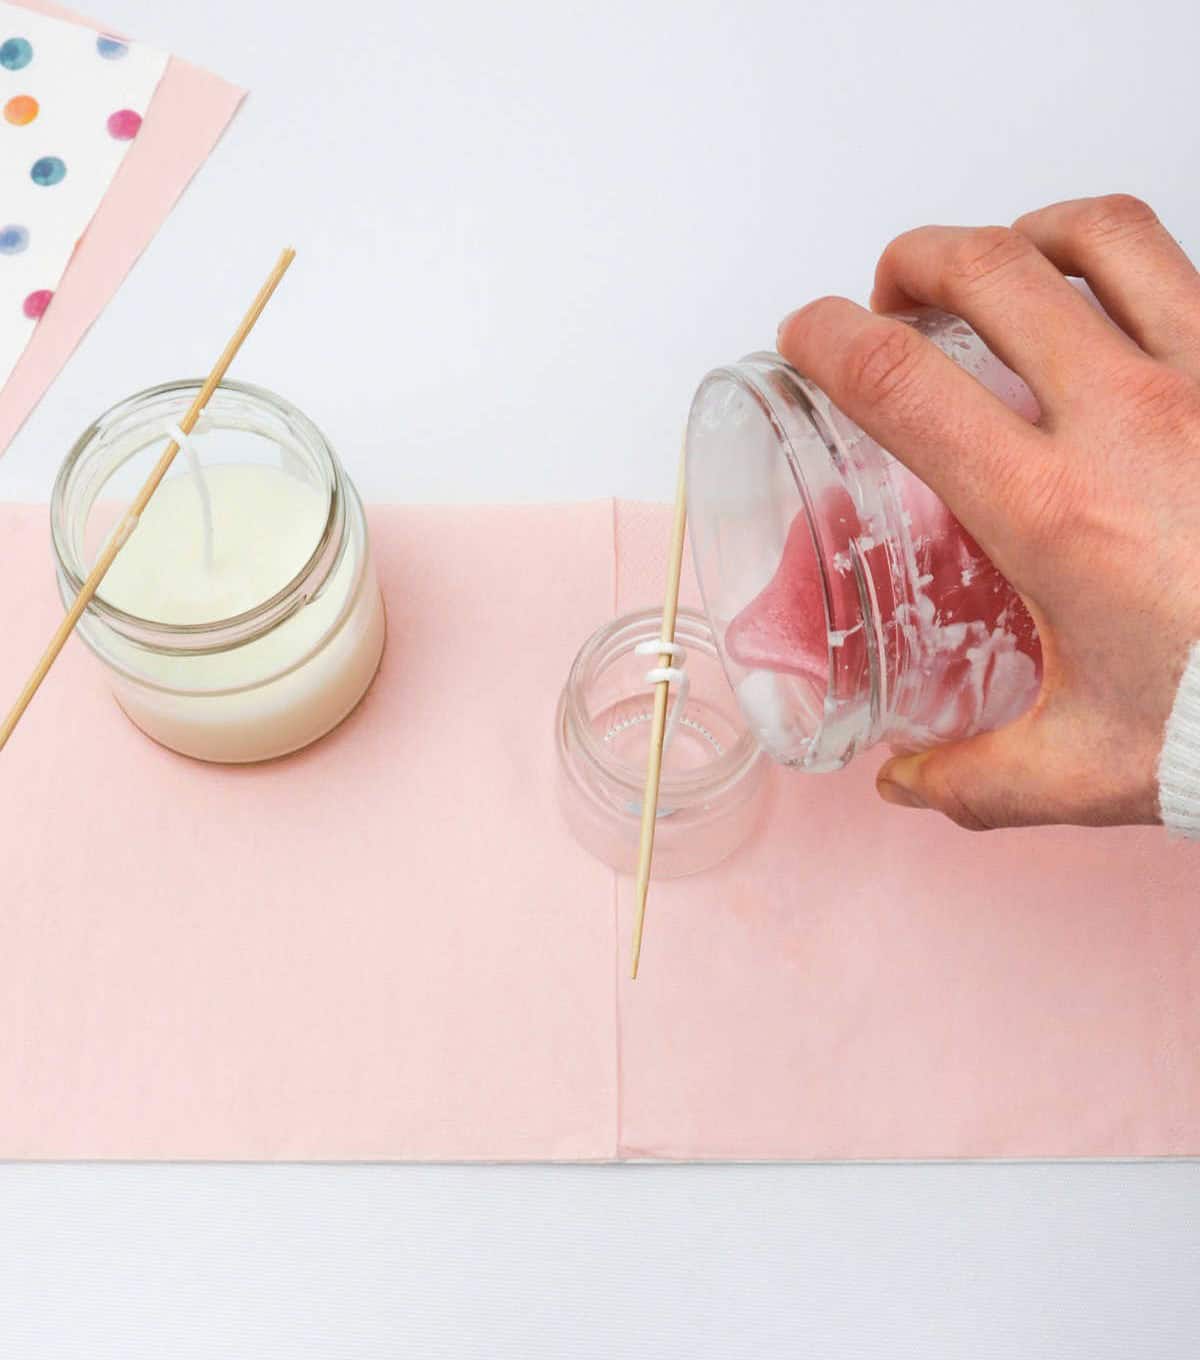
When it comes to customizing the appearance of your melted wax, you have two primary options. You can leave it in its natural state, or you can add a pop of color by incorporating a few drops of colored food dye. Simply stir the mixture thoroughly until the color is evenly distributed. Once you’ve achieved the desired shade, pour the wax into your jar and create unique layering patterns with different colors.
Step 7
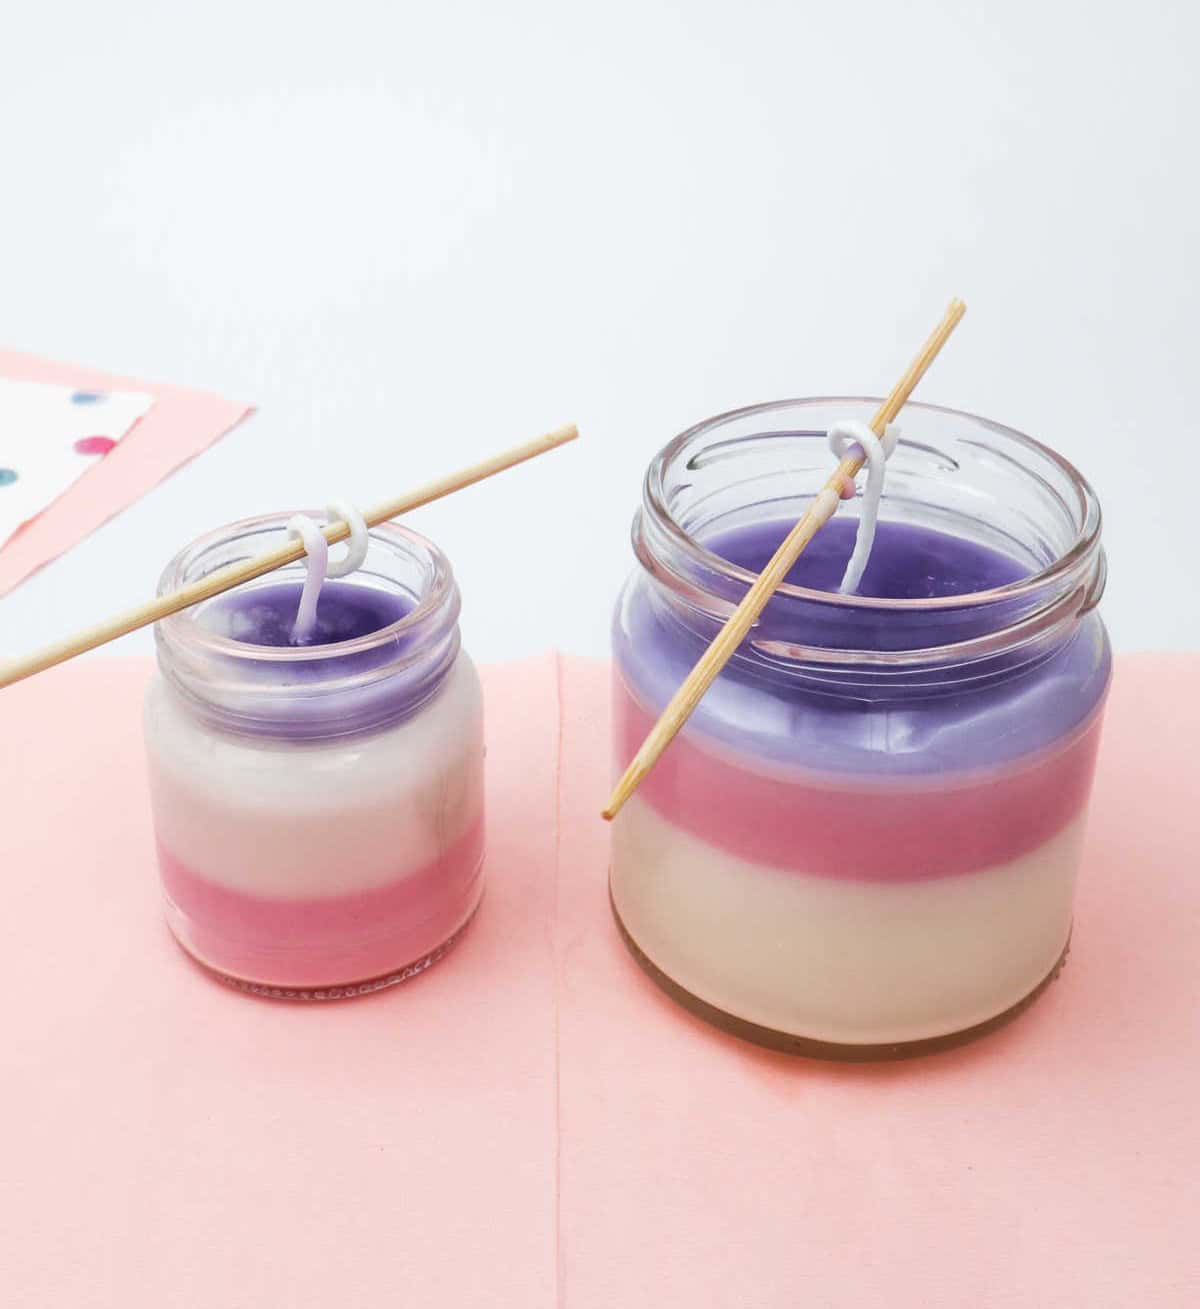
As the wax begins to solidify, let it cool down completely before moving on to the next step. The craft stick providing support to the wick ensures a steady anchor, eliminating any concerns about the wick becoming dislodged during this process.
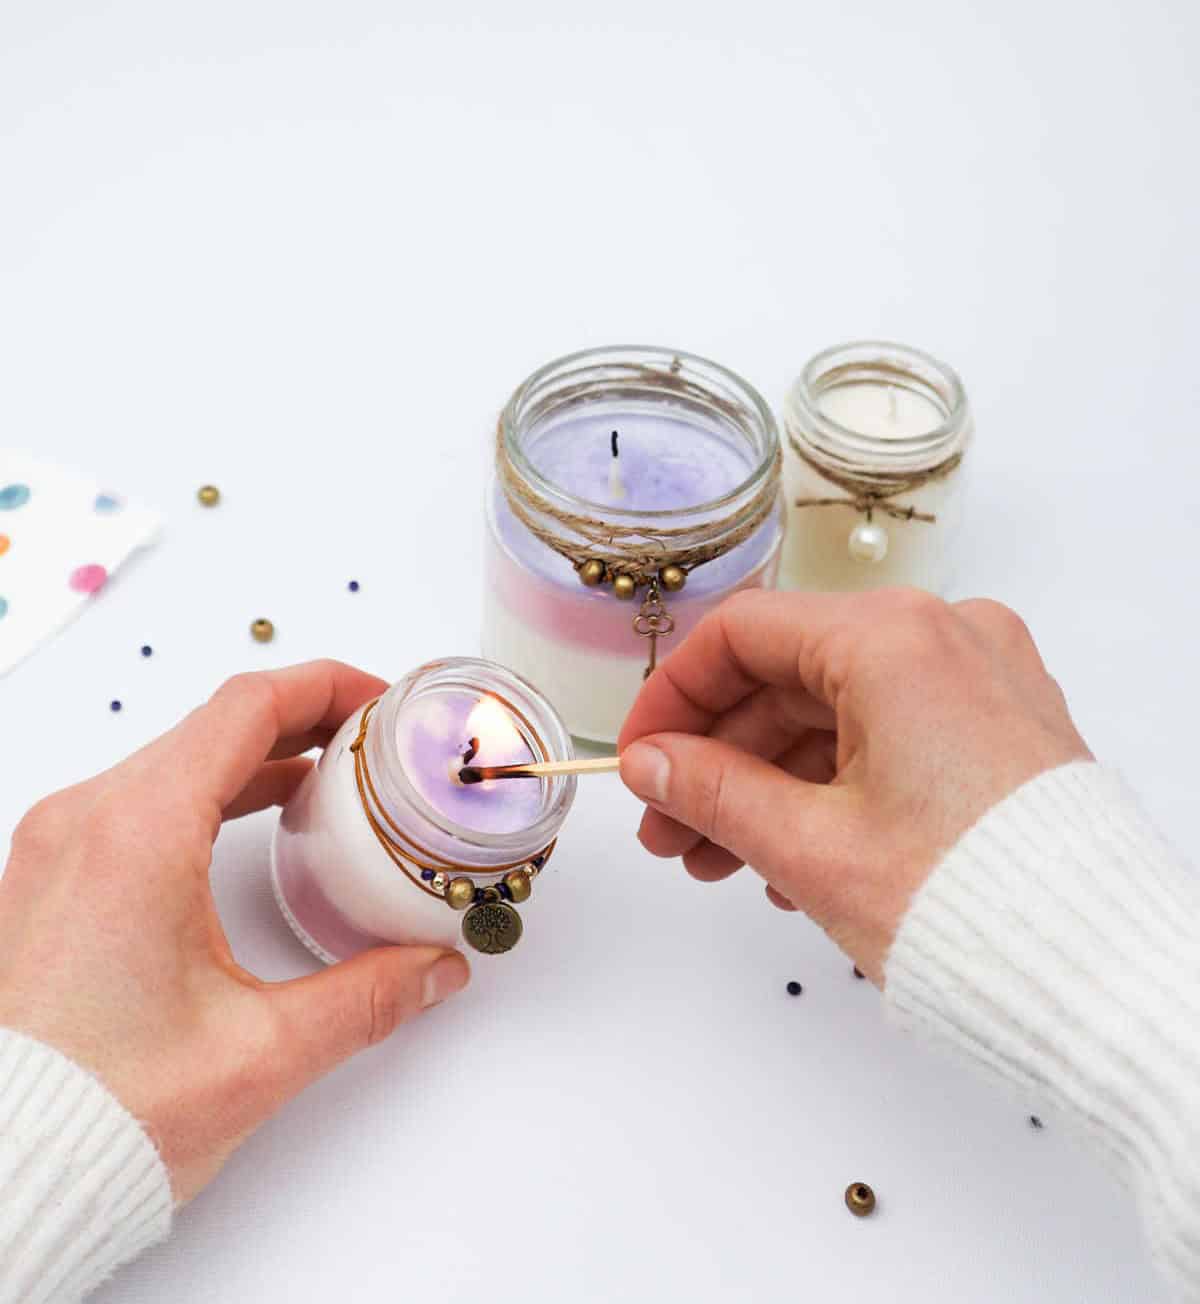
Step 8
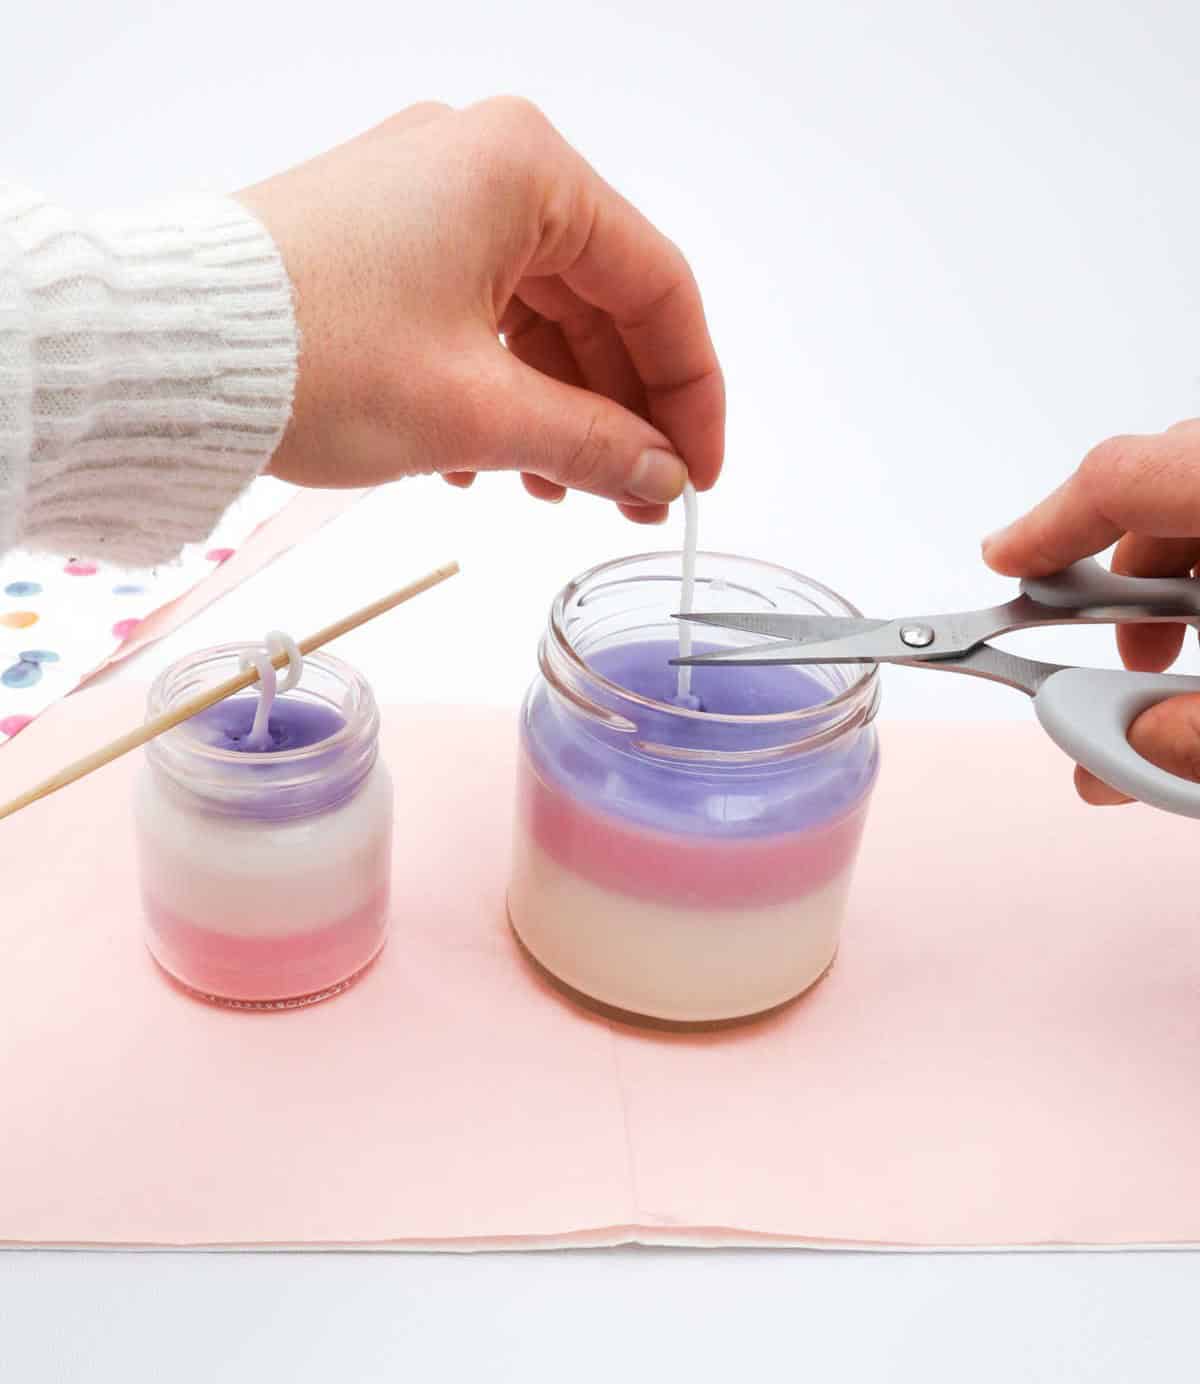
With the wax now set, delicately unwind the wick from its wooden anchor. A precision trim is then necessary to eliminate any excess length, ensuring a clean and controlled start for your candle’s burn.
Step 9
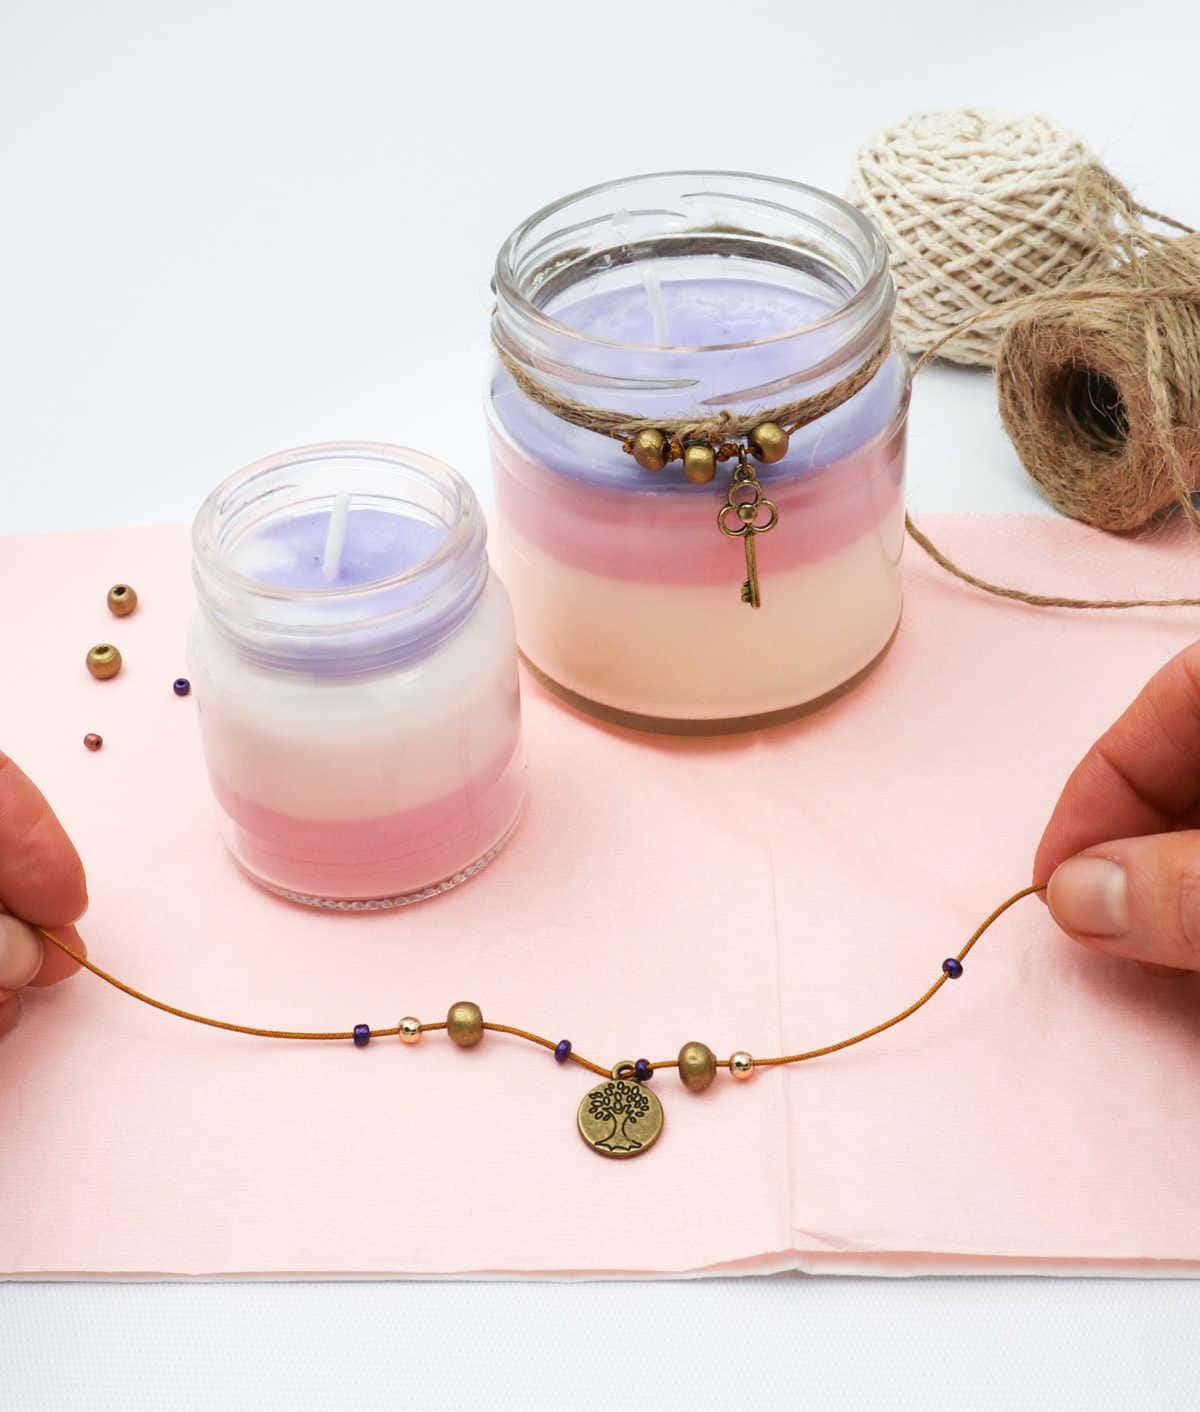
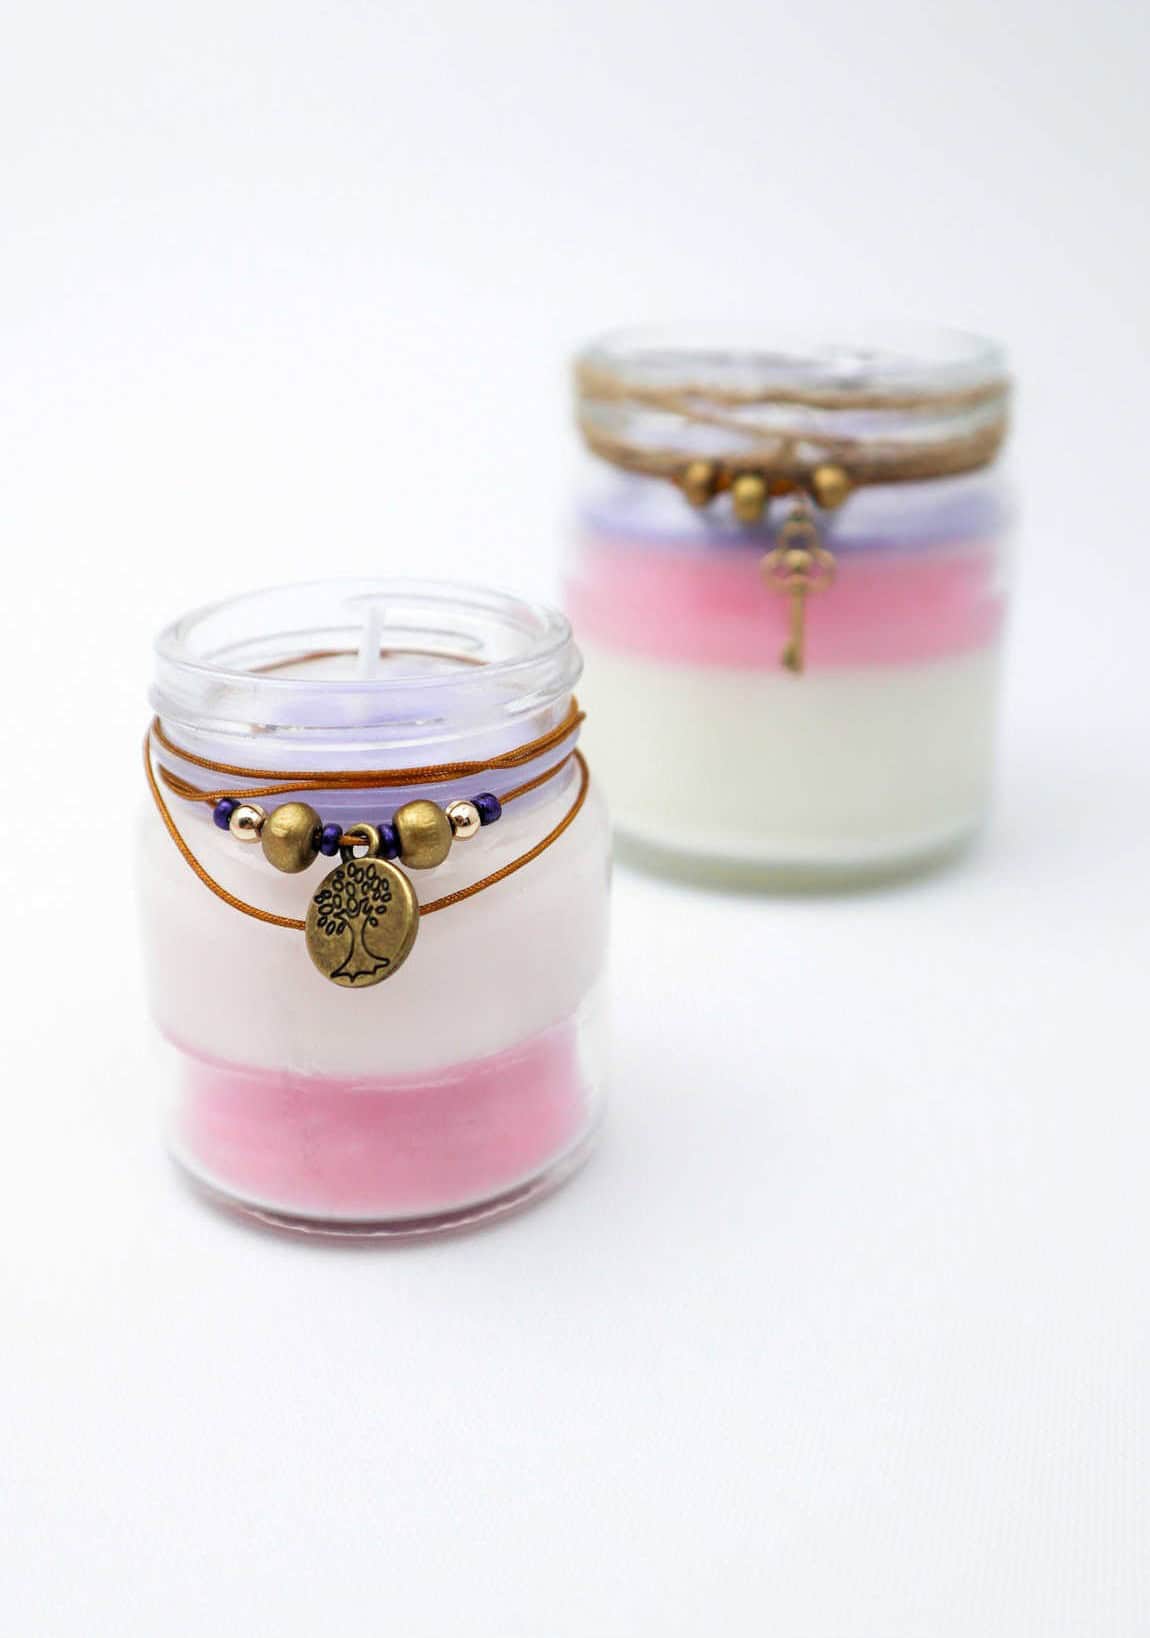
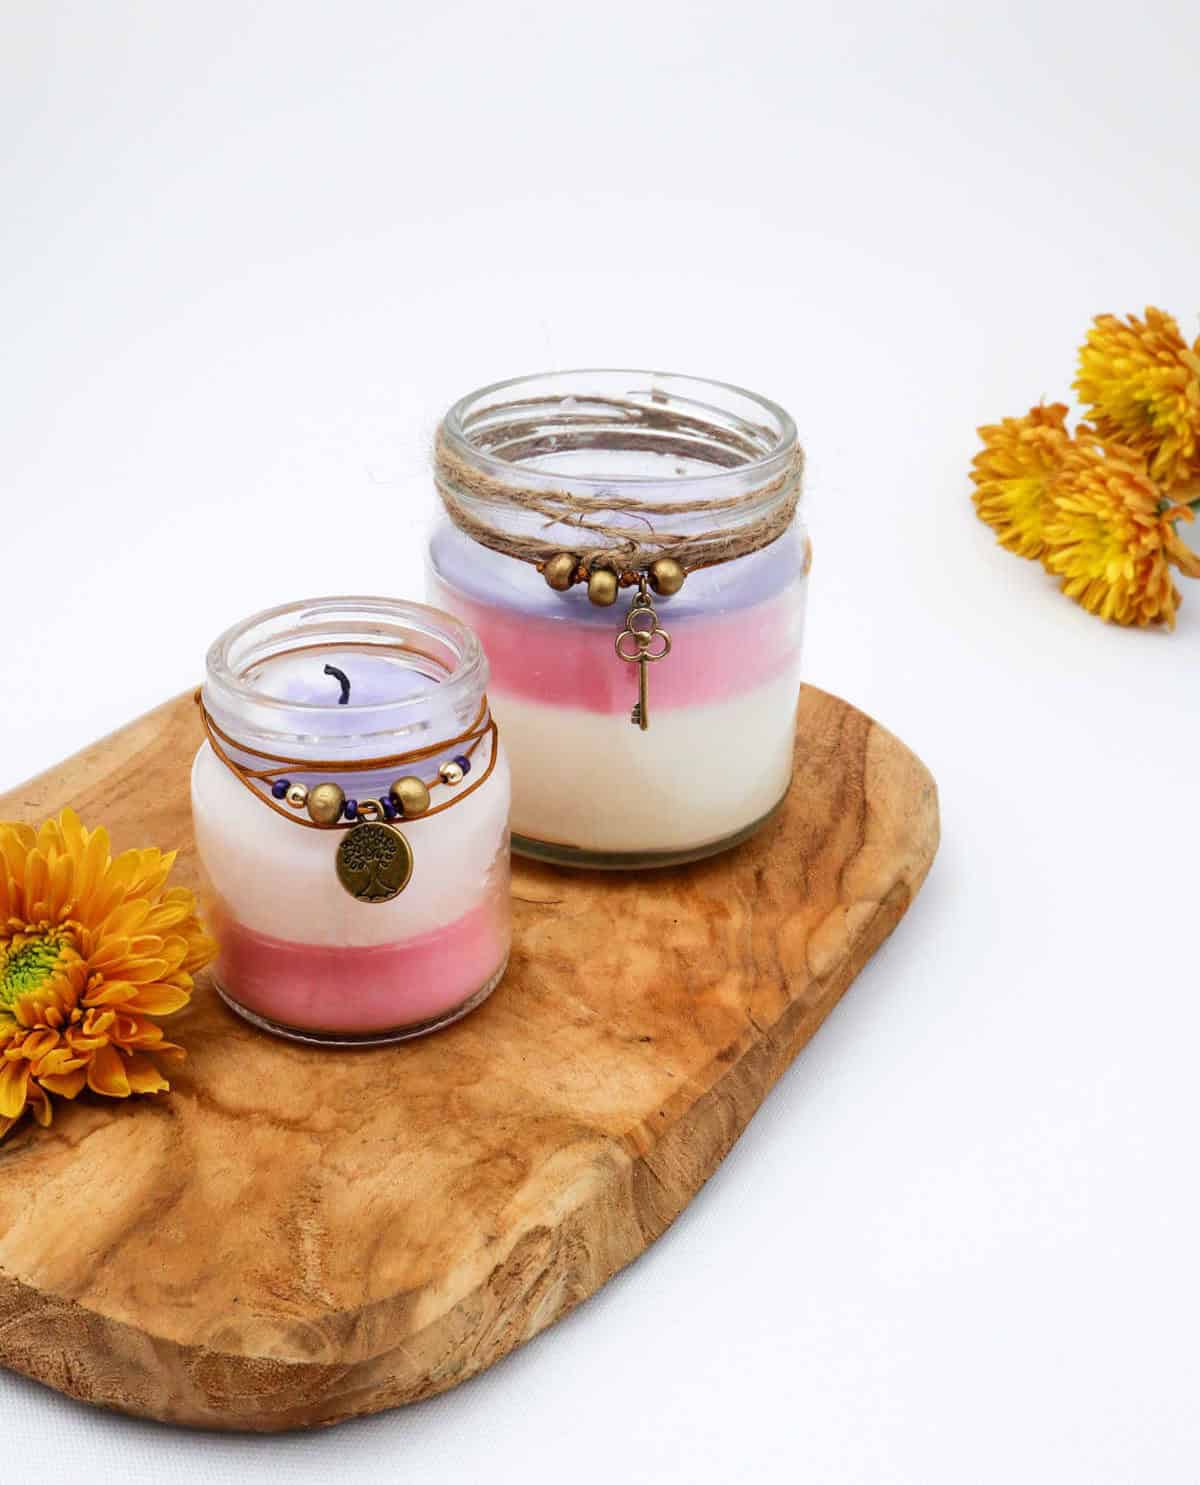
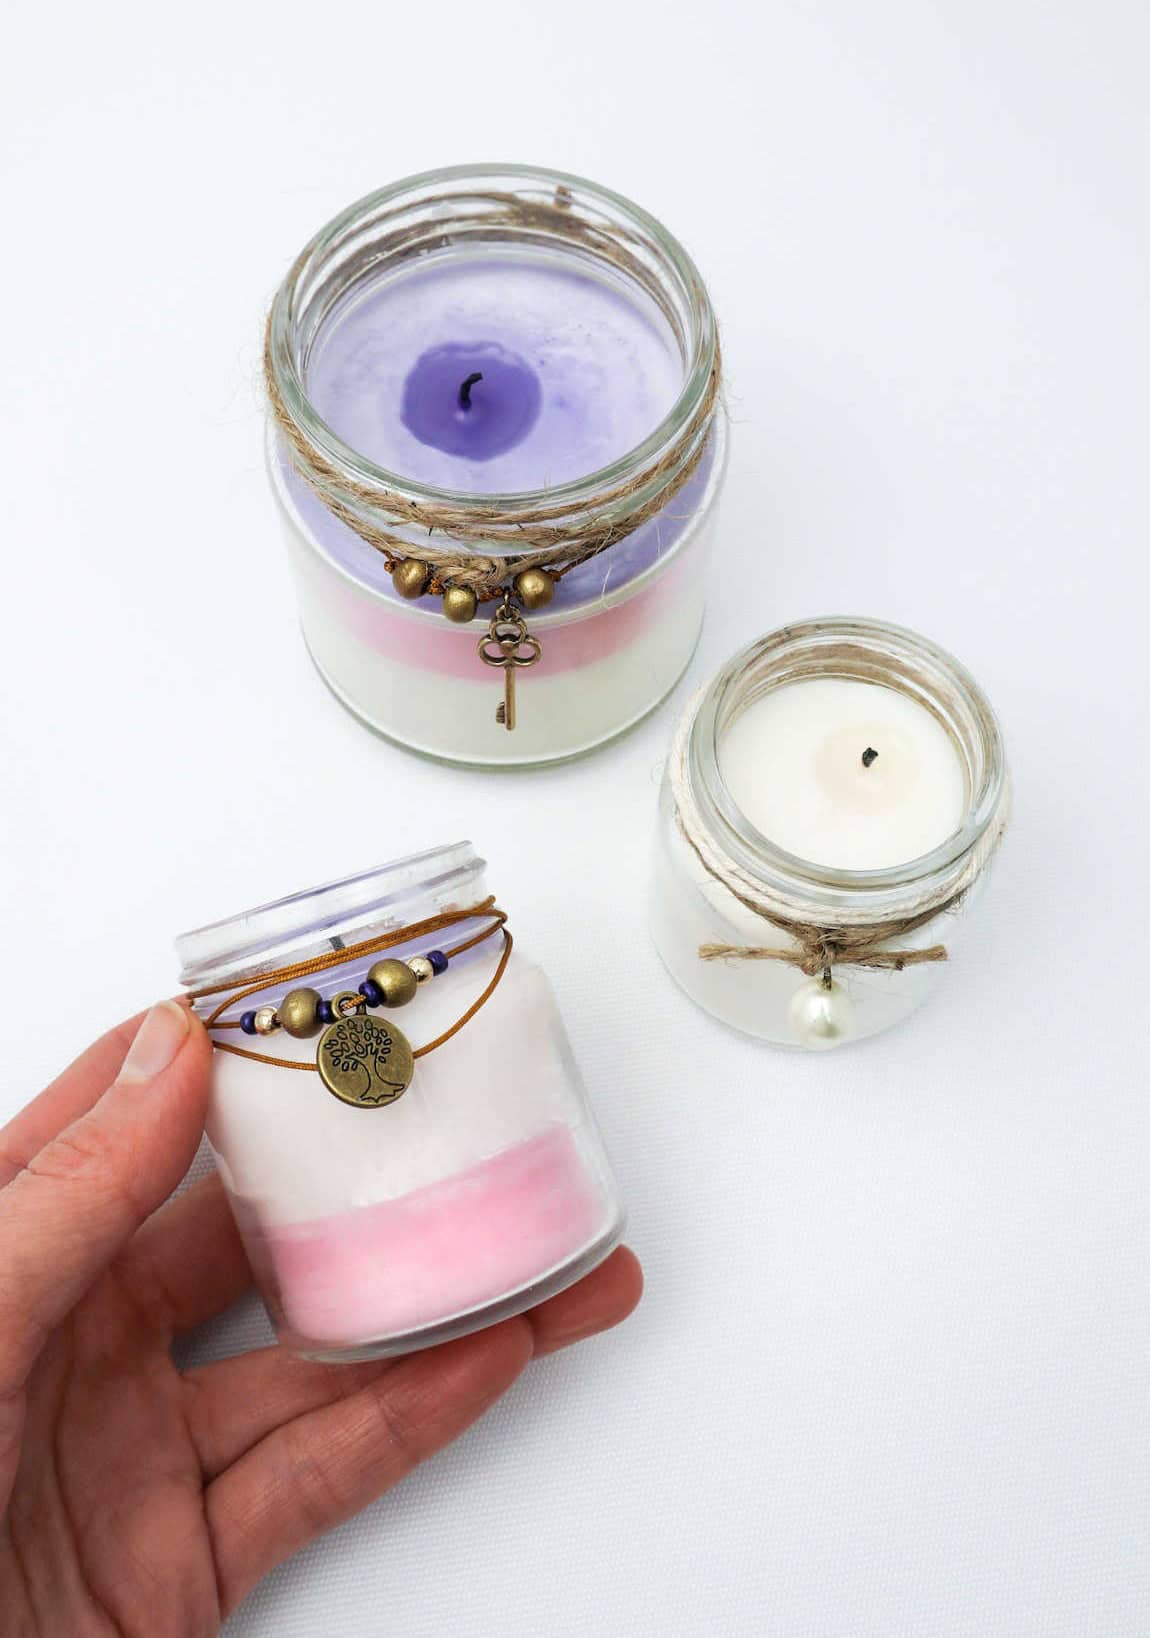
To give your DIY scented candle a personal touch, consider adding a natural accent with twine or jute. Simply wrap the material around the rim of the candle, creating a rustic and earthy vibe. You can also embellish the design by incorporating small beads, buttons, and charms to add an extra layer of visual interest. With these finishing touches in place, your homemade scented candle is now ready to be enjoyed – simply light it up and let the fragrance fill the air!
Is It Cheaper to Make Your Own Candles?
Creating your own DIY candles is not only a cost-effective alternative to purchasing them, but it also allows for customization with the essential oils of your choice. The basic materials required are wax, wick, and any desired fragrances – items that can be easily sourced from home or local retailers. To further reduce expenses, consider repurposing old mason jars as vessels for your handmade candles.
Not only will you save money on containers, but you’ll also be giving new life to otherwise discarded materials.
Types of Wax You Can Use for Candles
When selecting a wax for your candle, you’ll want to consider several factors before making a choice. The type of wax you use can greatly impact the overall quality and characteristics of your finished product. In this regard, understanding the different types of waxes available can help you make an informed decision. The most common type of wax is paraffin, which is often the most cost-effective option as well.
However, it’s worth noting that paraffin wax can have negative environmental impacts, making all-natural options a more appealing choice for many. Soy wax, made from soybean oil, is an excellent example of an all-natural wax. While it melts relatively easily and loses its shape, it makes sense to use it for candles in jars or containers rather than pillar or tapering candles. Beeswax is another popular option that meets the criteria for being natural and paraffin-free.
It can be used to create a wide range of candle styles, from jars to pillars and tapers. Palm wax offers a unique feature – it produces a crystal-like pattern on the surface of the candle. Typically, this type of wax is reserved for making votives, tapers, and pillars. Lastly, you’ll find other plant-based waxes like coconut, jojoba, candelilla, and carnauba that offer alternative options for your candle-making endeavors.
What Candle Wax Holds the Most Fragrance?
While paraffin wax is notorious for its ability to hold and throw off scents, it’s not without its drawbacks. Despite these concerns, paraffin remains a popular choice for scented candles due to its effectiveness in releasing fragrances. However, soy wax offers a more eco-friendly alternative that can still produce impressive scent throws.
By selecting the right type of oils to blend with soy wax, you can achieve similar results to those achieved with paraffin, providing a more sustainable option for your candle-making needs.
What is the Healthier Candle Wax?

When it comes to choosing a healthier alternative to paraffin wax, all-natural waxes are a great option. Not only do they produce fewer toxins, but they also emit less soot. The top contenders in this category include beeswax, soy wax, and palm wax, which are closely rivalled by coconut wax. While each of these options has its own unique benefits, the best one for you will ultimately depend on a range of factors, including cost, scent-holding capacity, and the desired shape or medium.
What Containers Can You Use for Candles?
When selecting containers for your wax candle, it’s crucial to prioritize heat-resistance. Not all glass or ceramic materials share this quality, so be sure to verify the heat resistance before making your final decision. For example, microwave- and oven-safe ceramic containers, heat-tolerant glassware, pressure canning jars, and cast-iron containers typically make excellent choices. On the other hand, plastic is a definite no-go.
If properly prepared and made, terracotta also emerges as a viable option for housing your wax candles.
Fragrances You Can Use for Candles
When selecting essential oils for your scented candles, it’s crucial to prioritize quality over cost. Artificial alternatives may seem like a more affordable option, but they can lead to unforeseen consequences. Instead, consider the following eight popular essential oils, each with its unique benefits and potential drawbacks:Lavender oil is often praised for its calming effects, promoting relaxation and natural sleep. However, excessive or prolonged use can cause headaches.
A balanced approach is key. Eucalyptus oil boasts a refreshing, earthy aroma that can effectively alleviate cold and sinus symptoms. It’s also used to soothe sore throats and manage allergies. Peppermint oil shares its minty freshness with lavender, offering rapid nasal decongestion and headache relief. A few candles infused with peppermint can work wonders for stress relief. Lemongrass oil has been shown to boost hemoglobin levels and alleviate muscle and joint pain.
Its earthy notes make it a popular choice for aromatherapy. Citrus scents like lemon, lime, and orange are not only pleasant but also possess natural air-purifying properties. Their invigorating aroma can uplift your mood and clear the air of unpleasant odors. Chamomile oil, much like herbal tea, soothes skin irritations, ulcers, and sores. Its calming effects also make it a popular choice for anxiety relief.
Other DIY Ideas You Might Like
Transforming ordinary objects into unique and valuable crafts is an art that can bring joy to both the maker and the buyer. Among the many creative options available, making and selling items from everyday materials like dollar stores and scrap fabric can be a lucrative venture. Here are some innovative ideas to get you started: start with a simple yet charming dollar tree lantern that can be customized to fit any theme or decor.
For a more rustic look, try crafting DIY rope coasters that add a touch of natural elegance to any room. If you’re looking for something more whimsical, consider creating DIY leaf candle holders that bring the outdoors in. Alternatively, you can create beautiful and functional projects using scrap fabric, such as 47 different ideas for scrap fabric crafts. Upcycling old or discarded materials is not only eco-friendly but also a great way to breathe new life into forgotten items.
Whether you’re a crafty teen looking for a fun project or an adult seeking a creative outlet, there are plenty of options to explore. With just a little creativity and some basic materials, the possibilities are endless.
How to Make Scented Candles
Creating homemade candles is a truly unique experience. Not only do you get to craft something with your own hands, but the end result is a one-of-a-kind scented candle that’s tailored to your personal preferences. And the best part? It’s surprisingly easy to make! With just 30 minutes of active time and an additional 15 minutes for preparation, you can whip up a batch of DIY candles that will leave your friends and family impressed.
So why not give it a try and take your candle-making skills to new heights?
Equipment
To keep your devices running smoothly without interruptions, it’s essential to prevent the screen from going dark. One way to achieve this is by using wooden skewers and scissors. Yes, you read that right! These simple tools can help you find a solution. For instance, if you’re working on a project or watching a video, using wooden skewers as a makeshift stand for your device can prevent it from going into sleep mode.
Similarly, you can use scissors to keep the screen lit by simply holding them close to the screen. Although these solutions might not be conventional, they work well in emergency situations when you’re away from a power source.
Materials
To craft a unique and personalized candle, you’ll need the following materials: a selection of Mason jars in various sizes, soy wax flakes as your primary wax source, lolly sticks for creating custom handle designs, essential oils for infusing your candles with distinct scents, candle dye to add color and character, high-quality wicks to ensure a smooth burn, jute twine for finishing touches, and finally, optional charms beads to add an extra layer of customization.
Instructions
First, ensure that your candle jar is spotless and dry. Then, use a craft stick or lollypop stick to stabilize the wick at its base, ensuring it rests snugly on the bottom of the container. Next, melt the wax by placing it in a heatproof glass bowl set over a saucepan of simmering water. This gentle heat will prevent the wax from burning or charring. As the wax melts, add a few drops of your preferred essential oil and stir well to eliminate any lumps that may form.
Once the wax is fully melted, carefully pour it into the jar, taking care not to dislodge the wick in the process. If you desire, you can also infuse the wax with a few drops of colored food dye for a personalized hue. Allow the wax to cool and solidify before trimming any excess wick material. Finally, embellish your DIY scented candle as desired with twine, charms, and ribbon, then enjoy its warm glow.