Transform household items into creative masterpieces with these toilet paper roll crafts for adults! If you’re looking to create a waste-free environment or save some cash, look no further. We’ve got over 40 DIY ideas that’ll keep you engaged and entertained. From crafting enthusiasts to those just looking for a unique activity, there’s something for everyone. And the best part? You can start making them today!
Whether you’re searching for inspiration or looking to join in on the fun, we’ve got you covered with our top picks.
Snowflakes
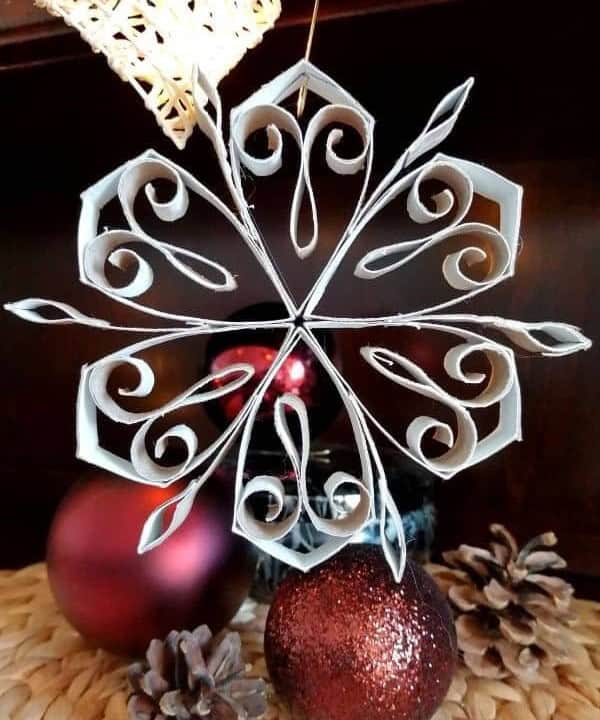
Are you longing for the magical atmosphere of snow outside your bedroom window? Bring that winter wonderland charm indoors with these unique toilet paper roll snowflakes! Not only are they ridiculously easy to make, but they’ll also stay frosty forever. To create these delightful tree ornaments, you’ll need a few simple materials: toilet paper rolls, scissors, pencils, a ruler, a hot glue gun, glue, paint, and any other decorative elements that catch your eye.
The key to success is preparing the rolls beforehand and then using them as templates to craft your snowflakes. With these sweet little ornaments, you’ll be able to enjoy the magic of snow all year round.
Fire Starters
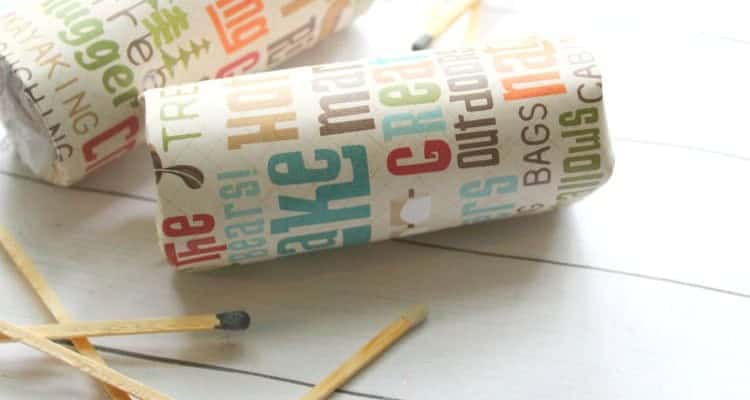
As summer approaches, many of us can’t wait to get outside and enjoy the great outdoors. What better way to celebrate the warmer weather than by creating some festive fire starters? These colorful creations are a camping season staple, and with just a few simple materials, you can create your own stunning color-changing fire starters.
To make these unique accessories, start by preparing the base material – toilet paper rolls.
Quarter fill each roll with dryer lint, then add a layer of tissue paper for extra texture. Next, insert a sealed campfire color changing packet and top it off with more dryer lint. Finally, wrap the roll in tissue paper or scrapbook paper to finish the look.
With these easy-to-make fire starters, you’ll be all set to enjoy your camping trip while adding a touch of whimsy to your outdoor gatherings.
Heart Wreath
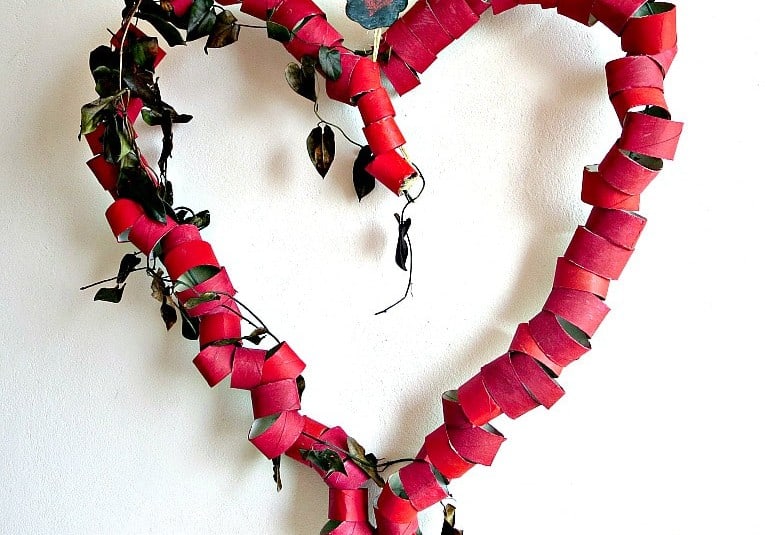
Show someone you care by turning everyday items into a thoughtful gift. A toilet roll heart wreath is an unexpected yet meaningful DIY project that requires just a few simple materials: toilet rolls, bendable wire, scissors, and paint. To get started, decorate and cut your toilet rolls to the desired size. Then, shape the wire into a heart form and string on your cut toilet rolls. Secure them with tape and voila! Your unique heart wreath is ready to be given as a token of appreciation.
Explore more creative projects that can be made and sold for inspiration.
Seedling Pots
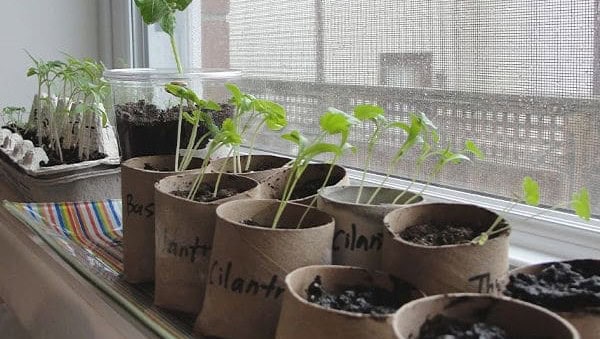
Revamping your green thumb has no expiration date, and what better way to start than crafting bespoke seedling pots from recycled toilet rolls? This eco-friendly endeavour offers a perfect blend of simplicity and sustainability. The only requirements are some toilet paper rolls and scissors – that’s it! Complete the setup by adding simple soil, seeds, and water. For an abundance of seeds, look no further than [link].
To create your mini greenhouse, make four even cuts in the toilet roll and fold them to form a cavity that will securely hold the soil. And just like that, you’re done! Simply fill the pots with a mix of soil and seeds, and watch your green thumb flourish.
Napkin Ring Place Holder
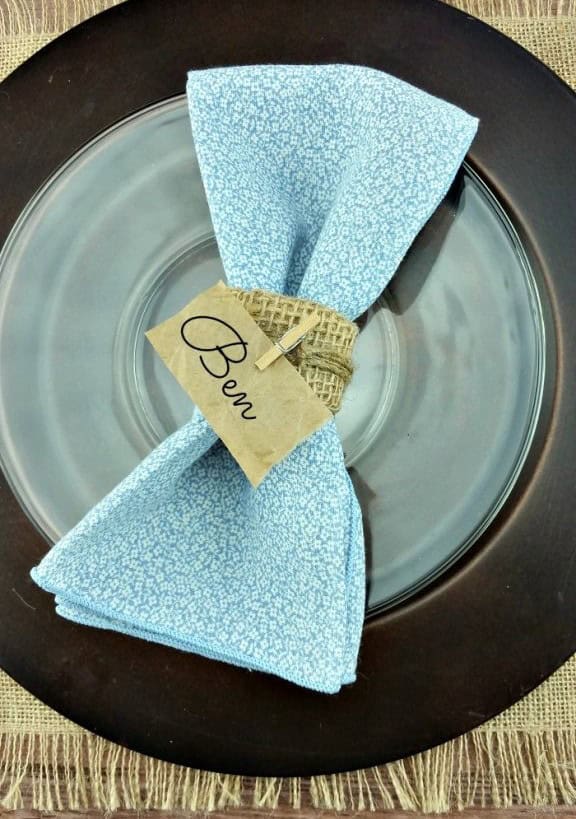
As the holiday season approaches, hosting gatherings becomes a top priority for many of us. Amidst the hustle and bustle, a thoughtful touch can make all the difference. One such detail is a personalized napkin ring place holder, which not only adds a personal flair to the evening but also makes each guest feel special. And the best part? Crafting one yourself is surprisingly easy!
With just a few basic materials – toilet paper rolls, twine, burlap, markers, scissors, and a hot glue gun – you can create unique place holders that reflect your personal style. If mini clothespins are not already stocked in your crafting arsenal, you can easily purchase them here. To get started, simply cut the toilet paper rolls and burlap pieces to the desired size, then wrap the latter around the former until fully covered.
Secure the burlap with a dab of hot glue before adding twine and name tags for a polished finish.
Pillow Boxes
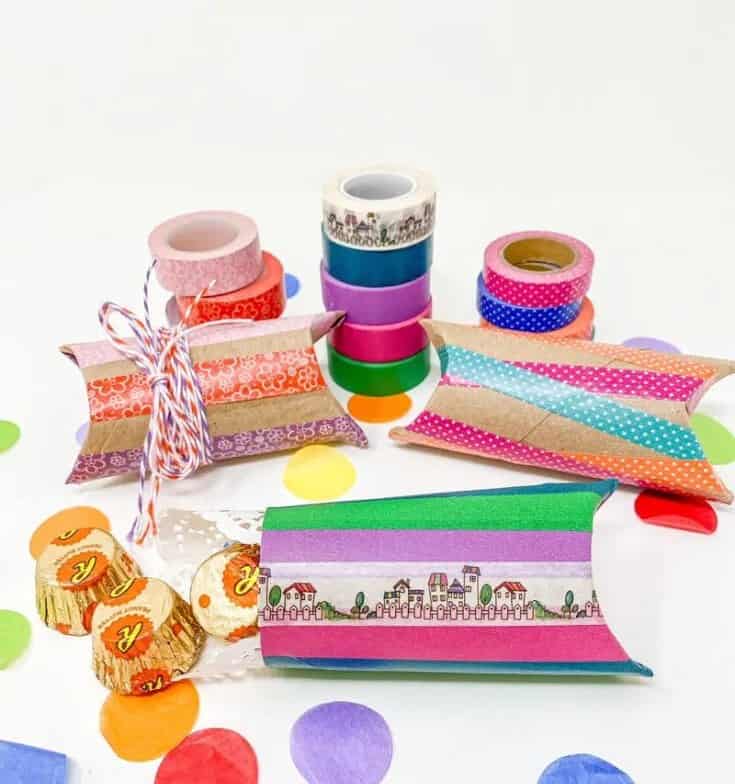
When planning a kids’ party or fundraiser event on a budget, pillow boxes filled with treats can be a thoughtful and cost-effective way to go. To create these charming containers, start by gathering empty toilet rolls, tape, and twine. Simply decorate your toilet roll to your liking, fold one end inward to form a closure, and fill it with your desired goodies. With minimal materials and some creativity, you’ll have beautifully wrapped treats to share without breaking the bank.
Bird Feeder
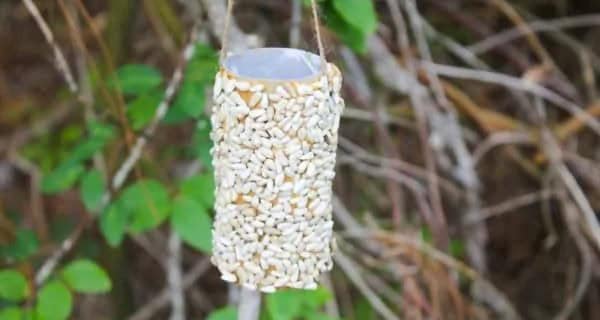
Bring a touch of nature to your backyard by attracting birds with their sweet songs and vibrant plumage. Not only do they add visual appeal, but their chirping melodies can create a harmonious atmosphere for relaxation or work. To create your own bird-friendly haven, start by upcycling toilet paper rolls into feeders. Simply punch holes on either side of the roll, then coat it with peanut butter and seeds. Secure the feeder with a knotted string and hang it from a branch or wooden pole.
Fill the space around your feeder with natural ingredients like birdseed or peanut butter for an added attraction.
Baseball Utensil Holder
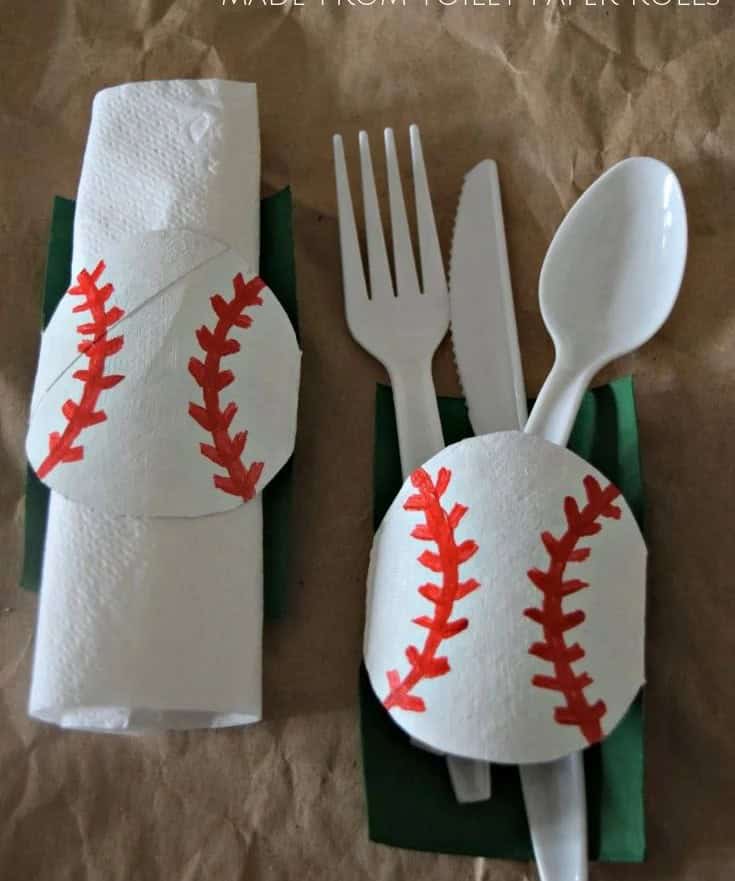
Create excitement for the upcoming baseball season by crafting unique utensil holders with family fun in mind. To get started, gather a few simple materials: toilet paper rolls, acrylic paints, paintbrushes, scissors, and a pencil. Flatten your toilet paper rolls by pressing down on them, then draw baseball designs, carefully cutting around the edges to preserve the circular shape.
Add some colorful flair with paint, and you’ll have an array of whimsical holders ready for your next baseball gathering.
Cherry Blossom Wall Art
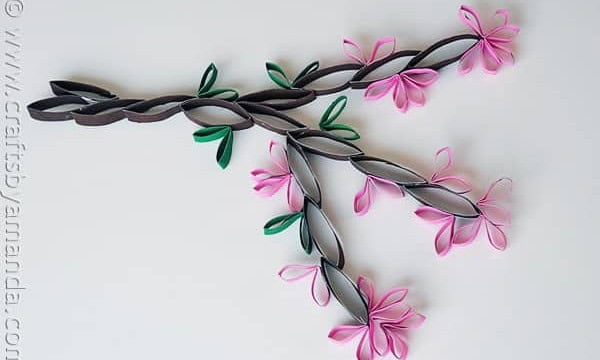
Indulge in the serenity of blooming beauty by crafting a stunning cherry blossom wall art. Gather an assortment of materials – empty toilet rolls, paint, staples, and tape – to create a vibrant piece that brings a touch of springtime elegance to your space. As you work on this project, envision the warmth and coziness it will bring to your home.
Mandala
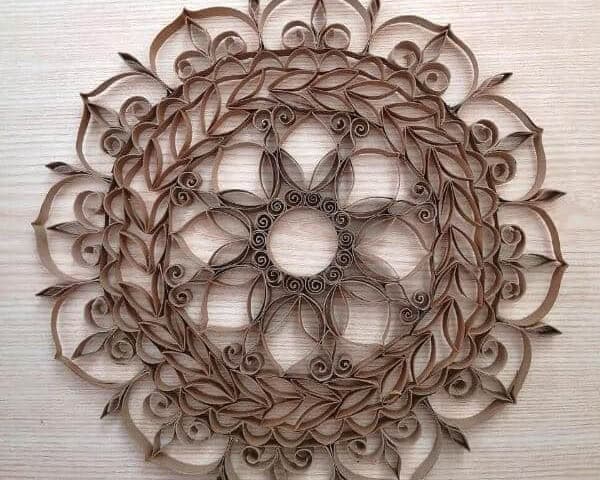
Embracing the no-waste philosophy, you’ve likely accumulated a stash of empty toilet rolls at home. But instead of discarding them, why not repurpose them as a creative outlet for your mandala art? These intricate designs can add a touch of elegance to any space. To get started, gather your materials: toilet rolls, scissors, pliers, ruler, pencil, glue gun, stapler, and an empty gift wrap roll. Begin by cutting and shaping your mandala pieces using the pliers to give them a pointed appearance.
Once you’re satisfied with their shape, use the glue gun to assemble the pieces, layering them until your design is complete.
Santa Napkin Ring
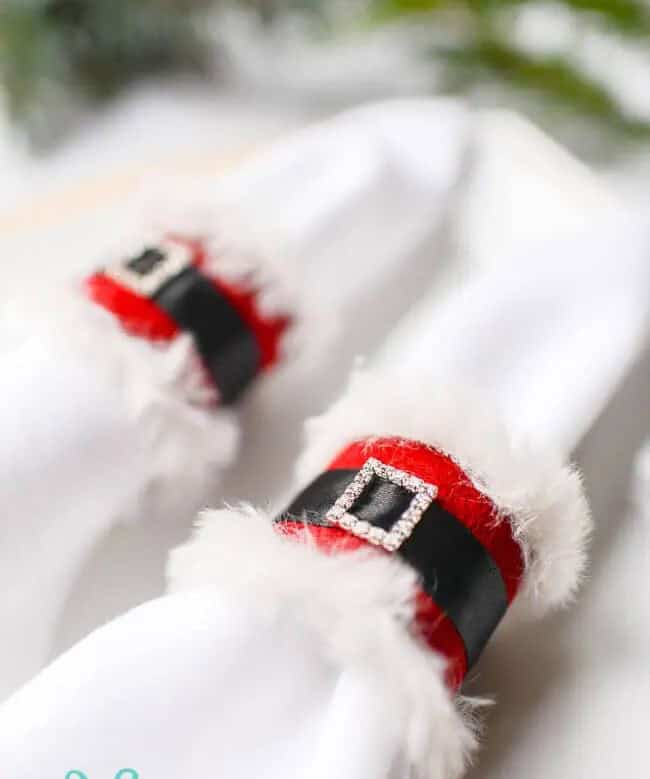
Embracing the holiday spirit is all about creating memories with loved ones. One fun way to do this is by crafting together as a family. A great project for this time of year is making Santa napkin rings that are sure to bring joy to everyone involved. To get started, gather some basic supplies like toilet paper rolls, red felt, black ribbon, ribbon buckles, fuzzy white yarn, and hot glue. You can easily find the necessary ribbon buckles online or in craft stores.
Begin by cutting the felt into the desired shapes for Santa’s suit. Then, use hot glue to attach each piece to a toilet paper roll, gradually building up the layers until you have a complete napkin ring that resembles Santa’s iconic attire. This project is an excellent way to bond with family members of all ages and create lasting holiday memories.
Christmas Stars
Transform your home into a winter wonderland by creating DIY Christmas stars that will bring joy and sparkle to any room! To get started, gather essential materials like empty toilet rolls, paint, glue, and a cord. With these basics, you’ll be well on your way to crafting unique and festive decorations.
Begin by painting the toilet rolls in your favorite colors or holiday hues. Once dry, cut them into smaller pieces, carefully shaping each piece into a pointed tip.
Assemble the star shapes by gluing the pieces together, allowing them to dry completely before displaying them proudly.
Fake Halloween Candles
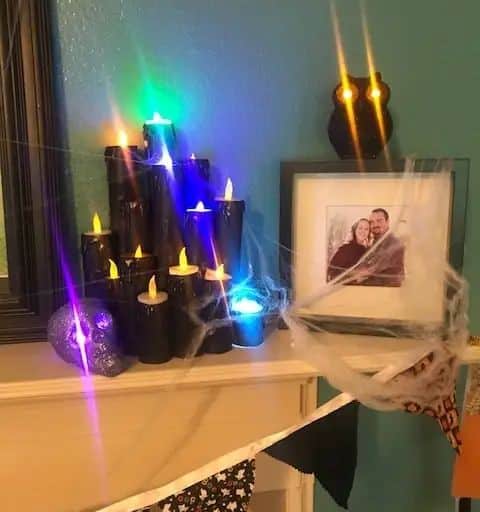
Transform your home into a haunted haven this Halloween with an eerie ambiance courtesy of these DIY fake candles. To create this spooky setting, gather a few simple materials: toilet paper rolls, duct tape, a hot glue gun, tea lights, and spray paint. Begin by shaping the toilet paper rolls into varying sizes to resemble candle clusters. Secure them together using duct tape until you achieve your desired arrangement.
Next, use the hot glue gun to create a drippy wax effect around the edges of each candle, adding an extra layer of realism. Finally, give the candles a coat of spray paint and insert tea lights for an authentic glow. With these fake Halloween candles, you’ll be sure to cast a spell on your guests this All Hallows’ Eve.
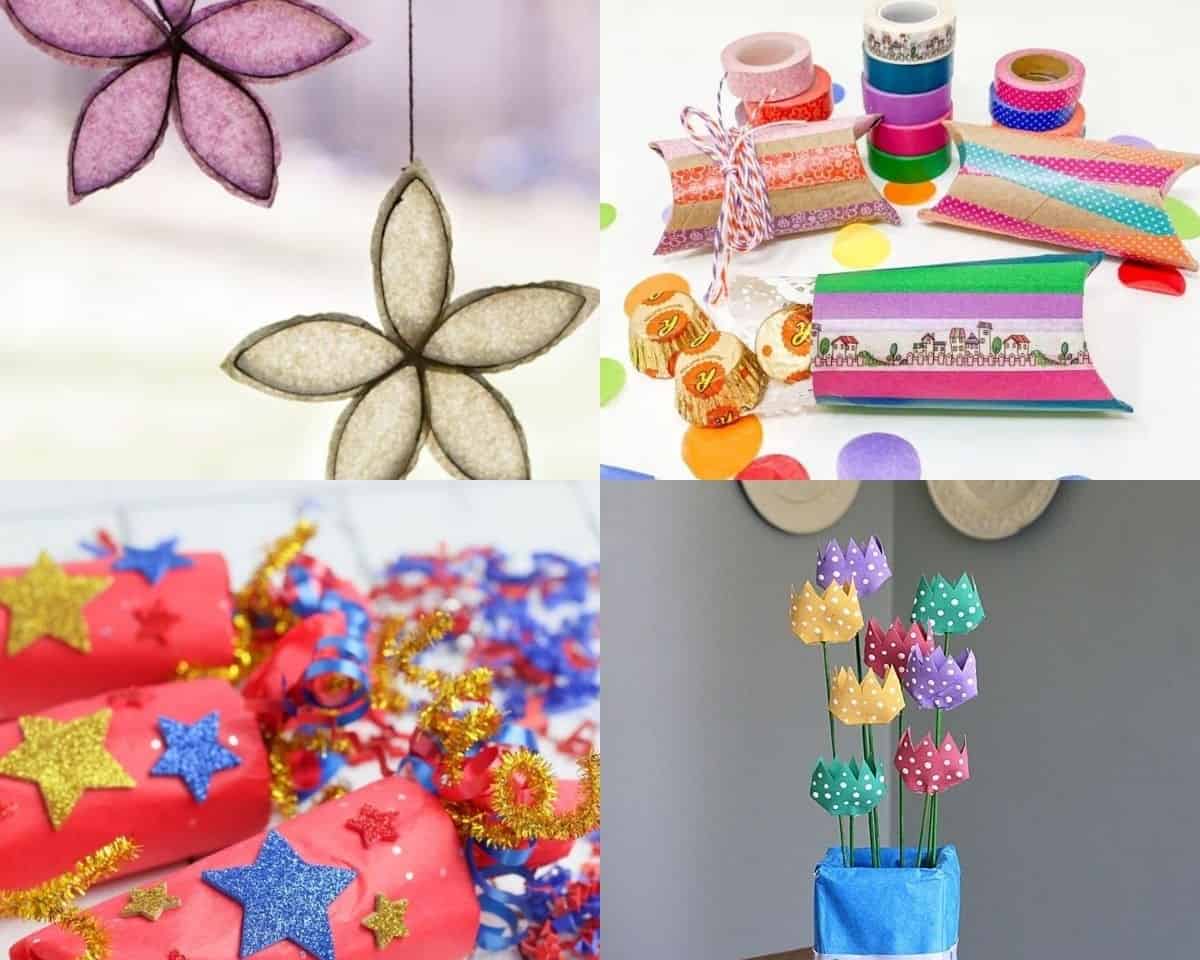
Confetti Poppers
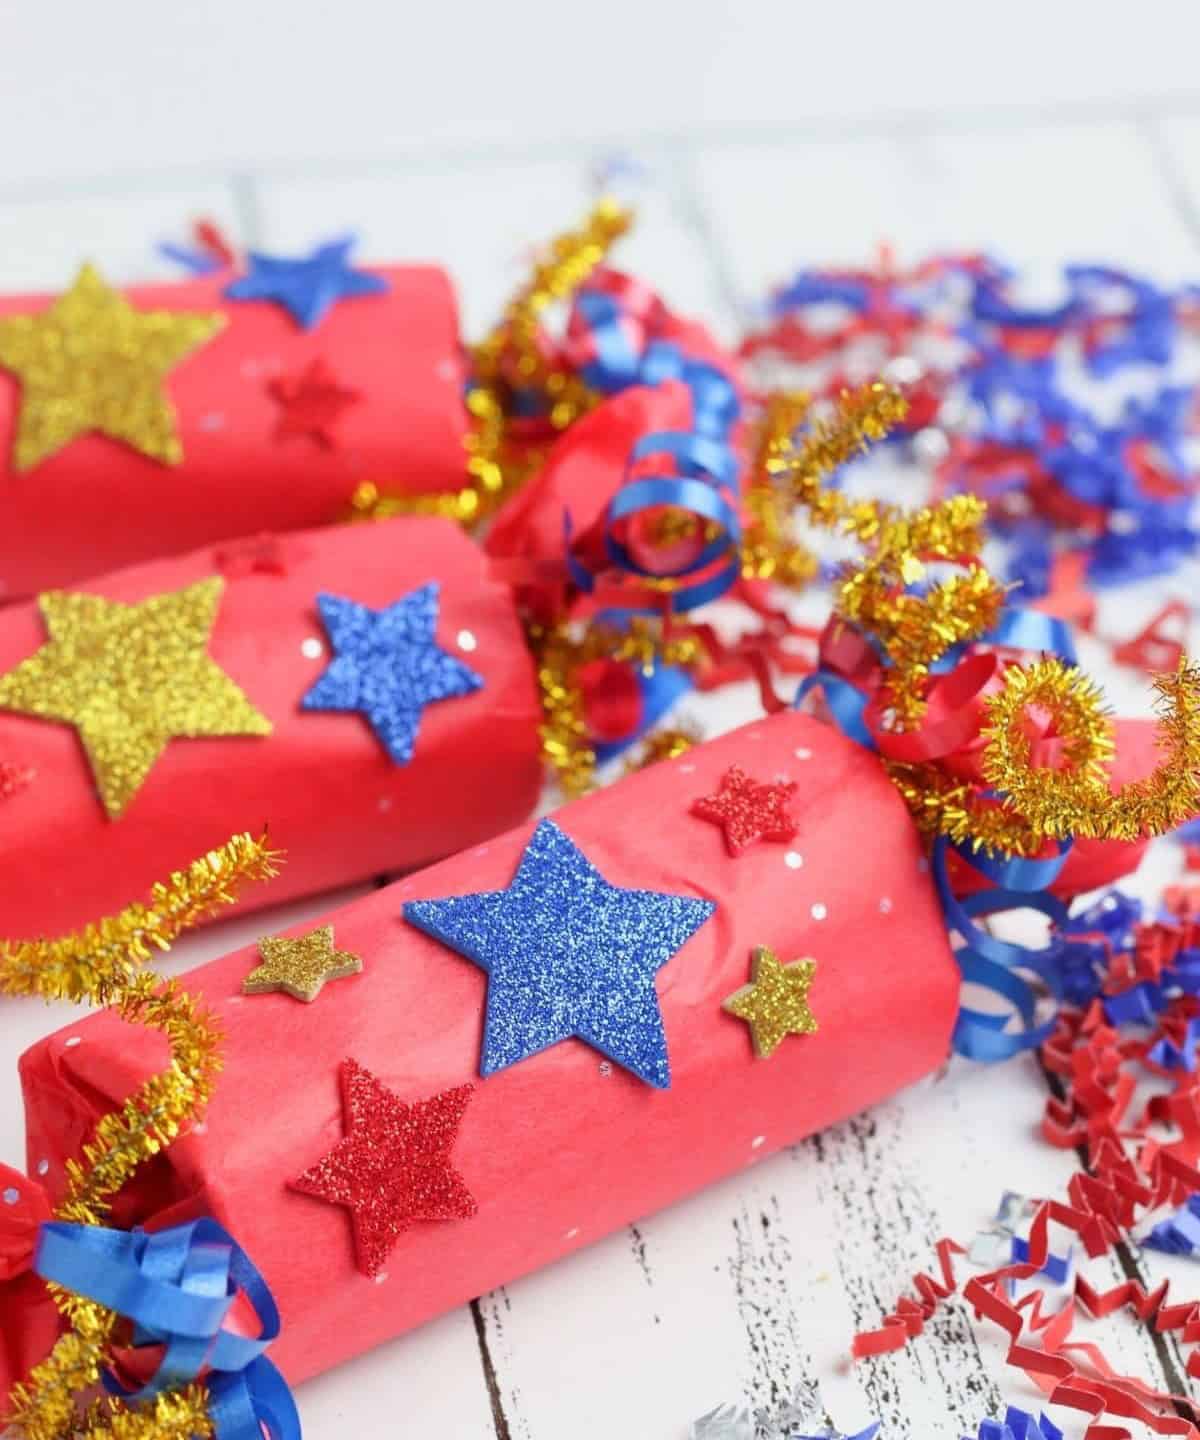
Celebrate Independence Day with a fun and creative twist! Toilet roll crafts are perfect for any season, including the 4th of July. Bring out the patriotic colors by making these confetti poppers that will add excitement to your holiday celebrations! To get started, you’ll need some basic materials: colored tissue paper, paper confetti, ribbon, pipe cleaners, and star stickers. Begin by wrapping the toilet roll with tissue paper, securing it with a dash of glue.
Next, fill the popper with items of your choice – this is where you can add your personal touch! Tie ribbons around either end to give it a finishing touch, and top it off with sparkly pipe cleaners and star stickers for an extra pop of color and excitement. With these DIY confetti poppers, you’ll be ready to ring in the 4th of July in style!
Fairy Lights
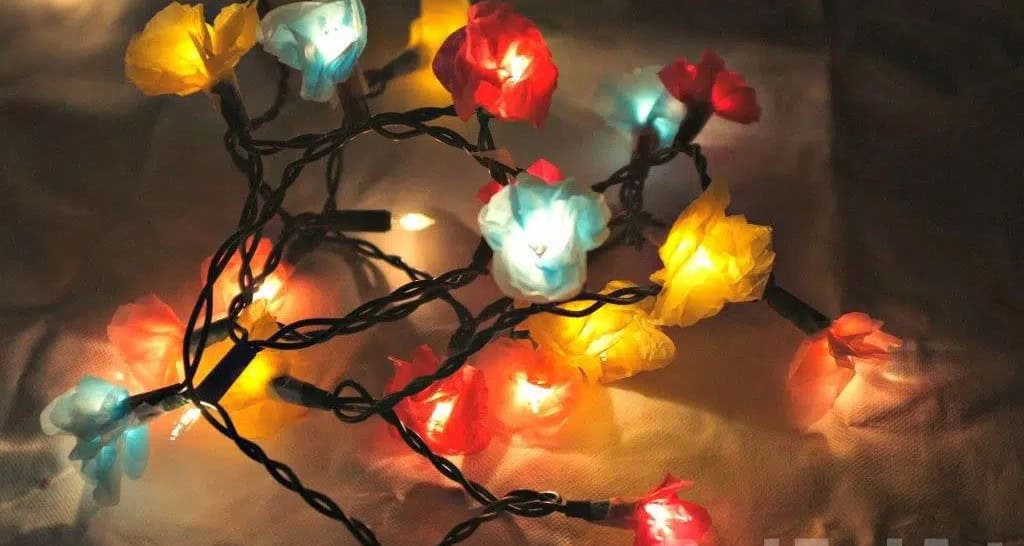
Transform any room into an enchanting space with the magic of DIY fairy lights! I’m a firm believer that these twinkling beauties can instantly lift my mood, which is why they’re a staple in my bedroom. And the best part? You can create your own at home with just a few simple materials. To get started, gather empty toilet rolls, LED fairy lights, tissue paper, scissors, and tape. Begin by crafting flowers out of tissue paper and inserting an LED light into the center of each one.
Repeat this process for all the LEDs on a string to prepare your very own homemade flower fairy lights. For more creative DIY projects that will make you sparkle, check them out!
Advent Calendar
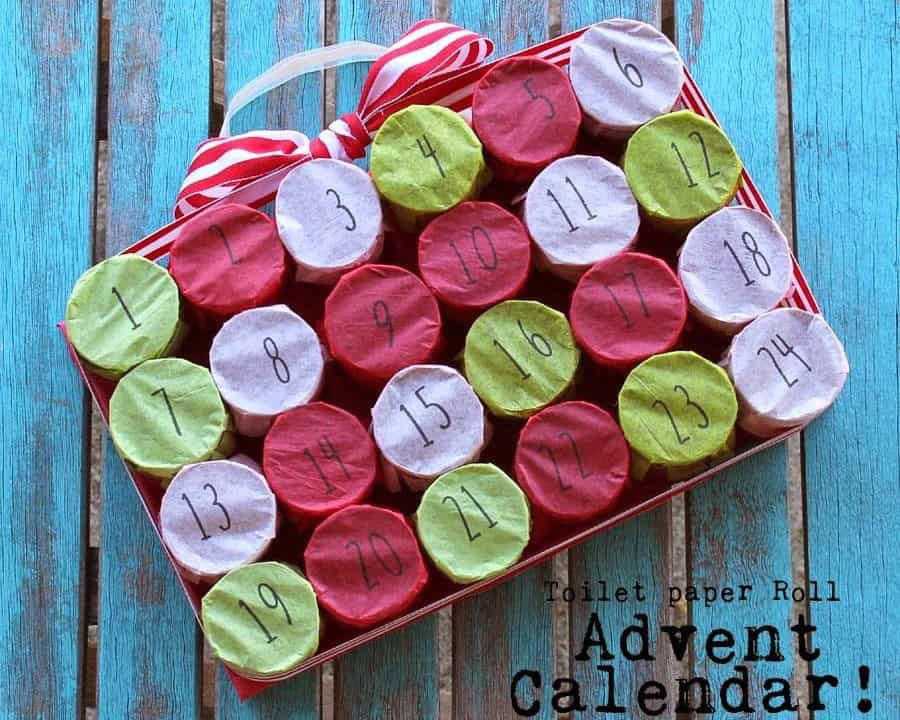
Crafting a personalized advent calendar at home is an exciting way to build anticipation for Christmas. While buying one can be enjoyable, creating your own offers an added layer of satisfaction. To start, consider what themes or activities you want to include in each day’s surprise. Then, gather the necessary materials such as toilet paper rolls, construction paper, ribbon, number stamps, elastic bands, tissue paper, cardboard, and hot glue.
You can also add personal touches like fillers, small toys, or candies. Just be sure to keep the calendar out of reach from curious kids until you’re ready for them to start counting down!
Chinese Lanterns
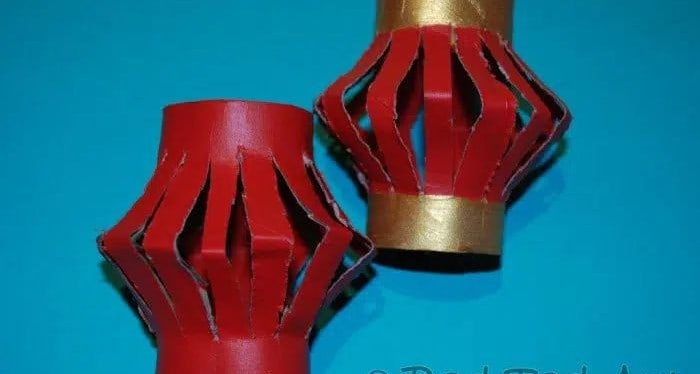
As the Chinese New Year approaches, bring in a touch of prosperity and reunion with these easy-to-make Chinese lanterns. To get started, gather toilet rolls, red and gold paint, scissors, red ribbon, and staples. Once you have your supplies, follow these simple steps. First, give the toilet rolls a vibrant makeover by painting them red and gold. This will add a pop of color to your finished lanterns. Next, use scissors to carefully cut slits into each roll, creating the iconic lantern shape.
Finally, secure the red ribbon around the top of each lantern with staples, and you’ll have beautifully crafted Chinese lanterns ready to adorn your home or gift to loved ones.
Pumpkin Lantern

This Halloween season, elevate your spooky celebrations with a simple yet creative DIY project: making pumpkin lanterns! This fun activity is perfect for families to enjoy together, and you’ll be rewarded with oohs and ahhs from friends and neighbors alike. To get started, gather the following materials: empty toilet paper rolls, orange and green construction paper, black markers, a ruler, pencil, scissors, and glue stick.
Begin by wrapping the orange paper around your toilet paper roll, then use the black markers to draw a jack-o-lantern face on the orange paper. Cut the paper into strips, leaving the ends attached to create a lantern-like effect.
Next, add green paper accents to the ends of the lantern and fashion a handle from the same material, securing it with glue for a sturdy finish.
Flower Vase
As the arrival of spring brings an influx of joy, it’s no surprise that Easter is just around the corner. The combination of chocolates and nature’s vibrant colors creates a perfect storm of happiness. And what better way to share that joy with loved ones than by bringing it to your table? One creative way to do so is by crafting a unique candy mason jar flower vase.
To get started, you’ll need a few simple materials: a mason jar, an empty toilet roll, a variety of candies (feel free to explore some inspiration here), wire-edged ribbon, and silk flowers. Once you have these items in hand, the process is surprisingly straightforward. Simply insert the toilet roll into the mason jar, fill the remaining space with candy, wrap the ribbon around the rim of the jar, and finish by adding your preferred choice of flowers.
With these easy steps, you’ll be enjoying the fruits of your labor in no time.
Christmas Tree Topper
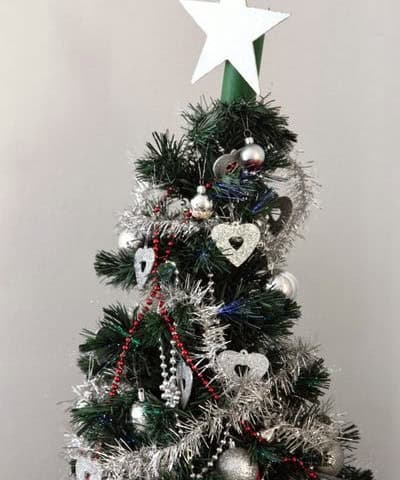
When it comes to choosing the perfect Christmas tree topper, many of us can relate to feeling overwhelmed. After all, we want our tree to shine and make a beautiful statement in our home. This year, why not take a creative approach and create your own unique tree topper? Not only will it be an affordable and fun DIY project, but it’ll also become a cherished memory you can look back on with family and friends.
To get started, gather the following supplies: empty toilet paper rolls, tweezers, glitter, scissors, a pencil, and paint. With these simple materials, you’ll be well on your way to crafting a one-of-a-kind tree topper that reflects your personal style and adds an extra touch of magic to your holiday decorations.
Planter
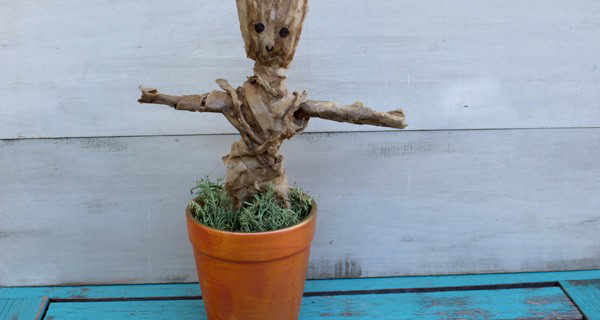
Bring a touch of Marvel magic into your home with this adorable Baby Groot Planter. The best part? It’s surprisingly easy to make! Start by gathering the necessary materials: toilet rolls, plant pot, soil filler, chia seeds, glue, and planter filler. Next, soak the toilet roll in water until it becomes pliable, then shape the pieces into the iconic Baby Groot figure. Apply a layer of glue to the entire body and allow it to air dry or bake in the oven for a few minutes.
Once dry, carefully place your new Groot planter into its container, adding a dash of peanut butter and chia seeds to his head and arms to complete the look.
Shamrock Card

Add some Irish charm to your St. Patrick’s Day celebrations with this delightful Shamrock quilling card craft! Not only will you have a blast creating it, but the end result is truly stunning. To get started, gather your materials: cards, rainbow paper, toilet rolls, green paper, toothpicks, scissors, and glue. Once you have everything in place, begin by cutting out the outline of a Shamrock from the toilet roll and attaching it to your card. Next, take your green paper and cut it into strips.
Quill each strip into curled circles and then stick them onto the card, gradually filling in the Shamrock shape as you go. Continue this process until your shamrock is complete, and voila! Your quilling card is ready to spread some luck on St. Patrick’s Day.
Chinese New Year Firecracker
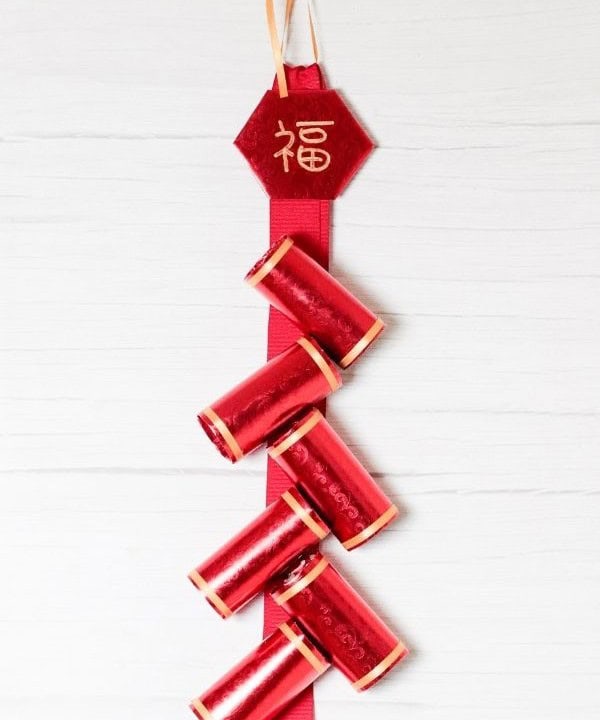
Celebrate Chinese New Year with a fun and creative twist! Gather the following materials: toilet rolls, red wrapping paper, construction paper, scotch tape, gold and red ribbon, glue, scissors, a pencil, and a Chinese character template. To create these DIY firecrackers, start by wrapping each toilet roll in red wrapping paper, cutting and folding the ends to secure it, then add a touch of gold with the ribbon.
Arrange the rolls on construction paper, securing them with glue, and top it off with a Chinese character from your template. With these easy steps, you’ll have a festive firecracker to ring in the new year with your family.
Cinco de Mayo Pinata
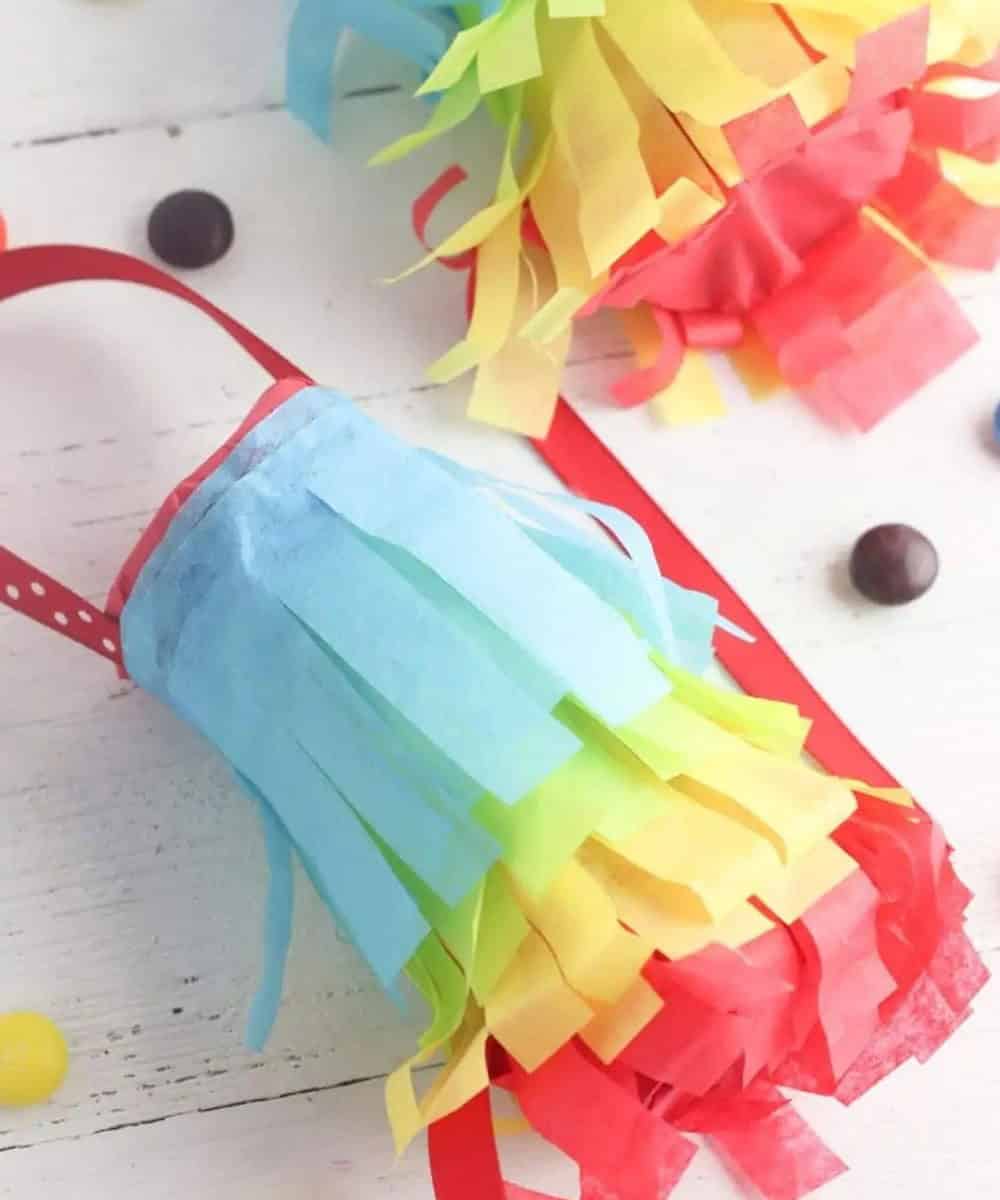
Celebrate Cinco de Mayo in style by creating your own make-at-home pinatas! This fun and easy DIY project adds a personal touch to your fiesta. To get started, gather some essential supplies: toilet rolls, ribbon, rainbow tissue paper, candy, and glue. For the perfect treat selection, check out this [candy recommendation](insert link here) for inspiration. First, wrap your tissue paper around the toilet roll, cutting the attached strips into a frilly design.
Fill the tube with candy, then seal it from the sides and attach a ribbon handle to the top. Voila! Your very own Cinco de Mayo pinatas are ready to burst with fun and excitement.
Gift Card Holder
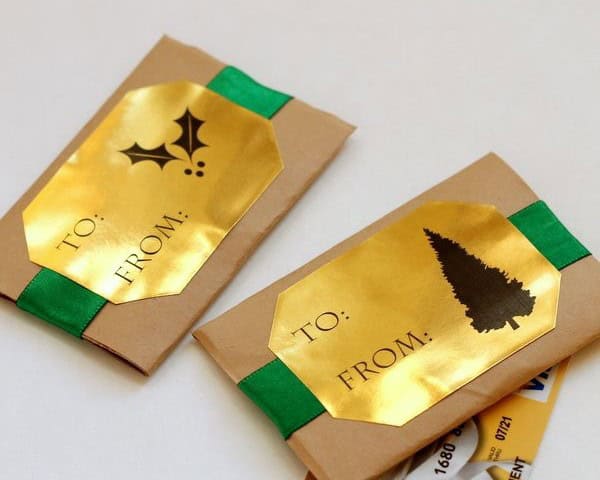
Gift-giving during the holiday season can be overwhelming, making gift cards a popular choice. However, they may come across as impersonal. This is where a handmade gift card holder can make a thoughtful difference.
To create this unique and personalized gift, gather some essential materials: toilet paper rolls, kraft paper, gold foil, ribbon, tape, and customizable gift label printouts. Begin by flattening the toilet paper rolls and wrapping them in kraft paper.
Place your gift card inside before adding a decorative ribbon wrap and securing it with tape.
Take it to the next level by attaching a gold foil label on top, accompanied by a heartfelt note expressing your thoughtfulness. With these simple steps, you’ll transform an ordinary gift card into a one-of-a-kind present that shows you care.
Cat Toy
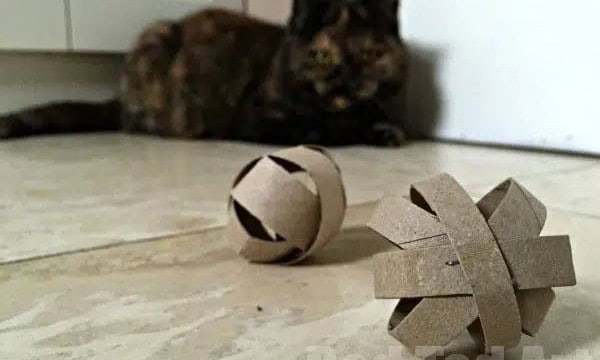
As a feline enthusiast, I’m sure you’re well aware of the perils that many store-bought toys pose to our beloved pets’ well-being. Fortunately, creating your own cat toys at home is not only a fun and creative outlet but also a way to ensure your kitty’s safety. So, let’s get started! Simply gather some basic supplies: toilet paper rolls, scissors, and glue – that’s it! Next, take those toilet paper rolls and cut them into rings.
Arrange the rings on top of each other, securing them with glue as you go, until you’ve formed a ball shape that your cat will adore.
Desk Organizer
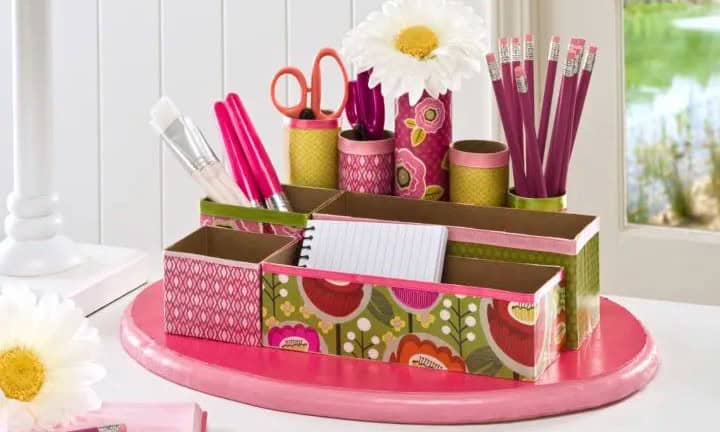
If you’re tired of dealing with cluttered workspaces and lost stationery, fear not! A toilet roll desk organizer is just the solution you need. This DIY project requires a few simple materials: cereal boxes, toilet paper rolls, wooden plaques, mod podge satin, acrylic paint, scrapbook paper, ribbons, glue, and tape. To get started, cut and shape your compartments to fit your desired size and secure them with tape. Next, give the pieces a pop of color with some acrylic paint and plaque finishes.
Then, apply layers of satin and scrapbook paper to add texture and visual interest. Finally, top it all off with a ribbon and let it dry before placing your stationery inside. With this clever organizer, you’ll be able to keep your desk tidy and find what you need in no time.
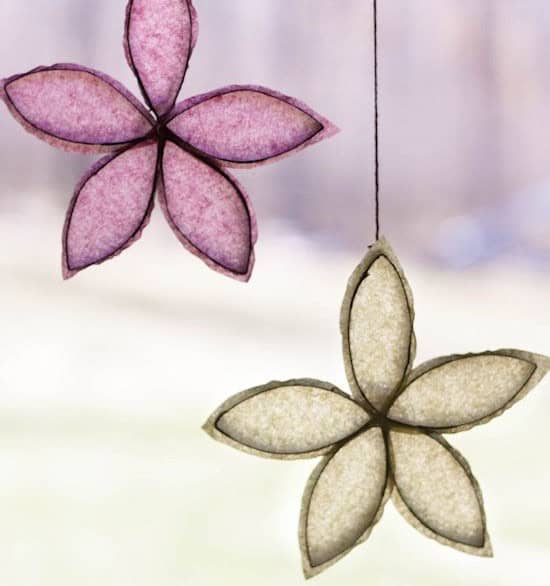
Springtime Flowers
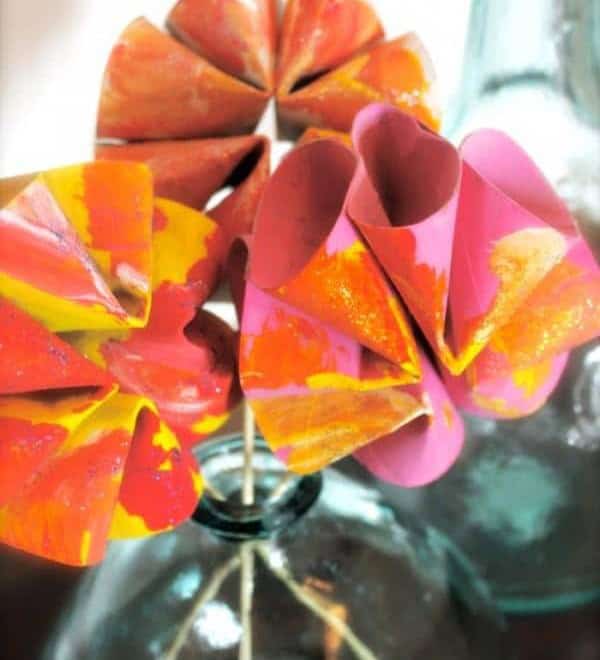
Envision a bouquet of vibrant flowers that remain radiant and lush forever. It’s a fantasy come true! To bring this vision to life, gather some unexpected materials: toilet paper rolls, a stapler, wooden skewers, and a stash of creative embellishments like paints and glitter. Begin by folding each toilet roll in half and securing it with staples to maintain its shape. Then, join four such units together to form a circular flower using your trusty stapler.
Once you’ve crafted the base of your blooms, get creative and decorate them with flair. Simply push a skewer through the center of each flower once they’re fully decorated, and voilà! Your perpetual springtime flowers are ready to brighten up any space.
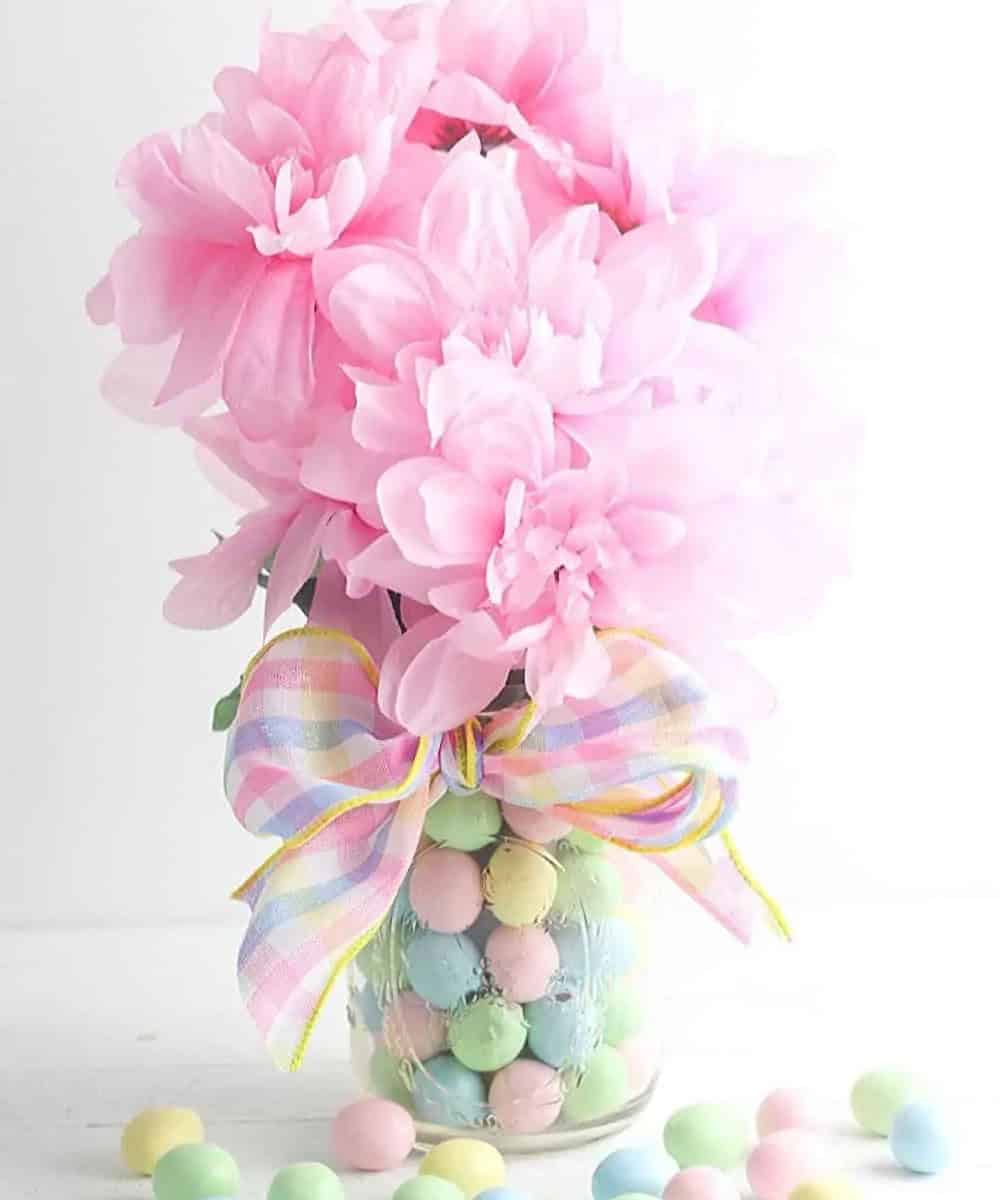
Easter Candy Vase
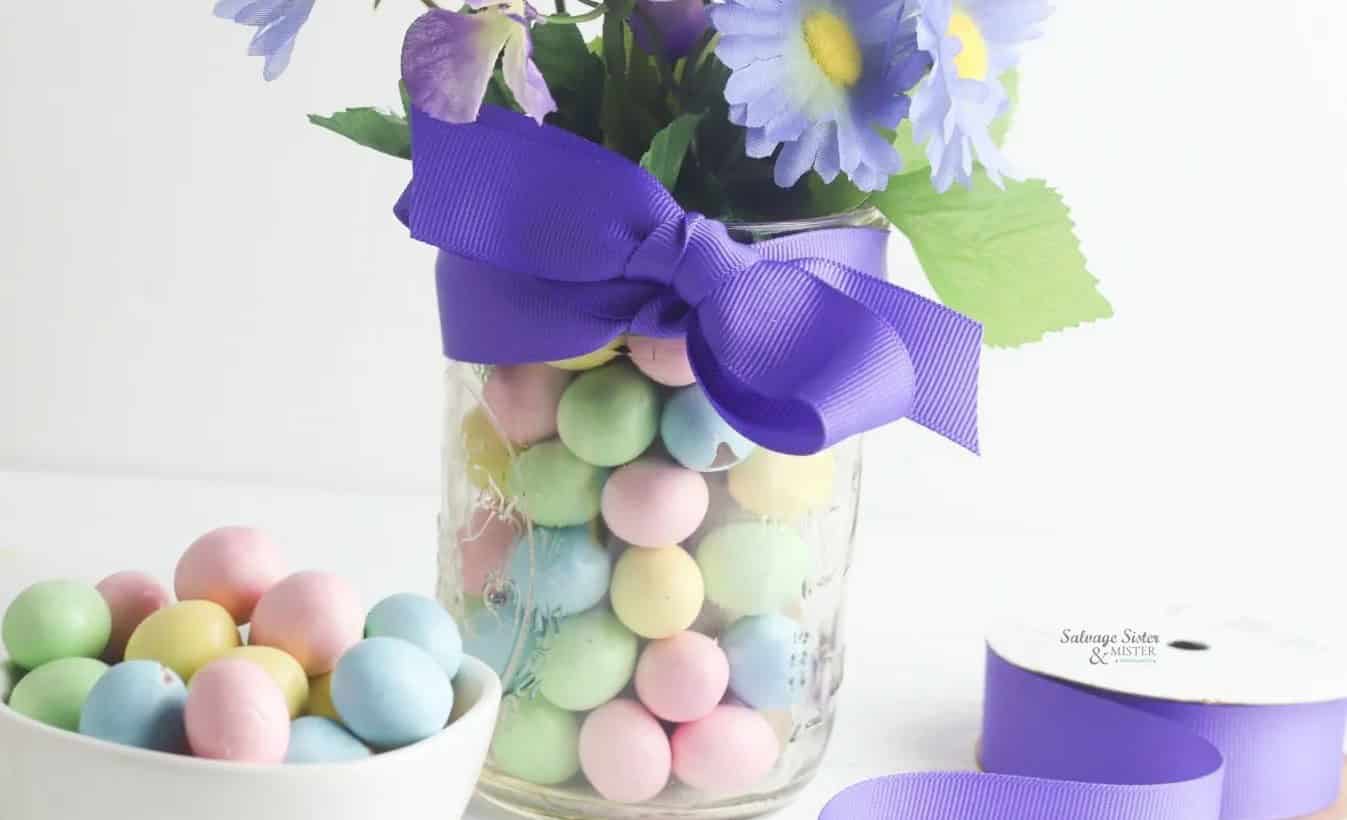
Easter celebrations are a time to cherish loved ones, indulge in sweet treats, and surround ourselves with vibrant blooms. This delightful DIY project combines these elements beautifully. To create this charming Easter candy vase, you’ll need just a few simple materials: a mason jar, toilet paper rolls, an assortment of candies, some ribbon, and a bit of glue. Begin by arranging the toilet paper rolls within the jar, followed by a generous helping of your favorite candies.
Next, wrap the ribbon elegantly around the jar’s edge, allowing it to gently overlap as you secure it with a dab of glue. Finally, fill the jar’s opening with an assortment of flowers or greenery to create a stunning centerpiece that’s sure to delight both kids and adults alike.
Tulips
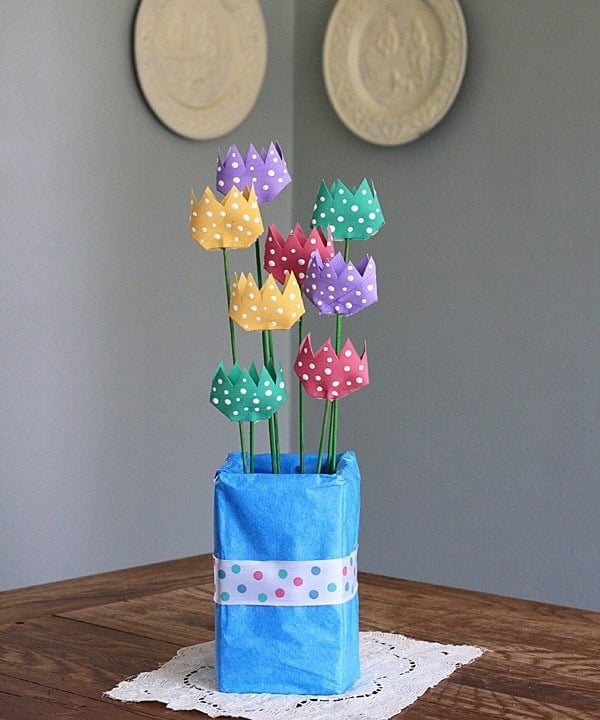
Transforming everyday waste into stunning flower crafts is an art form that requires minimal materials and maximum creativity. Take, for instance, these remarkable toilet roll tulips, crafted from recyclable toilet rolls. To create these charming blooms, you’ll need a few simple supplies: toilet rolls, wooden dowels, paint, scissors, and a hot glue gun.
Begin by giving your toilet rolls and dowels a splash of color using the paint.
Once dry, cut each roll in half lengthwise, then flatten one end to create a stable base. Cut slits along both sides, making sure they’re not too deep, as this will affect the tulip’s structural integrity.
Next, take the other end of each roll and carefully cut triangular shapes to form the characteristic tulip shape. Insert the wooden dowel into the flattened end, securing it in place with a dollop of hot glue. And just like that, your toilet roll tulips are ready to brighten up any space!
The best part? You’ve not only created something beautiful but also given old materials a second chance at life.
Sun Catcher
Bring the warmth and beauty of sunlight and flowers together with this creative DIY project. To create your own flower-shaped suncatcher, gather some essential materials: toilet rolls, hole punch, tissue paper, paper plates, twine, glue, and scissors. Start by preparing your toilet roll rings by flattening and cutting them into equal pieces, then punch a single hole in each. Next, cut the tissue paper into petal shapes to match the ring’s design.
Attach the petals to one side of the ring using glue, and use twine to thread through the holes on the other side. Pull the twine gently to form a flower-like shape. Finally, hang your masterpiece up and watch as the sun casts a kaleidoscope of colors, filling your space with warmth and joy.
Tablet Stand
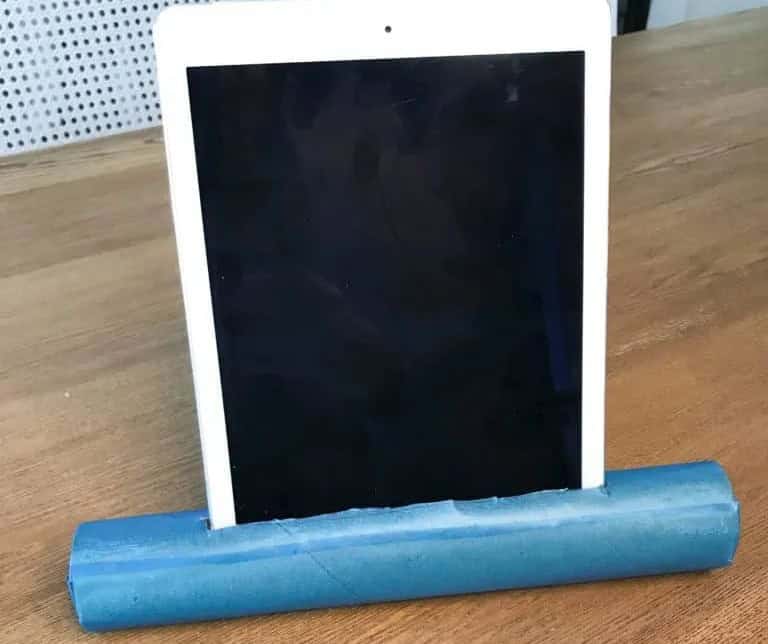
Are you tired of juggling recipes, gardening tips, or entertainment while cooking, gardening, or relaxing? Do you find yourself struggling to balance your device with messy hands or surfaces? If so, this DIY tablet stand is the perfect solution for you. All you need are some toilet rolls, scissors, pencils, and a little creativity to create a sturdy stand that holds your tablet securely in place.
Simply decorate your toilet rolls, cut a slit in one to accommodate your tablet’s size, and attach it to another roll with a hole to create a support system. With this easy-to-make stand, you’ll be able to cook, garden, or relax without worrying about getting your device dirty or misplaced. And if you’re interested in more DIY projects like this, be sure to check out our other tutorials for inspiration.
Bee Wreath
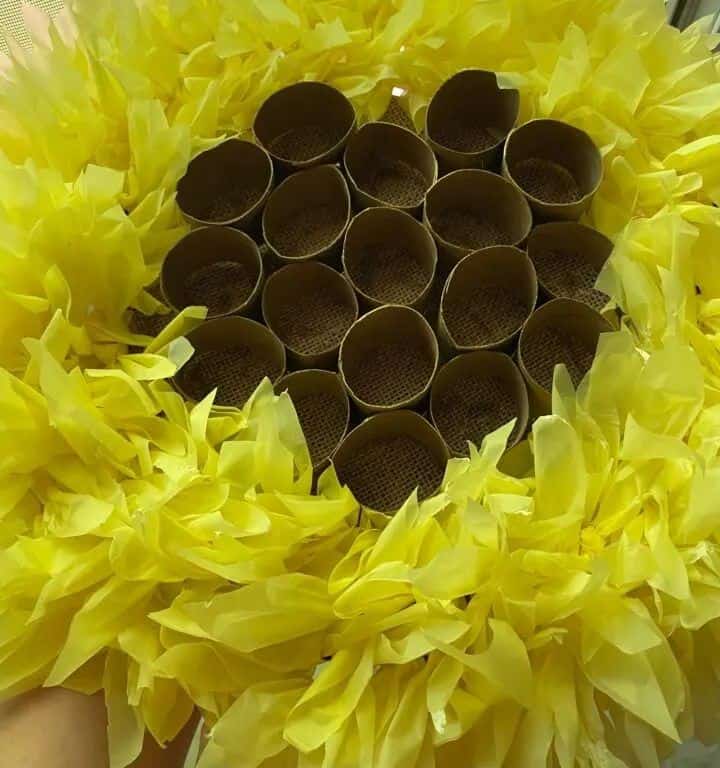
To make a difference for these buzzing buddies, start by crafting a charming bee wreath that showcases their cuteness. Gather essential materials like toilet rolls, yellow plastic tablecloths, scissors, a metal wreath frame, burlap scraps, paints, and a hot glue gun (check out this reliable option). Don’t forget some cardboard scraps! With these simple elements, your bee-inspired masterpiece will be the centerpiece of any room.
Wedding Popper
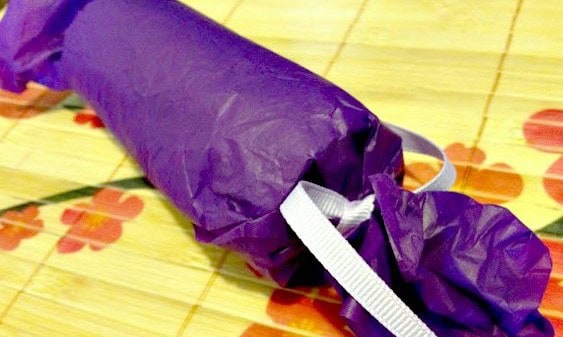
As a bride-to-be, budget constraints are all too real. That’s why finding affordable yet stylish wedding favors is a must. Wedding poppers fit the bill perfectly – they’re adorable and won’t break the bank.
To create these sweet keepsakes, you’ll need just a few simple supplies: tissue paper, toilet rolls, ribbon, scissors, and bride-and-groom buttermints (you can find those here). Simply fill each toilet roll with confetti, wrap it in tissue paper, and secure it with ribbon on both sides.
Voila! Your DIY wedding poppers are complete.
The best part? This project is as easy as it is charming – no crafting experience necessary.
Birdhouse Ornaments
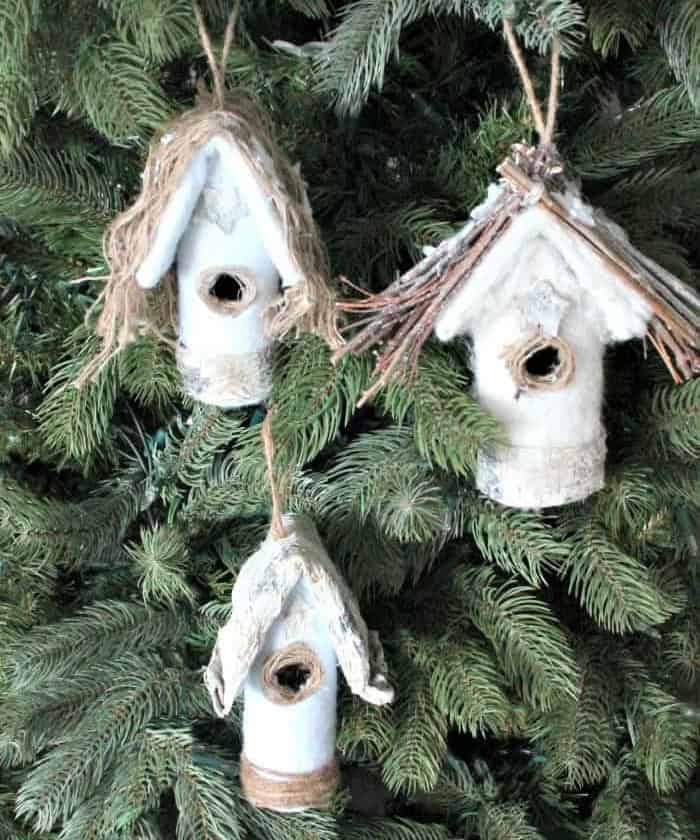
Transform your backyard into a haven for feathered friends by crafting DIY birdhouse ornaments that are both charming and functional. To get started, gather an assortment of materials including toilet paper rolls, cardboard, a glue gun, twine, bark, twigs, rope, felt, and any leftover fabric you may have lying around.
As you bring your creations to life, feel free to add your personal touch with decorations or even include some bird treats for an extra-special treat.
Before long, the sweet songs of birds will fill the air, making your outdoor space a true haven.
Marshmallow Shooters
Bring out the kid in everyone with this fun and easy DIY project. Transform toilet rolls into marshmallow shooters that are sure to delight both kids and adults alike.
To get started, gather just a few simple materials: toilet paper rolls, decorative paper, balloons, rubber bands, glue, and of course, marshmallows.
Wrap each toilet roll in decorative paper, securing it with a half balloon on one end using a rubber band. This will create the foundation for your shooter.
Once you’ve got that set up, you’re just moments away from adding the star of the show: the marshmallows!
Toy Car Garage
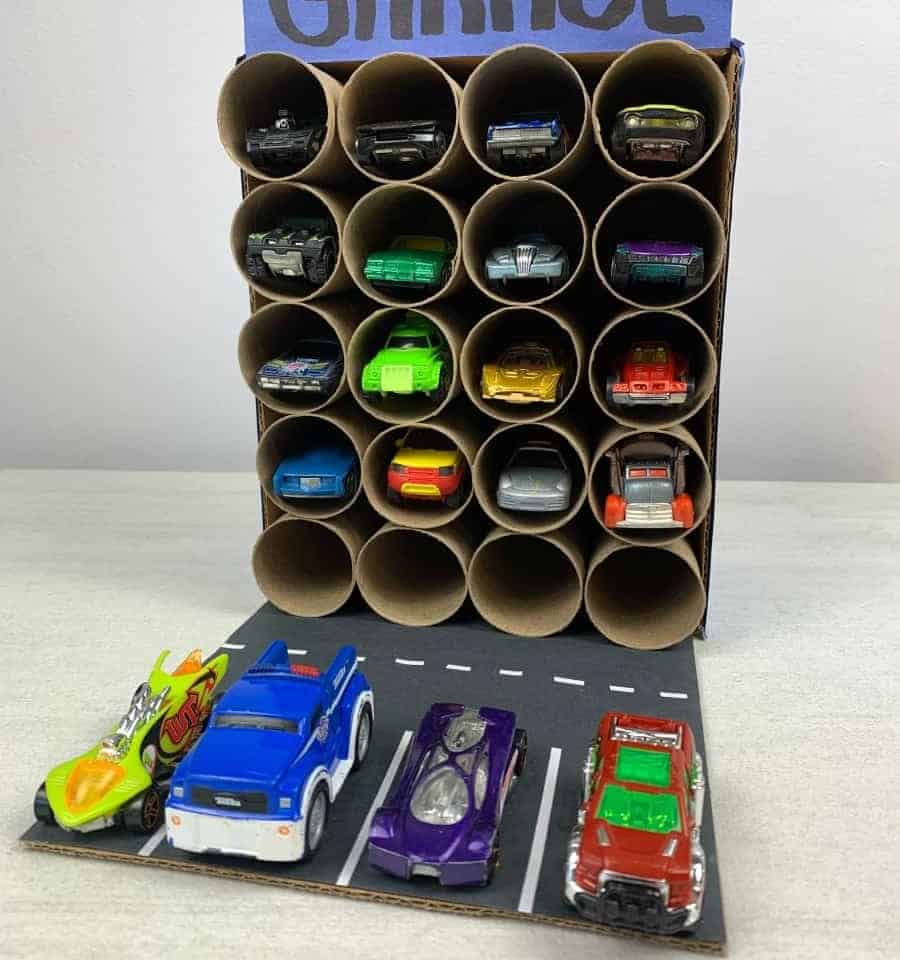
Is your child’s toy car collection causing clutter and chaos? Transform their playtime with a DIY toy car garage! Gather an overlapping box, toilet rolls, construction paper, a sticky name tag, a black marker, scissors, and a glue gun. You can find a wide range of construction paper at [link], so let your child pick their favorite design. Begin by cutting off the side flaps of the overlapping box and cover the outside and bottom flap with construction paper using your glue gun.
Fill the box with stacked toilet rolls and add a personal touch with a name tag on top. Your little ones will adore this creative solution!
Heart Shape Stamp
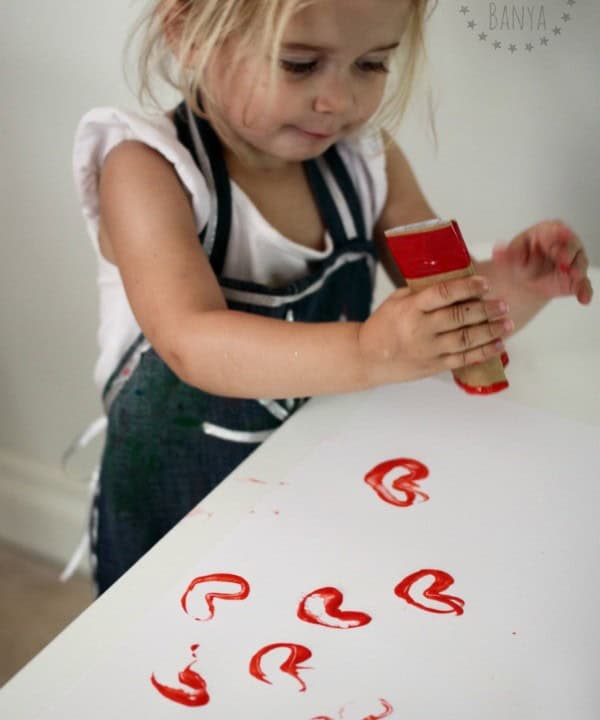
Transform your arts and crafts sessions into a delightful experience with these easy-to-make heart-shaped stamps. The best part? They require only two simple materials: toilet rolls and tape. Begin by shaping the toilet roll’s opening into a heart-like form, then secure it with tape to maintain the shape. With just a few basic steps, you’ll be ready to create unique stamp prints using paint or ink.
Trinket Display

Transforming clutter into a functional storage solution is easier than you think. Gather some ordinary household items like toilet paper rolls, an old shoebox lid, paint, and glue to create a one-of-a-kind trinket display. Begin by giving the shoebox lid a fresh coat of paint and cutting the toilet paper rolls into smaller pieces. Then, secure these cut pieces onto the painted lid using your trusty glue. Allow the adhesive to set before proudly displaying your newly crafted storage solution.
House Warming Cake

A thoughtful yet practical gift for any homeowner can be crafted from everyday essentials. This unique toilet roll housewarming ‘cake’ is sure to delight. To create it, gather a selection of new toilet rolls with their tissue still intact, along with scissors, tape, ribbon, string, and other household items like toothpaste, washing liquid, and shampoo. Begin by arranging the products in a cake-like formation, securing them together with string.
Add a touch of elegance with a wrapped ribbon and ensure everything stays in place using tape.
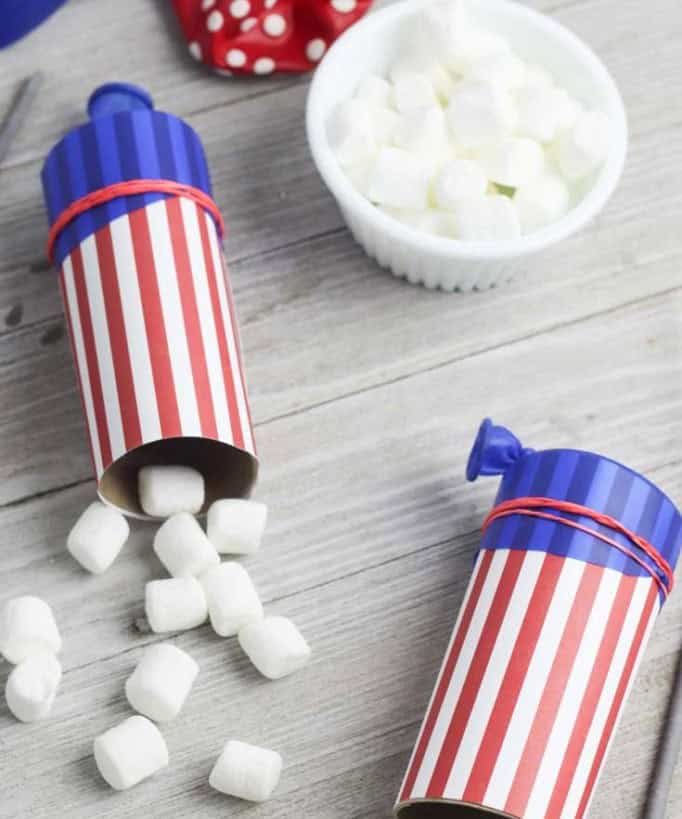
4th of July Shaker Boxes
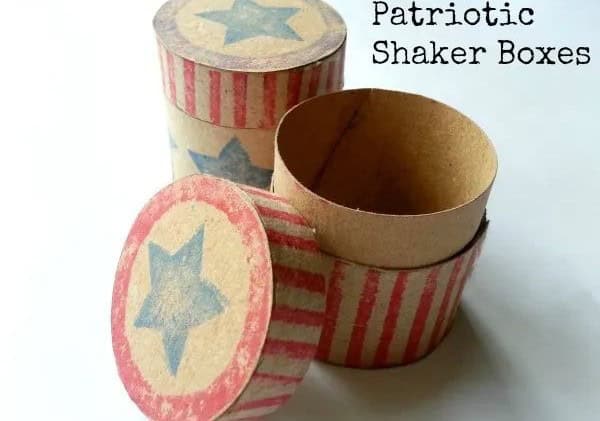
There’s no more iconic American celebration than Independence Day, and what better way to commemorate it than with a uniquely crafted 4th of July shaker box? With a few simple materials and some creative flair, you can create your own masterpiece that will be the star of any patriotic gathering.
To get started, gather up some toilet paper rolls, a trusty knife, a ruler, pencils, foam sheets, cardboard, scissors, cardstock, and glue – all the essentials for crafting a truly unforgettable shaker box. Trust me, once you’ve got your creations done, they’ll be the talk of the party, with adults and kids alike clamoring to get their hands on them. And let’s not forget the best part: you’ll have a blast making them!
41 Toilet Paper Roll Crafts for Adults
Looking for a creative outlet as an adult? Look no further! With just 10 minutes of prep time, you can transform ordinary toilet paper rolls into unique and innovative creations. In total, this project will take about 30 minutes to complete, but the end result is well worth the effort. So grab your supplies and get ready to unleash your creativity with these fun and easy toilet paper roll crafts for adults.
Instructions
Explore the world of toilet paper roll crafts by browsing through the various options available. Get creative and find the one that sparks your imagination! Have you already tried your hand at one of these crafts? Share your experience by leaving a comment below, and let’s hear what you think. I’m always eager to read feedback and respond to every comment.