While the concept of recycling is well-established, there’s another creative approach that’s gaining popularity: upcycling. This innovative way of reusing and transforming existing materials into new, valuable items is a perfect blend of artistry and practicality. If you’re someone who tends to collect or store items, knowing what to do with them can be a challenge. But fear not! Your home is likely filled with hidden treasures just waiting to be repurposed.
Here’s a collection of 47 inspiring projects that will help you unlock the creative potential within your existing belongings.
Scented Candles
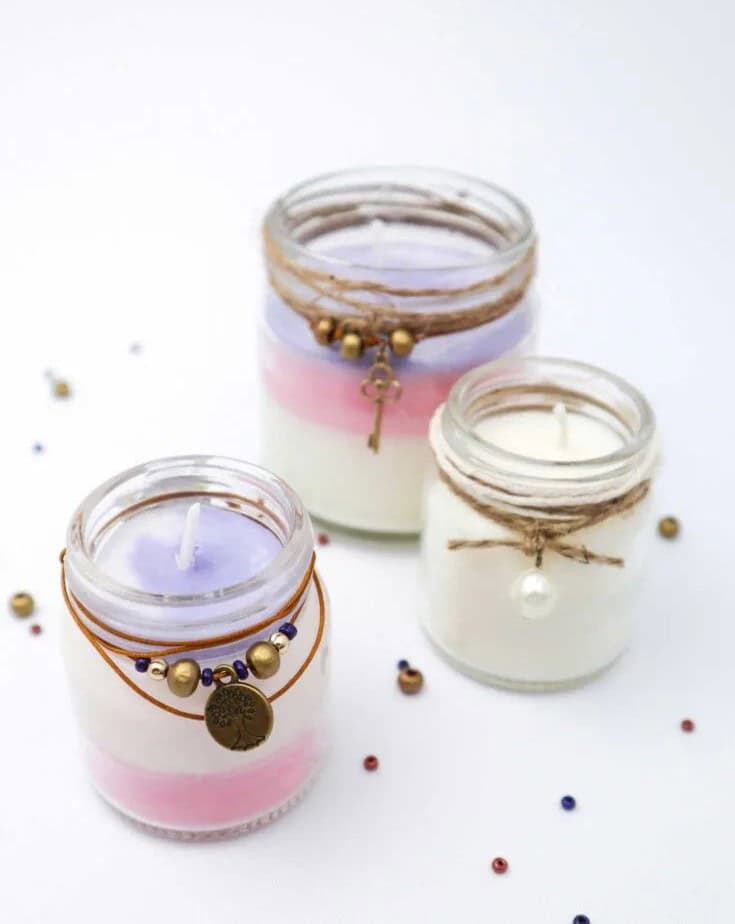
Every room requires a touch of warmth and fragrance, which scented candles effortlessly provide. Not only do they illuminate the space, but their inviting aroma can instantly elevate the atmosphere. While purchasing candles can be costly, the good news is that making your own at home is not only budget-friendly but also a fun DIY project. To get started, collect some mason jars from your recycling bin and upcycle them into unique candle containers.
Then, gather beeswax or soy wax flakes, candle wicks, dyes, and essential oils to create your custom candles.
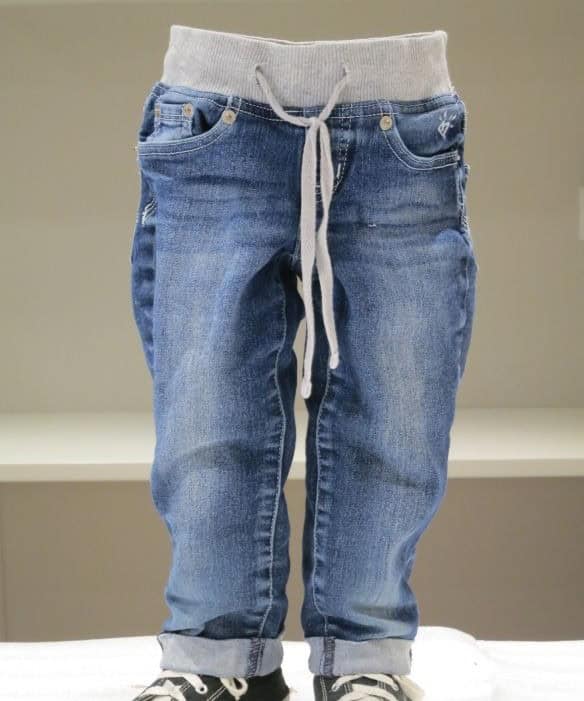
Denim Storage Bins
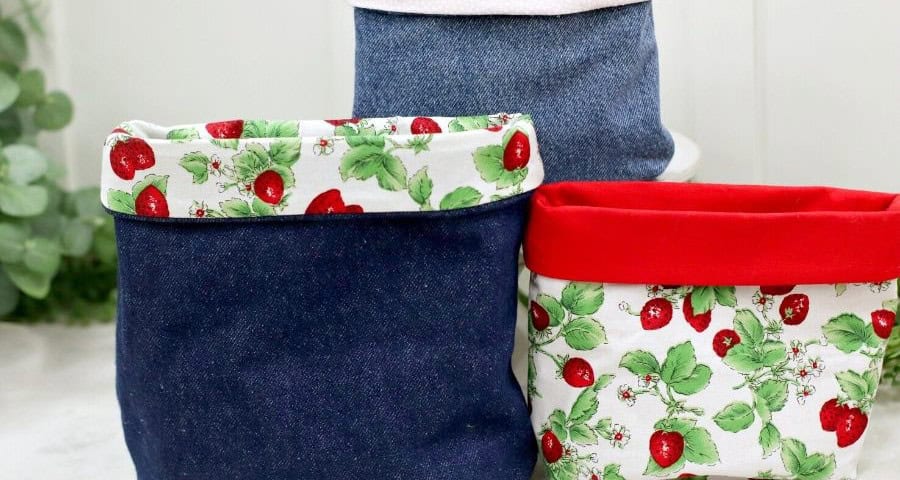
Before discarding an old or worn-out pair of jeans, consider upcycling them instead. The possibilities are endless! For instance, you can transform those jeans into a functional storage bin. To give it a finished touch, use leftover fabric to line the edges and add cute cuffs. The size of your bins will determine what you can store in them. Use them to keep yarn, crafting supplies, sewing materials, or other items neatly organized and clutter-free.
For more inspiration, check out these 47 DIY scrap fabric projects.
DIY Phone Holder
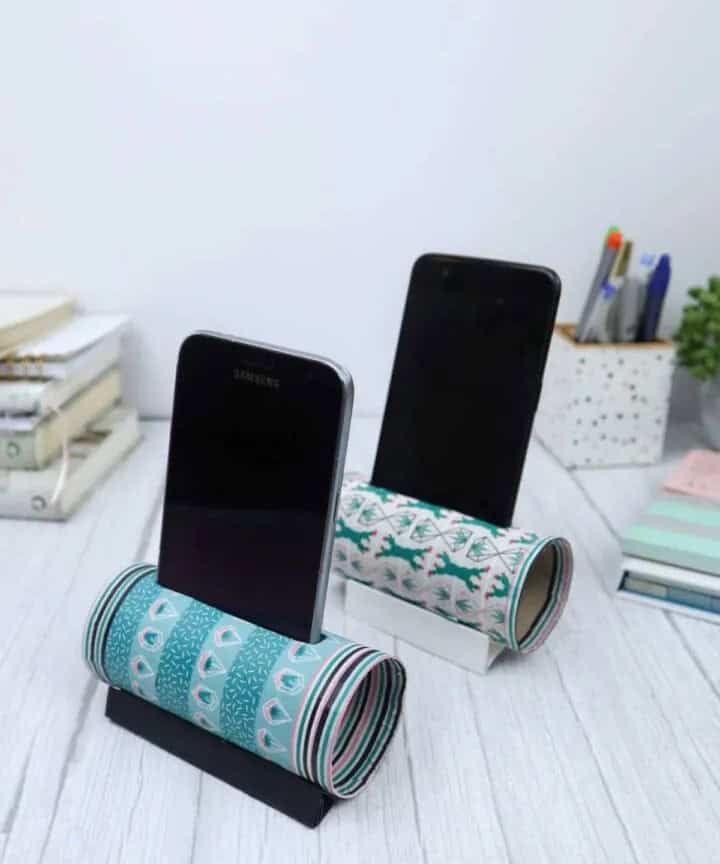
When it comes to phone holders, store-bought options are convenient, but have you considered crafting your own? I’m excited to share with you a unique and budget-friendly solution that’s sure to impress. These creative phone holders are made from recycled toilet paper rolls, requiring minimal supplies and zero cost. The key to their charm lies in the washi tape used to decorate them. With endless pattern options available, you can customize your phone holder to fit your personal style.
Plus, with a little creativity, you might just find yourself saving money and reducing waste while still achieving a stylish result.
Children’s Dress Up Wardrobe DIY
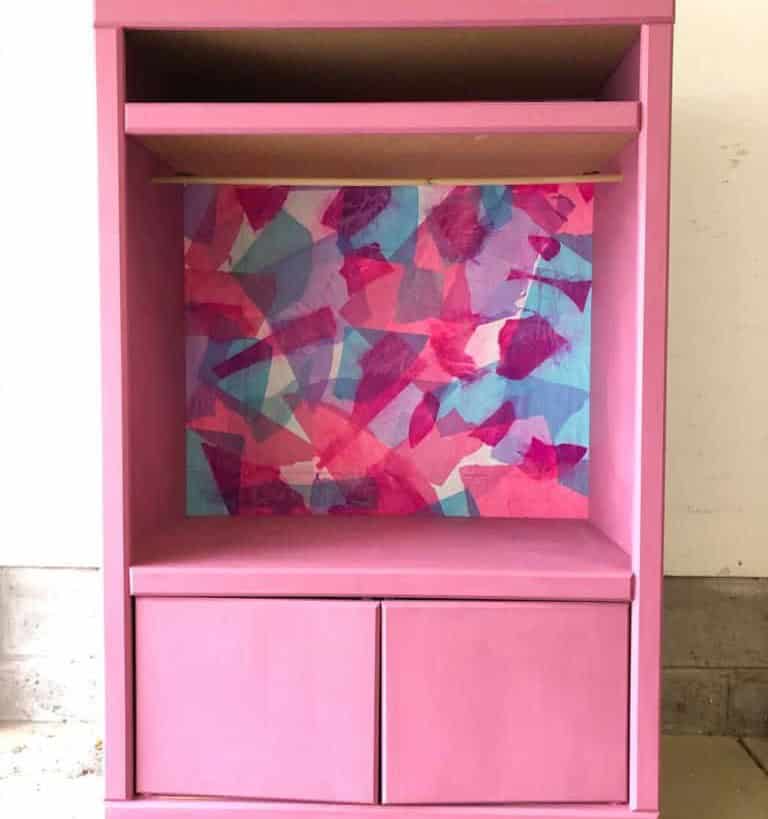
When scouring flea markets for hidden gems, it’s common to stumble upon an old wood wardrobe or dresser in need of a refresh. Don’t hesitate to bring one home and get creative with giving it a new life as a unique piece for your child. To revamp the dresser, start by applying a few coats of paint using chalk-finish paint, which can be easily mixed by combining equal parts plaster, water, and paint.
As you work, remember to lay out newspapers to contain any spills or splatters and make cleanup a breeze.
DIY Wooden Shape Puzzles
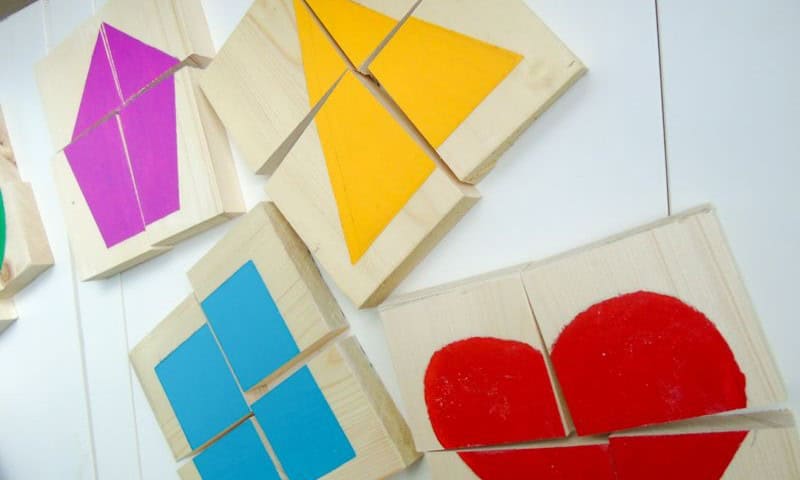
By dedicating a portion of your free time to DIY woodworking projects, you can create engaging shape puzzles that foster children’s motor and cognitive development. Start by scavenging for materials like old wooden blocks or scrap wood from previous projects, which can be easily upcycled into the puzzle pieces. To begin, fire up your saw and sander (check out our guide on how to get started) and prep the wood for painting.
Then, grab some acrylic paint, clear varnish (you can find it at), and painter’s tape (try). Once the wood is smooth and edges are neatly trimmed, get creative by drawing and painting different shapes onto each piece. With these simple steps, you’ll be well on your way to crafting a fun and educational shape puzzle for kids.
No-Sew T-shirt

Why not breathe new life into an old favorite tee by upcycling it? You likely have a few outdated tees collecting dust in your closet that you’re hesitant to part with. Take a moment to retrieve one of these hidden gems and get ready to transform it into a unique piece of wearable art.
With just the basics – a pair of fabric scissors, no sewing machine required! The process is refreshingly simple, allowing you to unleash your creativity without worrying about complicated stitching.
To begin, all you need to do is sketch out your design using chalk pencil or tailor’s chalk. Visualize your desired outcome and mark the fabric accordingly.
Next, simply cut along the marked lines and stretch each strip before looping them into ties that can be styled in various ways.
Rainbow Crayons
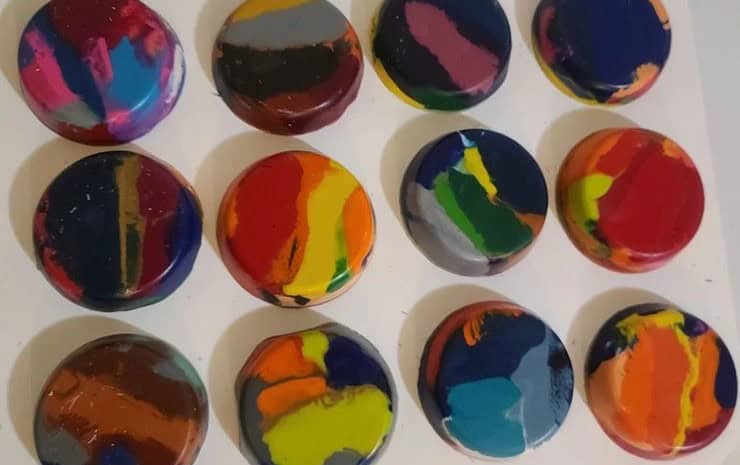
There’s nothing more frustrating than dealing with broken crayons that are no longer usable. The waste and clutter they create can be overwhelming. But instead of throwing them away, why not breathe new life into them? Simply gather all the broken crayons and remove the paper wrapping to get started. We’re going to transform these imperfect crayons into a vibrant and colorful batch of rainbow crayons. To do this, grab an old muffin tray and place the broken crayons in each cup.
You can create a marbled rainbow effect by mixing different colors together, or you can group similar shades together for a cohesive look – the choice is yours.
DIY Bracelet from Shoelaces

As a teenager, I was part of a creative crew that thrived on crafting unique accessories from everyday materials. Twist ties and embroidery floss were staples in our DIY arsenal. Fast forward to today, and we’re revisiting those nostalgic vibes with a modern twist – literally! Introducing DIY shoelace bracelets, a fun and easy project suitable for all ages. To get started, grab some shoelaces from [insert link here] and choose your favorite colors.
With just one essential item, you’ll be well on your way to creating your very own DIY masterpieces. Simply follow the instructions and let your creativity shine!
Upcycled Old Vases with Paint
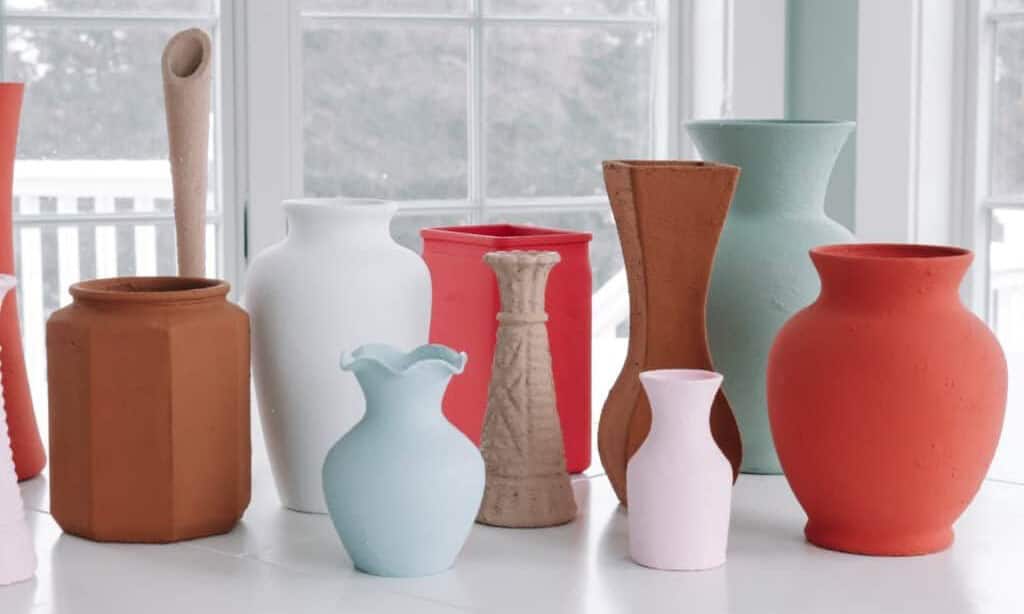
While a vibrant vase full of flowers can instantly inject energy into a room, it’s equally important to consider the vessel itself. A beautiful arrangement can be easily diminished by an uninviting vase. This DIY project aims to breathe new life into old vases, transforming them into stunning pieces that will elevate any space. To get started, gather some chalk paint from your preferred supplier, a few foam brushes, a drop cloth for protection, and two paper plates for mixing the paint.
It’s essential to begin by thoroughly washing each vase, then drying it completely before applying the paint. This ensures the paint adheres properly, eliminating any risk of a subpar finish due to dirt, grease, or other imperfections.
Christmas Card Holder
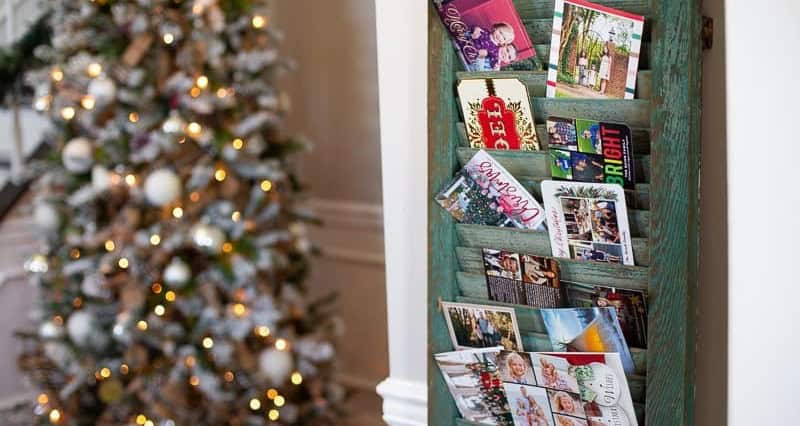
While it’s common to stash away Christmas cards after the holiday season, they’re truly treasures that deserve to be showcased. A unique card holder can make all the difference in keeping them organized and within reach. One innovative solution is to repurpose an old vintage shutter into a card holder.
To create this one-of-a-kind piece, you’ll need the following materials: a heavy-duty stapler and staples, a cardboard box, a box cutter, packing tape, the vintage shutter itself, and of course, your Christmas cards.
Upcycled Tin Cans
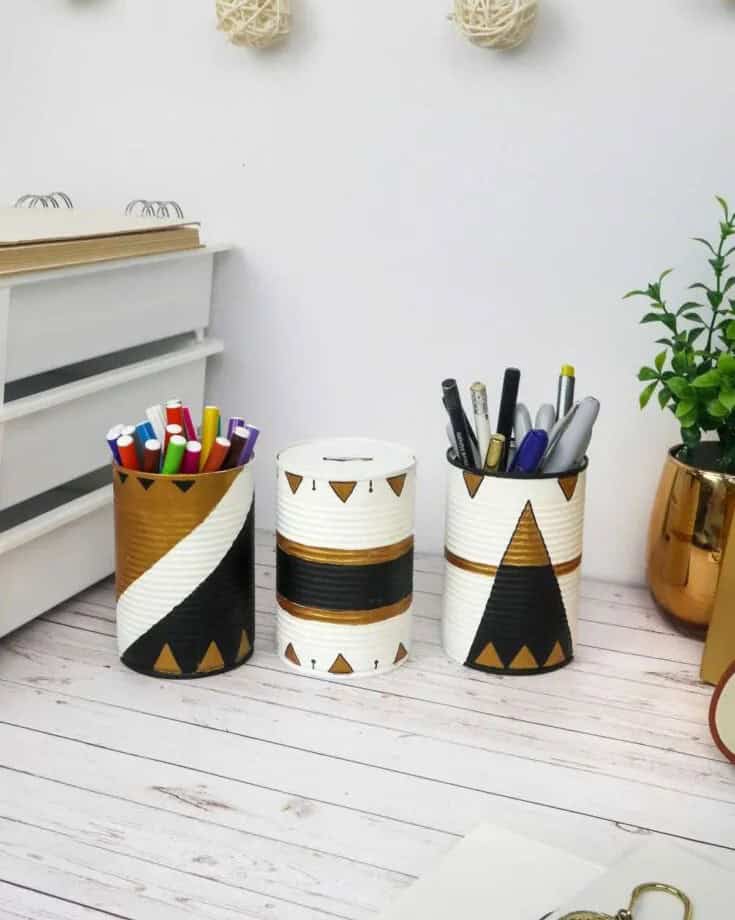
Tin cans are a treasure trove of creative possibilities, and it’s likely that you have a stash of them lying around, waiting to be transformed into something new. With their versatility and abundance, they’re the perfect material for upcycling into desk organizers. As someone who values organization, I can attest that having too many office supplies is a common problem – but with these tin can organizers, you’ll be able to keep your workspace tidy in no time.
And if you’re feeling extra creative, why not use one as a planter and add some greenery to your desk? It’s amazing how something so simple can bring a touch of nature indoors. If you’re looking for more inspiration, take a look at our DIY desk organizer project using cereal boxes – it’s a great starting point for exploring the world of upcycling. This project is perfect for anyone who enjoys crafting and wants to try something new, including men.
Wine Cork Ornaments
Collecting wine bottles and corks can be a fun part of crafting projects. Not only do you get to upcycle old containers, but you also get to create something new from the materials within. Speaking of which, don’t forget to salvage those corks as well! You can transform them into adorable ornaments with just a few simple supplies. A couple of rolls of washi tape and some string or twine are all you need to get started.
Feel free to add some embellishments to give your creations an extra touch of personality. As seen in the example, you can attach these decorations at the bottom of the corks for a unique look. For more inspiration, take a look at our stunning wine bottle crafts.
Thrift Store Painting
When seeking out creative and cost-effective projects, I’m a big fan of scouring dollar stores, flea markets, and thrift shops for hidden gems. One of my favorite finds is this clever thrift store painting project. Start by selecting a painting or canvas that speaks to you, then head to the hardware store to pick up some spray paint, masking tape, and vinyl letter stickers.
Use the masking tape to create a design or pattern on your canvas, adding visual interest without overpowering the original artwork. Once you’re happy with your layout, carefully apply the vinyl letters to spell out your chosen quote or phrase. Make sure they’re securely attached to ensure they don’t lift off over time.
As an added touch, consider incorporating color blocking techniques to preserve the integrity of the original painting while still adding a pop of personality.
With a little creativity and some affordable supplies, you can transform a thrift store find into a unique piece of art that reflects your personal style.
Unicorn Toilet Roll Craft
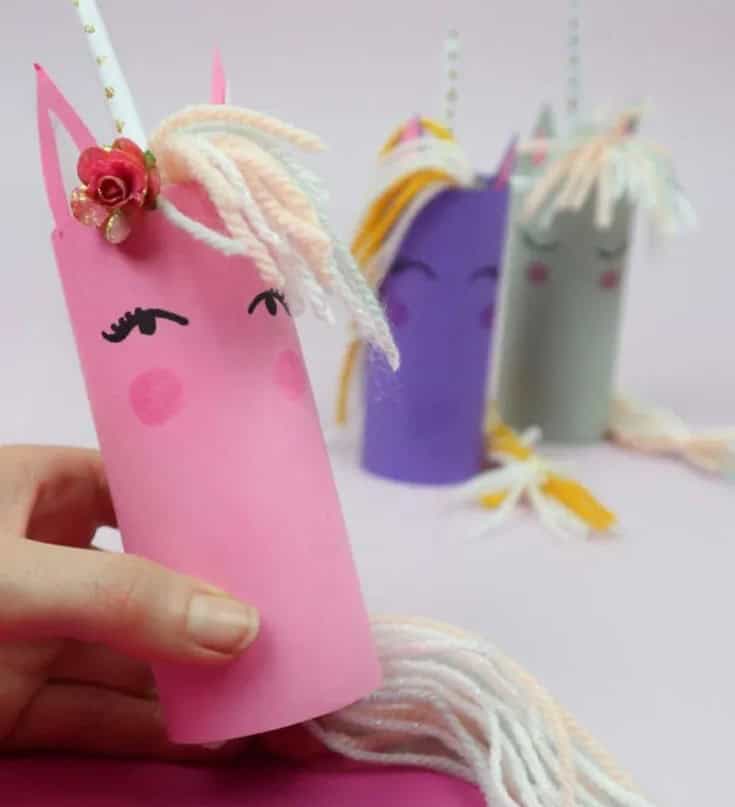
The humble toilet paper roll is once again transformed into a creative masterpiece in this DIY project. There’s something undeniably charming about taking something mundane and turning it into something vibrant and one-of-a-kind. This particular project has the added bonus of being a crowd-pleaser with kids, making it an excellent choice for family craft time.
For even more inspiration on unleashing your inner unicorn, be sure to explore these 27 delightful unicorn crafts for a treasure trove of creative ideas.
Bread Pan Planter
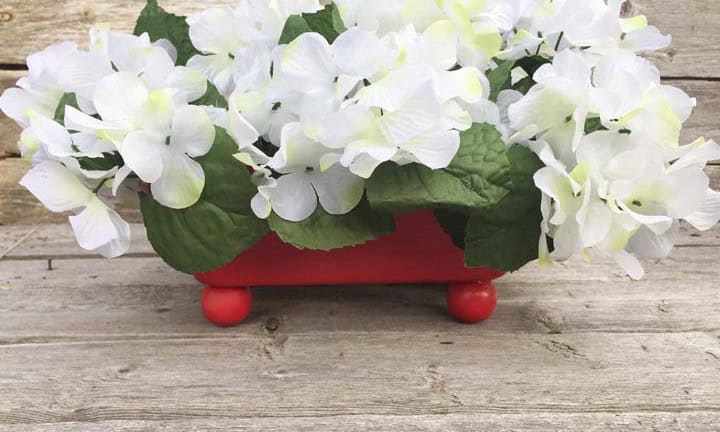
When it comes to creative projects, bread pans are often overlooked but can be a fantastic material for planters. Their unique shape makes them an ideal choice for window sill planters, providing a charming display for your plants. However, their versatility doesn’t stop there.
You can also use these upcycled bread pan planters as centerpieces to add a touch of personality to your outdoor spaces. Line the front porch, steps, or garden path with them for a warm and inviting atmosphere.
To take your project to the next level, simply grab some large wooden beads to serve as stands for your planter. Secure the beads using hot glue, and you’ll have a sturdy and visually appealing display. With this creative reuse idea, the possibilities are endless!
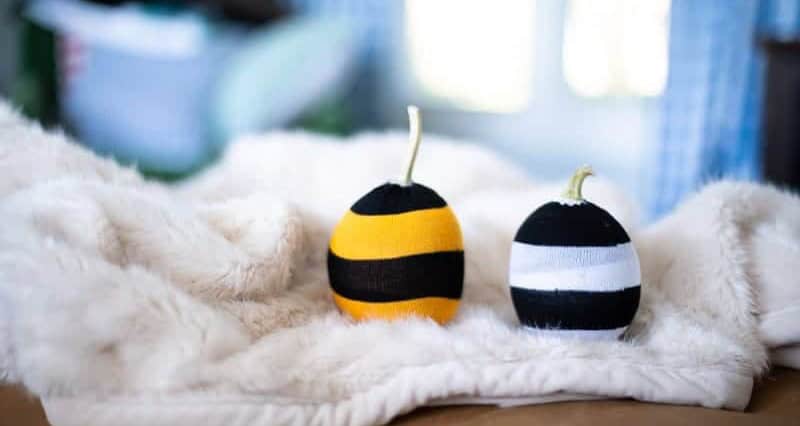
Embroidery Hoop Pumpkin
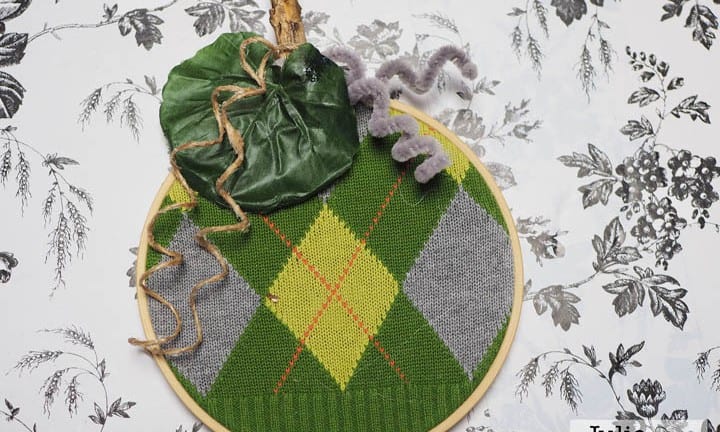
A stylish pumpkin with an air of academia, dressed in sweater vest print as if it were a professor playing the part of the gourd. This unique creation is actually made from upcycled old sweaters, perfect for repurposing those accidentally shrunk or hole-y garments you’ve been meaning to get rid of.
Grab one and combine it with embroidery hoops and pipe cleaners for the vine tendrils, then explore more pumpkin-themed inspiration by checking out our curated list of 27 Thanksgiving crafts for adults.
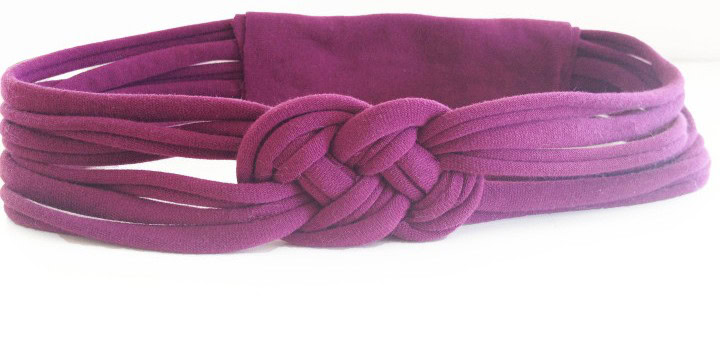
DIY Headband
Remember that no-sew DIY t-shirt project from earlier? If you’ve got another shirt or two lying around, you can create an even more stylish and sustainable upcycle with these personalized and chic DIY headbands. The Celtic pattern is both fashionable and easy to recreate. To get started, gather your essential materials: a pair of fabric scissors, a hot glue gun, and of course, the t-shirt itself. When selecting the tee for upcycling, opt for one with soft, stretchy, and moisture-absorbent fabric.
This will ensure the final headband is comfortable to wear. Begin by cutting the bottom hem of the tee into three long strips, leaving them looped together by the seam. The size of your tee will directly impact the size of your finished headband, so choose a shirt that’s not too small.
Toilet Paper Seedling Pots
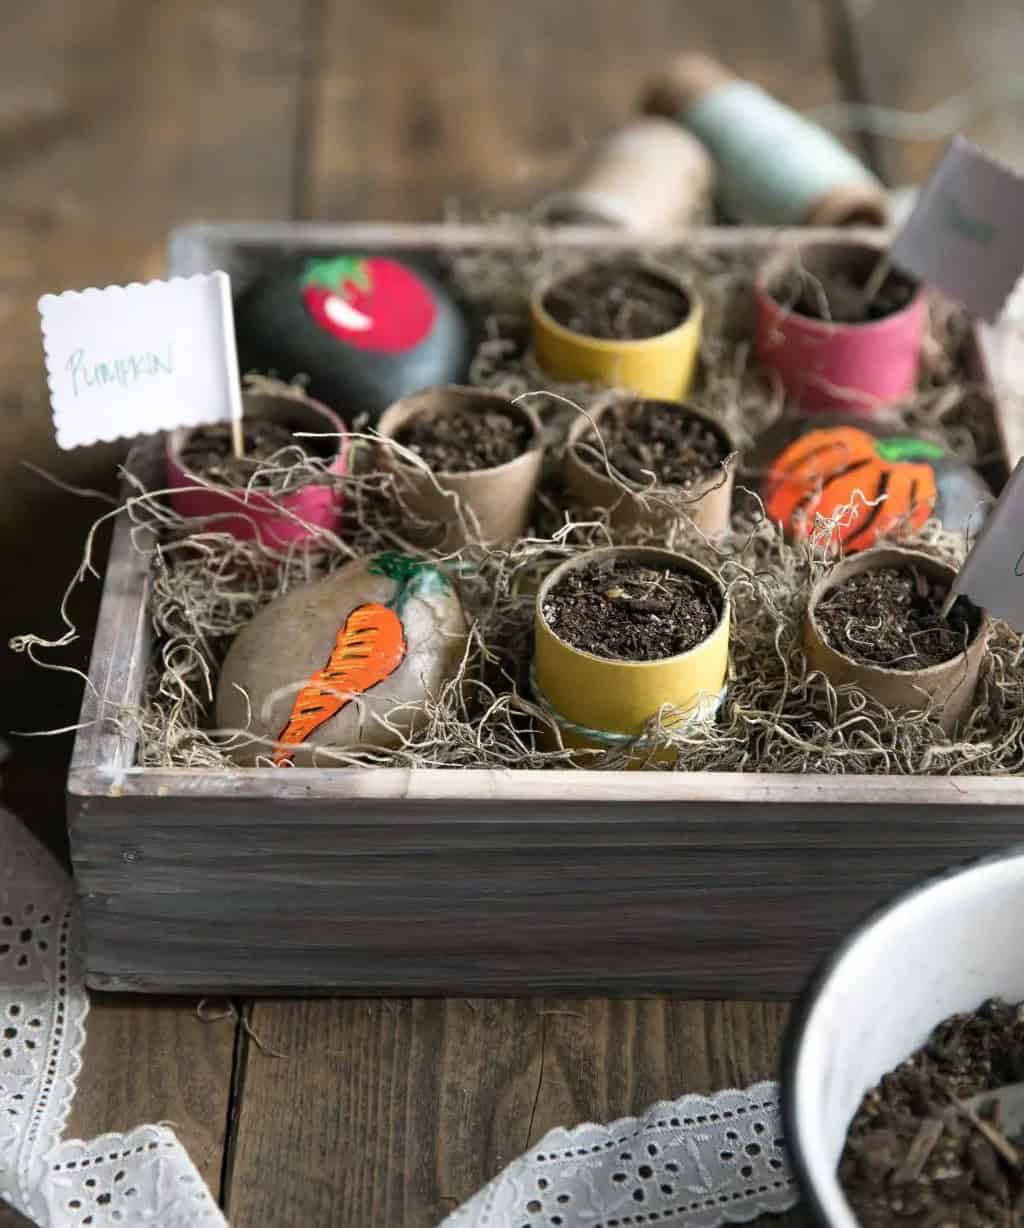
Innovative seedling pots born from recycled toilet paper rolls are revolutionizing indoor gardening. This project offers a unique opportunity for families to bond over the wonders of horticulture, teaching kids about sustainability, plant life cycles, and the joys of growing their own food. To add a touch of personality to these eco-friendly planters, simply decorate them with washi tape and ribbons before repurposing them as mini greenhouses for your seedlings.
Socks Pumpkin Craft
Get ready to breathe new life into your sock collection! Building on our upcycling expertise with old tees, we’re now tackling those pesky lone socks or mismatched pairs that often accumulate in our drawers. Let’s dive into the world of creative reuse and turn them into adorable pumpkin decorations. To get started, you’ll need a few simple supplies: fluffy polyfill for stuffing, rubber bands to shape your sock pumpkins, a sturdy stick for the stem, and, of course, your trusty hot glue gun.
As you embark on this project, remember that there’s no rulebook – feel free to experiment with different colored socks to create one-of-a-kind quirky masterpieces!
DIY Pencil Case
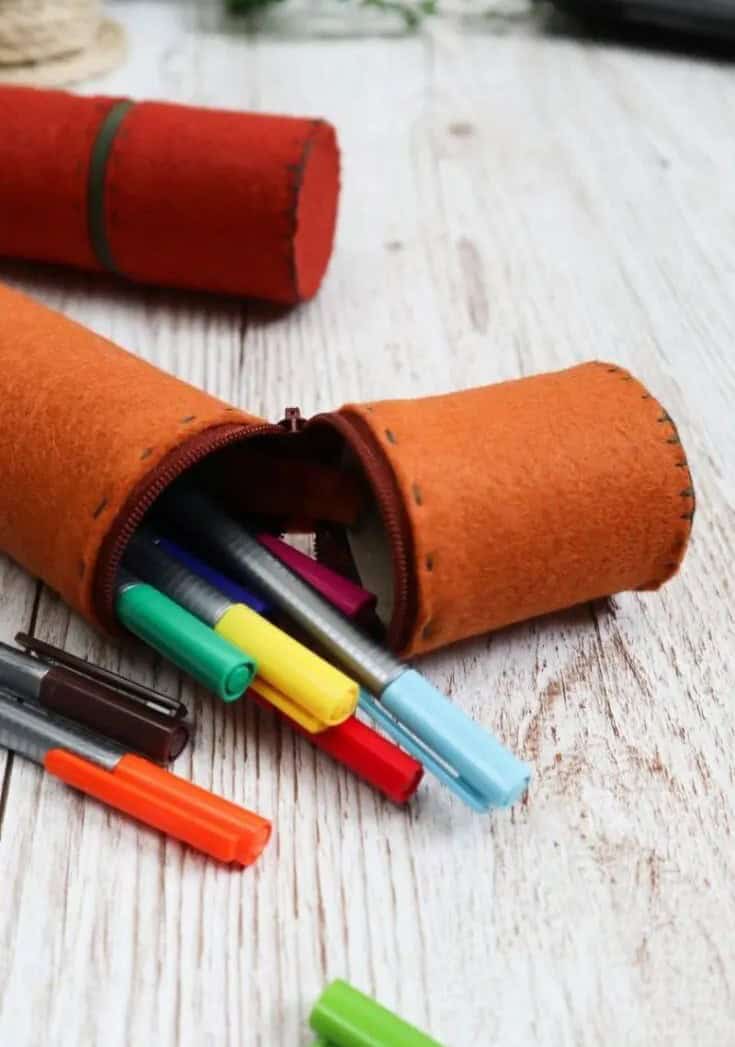
We’re thrilled with the wealth of upcycled toilet paper roll craft projects we’ve discovered, and this DIY pencil case is a standout. Not only does it look great, but it’s also functional – let’s explore how!
To get started, gather your materials: nylon zips, a needle, colored thread, cardboard, a hot glue gun, scotch tape, and a craft knife. One of the best aspects of these pencil cases is their textured feel, which makes them feel like high-end accessories.
You can customize this look further by substituting the felt with fabric, leather, or even suede scraps.
Yoghurt Container Flower Pot
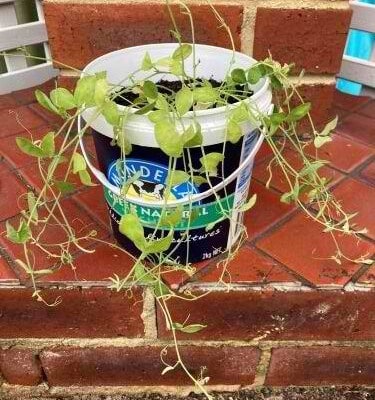
I’m a yogurt enthusiast, and I’m confident that anyone can develop a taste for its creamy delight. The large containers they come in are not only convenient but also surprisingly sturdy and durable. Instead of discarding them, you can upcycle them into charming flower pots. Yes, you read that right – flower pots! Before diving into the transformation process, make sure to give those buckets a good washing and drying. This crucial step will ensure a smooth decorating experience.
Money Tissue Box
There’s something special about receiving thoughtful gifts on my birthday – but I must admit that cash is always a welcome surprise! It’s amazing how practical it can be in various situations. If you’re looking for an innovative way to give the gift of cash, consider gifting a money tissue box. This unique idea is perfect for occasions like graduations, birthdays, and weddings, especially if the couple prefers monetary gifts over traditional presents.
To create this thoughtful gift, you’ll need a basic tissue box, dollar bills, paper, scissors, and double-sided tape. Feel free to get creative with decorative confetti, tissue paper, or other embellishments to make it an even more special keepsake.
DIY Dollar Tree Lantern
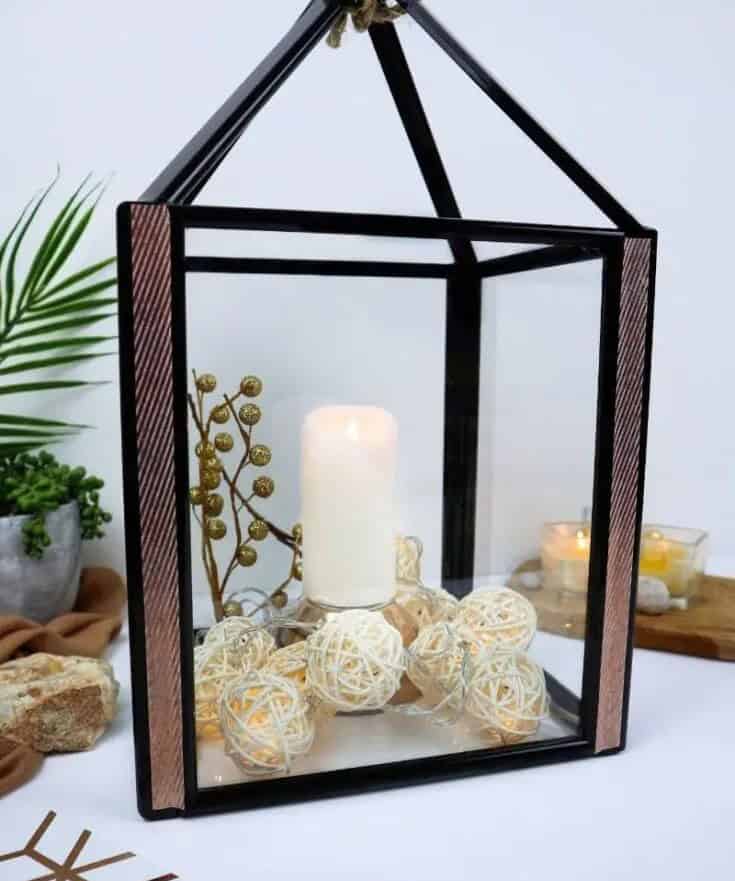
There’s something special about illuminating a space with creative lighting, and I’m no exception. That’s why I appreciate the simplicity of crafting my own lanterns using affordable materials from the dollar store. Gone are the days of breaking the bank on fancy lanterns at stores or online – with a few basic craft supplies, you can create your own unique pieces that reflect your personal style.
To get started, grab some easy-to-find and budget-friendly frames from the dollar store.
You can disassemble these frames to repurpose them as the base for your lantern. Once you’ve crafted it and the glue has dried, simply insert an electric pillar candle and add some decorative accents, like balls or other embellishments.
For more DIY inspiration, check out [link] for a collection of projects perfect for teens.
Early Learning Recycled Project
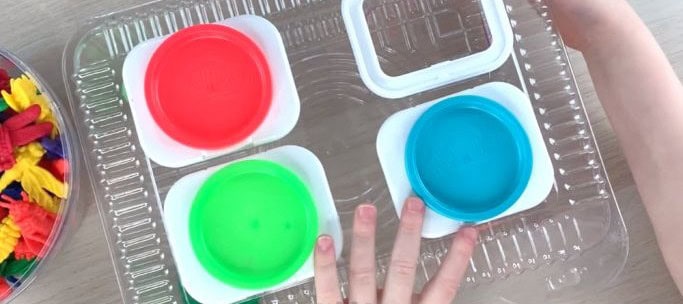
This innovative toy takes upcycling and recycling to the next level by merging them into one engaging activity. Imagine a creative outlet that’s as fun as it is educational, with opportunities for learning lurking around every corner.
To get started, grab a plastic container and use a craft knife to carefully cut out four holes before attaching a recycled baby wipe opener via hot glue.
Next, secure the playdough container tops onto the openers using hot glue, taking care to differentiate the colors with this clever touch.
A quick tip: be sure to let each component dry completely before moving on to the next step in this project.
Fire Chair Makeover
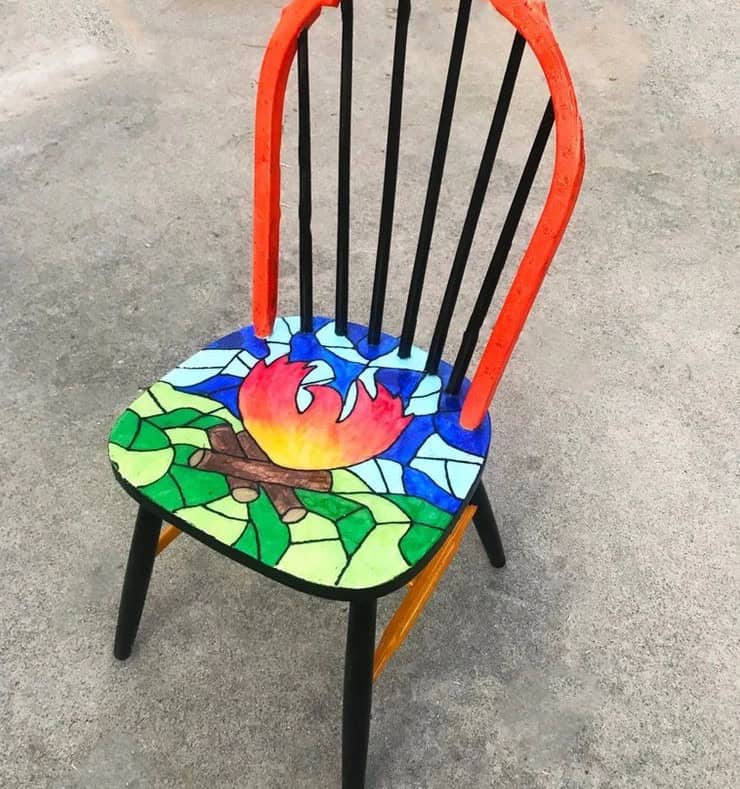
Before discarding your old dining room chairs for new ones, consider giving them a makeover instead. You can stick to a campfire-inspired theme and transform the chairs into rustic seating for around a cozy bonfire. Alternatively, you can unleash your creativity by experimenting with different patterns and designs. Once you’ve finished, simply seal the chairs with a couple of coats of protective coating and they’ll be good as new.
DIY Leaf Candle Holder
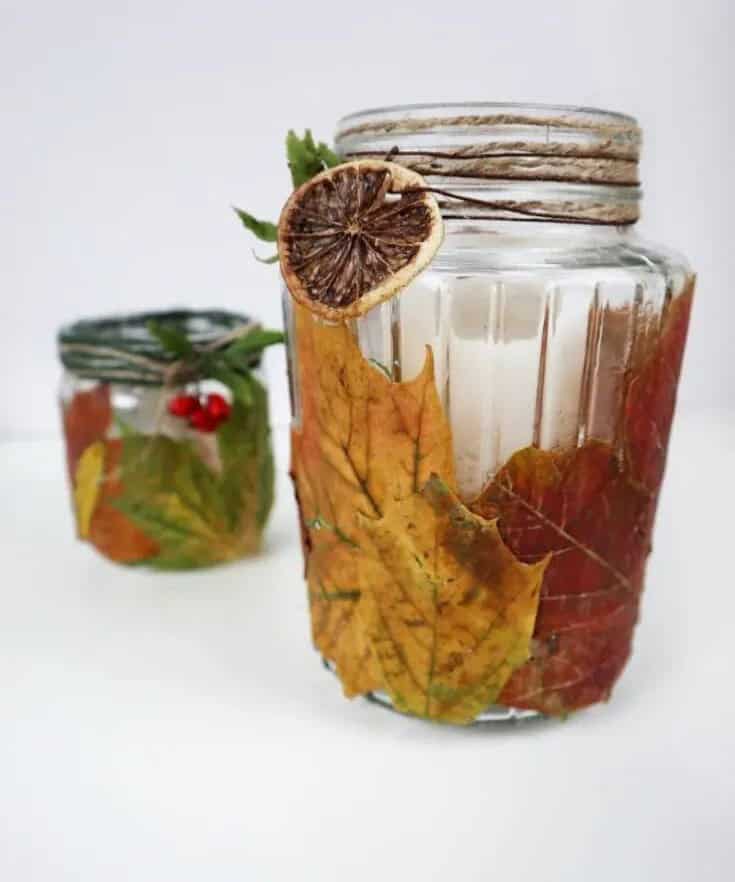
While scented candles undoubtedly evoke a cozy ambiance, it’s crucial to choose a vessel that complements their inviting aroma. A DIY leaf holder, for instance, can transform any room into a haven of warmth and comfort. The rustic charm of fall colors on a candle jar is particularly captivating, as the fragrance of spicy, citrus notes wafts through the air, transporting you to a cozy autumnal scene.
To create this look, gather some jute twine, dried orange peels, and a few decorative elements like cinnamon sticks or dried cranberries.
Recycled Batteries Container

Properly disposing of used batteries is crucial for the environment’s well-being. If you simply discard them with regular waste, you’ll be releasing toxic chemicals like sulphuric acid and lead into the ecosystem. These substances require careful handling to prevent harm. So, what’s the right way to get rid of them? For starters, consider upcycling an old container, such as a disinfectant or cleaning wipes tub.
This creative approach can motivate you to take the necessary steps to dispose of your batteries responsibly. Just ensure the container is thoroughly cleaned before giving it a decorative makeover.
DIY Bottle Cap Candles
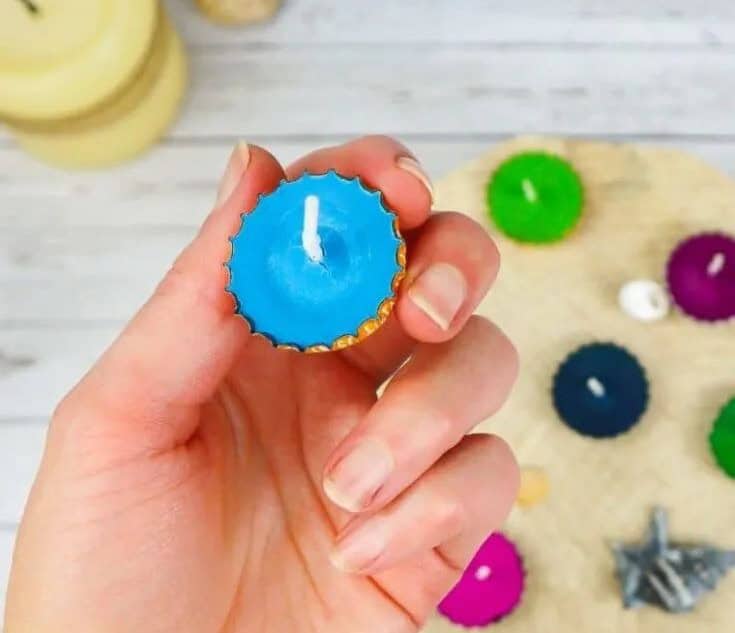
While there are countless creative bottle cap projects out there, one that really caught our attention is using them as unique candle vessels. Who would have thought that something so small could be transformed into something so charming? To get started, thoroughly clean and dry the caps before proceeding with your project. You’ll need a type of wax – such as beeswax or soy wax – and candle wicks to bring your creation to life.
If the wicks are too large, simply trim them down to size using scissors. For an added touch, consider adding a drop of candle dye or essential oil to give your candles a personalized scent and color.
DIY Bathroom Vanity
This innovative bathroom vanity truly stands out from the crowd. Its one-of-a-kind design is likely to leave you wondering what inspired it. Meanwhile, I invite you to ruminate on whether a similar creation exists elsewhere. Once you’ve had a chance to ponder, let’s explore an even more creative solution – repurposing an old suitcase as this vanity! Just think about the potential for upcycling that dusty relic into something truly unique and functional.
Not only can such a vanity serve as a striking accent piece in your bathroom, but it also offers a clever way to stash away all those toiletries, cosmetics, and other essentials, effectively decluttering the space.
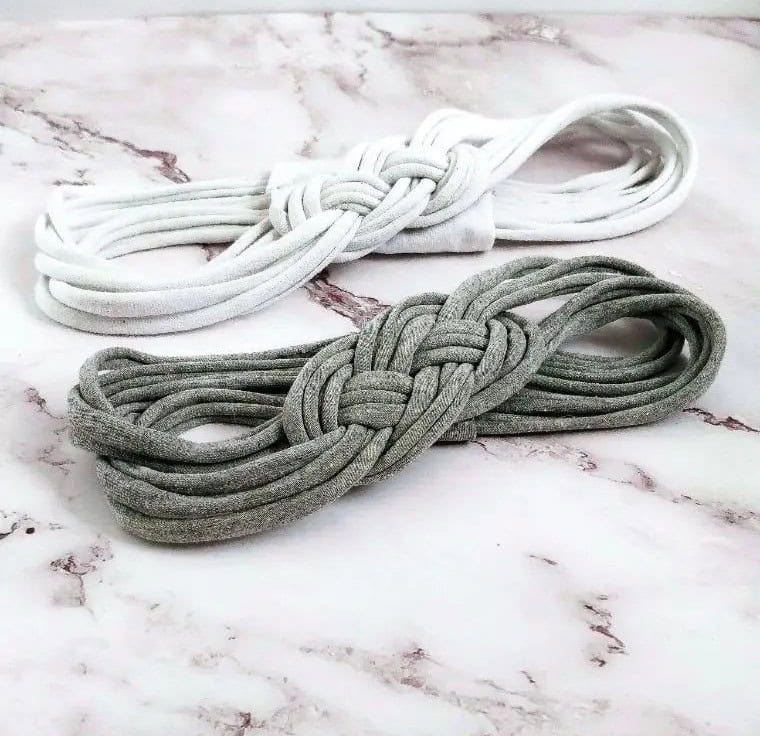
Knotted T-shirt Headband
Recall the creative DIY project where you transformed an old T-shirt into a trendy headband? We’re bringing back that same magic with another no-sew headband transformation. Simply grab an unwanted T-shirt and a pair of scissors, then cut long strips as instructed. Following these easy steps will have you sporting your very own knotted tee headband in no time. And if you’re feeling inspired, be sure to explore more innovative upcycle ideas for old tees.
Upcycled Drawers Wall Unit
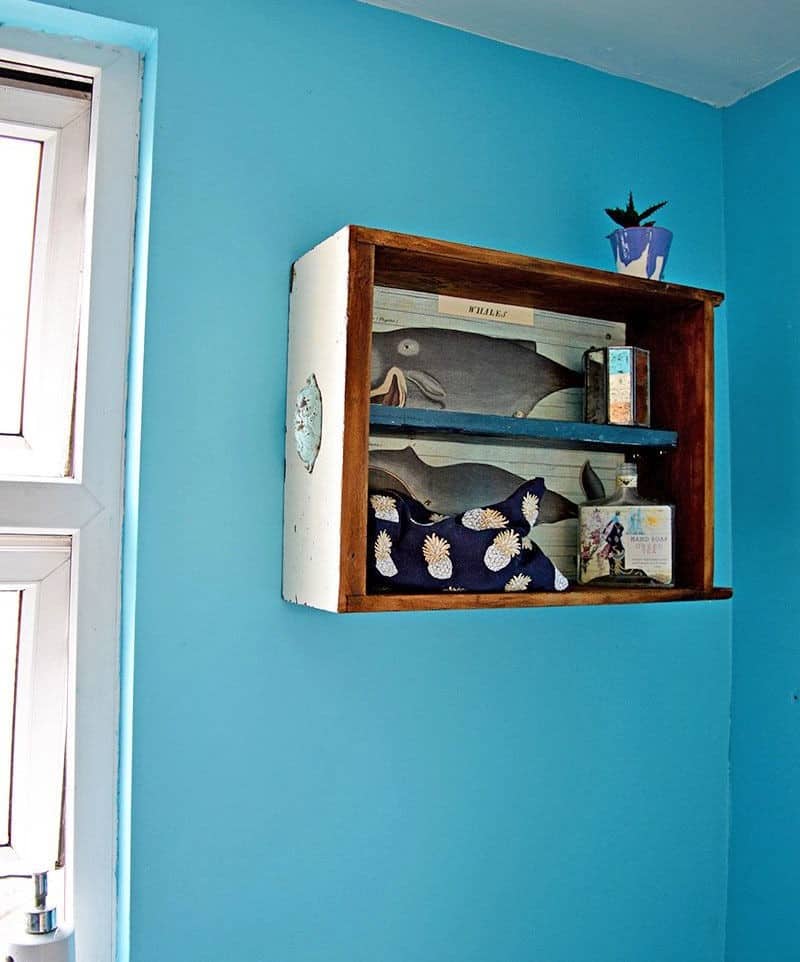
If your bathroom is in need of an extra storage boost without breaking the bank, consider repurposing an old drawer into a unique shelving unit instead of investing in a costly new one. Scour local sources like skips, dumpsters, or flea markets for discarded drawers that can be transformed into functional storage spaces. To give your upcycled drawer some personality, decoupage printed napkins onto its surface.
Once you’ve completed the painting and refurbishing process, add a touch of elegance by selecting an ornate handle to complete the look.
Tin Can Piggy Bank
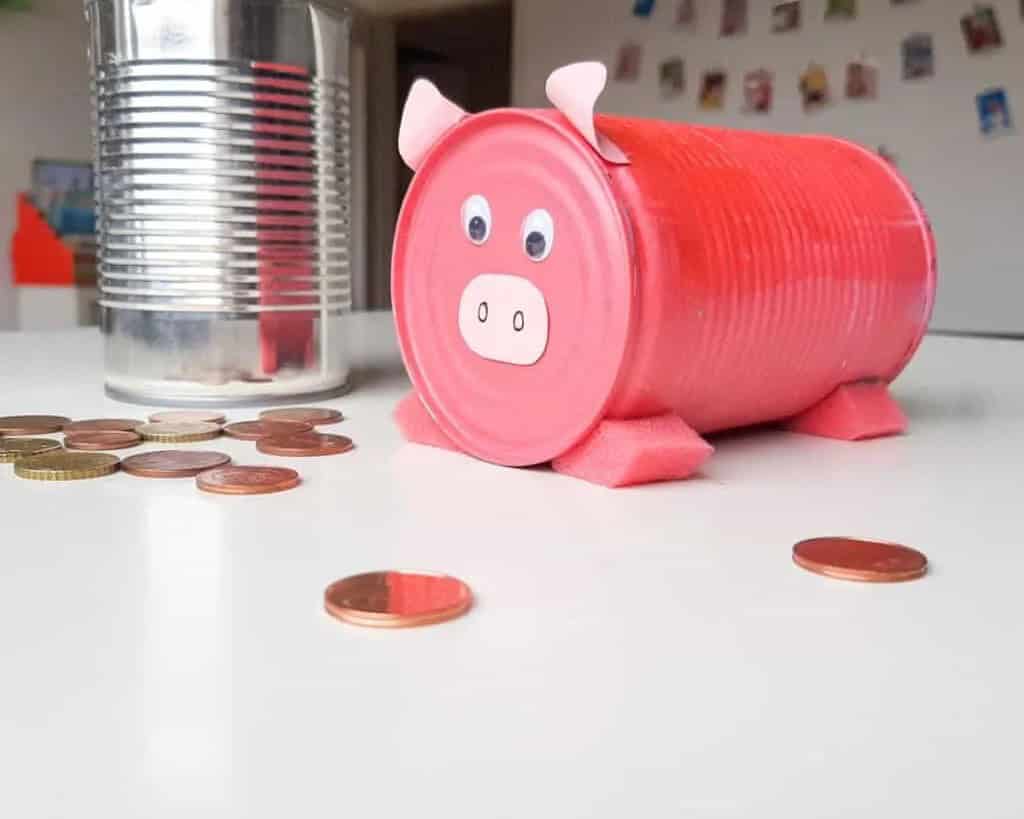
Transform a humble tin can into a charming piggy bank using some creative crafting techniques! Start by giving the can a metallic makeover with a couple of coats of paint. Next, gather your embellishments: googly eyes, pink cardstock for the ears, and pink sponges to create the stands. Use a hot glue gun to securely attach these components to the can. Allow the adhesive to fully dry before handling the piggy bank. Don’t forget to add a slot on the lid for dropping in those pennies!
If you’re loving this craft, you might enjoy exploring more creative possibilities with Dollar Tree crafts.
Eco Friendly Wrapping Paper
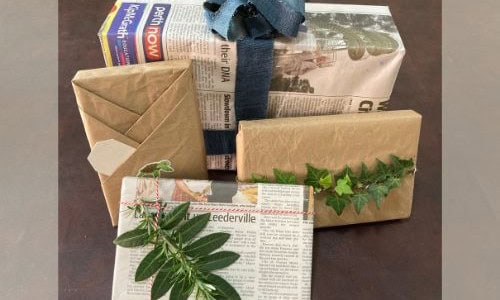
The nostalgia-inducing textured patterned wrapping paper of yesteryear is now collecting dust on my shelves. I’ve opted for the eco-friendly route, using newspaper or brown paper instead, which not only benefits the environment but also encourages creativity and resourcefulness. The key to elevating plain old brown paper is in the accessories – a dash of research and experimentation with different techniques and styles can transform your wrapping game.
With just a few strategic tucks and folds, you can convincingly replicate professional packaging. Next, add some pop with colorful string, ribbon, or twine, pressed leaves and flowers, stickers, and more to take your gift-giving to the next level.
Christmas Glitter Jars
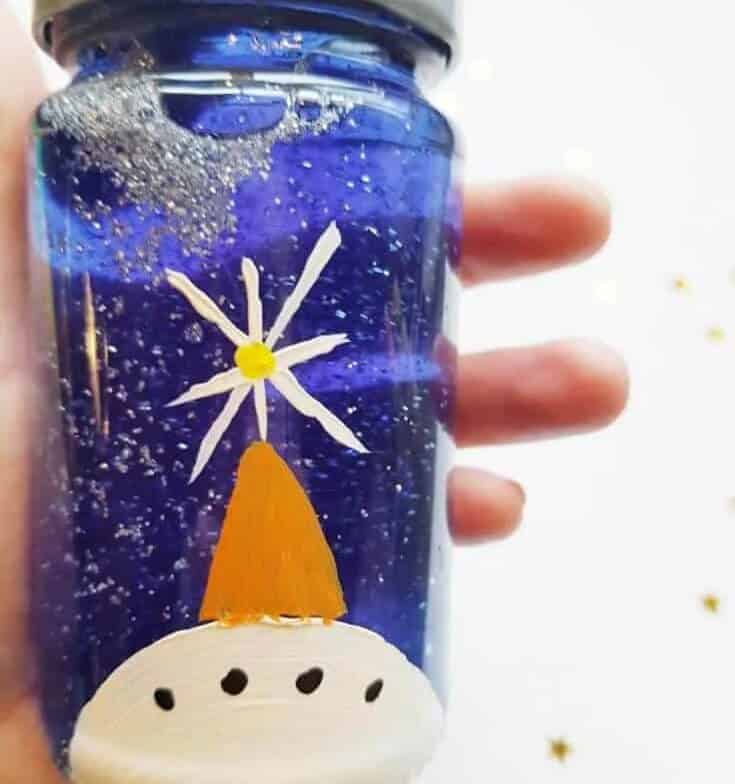
Sensory glitter jars are a delightful way to keep both children and adults engaged for an extended period. They also present a fantastic opportunity to repurpose old glass containers, giving them a new lease on life. To create these mesmerizing jars, you’ll need some basic supplies, which can be easily sourced from your local craft store or scavenged from around the house.
Simply gather glitter, water, confetti, food coloring, paint, and a few brushes, and you’re ready to begin crafting your very own calming Christmas-themed sensory jars.
Scrap Wood Sculptures for Kids
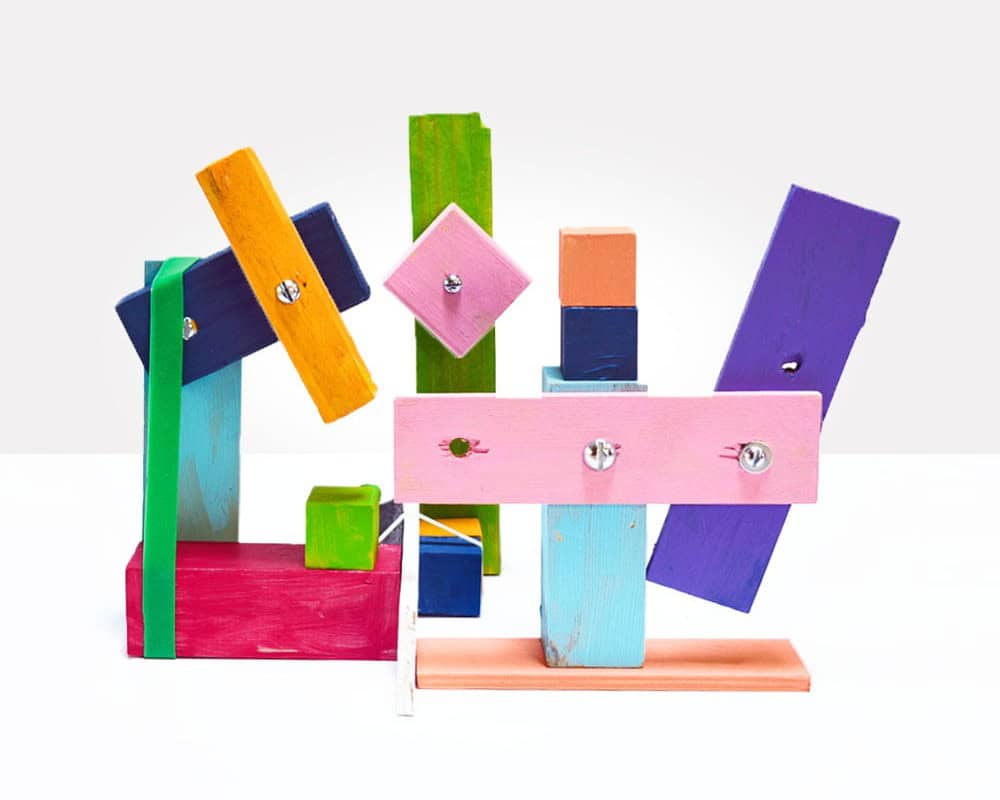
Transforming scrap wood into creative masterpieces is an excellent way to spark your kids’ interest in building and learning. By providing them with small-scale structures made from these wooden blocks, you can engage them in hands-on activities that teach architectural principles and foster imagination. This unique approach allows for a fun and educational experience, where children can build upon their creativity while developing essential skills.
Repurposed Light Parts Angel
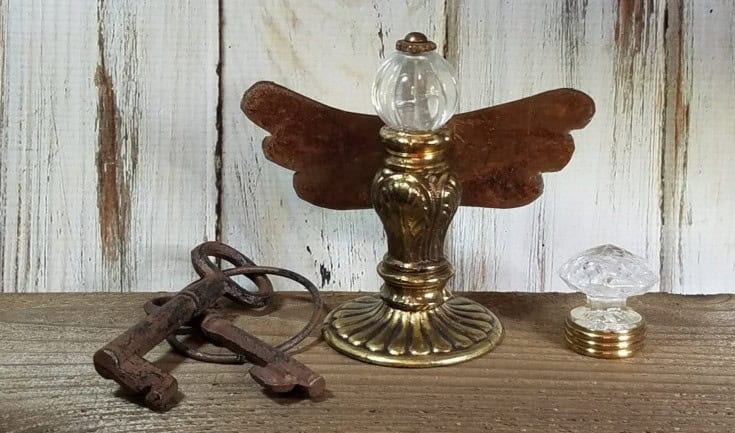
Transforming old light fixtures into a unique angelic creation is a clever idea that can brighten up your room with a touch of heavenly elegance. To create this bespoke piece, start by sourcing a crystal knob from an antique store or salvage one from an old dresser or drawer. Alternatively, get creative and fashion the wings using materials like felt sheets or wire twisted into shape. The metal wings are merely a suggestion – feel free to experiment with different textures and forms.
Once you’ve crafted your angel’s wings, connect it to an electric outlet and set up the wiring according to previous instructions. With these simple steps, you’ll have a one-of-a-kind angelic light fixture that exudes warmth and character.
Cutting Board and Grater
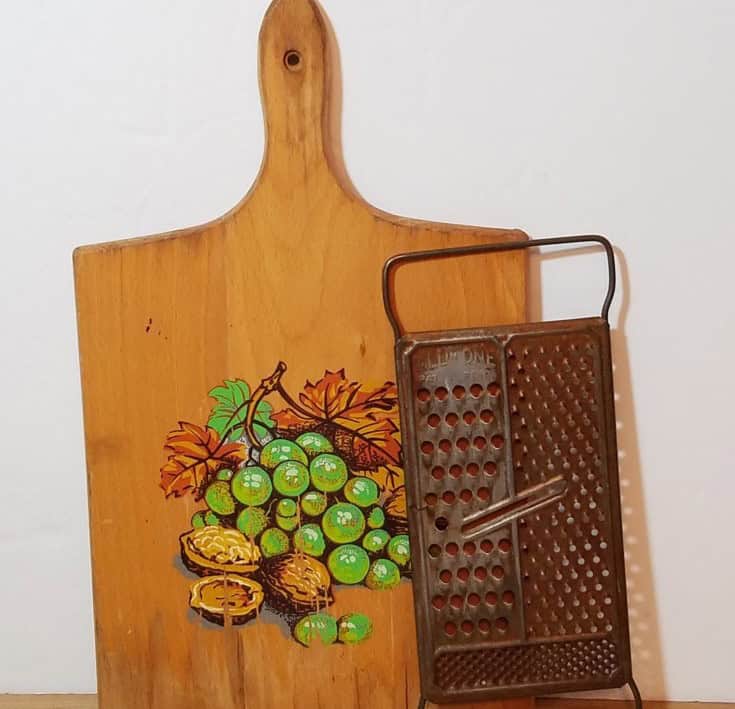
To give your kitchen an industrial-chic touch, I’ve repurposed an old rusty grate and cutting board into a unique photo or recipe display. You might already have these items gathering dust in your pantry. To create this project, you’ll need to source a few additional materials: a wrought iron coat hook with screws (available online), wire, wire cutters, screwdriver, pliers, round magnets (found at [online supplier]), and adhesive.
Don’t forget to protect yourself while working on this DIY endeavor by wearing protective gloves – the rusted items can be hazardous if not handled carefully.
Chair Back Kitchen Storage
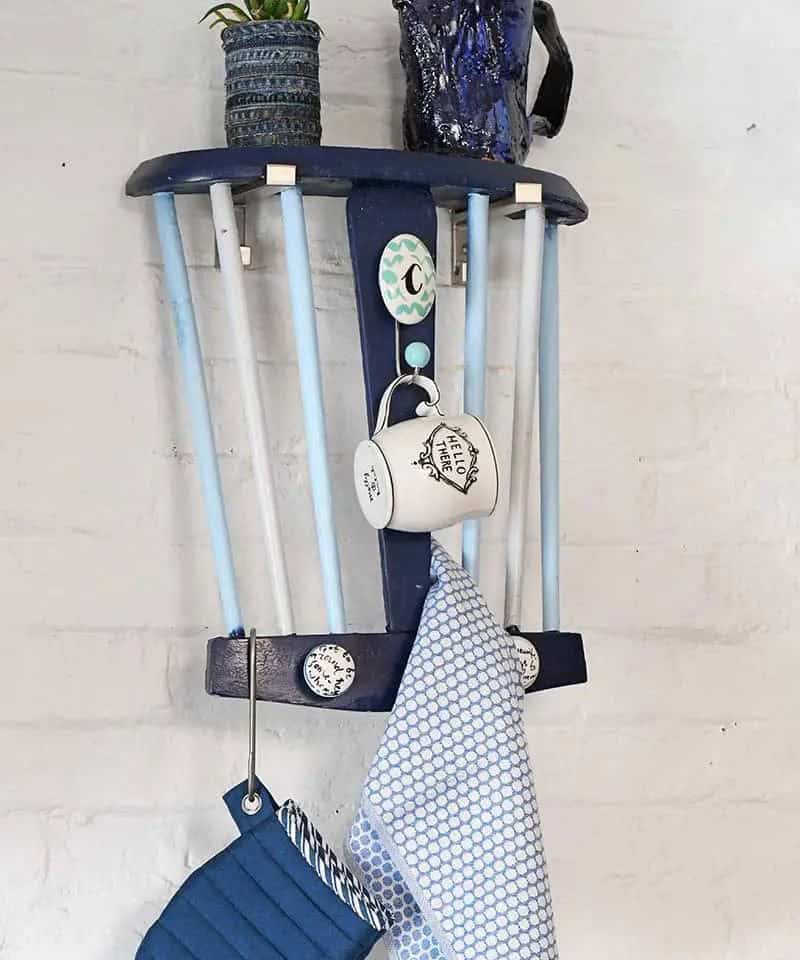
To construct a kitchen rack from scratch, start by procuring the back section of an old chair. You can acquire this component at a local scrap yard or thrift store. Next, utilize either a hand saw or a reciprocating saw to carefully cut off the topmost portion of the chair. This will provide you with the necessary material for your kitchen rack. Once you have severed the chair back, take some time to refinish the newly exposed surface by applying a coat of spray paint.
For added aesthetic appeal, consider incorporating decorative knobs into your design. Finally, select two shelf brackets and employ them to securely fasten your newly crafted kitchen rack to the wall.
Wire Lampshade Frames into Plant Stands
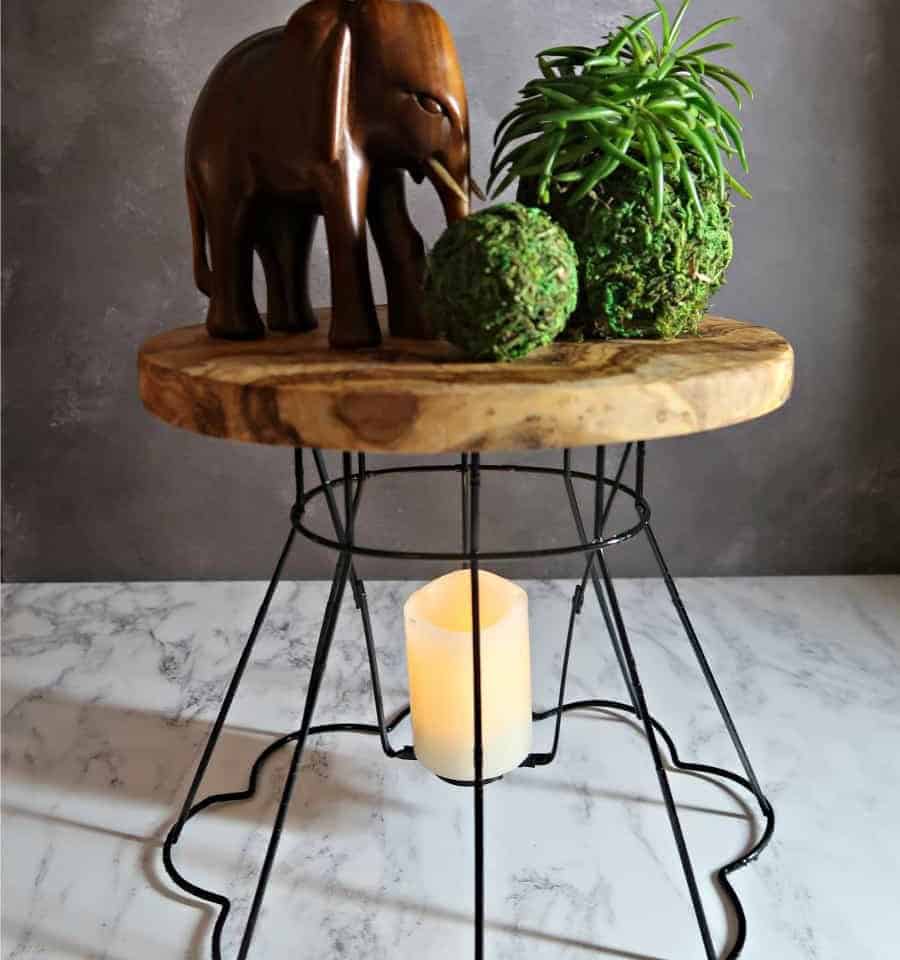
When discarding a lamp beyond repair, consider salvaging its metal frame for future projects. A vintage lampshade’s intricate patterns make it an ideal candidate for upcycling into a plant stand. You can either purchase one or scour thrift stores for a unique find. Begin by stripping the material or fabric from the frame using scissors or a similar tool. If you’re feeling crafty, you can even salvage the fabric scraps for future use in your creative endeavors.
Nature Explorer Shoebox Trunk
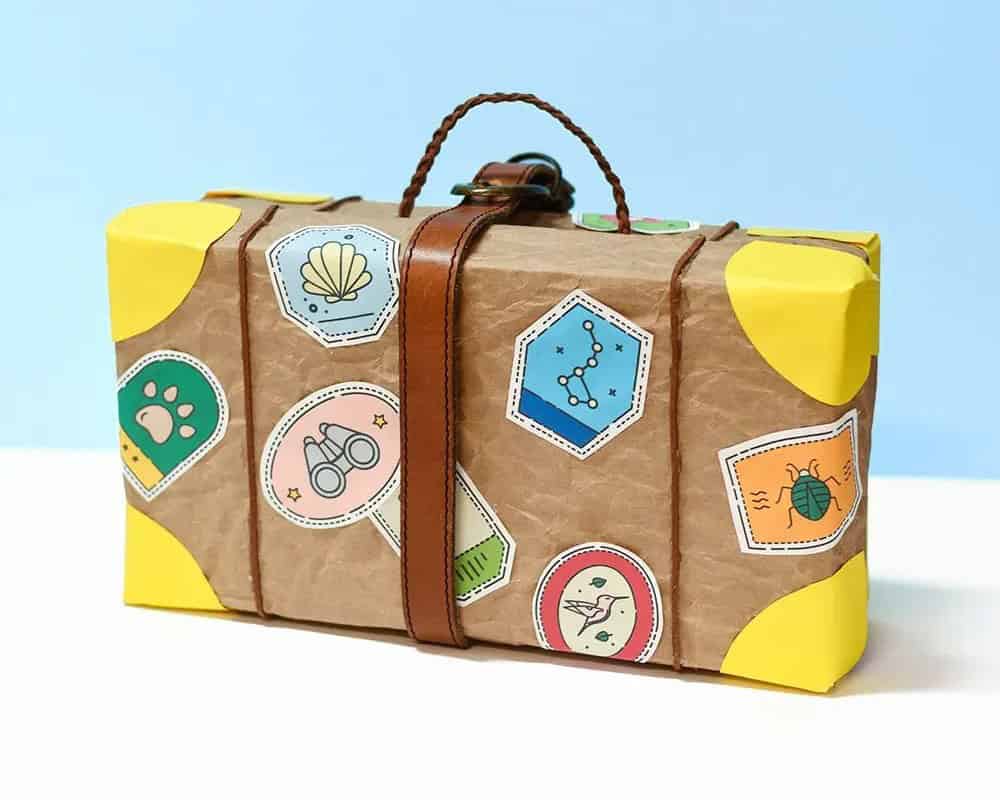
Imagine transforming a humble shoebox into a treasure trove for your most prized possessions. The concept is simple: take an old shoebox and morph it into a trunk-like container to store your cherished collectibles. This could include souvenirs gathered during travels, seashells collected on beachcombing excursions, or unique stones discovered on hikes. To create this one-of-a-kind storage box, you’ll need some scrap cardboard, a utility knife, and a little creativity.
Once the basic shape is crafted, it’s time to get creative with decorations. Wrap the entire trunk in brown paper for a rustic touch, add an old leather belt for a pop of texture, and top it all off with travel stickers that bring back fond memories.
Blue Jean Planter
As you recall the creative endeavour of upcycling your old denim jeans into jean bins, another innovative project comes to mind. This time, you’ll be transforming those same jeans into one-of-a-kind planters. While this project may require a bit more effort and a comprehensive list of materials and tools, the end result will be well worth the extra effort when you get to showcase your unique denim planters.
If you’re feeling particularly crafty, consider swapping out traditional flowers for something like a bowl of candy – this DIY planter would make an eerily delightful Halloween prop. Just imagine a pair of denim-clad legs standing solo… spooky indeed! For more inspiration on upcycling Dollar Store planters, check out our related article.
Cardboard Tube Lamb
There’s something undeniably charming about creating a DIY project that’s both functional and adorable. Take the fluffy cardboard tube lamb, for instance. Made from humble materials like cardboard, it’s surprisingly soft to the touch – almost as if you could cuddle it. Of course, there are more practical uses for this craft than just giving it a squeeze. With Christmas looming, you can use it to add some festive flair to your holiday decor, such as dressing up the manger scene.
To get started on this project, gather some basic supplies like cotton swabs, felt, and pipe cleaners. If you’re looking for an engaging activity to do with younger students or toddlers, this DIY project has the potential to be a real hit. In fact, why not explore more classroom craft ideas? We’ve compiled 27 unique projects that are sure to inspire your creativity and bring joy to your young learners.
Bunny Doll Pattern
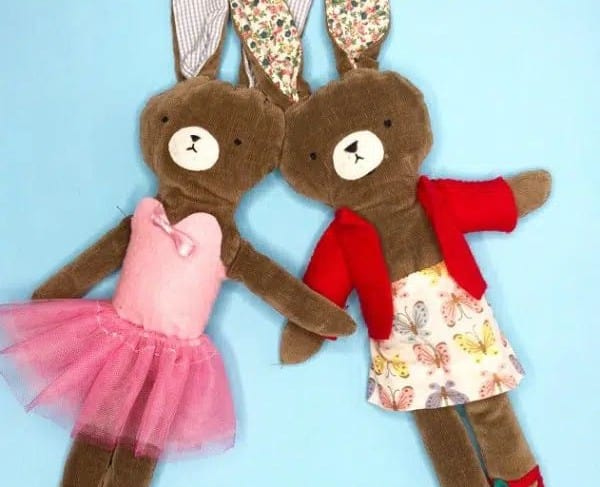
Building upon our previous upcycled animal creations, it’s only natural that we’d next craft these adorable bunnies. Imagine having a whole menagerie of eco-friendly friends at our disposal! With their endearing appearance, these bunnies would be perfect for incorporating into your Easter-themed decorations, sure to delight both kids and adults alike.
But what really gets me excited is the wealth of small fabric scraps we’ll generate – not only will they add a delightful touch around the ears, but also serve as a creative canvas for showcasing our needlework skills.
Christmas Gift Tags
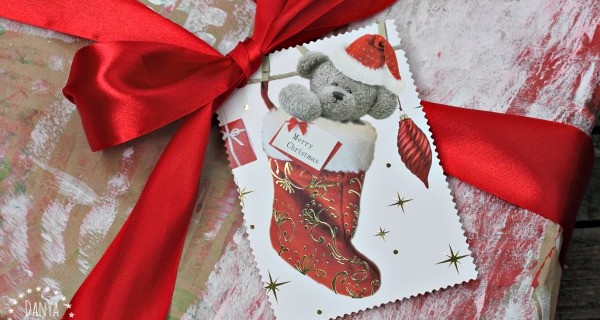
Christmas gift giving isn’t complete without the perfect finishing touches. A beautifully designed gift tag is an essential element in making your presents truly special. It’s not just about labeling the recipient’s name; it’s also an opportunity to express your gratitude and show your love with a heartfelt message. To take your gift tags to the next level, consider adding a decorative edge using a pair of ornate scissors like these.
Wooden Wall Art
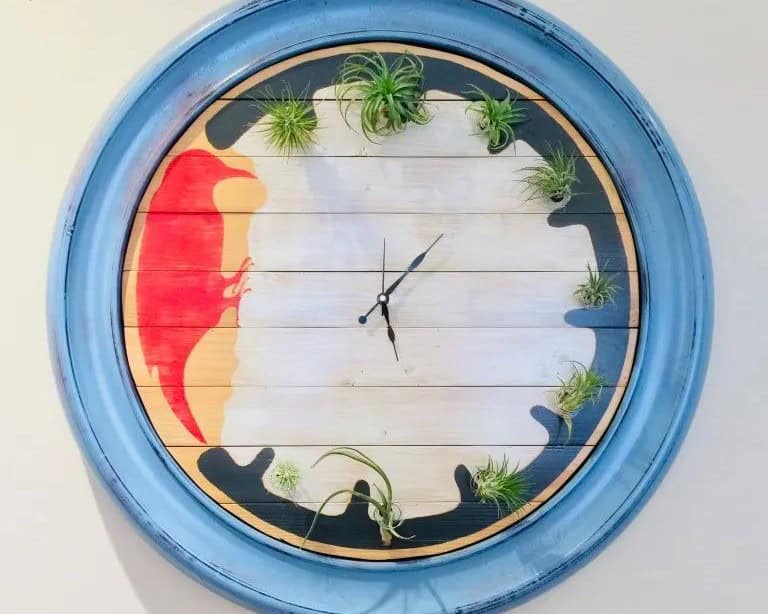
Transforming your home’s décor is always exciting! One timeless addition is, of course, wall art – and this particular piece deserves a spotlight. Get creative by repurposing an old wooden crate or scavenging wood pallets for a unique display. The decorating possibilities are endless. How about taking it to the next level? Convert your stunning wall art into a functional wall clock!
To make this idea a reality, simply purchase a wall mechanism from [insert link here] and let your creativity shine.
DIY Beach Dollhouse from Scrap Wood
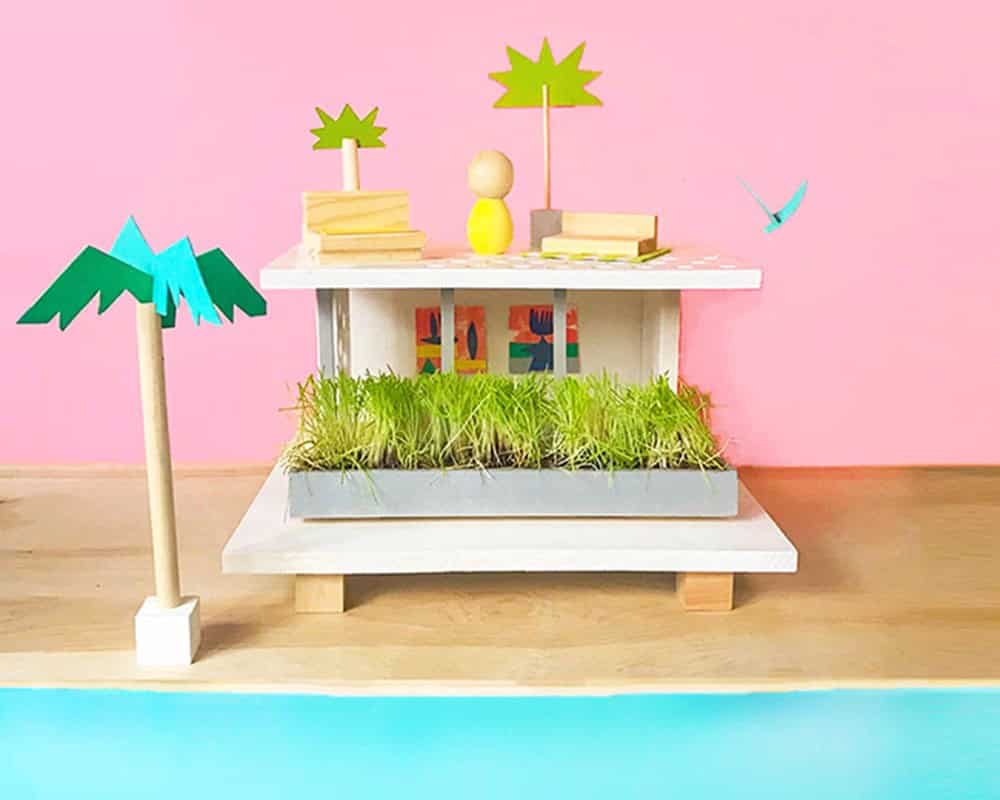
Imagine a beachside abode that’s a true masterpiece of DIY creativity. This enchanting dollhouse is a must-have for any beach lover, with its every detail meticulously crafted from scratch. From the wooden furniture to the welcoming front porch, each element is lovingly upcycled or repurposed. To get started on your own coastal retreat, simply gather some wood dowels, paint cans, and wheatgrass for the lush shrubbery.
DIY Bathroom Cabinet
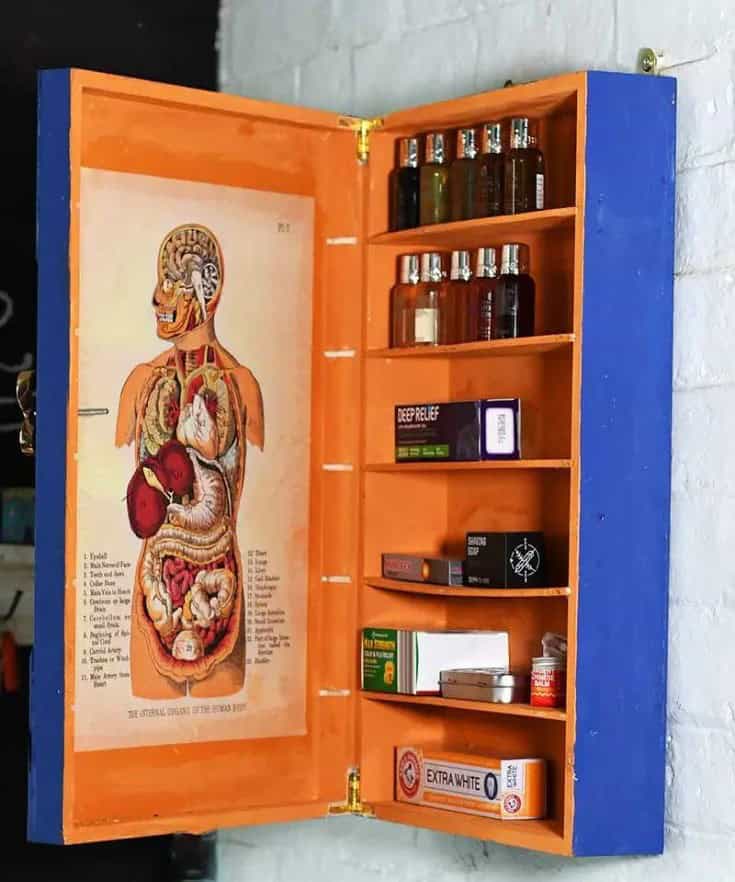
The impact of clutter on a room’s ambiance is astonishing. By eliminating visual distractions from your bathroom counter and streamlining them into a DIY storage solution, such as a custom-built cabinet, you’ll be amazed by the transformative effect. Moreover, repurposing an old wine box – complete with added compartments and dividers – can serve as a unique and functional bathroom organizer.